
University of Louisville
Information Technology
Services
Webex Telephone
User Guide
February 16, 2024

Webex Application Guide
Cisco Webex is the University of Louisville’s telephone service. The Webex
application can be used on a desktop, laptop, tablet or cellular device to
make and receive phone calls using your UofL phone number. Webex calling
allows encrypted calls from any location, whether on or o campus. Webex
also allows self-service control over your phone settings including call
forwarding, voicemail, do not disturb, blocking numbers and more.
Contents
Getting started
o Installing Webex client on a desktop or laptop 3
o Steps for sign-in on a desktop or laptop 4
o Installing Webex application on an iOS device 6
o Installing Webex application on an Android device 7
Using Webex
o Making a call 8
o In-call features
Hold, Transfer, Conference 8, 9
Audio, Video 9, 10
Keypad, End call 10
o Other Settings
Settings panel, Call settings, Personal Profile, Status 10, 11
Adding Contacts 12
Set up and configure voicemail
o Set up and access voicemail in the Webex User Portal 12, 13
o Manage voicemail in the Webex application 13
Using Webex phone with MS Teams
o Add Webex to Teams client 14
Support and troubleshooting
o Important Cisco Webex Help Center links 15
o Troubleshooting 15
o Check for app updates 15
o Check Webex status 15
2
Getting Started
How to install Webex on a desktop or laptop and log in for the
first time.
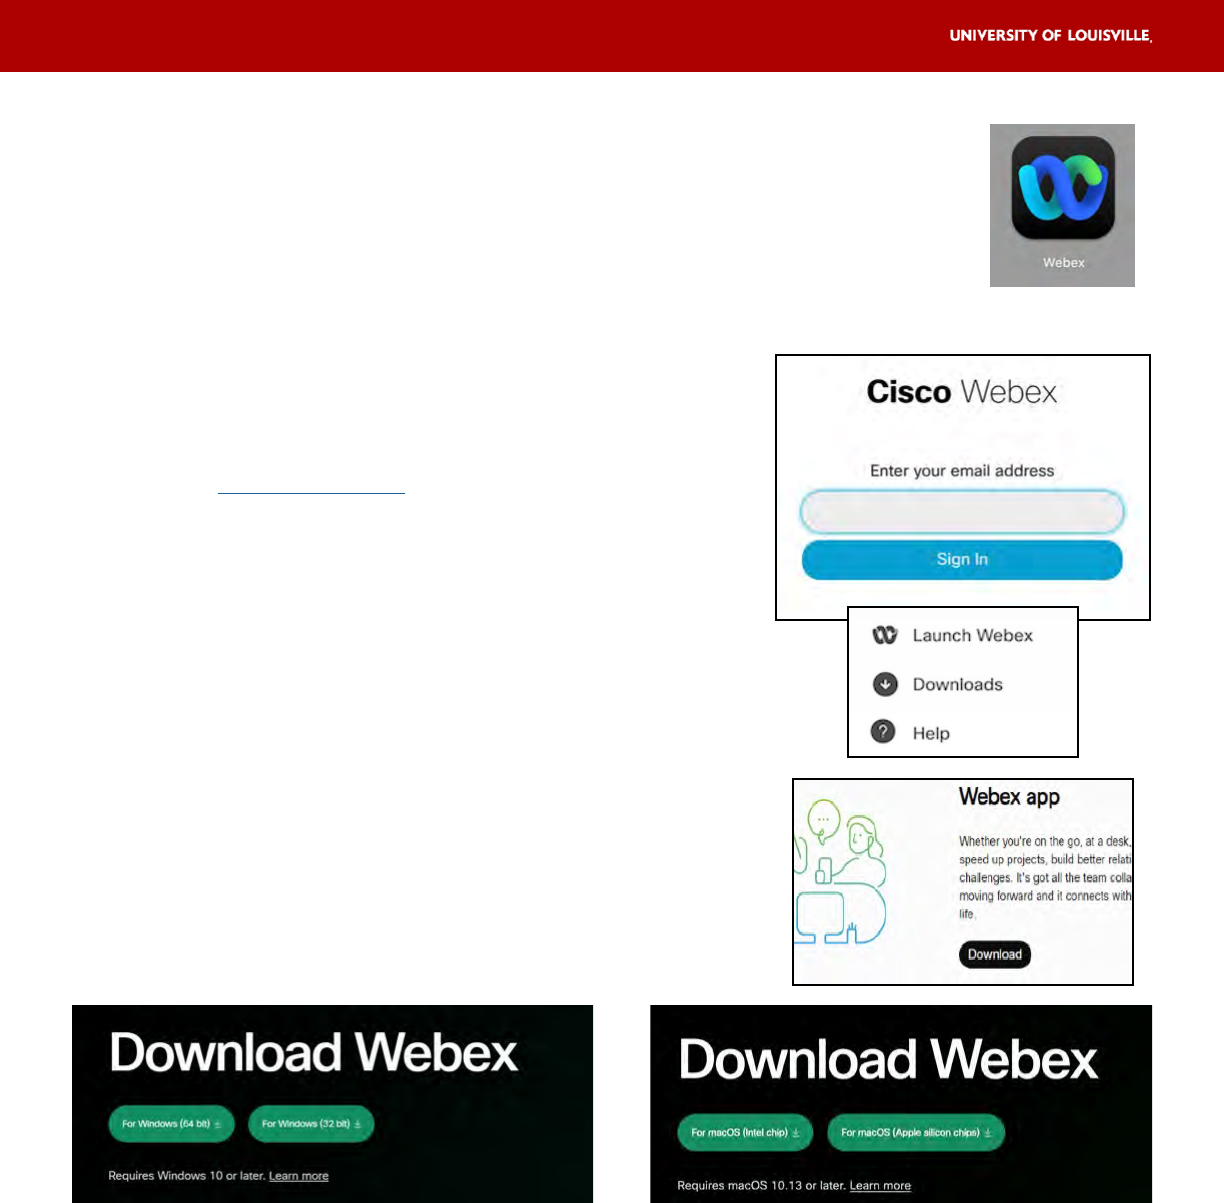
Before beginning, please check whether the Webex client is already
installed on your computer. Search for the Webex icon on the Start menu
in Windows or the Launchpad for Macs.
If Webex is not installed, follow these steps:
1. Go to user.webex.com
2. Login using your UofL userID email address
(abcdef01@louisville.edu).
3. Select downloads icon at the bottom left of open
window to open the Downloads page. Click
Download under Webex app. Note: Do not select
any other options on the Downloads page.
4. Download and save the proper Webex version for
your device.
5. Locate the downloaded file in your computer and
run to begin the install.
6. Follow the on-screen prompts and finish the
install.
Note:
• If you use a Windows system, use these Microsoft directions to determine whether
your system is running 64 or 32 bit Windows. Click the button most appropriate for
your device.
• If you use a Mac, use Apple’s System Information to determine which processor your
Mac is using. If you see Apple M1 (or higher) in the “Chip” section, you are using a
Mac with an Apple M1 or higher chip. If you see an Intel processor in the “Processor”
section, you are using a Mac with an Intel chip. Click the button most appropriate for
your device.
3
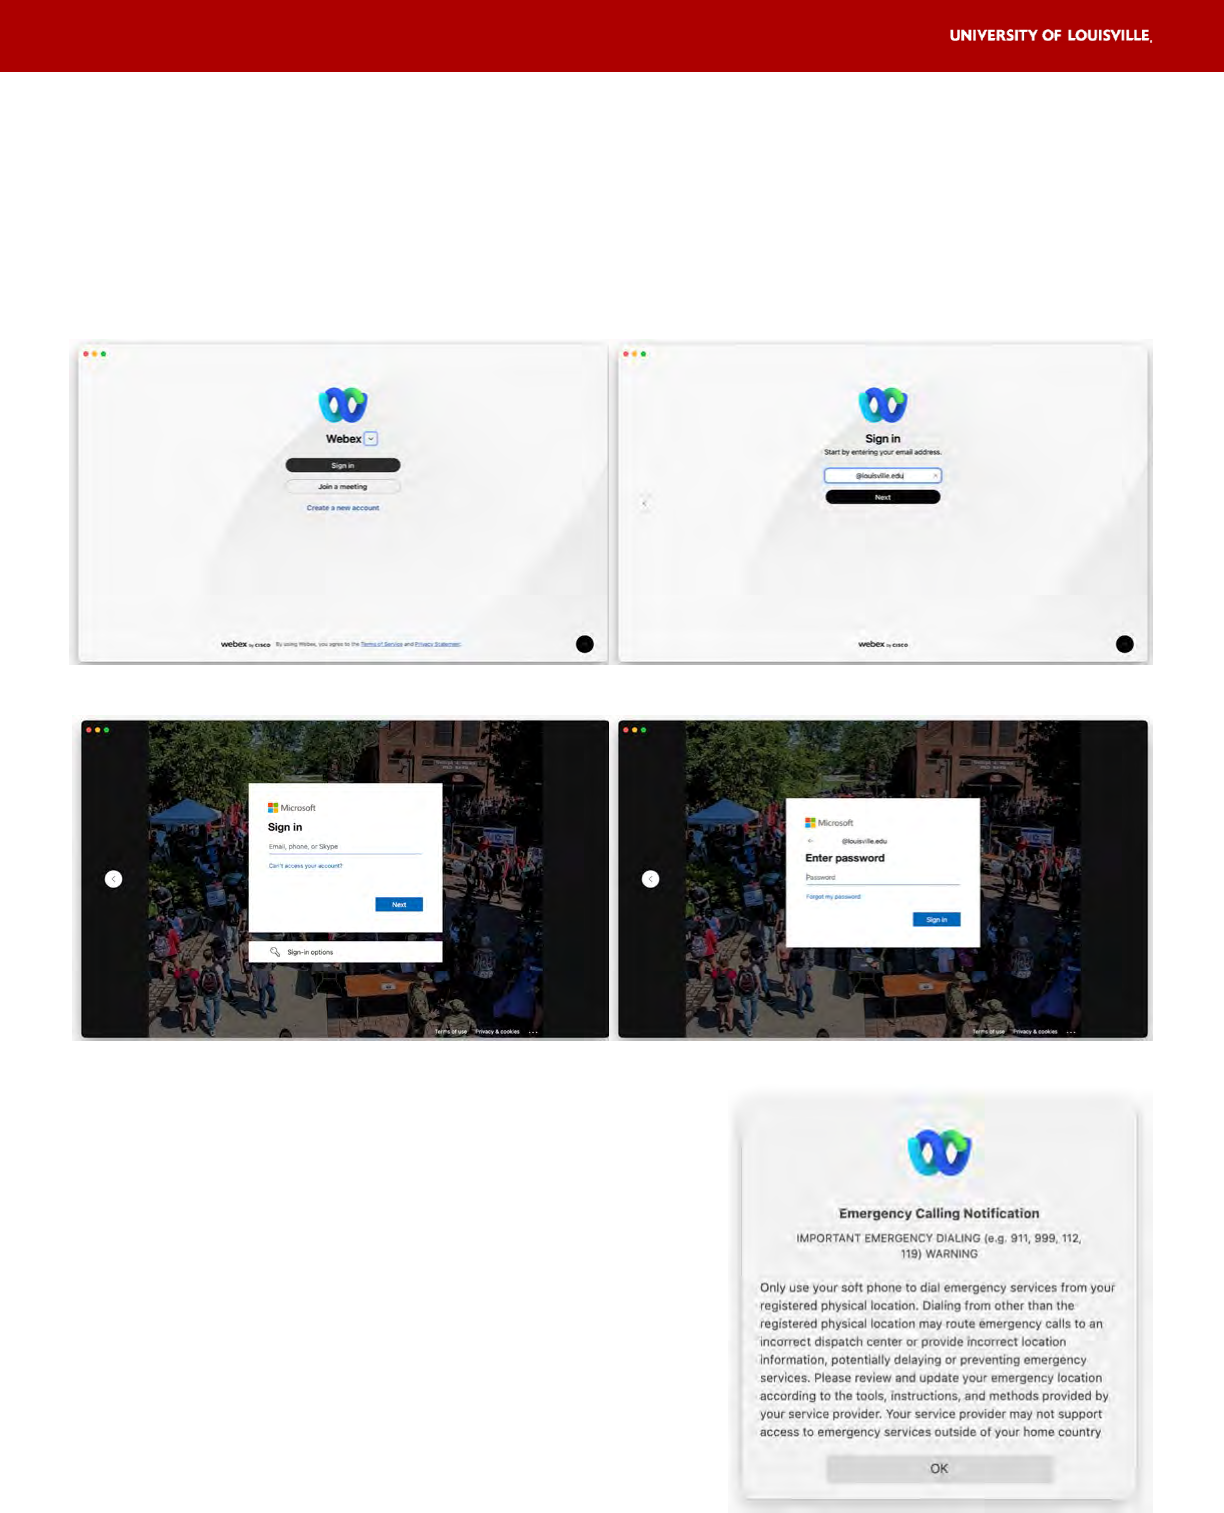
3. Enter the requested information as prompted.
4. Read the Emergency Calling Notification and
click OK.
Steps for sign-in on a desktop or laptop once installed
1. Once the Webex application has been installed, open it using the Webex icon.
2. After the login screen opens, enter your UofL userID email address
(abcdef01@louisville.edu).
4
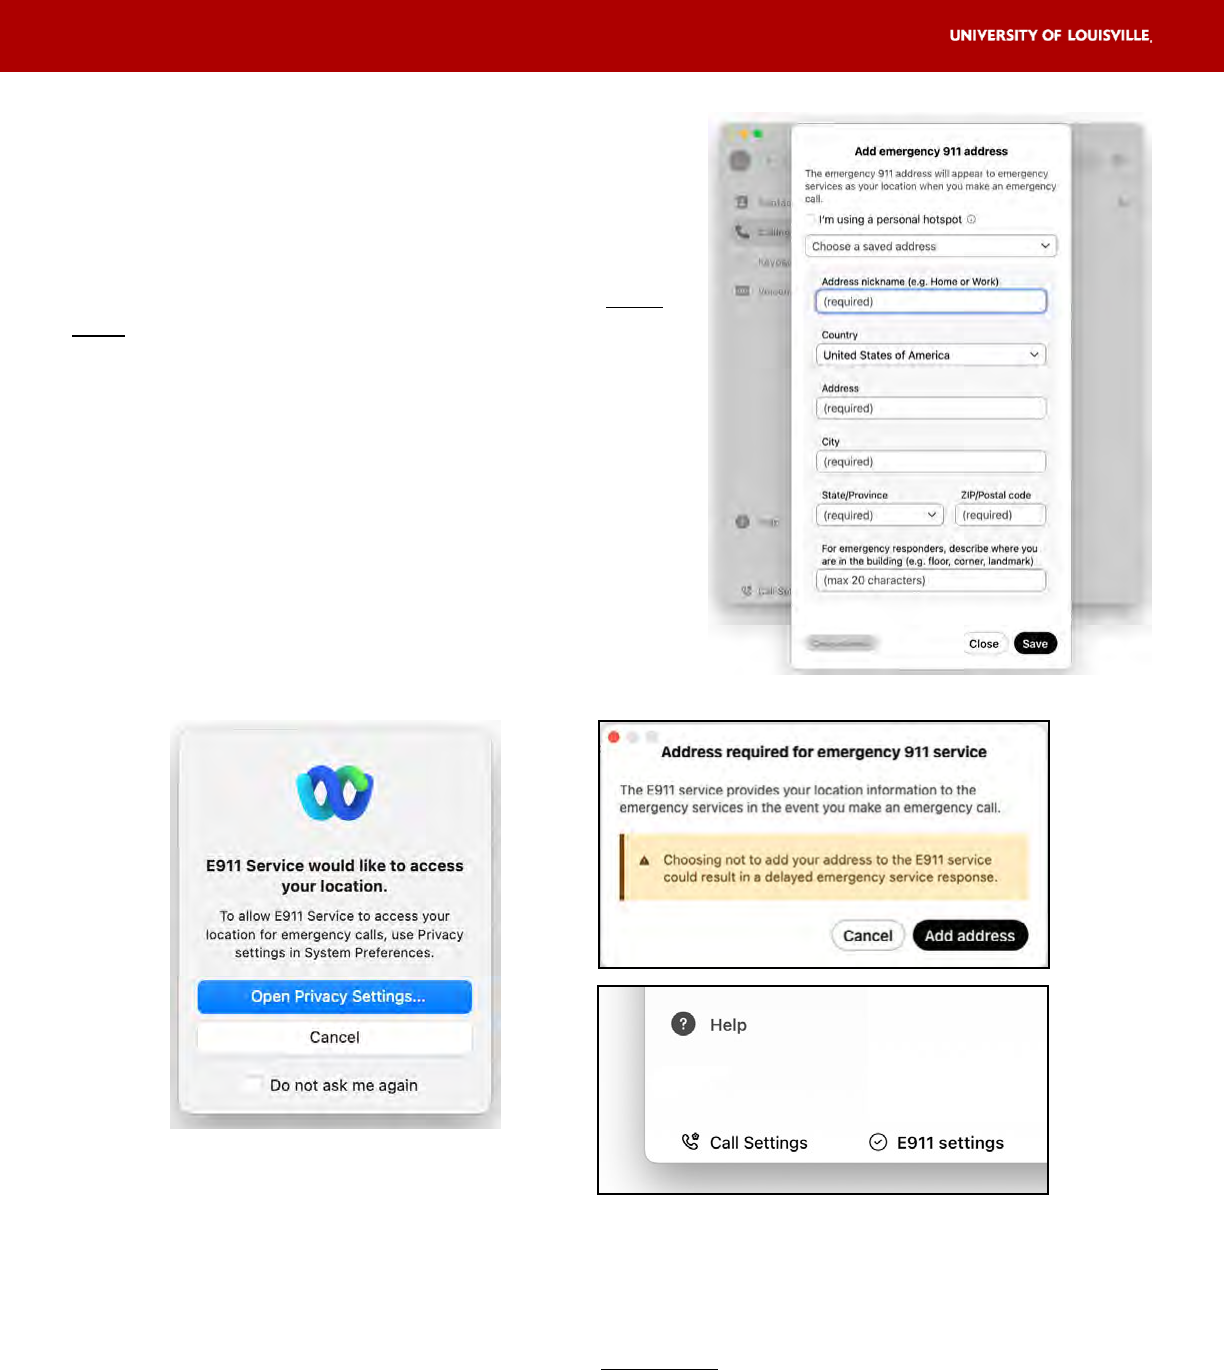
5. Critical: Enter your emergency (e911) location
information
If you use the Webex Calling app on a desktop or
laptop, you are required to set the Enhanced 911
(E911) location within the Webex application each
time your working location changes per UofL voice
policy.
E911 location data is essential for 911 calls to be ac-
curately routed in the event of an emergency and is
mandated by federal law.
Complete the form and click Save.
Note:
• If your system requires confirmation of your location through device geolocation
services, please follow the steps to approve access in your system settings. This
action does not replace the user’s requirement of setting or confirming a new
location within the Webex application each time the device is moved or your
working location changes per UofL voice policy.
• You can confirm the E911 location data is set by the check icon at the bottom of the
Webex window. You can update or change your location by clicking on this button.
4 5
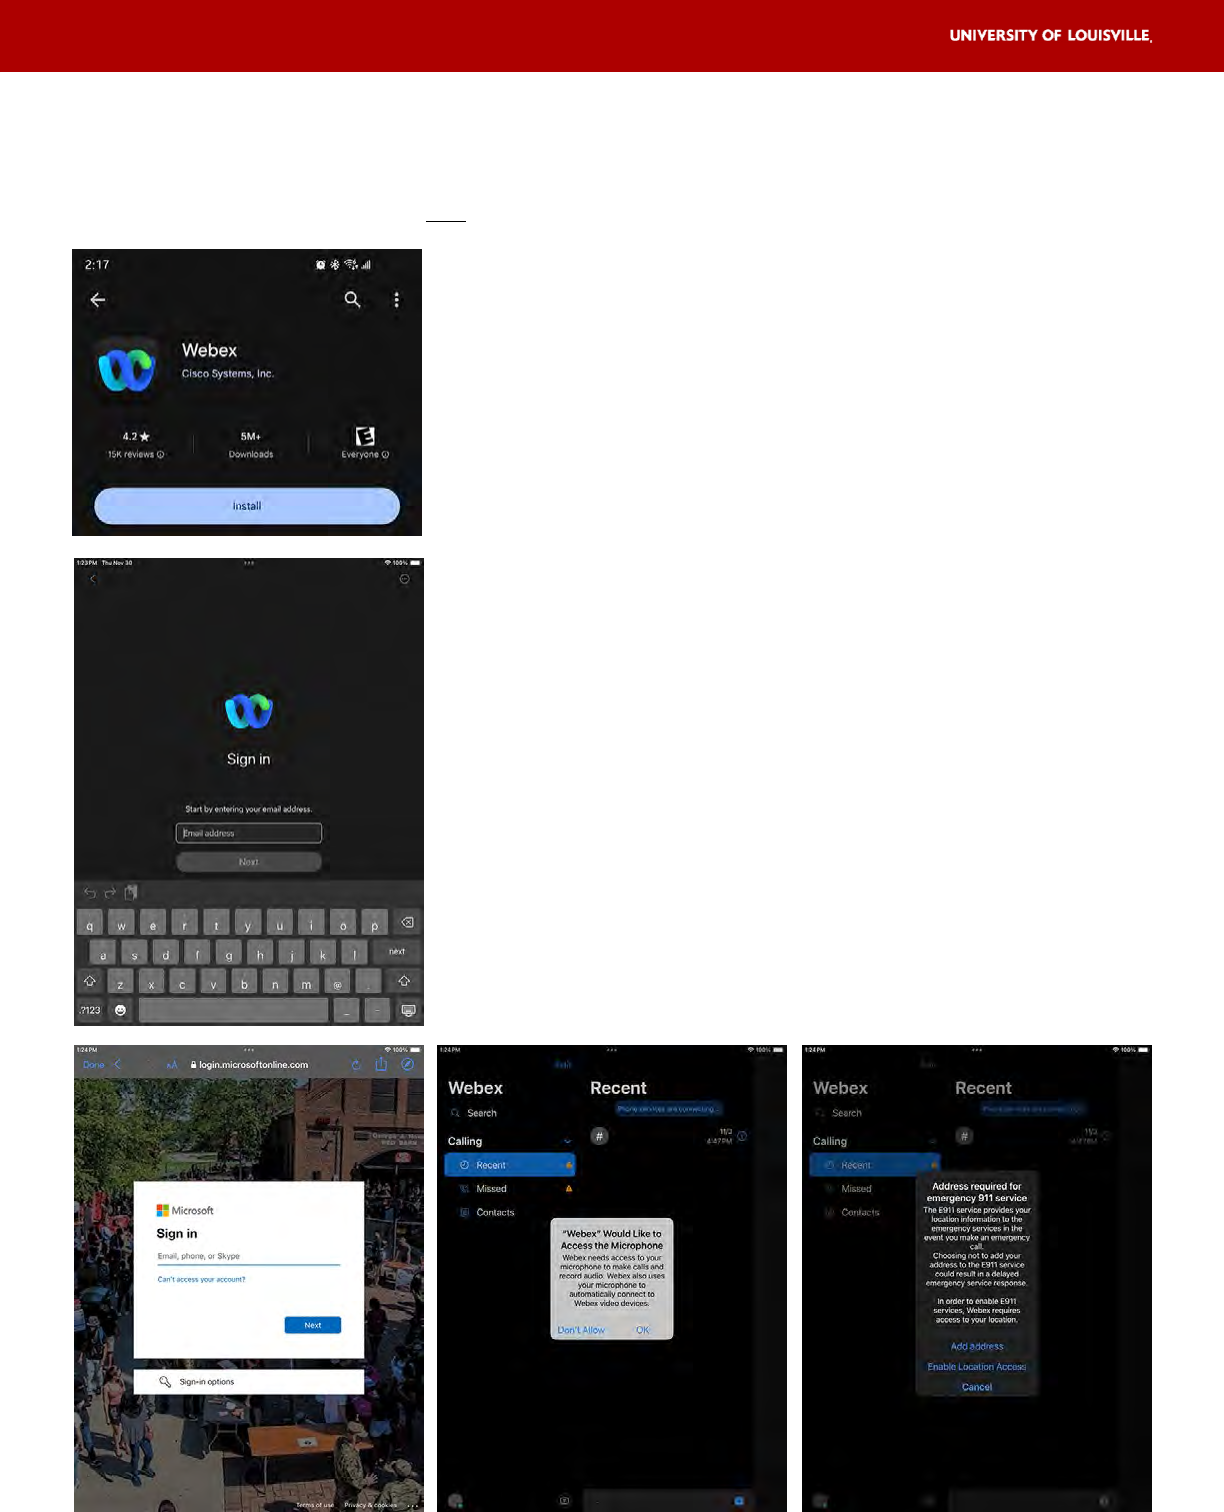
Installing and logging in to the Webex application on an iOS device
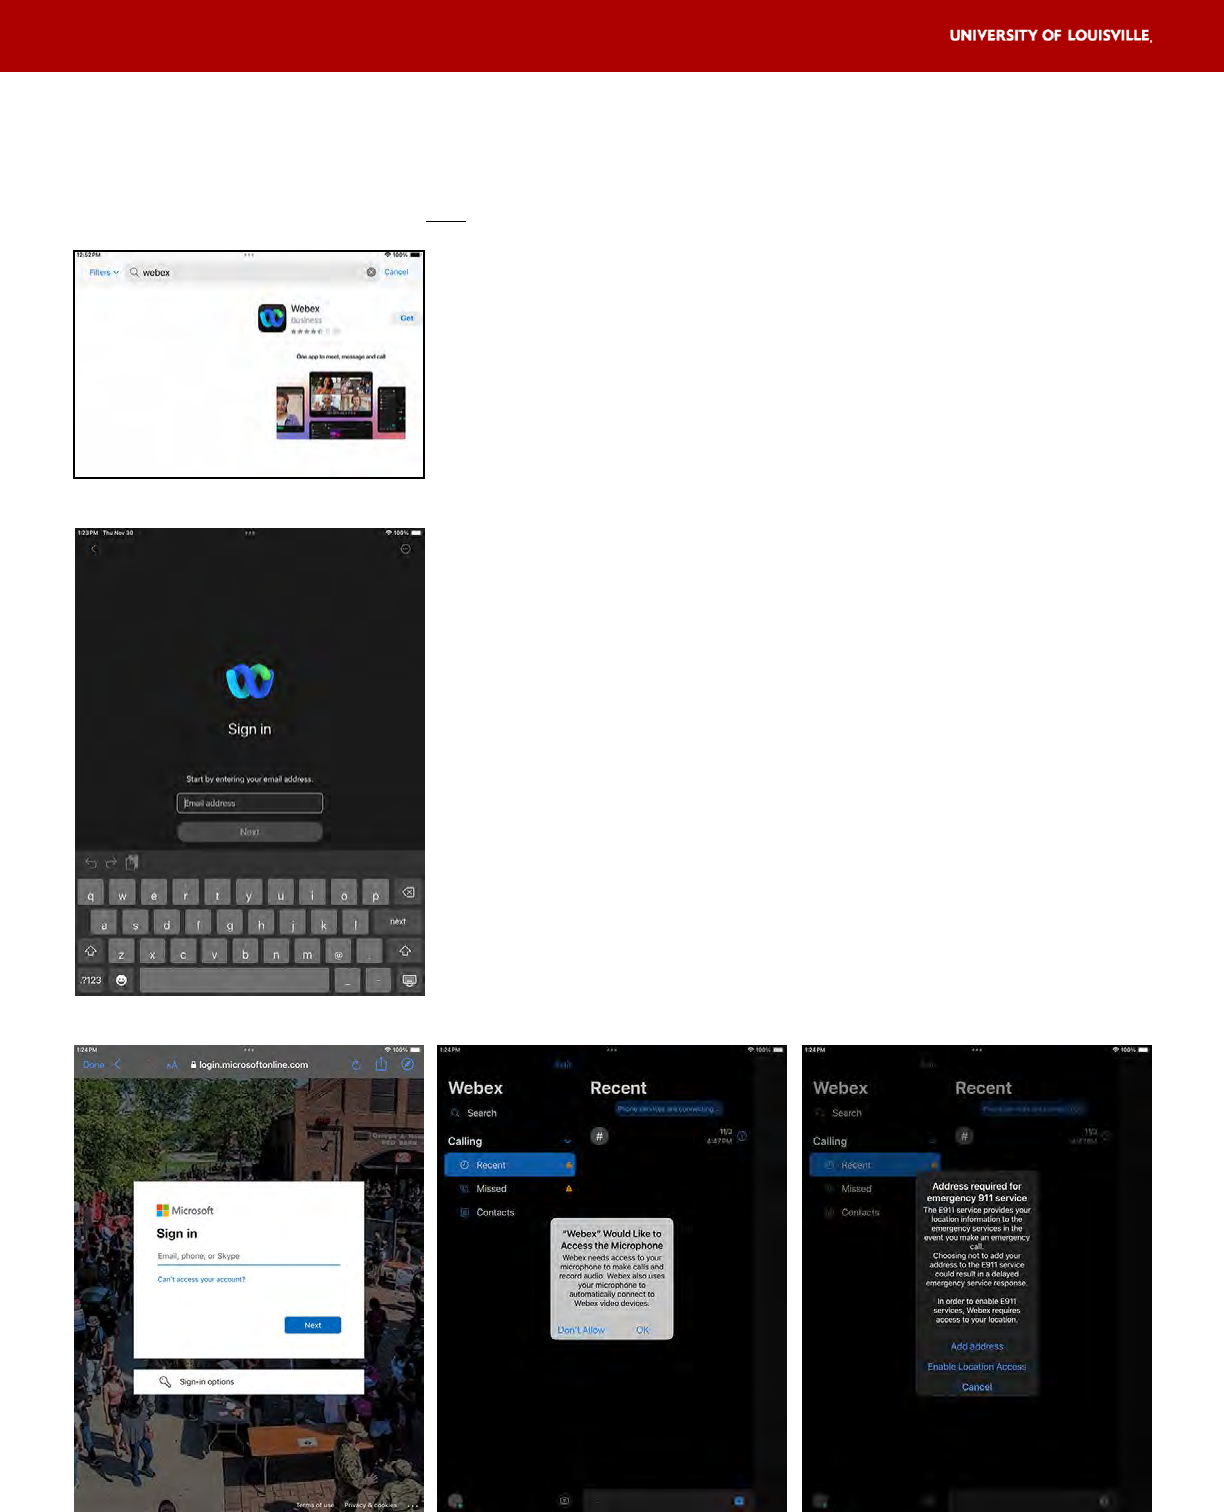
1. Download the Webex application from the Apple App Store. Verify that it is the
Webex application and not Webex Meetings, Webex Events, or Webex for Intune.
2. Click “Get” to install the application.
3. Once installed, open the Webex app.
4. Enter your UofL userID email address
(abcdef01@louisville.edu) and click Next.
5. You will be redirected to the UofL sign on page.
Enter your UofL sign on credentials. You may be
prompted to enter your UL2FCTR information.
6. Once logged in, you will be asked to accept a
variety of permissions before you are able to start
using the app. For “contacts, notifications,
microphone, camera/video”, you only need to
allow microphone for the app to work.
7. You are required to set the Enhanced 911 (E911)
address and/or enable location access for the
Webex application per UofL voice policy.
E911 location data is essential for 911 calls to be
accurately routed in the event of an emergency and
is mandated by federal law.
6
Installing and logging in to the Webex application on an Android device
1. Download the Webex application from the Google Play Store. Verify that it is the
Webex application and not Webex Meetings, Webex Events, or Webex for Intune.
2. Click to install the application.
3. Once installed, open the Webex app.
4. Enter your UofL userID email address
(abcdef01@louisville.edu) and click Next.
5. You will be redirected to the UofL sign on page.
Enter your UofL sign on credentials. You may be
prompted to enter your UL2FCTR information.
6. Once logged in, you will be asked to accept a
variety of permissions before you are able to start
using the app. For “contacts, notifications,
microphone, camera/video”, you only need to
allow microphone for the app to work.
7. You are required to set the Enhanced 911 (E911)
address and/or enable location access for the
Webex application per UofL voice policy.
E911 location data is essential for 911 calls to be
accurately routed in the event of an emergency and
is mandated by federal law.
6 7
Using Webex
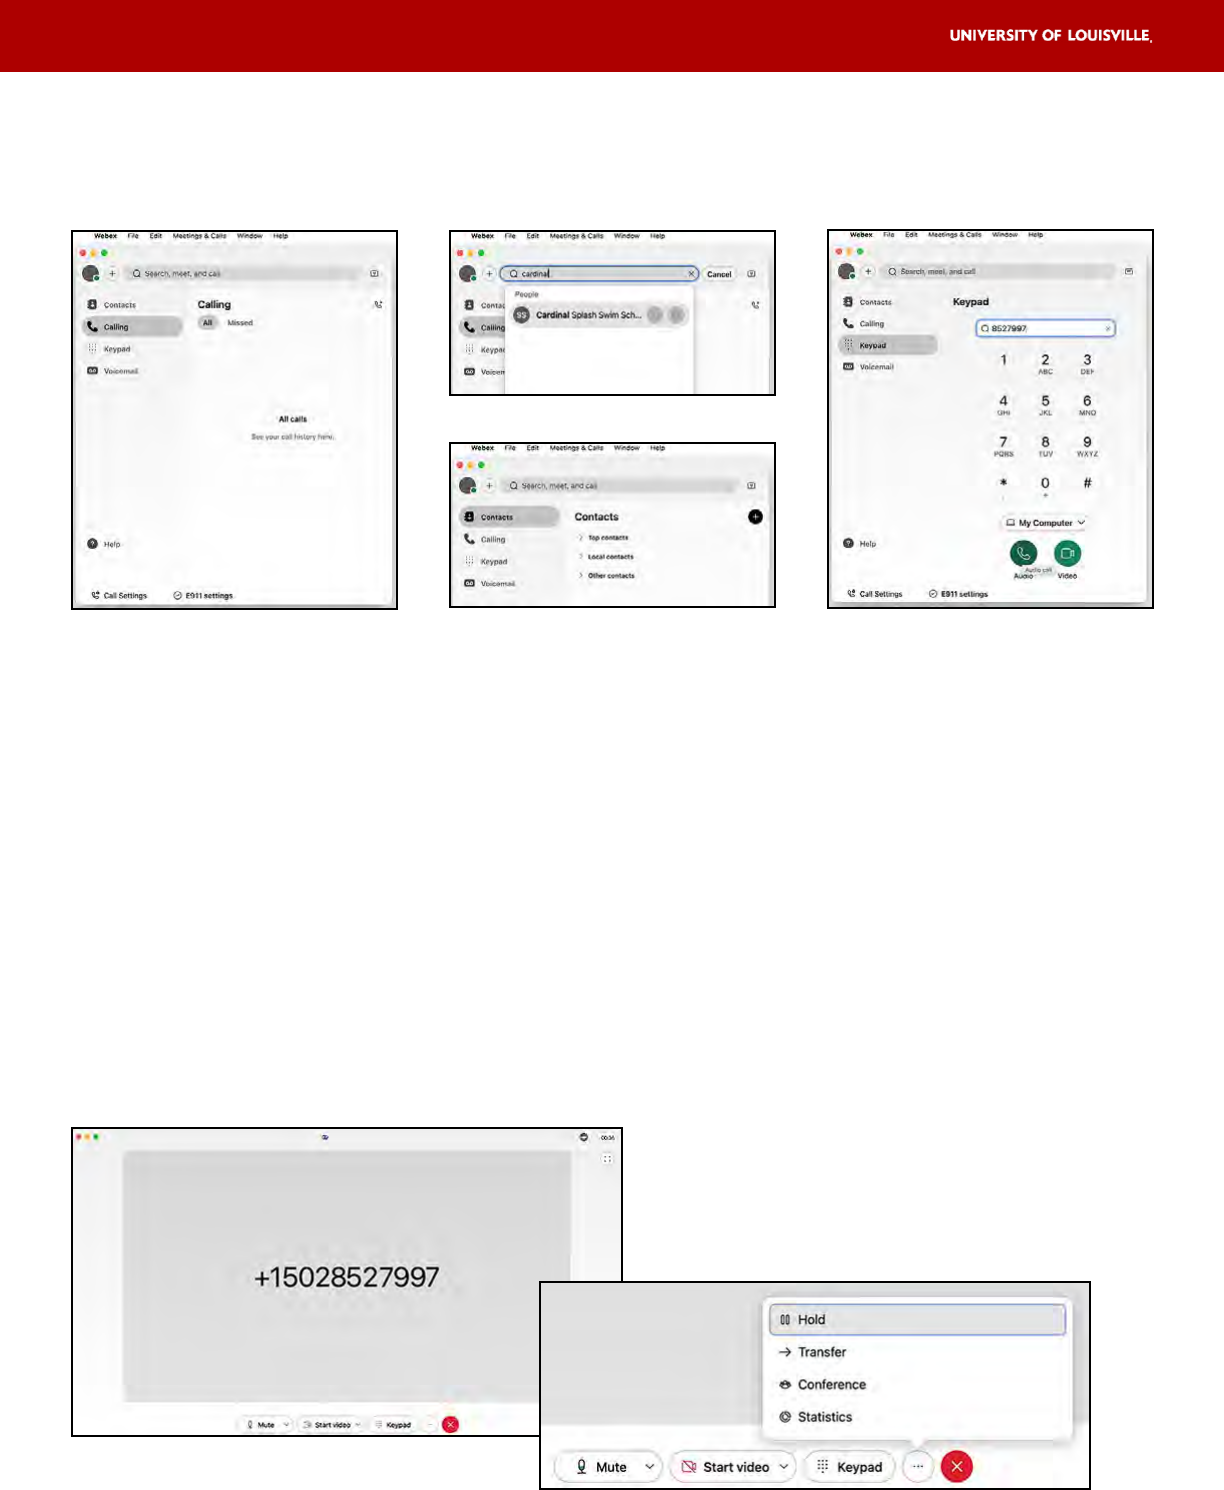
Making a Call
There are many options for making a call:
1. Select Calling on the left navigation pane to review your call history. You can select
from this listing and click on appropriate button to begin the call.
2. You can Dial by Name by looking up individuals or number in the UofL Webex
system or in your contacts. Search by name and auto-populate will provide a list. Or
use the drop downs under Contacts in the left navigation.
3. You can use the Keypad to dial direct. For standard dialing, you can dial a seven
digit number (852-7997) for local calls or area code + phone number for long
distance (1+502+852-7997). After entering number, press either Enter on your
keyboard or press the Audio button on-screen.
In-Call features
Once a call is connected, a new window will appear with additional options:
1. Select the More button (3 dots)
to Hold a call, Transfer a call or
change to a Conference call.
8
Selecting Hold will place the call on hold with music playing. To
continue the call, select the Resume button.
2. Clicking Transfer within the Hold panel or within the main panel
More ... options will open the Transfer Call window.
Enter the number or search for name or contact. When done, press
either Consult First or Transfer Now.
Consult First will allow
you to let the new person
answer to inform them
that a transferred call is
incoming. You will then
select the Complete
Transfer button to finish.
Transfer Now sends the
call on hold directly to the
forwarding number.
3. Clicking Conference within the main
panel will open the Add a Person
window.
Enter the number or search for name or
contact. When done, press Audio button to
connect. You will then select the Merge Calls
button to join the calls.
You may conference with up to 6 users by
repeating these steps to add callers.
4. Audio Settings can be controlled on the
first button on the main panel.
You can use the default system settings
(indicated by the ) or determine the
necessary selections for using headphones or
mics. This will vary depending on computer or
external device.
The Noise Removal settings can be
customized to isolate your own voice or to
minimize background noise.
9
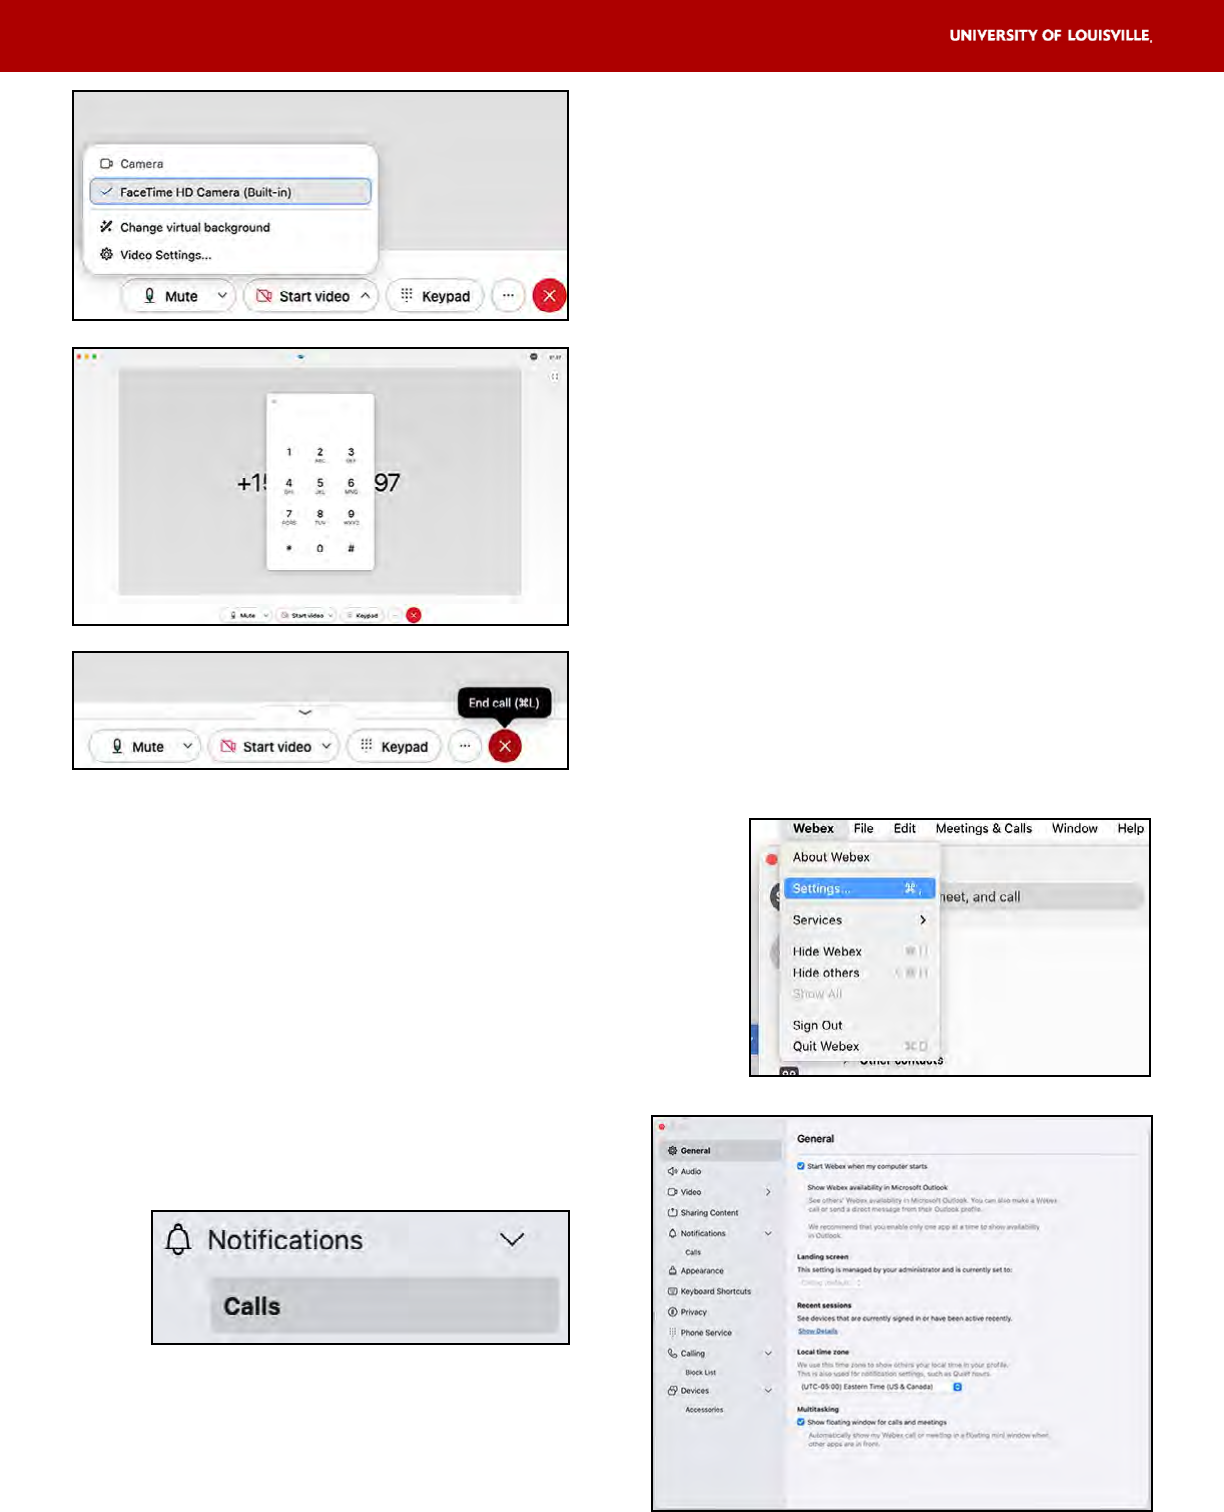
5. Video Settings can be controlled with
the Start Video button on the main
panel. * Webex defaults to audio only.
UofL’s Webex allows for video on one-to-
one calls but not a conference or group
meeting. MS Teams is the preferred video
communication and collaboration tool.
6. The Keypad button on the main
window allows for input while a call is
in progress.
You can select numbers or use your
computer’s keyboard to input numbers.
7. The red X on the right of the main call
panel will End the call.
Using Webex continued
Settings Panel
Located under the Webex menu dropdown,
most of your individual preferences can be
adjusted in the Settings panel.
Key items to consider are:
1. Notifications for Direct Calls and setting
Quiet Hours to mute calls and alerts.
2. Privacy controls allow you to set your
availability and status. However, this also
determines your ability to see the same
for other users.
10
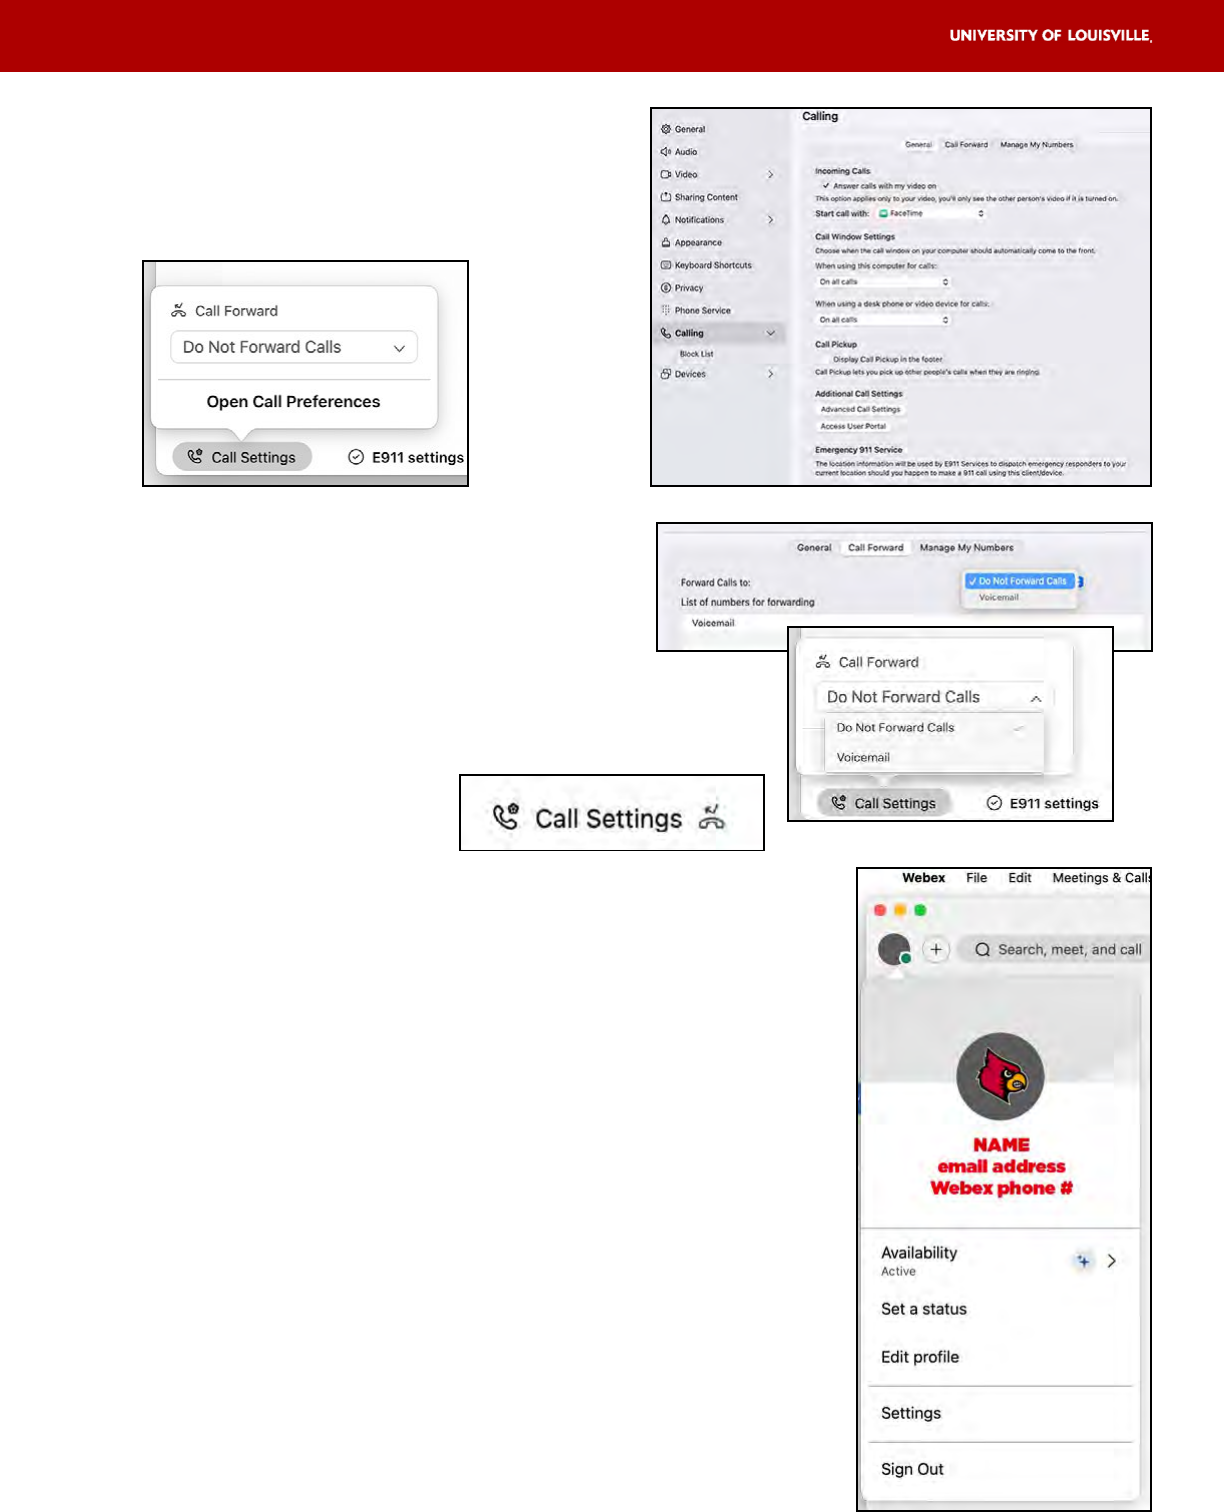
Call Settings
You can access the Call Settings from the
Settings Panel or at the bottom left on the
main Webex application center.
1. Call Forward defaults to a Do Not
Forward Calls (receiving calls) unless
changed in either location.
You can indicate that calls should be sent to
specific phone number (like a cell phone) or
sent to your Webex Voicemail. If activated, an
icon next to Call Settings will appear.
Personal Profile, Availability and Setting a Status
Under the Profile icon in the upper left of the main Webex
application center, you can click to open the Profile panel.
1. Availability allows for Active (receiving calls), Busy (time
determined) or Do Not Disturb (time determined).
2. Setting a Status can be personalized, set as options
listed and time determined.
3. Your Personal Profile defaults to a limited aesthetic. You
can use this Edit Profile option to add a profile picture,
set a preferred display name and personal pronouns,
configure your cover image visuals.
4. Another link for opening the Settings panel.
5. Click to Sign Out of Webex application.
11
Using Webex continued
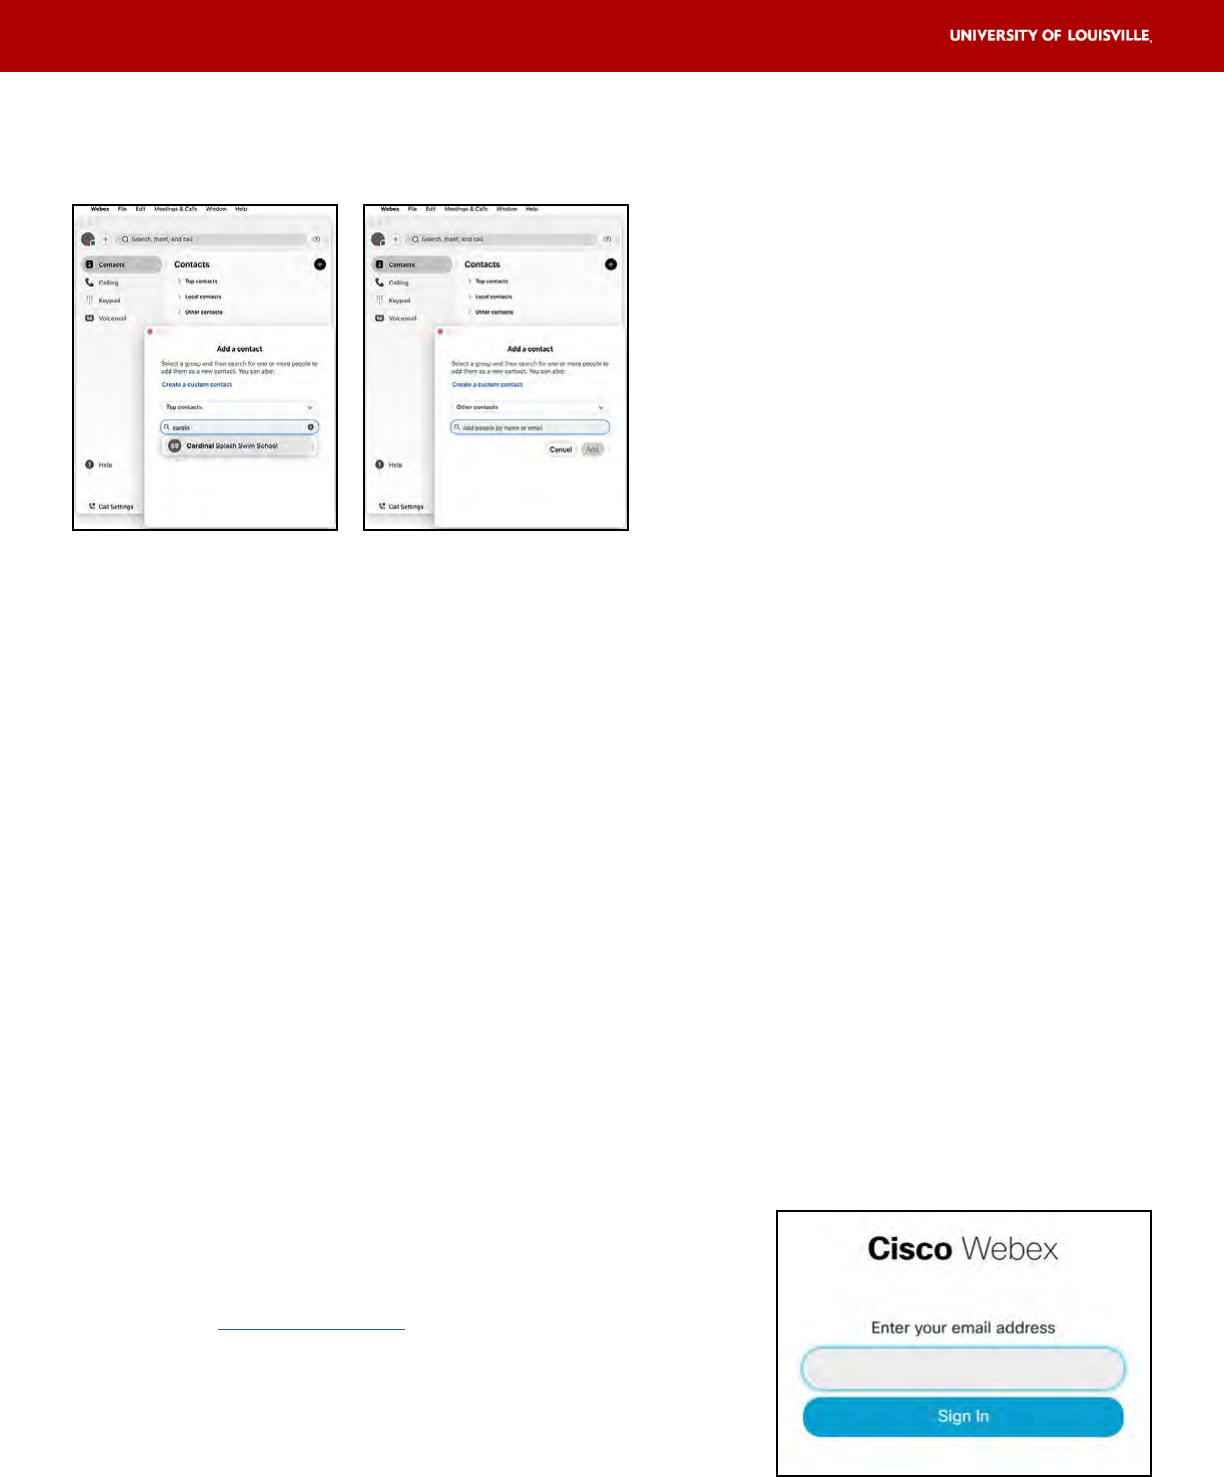
Adding Contacts
You can add Contacts or create a Group
within Webex for your frequently used
numbers or important university #s.
The + button allows you to Add a
Contact and select the placement of
that individual within your contacts.
You can look up individuals or numbers
in the UofL Webex system by name
and auto-populate will provide a listing
to select from. Or you can click the
Create a Custom Contact to open a
new window and enter the person’s
information directly.
Setting up and configuring Voicemail
Voicemail can be accessed through either the Webex User Portal or the Webex
application. Personal voicemail boxes are for individual users and require setting up.
Physical phone users: You must first create a PIN in the Webex User Portal to access a
personal voicemail box from a physical phone. A PIN only needs to be set up the first
time you access your voicemail box, or when you have forgotten your PIN and need to
reset it.
A PIN is not needed to access voicemail from the Webex app or Webex user portal.
You can listen to and/or manage your Voicemail via the Webex User Portal or the Webex
application. Your options include the following:
• Voicemail notifications can be e-mailed to you via an audio .wav file.
• Messages will be transcribed.
• Deleting emailed audio files will not delete the voicemail from the system.
Set up or access Voicemail in Portal
1. Go to user.webex.com
2. Login using your UofL userID email address
(abcdef01@louisville.edu).
12
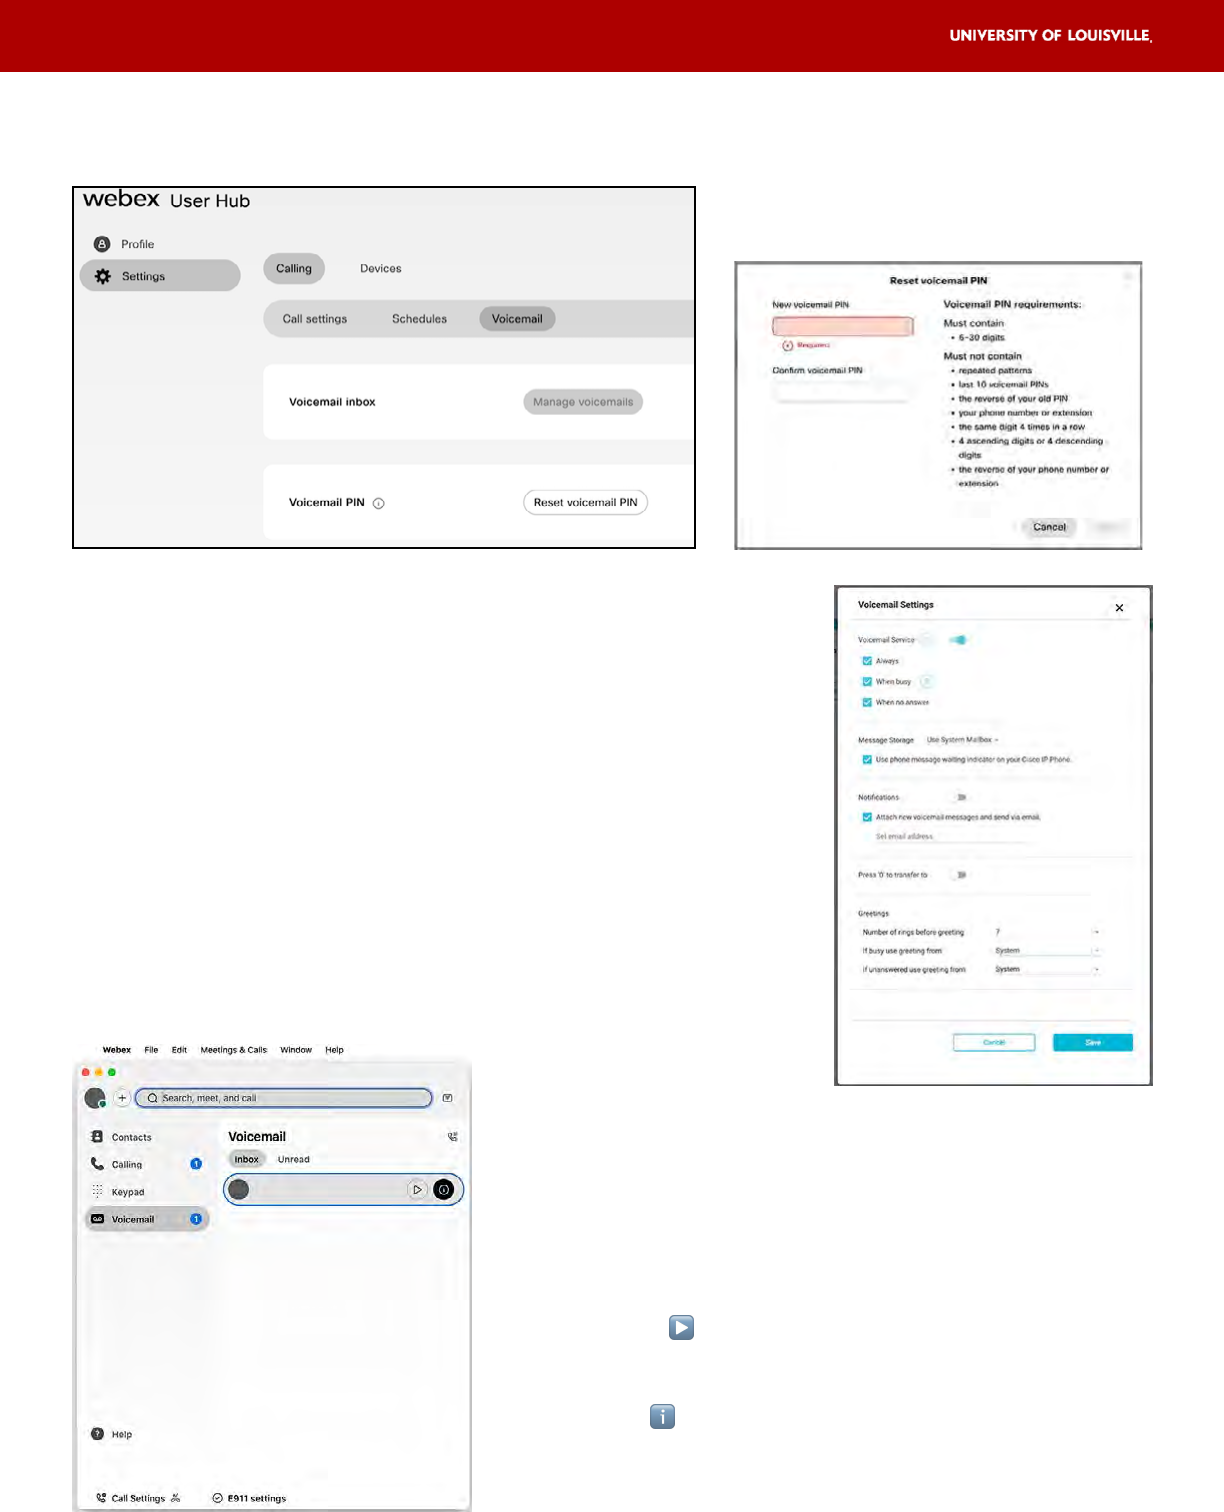
3. To get to Voicemail Settings, click Settings on left,
Calling on top menu and Voicemail on the submenu.
4. Physical phone users: If you have not established a
Voicemail PIN, click on Reset Voicemail PIN.
5. In Voicemail Settings, the default configuration is
set so that all voicemail messages are sent to the
user’s email as an audio .wav file. If Voicemail
to Email is desired, make sure the correct email
address is set under Additional Settings.
6. You are able to view, play, manage and
delete voicemails from the User Portal. Note: Deleting
emailed voicemails does not delete the voicemails
from the user portal.
Access Voicemail in Webex App
All voicemails will appear and can be played,
marked as “unread” or deleted in the Webex
application.
1. Click to play the message.
2. Either right-click the selected message or use
the to see more details or other options
such as delete.
13
14
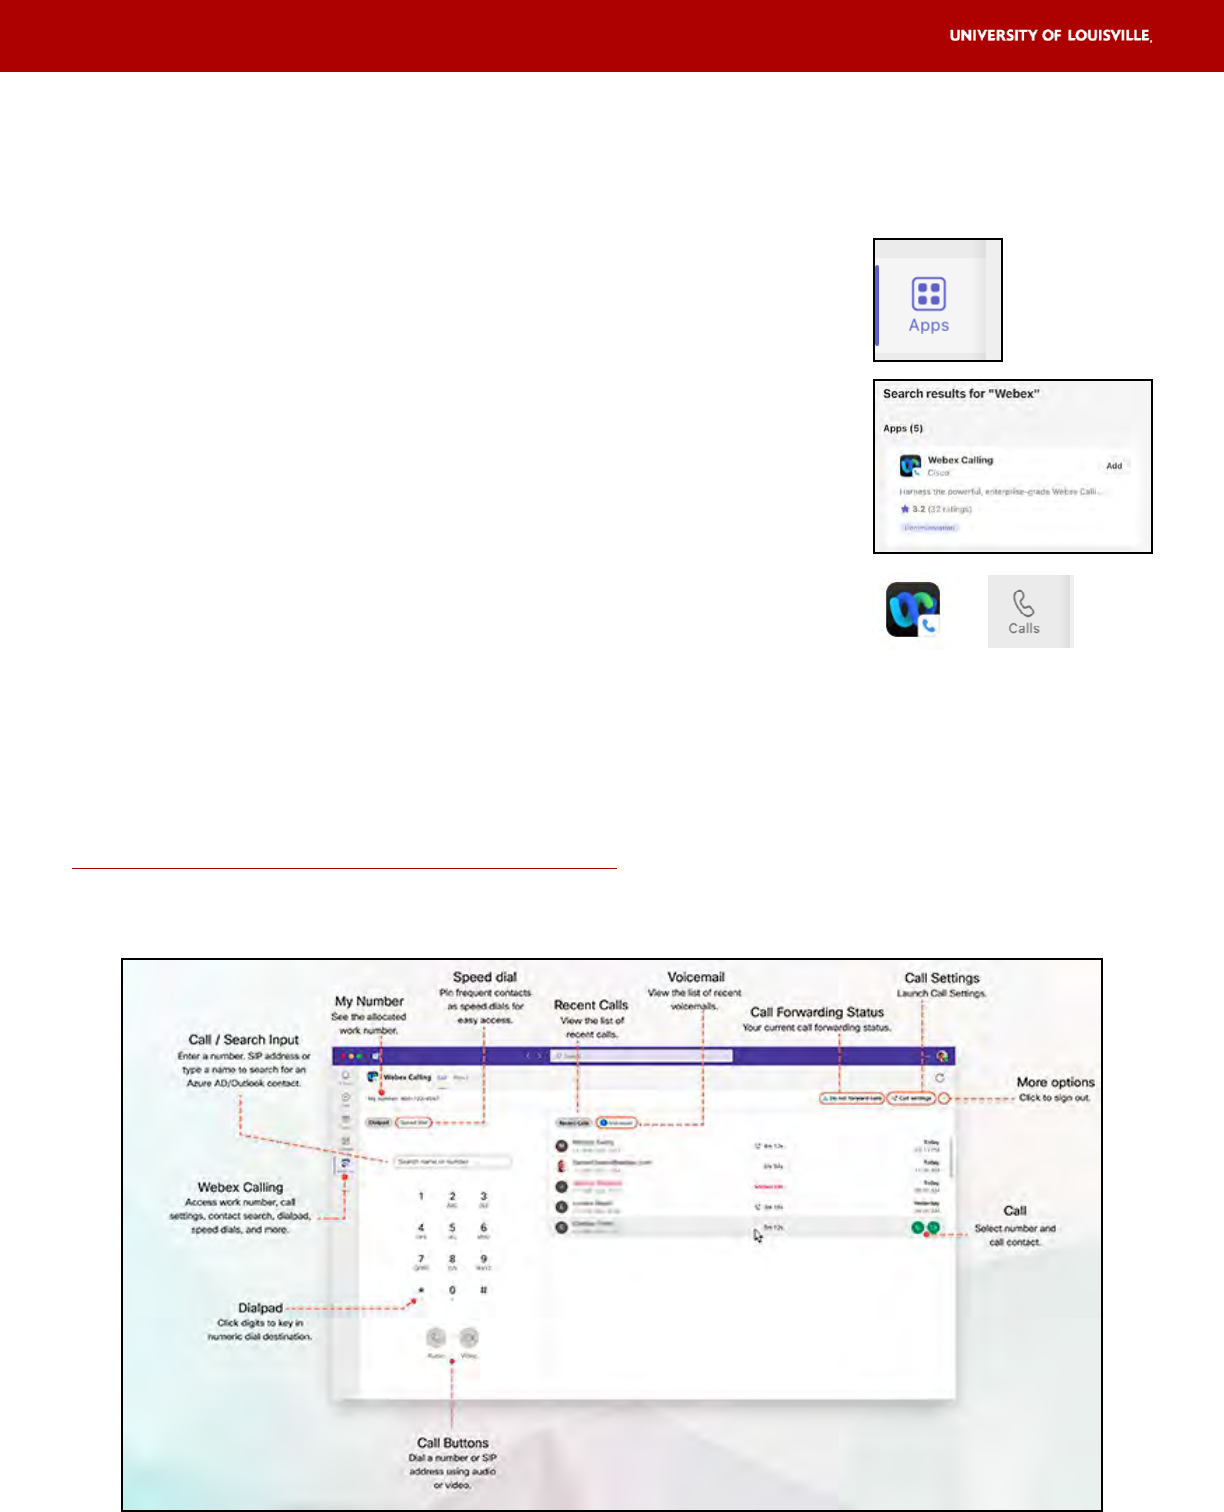
Using Webex Phone with the MS Teams client
Since Microsoft Teams is the preferred collaboration and conferencing software at UofL,
users can add Webex for outside phone calls within the Teams client.
Add the Webex App to your Teams application
1. Open your Teams application and click on Apps.
2. In the window’s search box, enter Webex Calling
and select Add.
3. Log into your Teams account as prompted.
4. Log into your Webex account as prompted.
5. Accept required permissions and the Webex Calling
icon should appear in the Teams naviation bar at left.
You may need to use the ... More to view.
Using Webex Calling under the MS Teams client will allow you to make outside calls
without going to the separate WebEx application. The dialpad, speed dials, recent calls list
and voicemail messages will appear in your Teams client. You will still use the
Teams calling icon (in left navigation bar) to make Teams calls (audio or video) to other
Teams users.
Article on Webex Calling for Microsoft Teams
15
Support and Troubleshooting
Assistance is available through the UofL ITS HelpDesk, our Knowledge Base and, for
logging tickets, our Service Catalog.
Cisco, our service provider, allows access to the
Webex Help Center with additional information on the
Webex App and Calling.
The Report an Issue in the Help menu is for Cisco, not UofL
ITS or, our preferred option, the ITS HelpDesk.
Troubleshooting issues with incoming calls
If you are not receiving incoming calls or calls are going directly to voicemail, please
check the following:
1. Make sure that you are signed into the Webex Application (see page 4).
2. Check to see if your calls are set to go directly to voicemail by clicking on Call
Settings at the bottom left of your Webex app. You will see Call Forward with
a drop-down box. The options are Do Not Forward Calls or Voicemail. If Voicemail
is selected, change to Do Not Foward Calls to receive incoming calls.
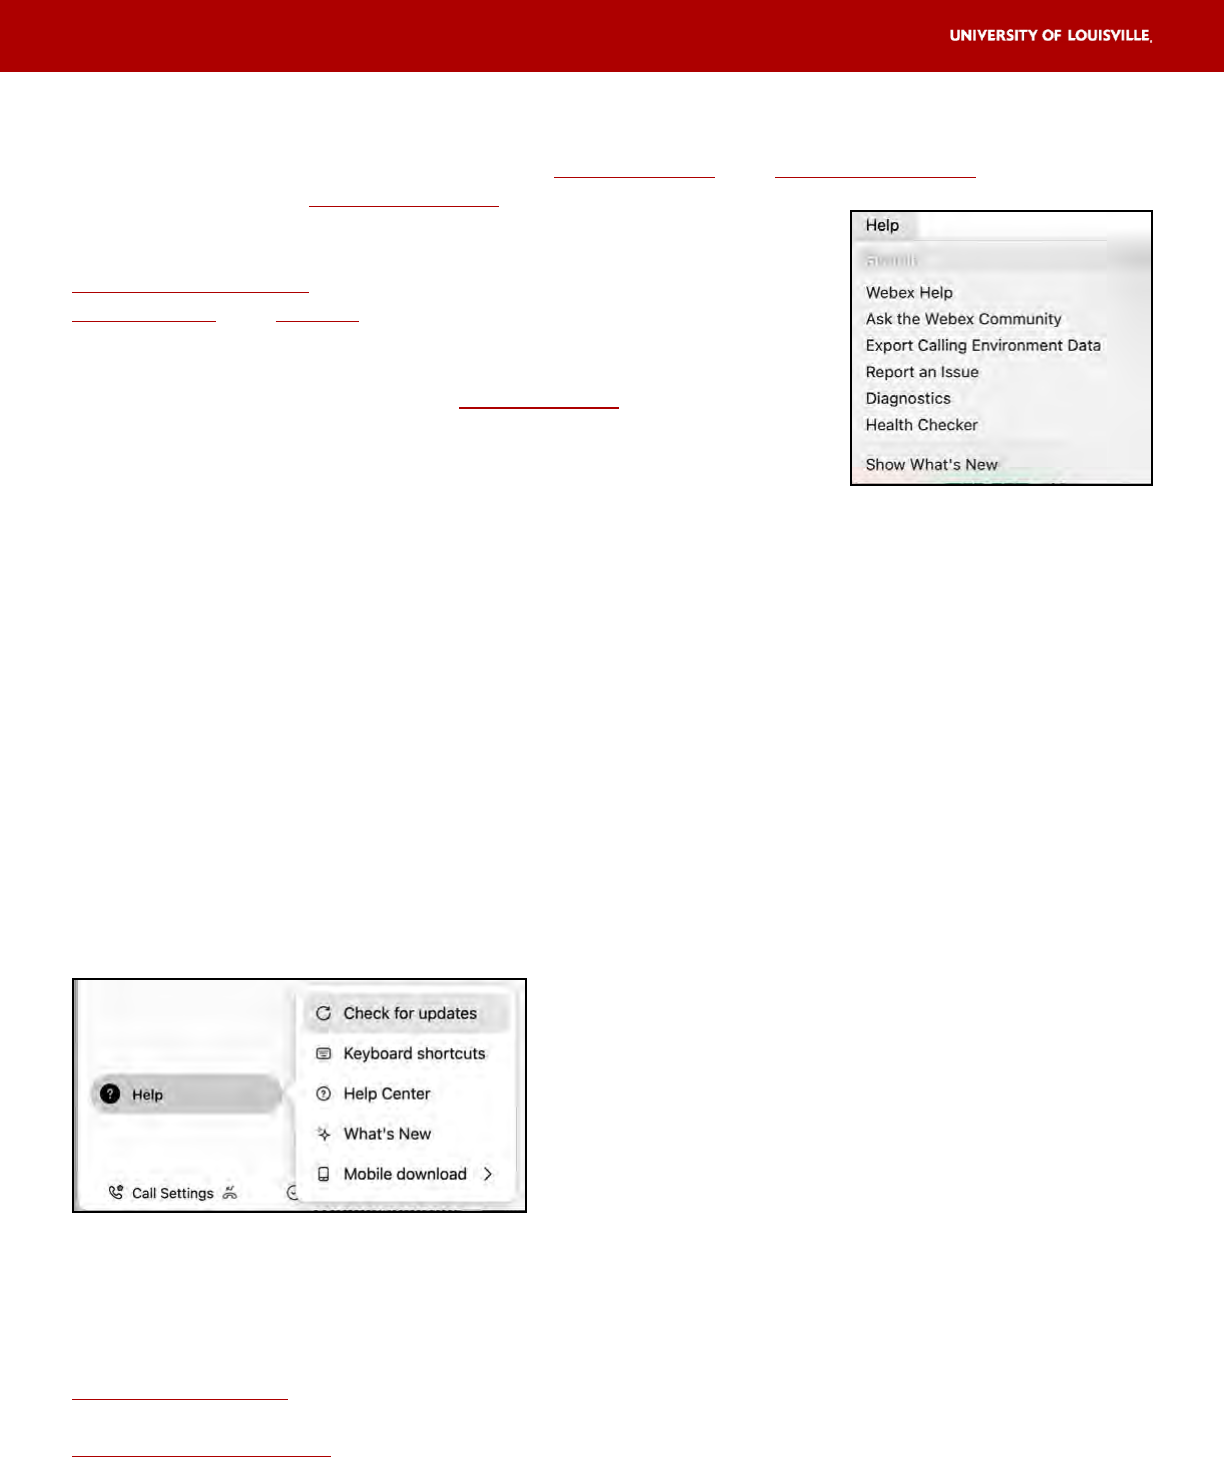
Webex App Updates
The Webex application will automatically apply any available update when restarted.
Keeping your Webex updated can prevent problems and fix existing issues.
To manually check for and run any available
Webex desktop app updates to ensure the
application is current.
Check for updates from the Help button on
home screen of the Webex application. Click the
? at the bottom left, and then click Check for
updates. When an update is available, you may
see “Update Ready” beneath the Voicemail icon
in the Webex app navigation menu and can click
that message to install the updates.
Check online for Webex Status
ITS System Status information
Webex / Cisco Status information
