
Oracle
®
Application Express
SQL Workshop Guide
Release 5.1
E64916-04
June 2017
Oracle Application Express SQL Workshop Guide, Release 5.1
E64916-04
Copyright
©
2003, 2017, Oracle and/or its affiliates. All rights reserved.
Primary Author: Harish Konakondla
Contributors: Terri Jennings, Christina Cho, Michael Hichwa, Joel Kallman, Hilary Farrell, Marc Sewtz, Jason
Straub, Drue Swadener, John Synders
This software and related documentation are provided under a license agreement containing restrictions on
use and disclosure and are protected by intellectual property laws. Except as expressly permitted in your
license agreement or allowed by law, you may not use, copy, reproduce, translate, broadcast, modify, license,
transmit, distribute, exhibit, perform, publish, or display any part, in any form, or by any means. Reverse
engineering, disassembly, or decompilation of this software, unless required by law for interoperability, is
prohibited.
The information contained herein is subject to change without notice and is not warranted to be error-free. If
you find any errors, please report them to us in writing.
If this is software or related documentation that is delivered to the U.S. Government or anyone licensing it on
behalf of the U.S. Government, then the following notice is applicable:
U.S. GOVERNMENT END USERS: Oracle programs, including any operating system, integrated software,
any programs installed on the hardware, and/or documentation, delivered to U.S. Government end users are
"commercial computer software" pursuant to the applicable Federal Acquisition Regulation and agency-
specific supplemental regulations. As such, use, duplication, disclosure, modification, and adaptation of the
programs, including any operating system, integrated software, any programs installed on the hardware,
and/or documentation, shall be subject to license terms and license restrictions applicable to the programs.
No other rights are granted to the U.S. Government.
This software or hardware is developed for general use in a variety of information management applications.
It is not developed or intended for use in any inherently dangerous applications, including applications that
may create a risk of personal injury. If you use this software or hardware in dangerous applications, then you
shall be responsible to take all appropriate fail-safe, backup, redundancy, and other measures to ensure its
safe use. Oracle Corporation and its affiliates disclaim any liability for any damages caused by use of this
software or hardware in dangerous applications.
Oracle and Java are registered trademarks of Oracle and/or its affiliates. Other names may be trademarks of
their respective owners.
Intel and Intel Xeon are trademarks or registered trademarks of Intel Corporation. All SPARC trademarks are
used under license and are trademarks or registered trademarks of SPARC International, Inc. AMD, Opteron,
the AMD logo, and the AMD Opteron logo are trademarks or registered trademarks of Advanced Micro
Devices. UNIX is a registered trademark of The Open Group.
This software or hardware and documentation may provide access to or information about content, products,
and services from third parties. Oracle Corporation and its affiliates are not responsible for and expressly
disclaim all warranties of any kind with respect to third-party content, products, and services unless
otherwise set forth in an applicable agreement between you and Oracle. Oracle Corporation and its affiliates
will not be responsible for any loss, costs, or damages incurred due to your access to or use of third-party
content, products, or services, except as set forth in an applicable agreement between you and Oracle.

Contents
Preface................................................................................................................................................................ ix
Audience ....................................................................................................................................................... ix
Documentation Accessibility ..................................................................................................................... ix
Related Documents....................................................................................................................................... x
Conventions................................................................................................................................................... x
Changes in This Release .......................................................................................................................... xi
Changes in Oracle Application Express Release 5.1............................................................................... xi
New Features................................................................................................................................................ xi
Deprecated and Desupported Features.................................................................................................... xi
Other Changes.............................................................................................................................................. xi
1 Getting Started with SQL Workshop
1.1 SQL Workshop Home Page ............................................................................................................ 1-1
1.2 Selecting a Schema............................................................................................................................ 1-2
2 Managing Database Objects with Object Browser
2.1 Accessing Object Browser................................................................................................................ 2-2
2.2 Object Browser .................................................................................................................................. 2-3
2.3 Searching for and Browsing Database Objects............................................................................. 2-4
2.4 Searching For and Selecting Database Objects ............................................................................. 2-4
2.5 Hiding the Object Selection Pane ................................................................................................... 2-5
2.6 Creating Database Objects............................................................................................................... 2-6
2.7 Managing Tables............................................................................................................................... 2-6
2.7.1 Creating a Table..................................................................................................................... 2-7
2.7.2 Browsing a Table ................................................................................................................. 2-10
2.7.3 Reports Available for Tables.............................................................................................. 2-10
2.7.4 Editing a Table ..................................................................................................................... 2-12
2.7.5 Dropping a Table................................................................................................................. 2-13
2.8 Managing Views ............................................................................................................................. 2-13
2.8.1 Creating a View ................................................................................................................... 2-14
iii
2.8.2 Browsing a View.................................................................................................................. 2-15
2.8.3 Reports for Views ................................................................................................................ 2-15
2.8.4 Editing a View Manually ................................................................................................... 2-16
2.8.5 Using Find and Replace...................................................................................................... 2-17
2.8.6 Downloading a View .......................................................................................................... 2-17
2.8.7 Compiling a View................................................................................................................ 2-17
2.8.8 Dropping a View ................................................................................................................. 2-18
2.9 Managing Indexes........................................................................................................................... 2-18
2.9.1 Creating an Index ................................................................................................................ 2-19
2.9.2 Browsing an Index............................................................................................................... 2-19
2.9.3 Reports for Indexes ............................................................................................................. 2-19
2.9.4 Dropping an Index .............................................................................................................. 2-20
2.10 Managing Sequences.................................................................................................................... 2-20
2.10.1 Creating a Sequence.......................................................................................................... 2-21
2.10.2 Browsing a Sequence ........................................................................................................ 2-21
2.10.3 Reports for Sequences....................................................................................................... 2-22
2.10.4 Dropping a Sequence........................................................................................................ 2-22
2.10.5 Altering a Sequence........................................................................................................... 2-22
2.11 Managing Types............................................................................................................................ 2-23
2.11.1 Creating a Type.................................................................................................................. 2-23
2.11.2 Browsing a Type................................................................................................................ 2-24
2.11.3 Reports for Types .............................................................................................................. 2-24
2.11.4 Dropping a Type................................................................................................................ 2-24
2.12 Managing Packages...................................................................................................................... 2-25
2.12.1 Creating a Package............................................................................................................ 2-26
2.12.2 Viewing a Package ............................................................................................................ 2-27
2.12.3 Reports for Packages......................................................................................................... 2-27
2.12.4 Editing a Package Manually ............................................................................................ 2-28
2.12.5 Compiling a Package ........................................................................................................ 2-28
2.12.6 Downloading a Package................................................................................................... 2-28
2.12.7 Dropping a Package While Viewing Specification....................................................... 2-29
2.12.8 Dropping a Package While Viewing the Body.............................................................. 2-29
2.13 Managing Procedures .................................................................................................................. 2-29
2.13.1 Creating a Procedure ........................................................................................................ 2-30
2.13.2 Browsing a Procedure....................................................................................................... 2-31
2.13.3 Reports for Procedures ..................................................................................................... 2-31
2.13.4 Editing a Procedure........................................................................................................... 2-32
2.13.5 Compiling a Procedure..................................................................................................... 2-33
2.13.6 Downloading a Procedure ............................................................................................... 2-33
2.13.7 Dropping a Procedure ...................................................................................................... 2-33
2.14 Managing Functions..................................................................................................................... 2-34
2.14.1 Creating a Function........................................................................................................... 2-34
2.14.2 Browsing a Function ......................................................................................................... 2-35
iv
2.14.3 Reports for Functions........................................................................................................ 2-35
2.14.4 Editing a Function Manually ........................................................................................... 2-36
2.14.5 Compiling a Function ....................................................................................................... 2-37
2.14.6 Downloading a Function.................................................................................................. 2-37
2.14.7 Dropping a Function......................................................................................................... 2-37
2.15 Managing Triggers ....................................................................................................................... 2-38
2.15.1 Creating Triggers............................................................................................................... 2-38
2.15.2 Browsing a Trigger............................................................................................................ 2-39
2.15.3 Reports for Triggers .......................................................................................................... 2-39
2.15.4 Editing a Trigger Manually.............................................................................................. 2-40
2.15.5 Compiling a Trigger.......................................................................................................... 2-41
2.15.6 Downloading a Trigger .................................................................................................... 2-41
2.15.7 Dropping a Trigger ........................................................................................................... 2-41
2.15.8 Disabling and Enabling a Trigger ................................................................................... 2-42
2.16 Managing Database Links ........................................................................................................... 2-42
2.16.1 Creating a Database Link ................................................................................................. 2-42
2.16.2 Browsing a Database Link................................................................................................ 2-43
2.16.3 Reports for Database Links.............................................................................................. 2-43
2.16.4 Dropping a Database Link ............................................................................................... 2-44
2.17 Managing Materialized Views.................................................................................................... 2-44
2.17.1 Creating a Materialized View.......................................................................................... 2-45
2.17.2 Browsing a Materialized View ........................................................................................ 2-46
2.17.3 Reports for Materialized Views....................................................................................... 2-46
2.17.4 Dropping a Materialized View........................................................................................ 2-47
2.18 Managing Synonyms.................................................................................................................... 2-47
2.18.1 Creating Synonyms........................................................................................................... 2-47
2.18.2 Viewing a Synonym.......................................................................................................... 2-48
2.18.3 Dropping a Synonym........................................................................................................ 2-48
3 Using SQL Commands
3.1 About SQL Commands.................................................................................................................... 3-2
3.2 Accessing SQL Commands ............................................................................................................. 3-2
3.3 About the SQL Commands Home Page........................................................................................ 3-3
3.4 Using the Command Editor ............................................................................................................ 3-5
3.4.1 Running a SQL Command................................................................................................... 3-6
3.4.2 About Transactions in SQL Commands ............................................................................ 3-6
3.4.3 Disabling Transactional SQL Commands.......................................................................... 3-6
3.4.4 Enabling Transactional SQL Commands........................................................................... 3-7
3.4.5 About Unsupported SQL*Plus Commands ...................................................................... 3-7
3.4.6 Terminating a Command ..................................................................................................... 3-7
3.4.7 Using Bind Variables ............................................................................................................ 3-7
3.4.8 Using the Find Tables Button .............................................................................................. 3-7
3.5 Saving an SQL Command ............................................................................................................... 3-8
v
3.6 Copying a Command ....................................................................................................................... 3-8
3.7 Viewing Results ................................................................................................................................ 3-9
3.7.1 Accessing the Results Pane .................................................................................................. 3-9
3.7.2 About the Results Pane ........................................................................................................ 3-9
3.8 Using Explain Plan ......................................................................................................................... 3-10
3.8.1 Viewing an Explain Plan .................................................................................................... 3-10
3.9 Using Saved Commands................................................................................................................ 3-10
3.9.1 Accessing Saved Commands............................................................................................. 3-11
3.9.2 About the Saved SQL Pane ................................................................................................ 3-11
3.10 Using SQL Command History.................................................................................................... 3-11
3.10.1 Accessing a Command from Command History ......................................................... 3-12
3.10.2 About the History Pane.................................................................................................... 3-12
4 Using Oracle Application Express Utilities
4.1 Using Data Workshop...................................................................................................................... 4-2
4.1.1 About the Data Load and Unload Wizards....................................................................... 4-2
4.1.2 About Importing, Exporting, Loading, and Unloading Data......................................... 4-3
4.1.3 Import/Export/Load/Unload Options............................................................................. 4-3
4.1.4 Accessing the Data Load/Unload Page............................................................................. 4-5
4.1.5 Loading Data.......................................................................................................................... 4-5
4.1.6 Unloading Data...................................................................................................................... 4-9
4.1.7 Using the Repository........................................................................................................... 4-10
4.2 Generating DDL.............................................................................................................................. 4-11
4.3 Managing Methods on Tables....................................................................................................... 4-11
4.4 Viewing Object Reports ................................................................................................................. 4-12
4.4.1 Viewing Table Reports ....................................................................................................... 4-12
4.4.2 Viewing PL/SQL Reports .................................................................................................. 4-13
4.4.3 Viewing Exception Reports................................................................................................ 4-15
4.4.4 Viewing Security Reports................................................................................................... 4-15
4.4.5 Viewing All Object Reports ............................................................................................... 4-16
4.5 Comparing Schemas....................................................................................................................... 4-17
4.6 Using Query Builder ...................................................................................................................... 4-18
4.6.1 Query Builder Home Page................................................................................................. 4-19
4.6.2 Accessing Query Builder ................................................................................................... 4-19
4.6.3 Understanding the Query Building Process.................................................................... 4-20
4.6.4 Using the Object Selection Pane ........................................................................................ 4-20
4.6.5 Using the Design Pane........................................................................................................ 4-21
4.6.6 Specifying Query Conditions ............................................................................................ 4-24
4.6.7 Creating Relationships Between Objects ......................................................................... 4-26
4.6.8 Working with Saved Queries............................................................................................. 4-28
4.6.9 Viewing Generated SQL..................................................................................................... 4-29
4.6.10 Viewing Query Results..................................................................................................... 4-30
4.7 Managing User Interface Defaults................................................................................................ 4-30
vi
4.7.1 About User Interface Defaults........................................................................................... 4-30
4.7.2 Creating User Interface Defaults for a Table................................................................... 4-31
4.7.3 Modifying Table User Interface Defaults......................................................................... 4-32
4.7.4 Creating User Interface Attributes.................................................................................... 4-32
4.7.5 Modifying User Interface Attributes ................................................................................ 4-33
4.7.6 Exporting and Importing User Interface Defaults.......................................................... 4-33
4.8 Viewing Database Details.............................................................................................................. 4-34
4.9 Monitoring the Database ............................................................................................................... 4-35
4.9.1 Accessing Session Page Reports........................................................................................ 4-35
4.9.2 System Statistics................................................................................................................... 4-38
4.9.3 Viewing System Statistics................................................................................................... 4-38
4.9.4 About Top SQL Page .......................................................................................................... 4-39
4.9.5 Viewing Top SQL Page....................................................................................................... 4-39
4.9.6 About Long Operations Page ............................................................................................ 4-39
4.9.7 Viewing the Long Operations Page.................................................................................. 4-40
4.10 Using the Recycle Bin................................................................................................................... 4-40
4.10.1 Managing Objects in the Recycle Bin ............................................................................. 4-40
4.10.2 Emptying the Recycle Bin Without Viewing the Objects ............................................ 4-41
5 Using SQL Scripts
5.1 About SQL Scripts ............................................................................................................................ 5-2
5.2 Accessing SQL Scripts...................................................................................................................... 5-2
5.3 About the SQL Scripts Page ............................................................................................................ 5-3
5.4 About the Tasks List......................................................................................................................... 5-5
5.5 Creating a SQL Script....................................................................................................................... 5-5
5.5.1 Creating a SQL Script in the Script Editor ......................................................................... 5-5
5.5.2 Uploading a SQL Script........................................................................................................ 5-6
5.6 Using the Script Editor..................................................................................................................... 5-6
5.6.1 Editing an Existing Script..................................................................................................... 5-7
5.6.2 Script Editor Controls ........................................................................................................... 5-8
5.7 Deleting a SQL Script ....................................................................................................................... 5-8
5.7.1 Deleting Scripts from the SQL Scripts Page ...................................................................... 5-9
5.7.2 Deleting a Script in the Script Editor.................................................................................. 5-9
5.8 Copying a SQL Script....................................................................................................................... 5-9
5.9 Executing a SQL Script................................................................................................................... 5-10
5.9.1 Executing a SQL Script in the Script Editor..................................................................... 5-10
5.9.2 Executing a SQL Script from the SQL Scripts Page........................................................ 5-11
5.10 Viewing SQL Script Results ........................................................................................................ 5-11
5.11 Exporting and Importing SQL Scripts ....................................................................................... 5-12
5.11.1 Copying Scripts to an Export Script ............................................................................... 5-12
5.11.2 Importing Scripts............................................................................................................... 5-13
5.12 Viewing Script and Result Quotas ............................................................................................. 5-14
vii
6 Enabling Data Exchange with RESTful Services
6.1 What Is REST? ................................................................................................................................... 6-2
6.2 About RESTful Services ................................................................................................................... 6-2
6.3 RESTful Service Requirements ....................................................................................................... 6-3
6.4 Accessing RESTful Services............................................................................................................. 6-3
6.5 How to Create the RESTful Service Module Example ................................................................ 6-4
6.5.1 About the Example RESTful Service Module (oracle.example.hr) ................................ 6-5
6.5.2 Returning the Result Set in CSV Format (empinfo/)....................................................... 6-8
6.5.3 Retrieving Data Based on a Parameter (employees/{id}) ............................................... 6-9
6.5.4 Returning the Result Set in JSON Format with Pagination Set (employees/) ........... 6-11
6.5.5 Returning the Result Set as a Feed (employeesfeed/) ................................................... 6-12
6.5.6 Returning the Result Set Based on a PL/SQL Block (empsecformat/{empname})... 6-13
6.5.7 Updating Data Based on a Parameter (employees/{id})............................................... 6-15
6.6 Managing RESTful Service Modules ........................................................................................... 6-18
6.6.1 Installing a Sample RESTful Service Module.................................................................. 6-19
6.6.2 Creating a RESTful Service Module ................................................................................. 6-20
6.6.3 Editing a RESTful Service Module.................................................................................... 6-21
6.6.4 Deleting a RESTful Service Module.................................................................................. 6-22
6.6.5 Managing RESTful Service Privileges .............................................................................. 6-23
6.6.6 Assigning Privileges to RESTful Service Modules ......................................................... 6-23
6.6.7 Creating a RESTful Service Privilege ............................................................................... 6-24
6.6.8 Editing a RESTful Service Privilege.................................................................................. 6-25
6.6.9 Deleting a RESTful Service Privilege................................................................................ 6-25
6.6.10 Exporting a RESTful Service Module ............................................................................. 6-26
6.6.11 Importing a RESTful Service Module............................................................................. 6-26
6.7 Managing Resource Templates..................................................................................................... 6-27
6.7.1 Adding a Resource Template ............................................................................................ 6-27
6.7.2 Editing a Resource Template............................................................................................. 6-28
6.7.3 Deleting a Resource Template........................................................................................... 6-28
6.8 Managing Resource Handlers....................................................................................................... 6-29
6.8.1 Adding a Resource Handler .............................................................................................. 6-29
6.8.2 Editing a Resource Handler............................................................................................... 6-31
6.8.3 Deleting a Resource Handler............................................................................................. 6-31
Index
viii

Preface
Oracle Application Express SQL Workshop Guide describes how to use Oracle Application
Express SQL Workshop and utilities to load and unload data from an Oracle database,
generate DDL, view object reports, and restore dropped database objects.
Audience (page ix)
Documentation Accessibility (page ix)
Related Documents (page x)
Conventions (page x)
Audience
Oracle Application Express SQL Workshop Guide is intended for application developers
who are building database-centric Web applications using Oracle Application Express.
The guide describes how to use Oracle Application Express SQL Workshop and
utilities to load and unload data from an Oracle database, generate DDL, view object
reports, and restore dropped database objects.
To use this guide, you must have a general understanding of relational database
concepts and the operating system environment under which Oracle Application
Express is running.
See Also:
Oracle Application Express App Builder User’s Guide
Documentation Accessibility
For information about Oracle's commitment to accessibility, visit the Oracle
Accessibility Program website at http://www.oracle.com/pls/topic/lookup?
ctx=acc&id=docacc.
Access to Oracle Support
Oracle customers that have purchased support have access to electronic support
through My Oracle Support. For information, visit http://www.oracle.com/pls/
topic/lookup?ctx=acc&id=info or visit http://www.oracle.com/pls/topic/lookup?
ctx=acc&id=trs if you are hearing impaired.
ix

Related Documents
For more information, see these Oracle resources:
• Oracle Application Express Release Notes
• Oracle Application Express Installation Guide
• Oracle Application Express App Builder User’s Guide
• Oracle Application Express API Reference
• Oracle Application Express Administration Guide
• Oracle Application Express Application Migration Guide
• Oracle Application Express End User Guide
• Oracle Database Concepts
• Oracle Database Development Guide
• Oracle Database Administrator’s Guide
• Oracle Database SQL Language Reference
• SQL*Plus User's Guide and Reference
• Oracle Database PL/SQL Language Reference
Conventions
The following text conventions are used in this document:
Convention
Meaning
boldface
Boldface type indicates graphical user interface elements associated
with an action, or terms defined in text or the glossary.
italic Italic type indicates book titles, emphasis, or placeholder variables for
which you supply particular values.
monospace Monospace type indicates commands within a paragraph, URLs, code
in examples, text that appears on the screen, or text that you enter.
x

Changes in This Release
This preface contains:
Changes in Oracle Application Express Release 5.1 (page xi)
New Features (page xi)
Deprecated and Desupported Features (page xi)
Other Changes (page xi)
Changes in Oracle Application Express Release 5.1
The following are changes in Oracle Application Express SQL Workshop Guide for Oracle
Application Express release 5.1.
New Features
The following feature is new in this release:
• Preview file contents before uploading the data.
Upon selecting the file to be uploaded, a data sample of the first 5 lines of the file
is displayed in the preview window. This is active by default and works for every
chosen file. You can see the data and adjust the separator and enclosed by
characters before actually uploading the data. See "Loading Data (page 4-5)."
Deprecated and Desupported Features
See "Deprecated Features" and "Desupported Features" in Oracle Application Express
Release Notes .
Other Changes
The following are additional changes in the release:
• All content has been updated to reflect new functionality.
• Screen captures and graphics have been added and updated to reflect Oracle
Application Express release 5.1 user interface enhancements.
xi
1
Getting Started with SQL Workshop
SQL Workshop provides tools that enable you to view and manage database objects.
Object Browser enables you to use a tree control to view object properties and create
new objects. The SQL Commands tool enables you to enter ad-hoc SQL. Query Builder
enables you to create join queries using drag and drop. SQL Scripts enables you to
store and run scripts. The Data Workshop enables you to load and unload text, DDL,
and spreadsheet data.
SQL Workshop Home Page (page 1-1)
Learn about the SQL Workshop home page.
Selecting a Schema (page 1-2)
Select the default database schema for your SQL Workshop session.
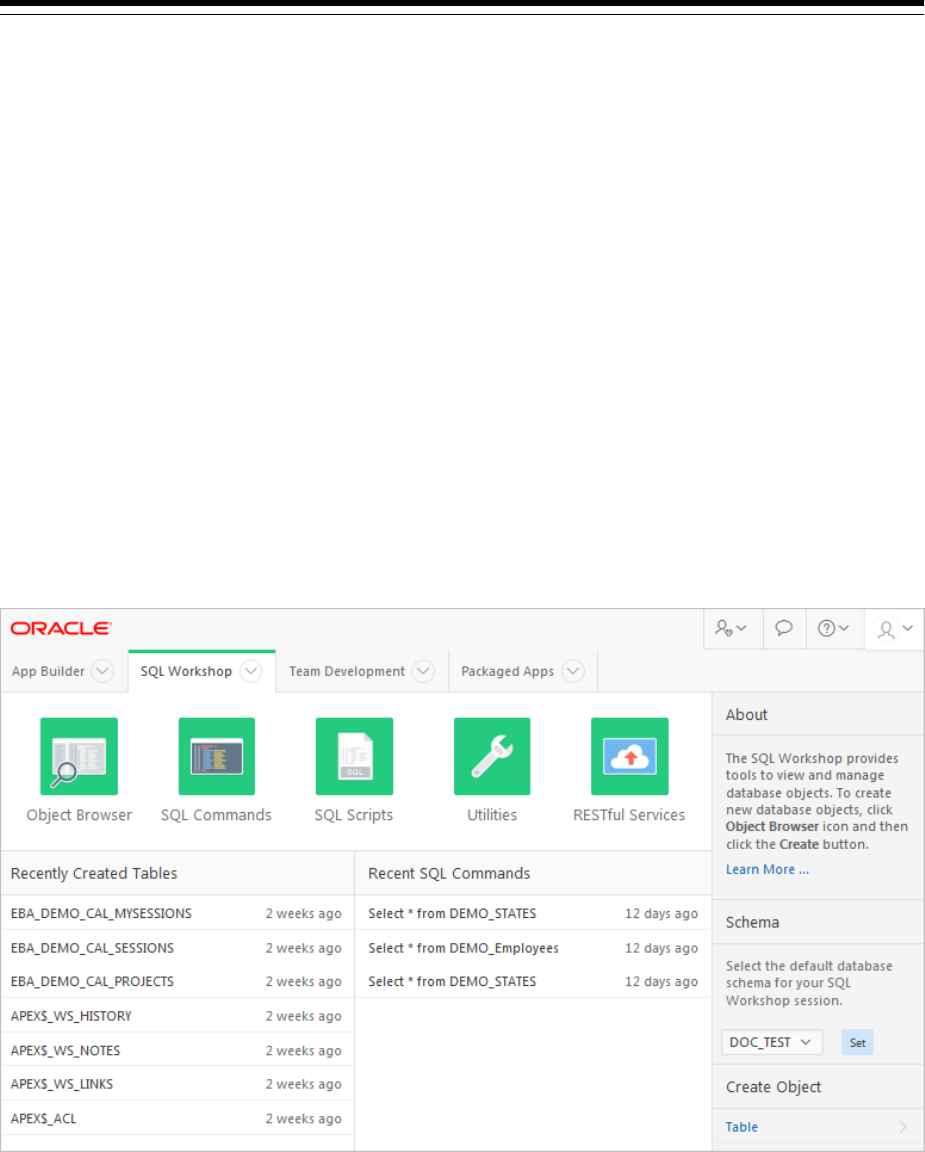
1.1 SQL Workshop Home Page
Learn about the SQL Workshop home page.
You access SQL Workshop by clicking the SQL Workshop icon on the Workspace
home page. The SQL Workshop home page appears.
SQL Workshop home page features the following icons:
Getting Started with SQL Workshop
1-1
• Object Browser.
• SQL Commands.
• SQL Scripts.
• Utilities.
• RESTful Services.
See Also:
• "Searching for and Browsing Database Objects (page 2-4)"
• "Searching For and Selecting Database Objects (page 2-4)"
• "Using Query Builder (page 4-18)"
• "Using Data Workshop (page 4-2)"
1.2 Selecting a Schema
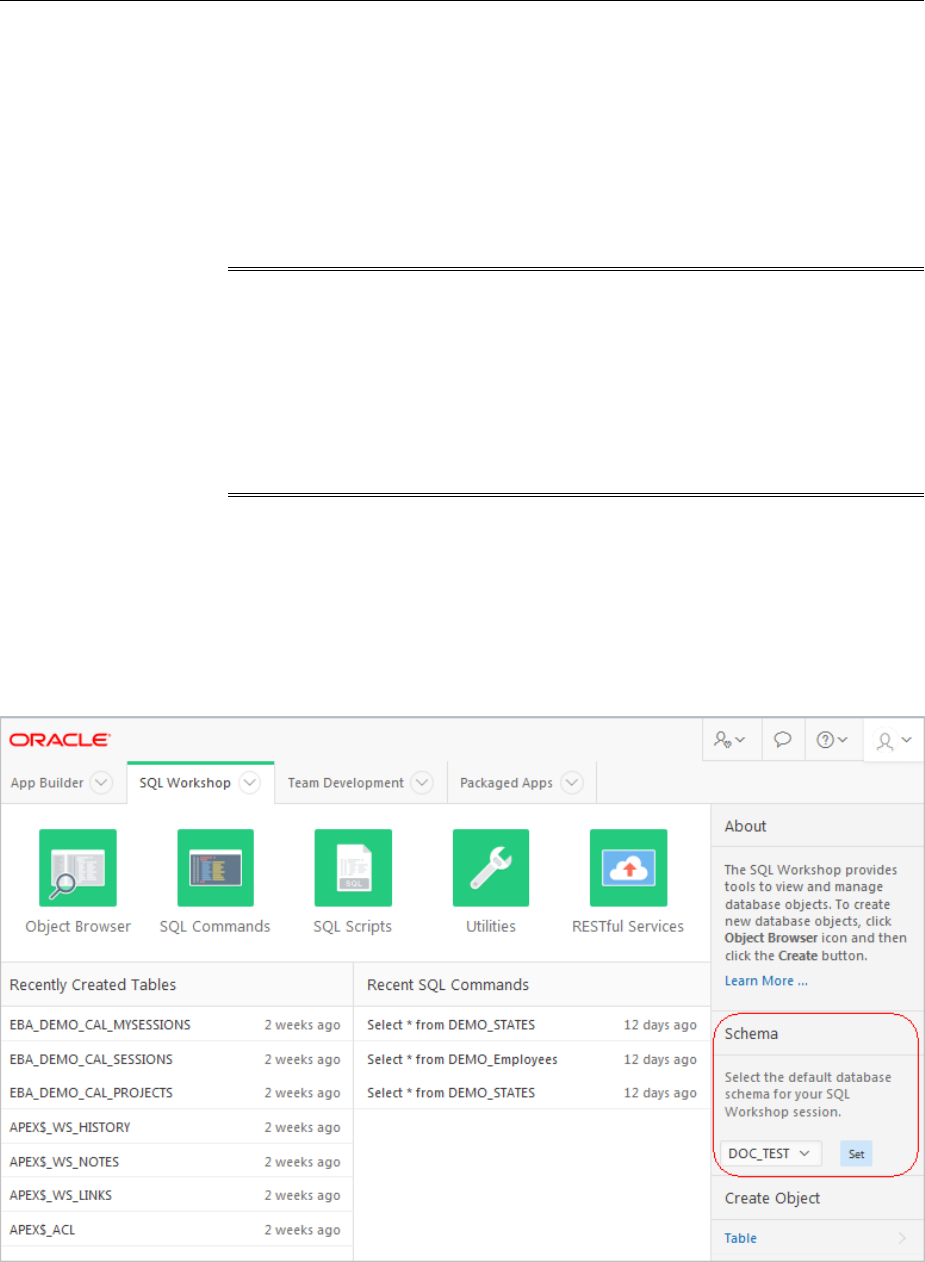
Select the default database schema for your SQL Workshop session.
A schema is a logical container for database objects. Use the Schema list on the right
side of the SQL Workshop home page to select the default database schema for your
SQL Workshop session. Only schemas assigned to your workspace display in the
Schema list.
Selecting a Schema
1-2 Oracle Application Express SQL Workshop Guide

2
Managing Database Objects with Object
Browser
Object Browser enables developers to browse, create, and edit objects in a database.
Oracle Application Express has many views defined to help you work with the
underlying table structures. The views combine multiple base tables and use
meaningful column names to minimize complexity and to be more intuitive to use.
Accessing Object Browser (page 2-2)
Learn about how to access Object Browser.
Object Browser (page 2-3)
The Object Browser page is divided into two panes - Object Selection
pane and Detail pane.
Searching for and Browsing Database Objects (page 2-4)
Filter the view by selecting an object type or entering a case insensitive
search term.
Searching For and Selecting Database Objects (page 2-4)
Search for and select database objects in Object Browser by selecting an
object type from the Object list.
Hiding the Object Selection Pane (page 2-5)
You can hide the Object Selection pane by selecting the Collapse control
which displays on the right side of the Object Selection pane.
Creating Database Objects (page 2-6)
You can create database objects using the Create Database Object
Wizard.
Managing Tables (page 2-6)
You can create, browse, edit, or drop tables as well as view different
table reports.
Managing Views (page 2-13)
A view is a logical representation of another table or combination of
tables. You can create, browse, edit, download, compile, drop a view and
view reports.
Managing Indexes (page 2-18)
An index is an optional structure associated with tables and clusters.
You can create, browse, drop an index and view reports.
Managing Sequences (page 2-20)
A sequence generates a serial list of unique numbers for numeric
columns of a database table. You can create, browse, drop, alter a
sequence and view a report.
Managing Database Objects with Object Browser
2-1

Managing Types (page 2-23)
A type is a user-specified object or collection definition. You can create,
browse, drop a type and view a report.
Managing Packages (page 2-25)
A package is a database object that groups logically related PL/SQL
types, items, functions and procedures. You can create, view, edit,
compile, drop, download a package, and view a report.
Managing Procedures (page 2-29)
A procedure is a subprogram that performs a specific action. You can
use Object Browser to view, create, edit, download, and drop
procedures.
Managing Functions (page 2-34)
A function is a subprogram that can take parameters and return a single
value. You can use Object Browser to create, browse, edit, compile,
download, drop functions and view report.
Managing Triggers (page 2-38)
A database trigger is a stored subprogram associated with a database
table, view, or event. You can create, browse, edit, compile, download,
drop, disable or enable a trigger and view report.
Managing Database Links (page 2-42)
A database link is a schema object in one database that enables you to
access objects in another database. You can create, browse, drop a
database link and view report.
Managing Materialized Views (page 2-44)
A materialized view provides indirect access to table data by storing the
results of a query in a separate schema object. You can create, browse,
drop a materialized view and view report.
Managing Synonyms (page 2-47)
A synonym is an alias for a schema object. You can create, view and
drop a synonym.
See Also:
• Oracle Database SQL Language Reference
• Oracle Application Express API Reference for details of the views defined
2.1 Accessing Object Browser
Learn about how to access Object Browser.
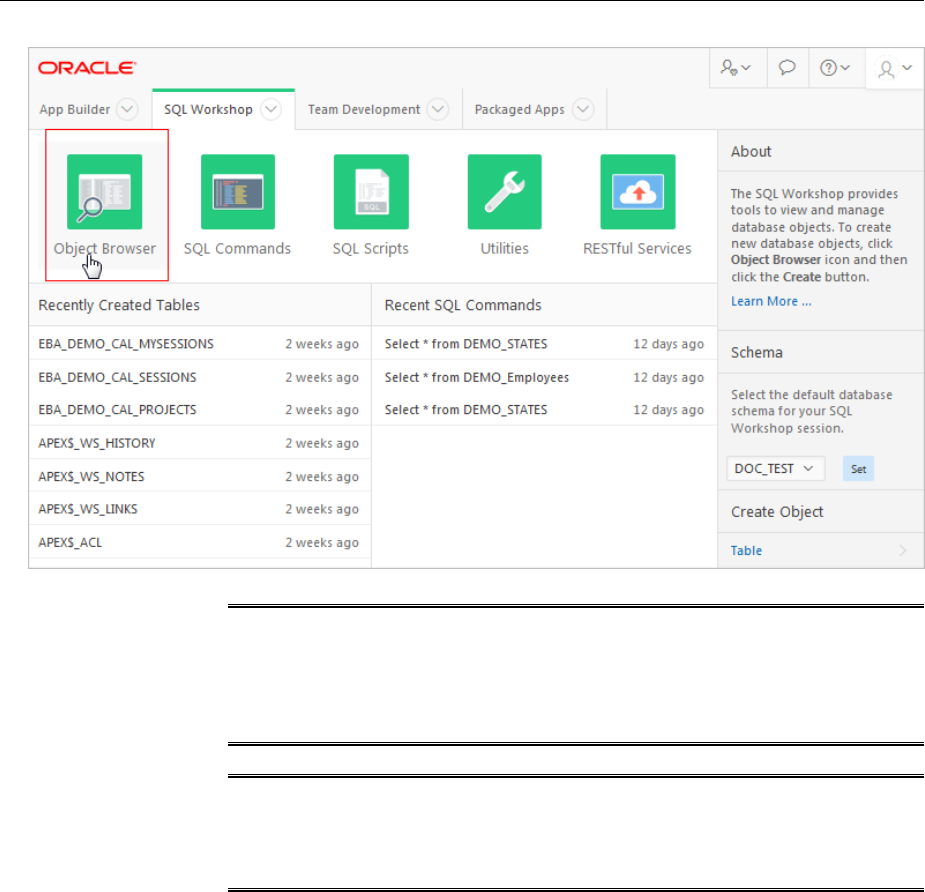
To access Object Browser:
1.
On the Workspace home page, click SQL Workshop.
2.
Click Object Browser.
Accessing Object Browser
2-2 Oracle Application Express SQL Workshop Guide
Note:
If the instance administrator has disabled RESTful Services for this
Application Express instance, RESTful Services are not available for this
instance and the RESTful Services icon does not display.
See Also:
"Configuring SQL Workshop" in Oracle Application Express Administration
Guide
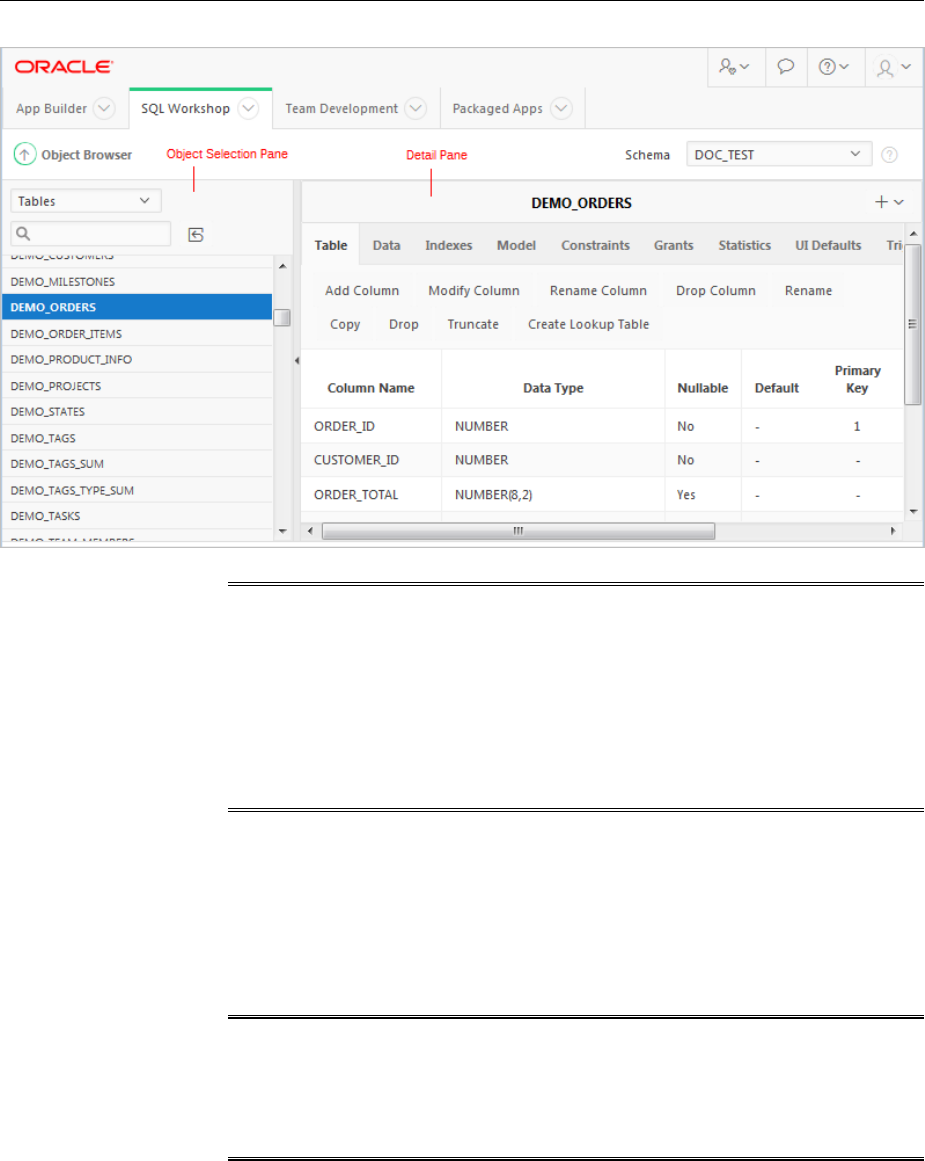
2.2 Object Browser
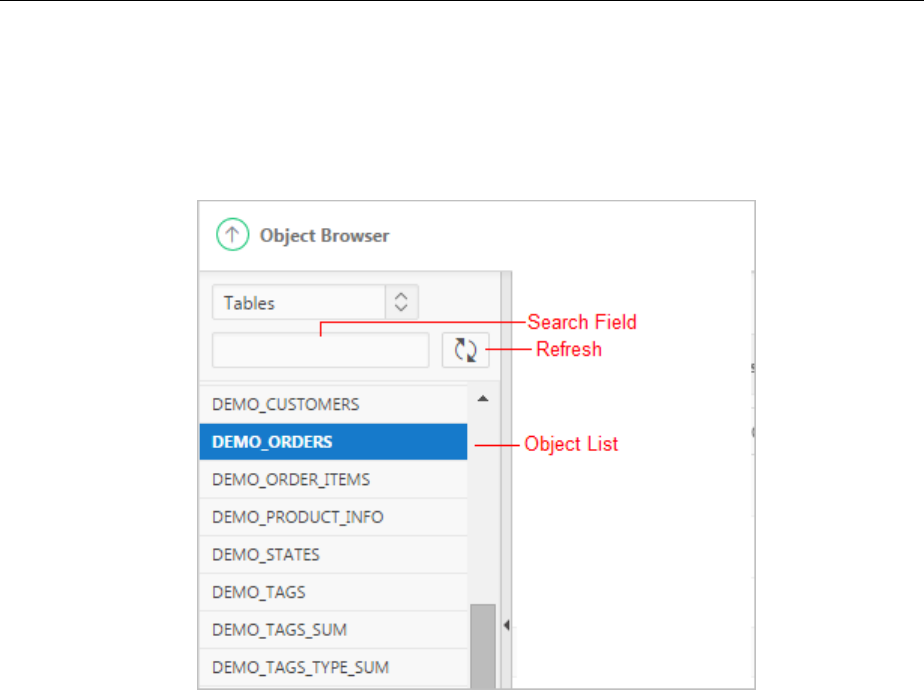
The Object Browser page is divided into two panes - Object Selection pane and Detail
pane.
• Object Selection pane displays on the left side of the Object Browser page and
lists database objects of a selected type within the current schema. You can further
narrow the results by filtering on the object name.
• Detail pane displays to the right of the page and displays detailed information
about the selected object. To view object details, select an object in the Object
Selection pane. Click the tabs at the top of the Detail pane to view additional
details about the current object. To edit an object, click the appropriate button.
Object Browser
Managing Database Objects with Object Browser 2-3
See Also:
• "Searching for and Browsing Database Objects (page 2-4)"
• "Creating Database Objects (page 2-6)"
• "Selecting a Schema (page 1-2)"
• "SQL Workshop Home Page (page 1-1)"
2.3 Searching for and Browsing Database Objects
Filter the view by selecting an object type or entering a case insensitive search term.
The Object Selection pane displays on the left side of the Object Browser page and lists
database objects by type with the current schema. You can filter the view by selecting
an object type or entering a case insensitive search term.
See Also:
• "Searching For and Selecting Database Objects (page 2-4)"
• "SQL Workshop Home Page (page 1-1)"
2.4 Searching For and Selecting Database Objects
Search for and select database objects in Object Browser by selecting an object type
from the Object list.
To search for a database object in the Object Selection pane:
1.
On the Workspace home page, click SQL Workshop and then Object Browser.
Searching for and Browsing Database Objects
2-4 Oracle Application Express SQL Workshop Guide
Object Browser appears.
2. Select an object type from the Object list.
The list of objects that appears depends upon the available objects in the current
schema. Note that any object having a red bar adjacent to it is invalid.
3. To search for an object name, enter a case insensitive search term in the Search
field.
4. To view all objects, leave the search field blank.
Once you locate the database object you want to view, simply select it. The selected
object displays in the Detail pane. If no object is selected, the Detail pane is blank.
2.5 Hiding the Object Selection Pane
You can hide the Object Selection pane by selecting the Collapse control which
displays on the right side of the Object Selection pane.
If the Object Selection pane appears, selecting this control hides it. Similarly, if the
Object Selection pane is hidden, selecting this control causes the pane to reappear.
Hiding the Object Selection Pane
Managing Database Objects with Object Browser 2-5
2.6 Creating Database Objects
You can create database objects using the Create Database Object Wizard.
Once you select an object, a set of tabs and buttons appears at the top of the Detail
pane. Use the tabs to view different aspects of the current items (for example, the
indexes of the table). Use the buttons to modify the current object.
To create an object:
1. On the Workspace home page, click SQL Workshop and then Object Browser.
Object Browser appears.
2. Click the Create icon which displays as a plus (+) sign in the upper right corner of
the Detail pane.
3. From the list of object types, select the type of object you want to create.
4. Follow the on-screen instructions.
2.7 Managing Tables
You can create, browse, edit, or drop tables as well as view different table reports.
A table is a unit of data storage in an Oracle database, containing rows and columns.
When you view a table in Object Browser, a table description appears that describes
each column in the table.
Creating a Table (page 2-7)
Create a table using Object Browser.
Browsing a Table (page 2-10)
Learn how to view different reports about a table.
Reports Available for Tables (page 2-10)
Learn about alternative views available when viewing a table in Object
Browser.
Creating Database Objects
2-6 Oracle Application Express SQL Workshop Guide

Editing a Table (page 2-12)
Click the appropriate buttons on a table in Object Browser to edit a table.
Dropping a Table (page 2-13)
Drop a table using Object Browser.
See Also:
• Oracle Database Administrator’s Guide for information on managing tables
• Oracle Database Concepts for conceptual information on tables types
• Oracle Database SQL Language Reference for the syntax required to create
and alter tables
2.7.1 Creating a Table
Create a table using Object Browser.
To create a table:
1.
On the Workspace home page, click SQL Workshop and then Object Browser.
Object Browser appears.
2.
Click the Create icon.
3.
From the list of object types, select Table.
4.
Enter a table name.
Table names must conform to Oracle naming conventions.
5.
To have the final table name match the case entered in the Table Name field, click
Preserve Case.
6.
Enter column details:
a.
Column Name - Enter the column name.
b.
Type - Select the column type.
c.
Precision - The precision is the number of digits before the decimal point. Not
all column types have this setting. Precision must be a positive integer. Only
NUMBER, FLOAT, INTERVAL YEAR TO MONTH, and INTERVAL DAY TO SECOND
have this setting. For example, if a column of type NUMBER has precision of 4,
the column value can be 0 through 9999.
d.
Scale - The function of the scale setting depends on the column type. For
NUMBER types, scale is the number of digits after the decimal point. For
VARCHAR2 and CHAR types, scale is the number of stored characters. For
TIMESTAMP types, scale is the fractional seconds precision and must be a
number between 0 and 9. Scale must be a positive number. For example, if a
column type TIMESTAMP has a scale of 3, seconds are between .000 seconds
and .999 seconds.
e.
Not Null - To specify a column must always have a value, select the Not Null
check box.
Managing Tables
Managing Database Objects with Object Browser 2-7

f. If running Oracle Database 12c - Select an identity option for NUMBER and
FLOAT columns. Options include:
• Always - The Oracle Database always uses the sequence generator to
assign a value to the column. If you attempt to explicitly assign a value to
the column using INSERT or UPDATE, then an error is returned.
• Default - The Oracle Database uses the sequence generator to assign a
value to the column by default, but you can also explicitly assign a
specified value to the column.
• Default on Null - The Oracle Database uses the sequence generator to
assign a value to the column when a subsequent INSERT statement
attempts to assign a value that evaluates to NULL.
g.
Move - Click the Up and Down arrows in the Move column to change the
order of previously entered columns.
h.
Add Column - Click Add Column to add additional columns.
i.
Click Next.
Next, define the primary key for this table (optional). A primary key is a single
field or combination of fields that uniquely identifies a record.
7. For Primary Key, select the appropriate option and click Next:
a. Select an option:
• No Primary Key - No primary key is created.
• Populate from a new sequence - Creates a primary key and creates a
trigger and a sequence. The sequence is used in the trigger to populate the
selected primary key column. The primary key can only be a single
column.
• Populated from an existing sequence - Creates a primary key and creates
a trigger. The selected sequence is used in the trigger to populate the
selected primary key column. The primary key can only be a single
column.
• Not populated - Defines a primary key but does not have the value
automatically populated with a sequence within a trigger. You can also
select this option to define a composite primary key (that is, a primary key
made up of multiple columns).
• If running Oracle Database 12c - Populate By Identity Column - Creates a
primary key and a sequence. The sequence is used to populate the selected
primary key column.
b.
Click Next.
Next, add foreign keys (optional). A foreign key establishes a relationship between
a column (or columns) in one table and a primary or unique key in another table.
8.
Add Foreign Key:
a.
Name - Enter a name of the foreign key constraint that you are defining.
b.
Select the appropriate option:
Managing Tables
2-8 Oracle Application Express SQL Workshop Guide

• Disallow Delete - Blocks the delete of rows from the referenced table
when there are dependent rows in this table.
• Cascade Delete - Deletes the dependent rows from this table when the
corresponding parent table row is deleted.
• Set to Null on Delete - Sets the foreign key column values in this table to
null when the corresponding parent table row is deleted.
c. Select Key Column(s) - Select the columns that are part of the foreign key, then
click the Add icon to move them to Key Column(s).
d.
References Table - Select the table which is referenced by this foreign key.
Then, select the columns referenced by this foreign key. Once selected, click the
Add icon to move the selected columns to Referenced Column(s).
e.
Click Add.
f.
Click Next.
Next, add a constraint (optional). You can create multiple constraints, but you must
add each constraint separately.
9. To add a constraint:
a. Specify the type of constraint (Check or Unique).
A check constraint is a validation check on one or more columns within the
table. No records can be inserted or updated in a table which violates an
enabled check constraint. A unique constraint designates a column or a
combination of columns as a unique key. To satisfy a unique constraint, no two
rows in the table can have the same values for the specified columns.A check
constraint is a validation check on one or more columns within the table. No
records can be inserted or updated in a table which violates an enabled check
constraint. A unique constraint designates a column or a combination of
columns as a unique key. To satisfy a unique constraint, no two rows in the
table can have the same values for the specified columns.
b. Enter the constraint in the field provided. For unique constraints, select the
column(s) that are to be unique. For check constraints, enter the expression that
should be checked such as flag in ('Y','N').
c. Click Add.
10. Click Next.
A confirmation page appears.
11.
Click Create.
See Also:
• "Using the Table Finder" in Oracle Application Express App Builder User’s
Guide
• "Overview of Tables" in Oracle Database Concepts for information about
tables
Managing Tables
Managing Database Objects with Object Browser 2-9

2.7.2 Browsing a Table
Learn how to view different reports about a table.
When you view a table in Object Browser, the table description appears. While
viewing this description, you can add a column, modify a column, rename a column,
drop a column, rename the table, copy the table, drop the table, truncate the table, or
create a lookup table based upon a column in the current table. Additionally, you have
access to other reports that offer related information including the table data, indexes,
data model, constraints, grants, statistics, user interface defaults, triggers,
dependencies, and SQL to create the selected table.
To view a table description:
1.
On the Workspace home page, click SQL Workshop and then Object Browser.
Object Browser appears.
2.
From the Object list, ensure Tables is selected.
3.
From the Object Selection pane, select a table.
The table description appears.
4. Click the tabs at the top of the page to view different reports about the table.
See Also:
"Reports Available for Tables (page 2-10)"
2.7.3 Reports Available for Tables
Learn about alternative views available when viewing a table in Object Browser.
Table 2-1 (page 2-10) describes all available reports for tables.
Table 2-1 Available Reports for Tables
View Description
Table Displays details of the first 57 columns including the column
name, data type, nullable status, default value, and primary
key. While viewing table details you can add, modify, delete, or
rename a column. Additionally, you can drop, rename, copy, or
truncate the table only if the referencing table has no records
and create a lookup table.
To export the data as a comma-delimited file (.csv) file, click the
Download link.
To print the data in a portable document format (.pdf) file, click
the Print link. Please note, this option must have a Report
Server configured at the instance level. See "Configuring Report
Printing" in
Oracle Application Express Administration Guide
.
Managing Tables
2-10 Oracle Application Express SQL Workshop Guide

Table 2-1 (Cont.) Available Reports for Tables
View Description
Data Displays a report of the data in the current table. Actions you
can perform include:
•
Query - Enables you to sort by column. To restrict specific
rows, enter a condition in the Column Condition field. Use
the percent sign (%) for wildcards. From Order by, select
the columns you want to review and click Query.
•
Count Rows - Displays a report of the number of rows in
the current table.
•
Insert Row - Enables you to insert a row into the table.
•
Download - Exports all data in the table to a spreadsheet.
Click the Download link at the bottom of the page to
export all data in the selected table.
•
Edit - Click the Edit icon to edit a row.
Indexes Displays indexes associated with this table. Actions you can
perform include Create and Drop.
Model Displays a graphical representation of the selected table along
with all related tables. Related tables are those that reference
the current table in a foreign key and those tables referenced by
foreign keys within the current table.
You can position the cursor over an underlined table name to
view the relationship between that table and the current table.
Click an underlined table name to view the model of the related
table.
Constraints Displays a list of constraints for the current table. Actions you
can perform include Create, Drop, Enable, and Disable.
Grants Displays a list of grants on the current table, including the
grantee, the privilege, and grant options. Actions you can
perform in this view include Grant and Revoke.
Statistics Displays collected statistics about the current table, including
the number of rows and blocks, the average row length, sample
size, when the data was last analyzed, and the compression
status (enabled or disabled). Click Analyze to access the
Analyze Table Wizard.
UI Defaults Displays user interface defaults for forms and reports. User
interface defaults enable developers to assign default user
interface properties to a table, column, or view within a
specified schema.
Click Edit to edit defined user interface defaults. Click Create
Defaults to initialize user interface defaults for tables that do
not currently have user interface defaults defined.
Triggers Displays a list of triggers associated with the current table.
Actions you can perform include Create, Drop, Enable, and
Disable.
To view trigger details, click the trigger name.
Dependencies Displays report showing objects referenced by this table, objects
this table references, and synonyms for this table.
Managing Tables
Managing Database Objects with Object Browser 2-11

Table 2-1 (Cont.) Available Reports for Tables
View Description
SQL Displays the SQL necessary to re-create this table, including
keys, indexes, triggers and table definition.
See Also:
• "Editing a Table (page 2-12)"
• "Managing Indexes (page 2-18)"
• "Managing User Interface Defaults (page 4-30)"
• "Managing Triggers (page 2-38)"
2.7.4 Editing a Table
Click the appropriate buttons on a table in Object Browser to edit a table.
While viewing a table description, you can edit it by clicking the buttons above the
table description.
To edit a table:
1. On the Workspace home page, click SQL Workshop and then Object Browser.
Object Browser appears.
2. From the Object list, ensure Tables is selected.
3. From the Object Selection pane, select a table.
The table description appears.
4. Click the appropriate button described in Table 2-2 (page 2-12).
Table 2-2 Edit Table Buttons
Button Description
Add Column Adds a column to the table. Enter a column name and select
a type. Depending upon the column type, specify whether
the column requires a value, the column length, precision,
and scale.
Modify Column Modifies the selected column. For Oracle Database 11g
Release 2 (11.2.0.4) and later, a Data Redaction region may be
shown if the current schema selected has been granted
execute on DBMS_REDACT.
Rename Column Renames the selected column.
Drop Column Drops the selected column.
Rename Renames the selected table.
Managing Tables
2-12 Oracle Application Express SQL Workshop Guide

Table 2-2 (Cont.) Edit Table Buttons
Button Description
Copy Copies the selected table.
Drop Drops the selected table.
Truncate Removes all rows from the selected table. Truncating a table
can be more efficient than dropping and re-creating a table.
Dropping and re-creating a table may invalidate dependent
objects, requiring you to regrant object privileges or re-create
indexes, integrity constraints, and triggers.
Create Lookup Table Creates a lookup table based on the column you select. That
column becomes a foreign key to the lookup table.
See Also:
"Using the Recycle Bin (page 4-40)"
2.7.5 Dropping a Table
Drop a table using Object Browser.
To drop a table:
1. On the Workspace home page, click SQL Workshop and then Object Browser.
Object Browser appears.
2. From the Object list, ensure Tables is selected.
3. From the Object Selection pane, select a table.
The table description appears.
4. Click Drop.
5. To confirm, click Finish.
See Also:
"Using the Recycle Bin (page 4-40)"
2.8 Managing Views
A view is a logical representation of another table or combination of tables. You can
create, browse, edit, download, compile, drop a view and view reports.
A view does not contain or store data but derives its data from the views or tables on
which it is based. These tables are called base tables. All operations performed on a
view affect the base table of the view. In order to be updatable, a view cannot contain
any of the following constructs: SET or DISTINCT, operators, aggregate or analytic
functions, GROUP BY, ORDER BY, CONNECT BY, START WITH clause, subquery, or
collection expression in a SELECT list.
Managing Views
Managing Database Objects with Object Browser 2-13

For an example where using a view might be preferable to a table, consider the
HR.EMPLOYEES table which has several columns and numerous rows. To allow users
to see only five of these columns or only specific rows, a view is created as follows:
CREATE VIEW staff AS
SELECT employee_id, last_name, job_id, manager_id, department_id
FROM employees
Creating a View (page 2-14)
Create a view using Object Browser.
Browsing a View (page 2-15)
Select a view from the Object Selection pane and view different reports
about the view.
Reports for Views (page 2-15)
Alternative views available when browsing a view in Object Browser.
Editing a View Manually (page 2-16)
When you edit a view you can edit the code manually, perform a search
and replace, and compile the view.
Using Find and Replace (page 2-17)
Select a view from the Object Selection pane and click Find or Replace.
Downloading a View (page 2-17)
Select a view from the Object Selection pane and download a view by
clicking Download Source.
Compiling a View (page 2-17)
If you edit and make changes to a view, you must compile to save your
changes.
Dropping a View (page 2-18)
Select a view from the Object Selection pane, select the View or Code tab,
and click Drop.
See Also:
Oracle Database Administrator’s Guide
2.8.1 Creating a View
Create a view using Object Browser.
To create a view:
1.
On the Workspace home page, click SQL Workshop and then Object Browser.
Object Browser appears.
2.
Click the Create icon.
3.
From the list of object types, select View.
4.
Define the view:
• View Name - Enter a name for the View.
Managing Views
2-14 Oracle Application Express SQL Workshop Guide

• Query - Enter a query to define the view.
Tip:
To access Query Builder or SQL Commands, click the appropriate button at
the bottom of the page. The selected tool displays in a pop-up window. Once
you create the appropriate SQL, click Return to automatically close the popup
window and return to the wizard with the SQL.
5. Click Next.
A confirmation page appears, which displays the SQL used to create the view.
6.
Click Create View.
See Also:
• "Using Query Builder (page 4-18)"
• " Using SQL Commands (page 3-1)"
2.8.2 Browsing a View
Select a view from the Object Selection pane and view different reports about the view.
When you access a view in Object Browser, the Detail pane displays a report listing
the columns in that view.
To browse a view:
1. On the Workspace home page, click SQL Workshop and then Object Browser.
Object Browser appears.
2. From the Object list, select Views.
3. From the Object Selection pane, select a view.
The view definition appears displaying the appropriate columns.
4. Click the tabs at the top of the page to view different reports about the view.
See Also:
"Reports for Views (page 2-15)"
2.8.3 Reports for Views
Alternative views available when browsing a view in Object Browser.
Table 2-3 (page 2-16) describes all available reports for views.
Managing Views
Managing Database Objects with Object Browser 2-15

Table 2-3 Available Reports for Views
View Description
View (Default) Displays the columns in the current view. Actions you can perform
include:
• Compile
• Drop
Code Displays the code editor.
Data Displays a report of the data in the columns in the view. Actions you can
perform include:
•
Query - Enables you to sort by column. To restrict specific rows, enter a
condition in the Column Condition field. Use the percent sign (%) for
wildcards. From Order by, select the columns you want to review and
click Query.
•
Count Rows - Enables you to count rows in the table.
•
Insert Row - Enables you to insert a row into the table.
Grants Displays a list of grants associated with the columns in the view. Grant details
include grantee, privilege, and grant options. Actions you can perform
include Grant and Revoke.
UI Defaults Displays user interface defaults for forms and reports. User interface defaults
enable developers to assign default user interface properties to a table,
column, or view within a specified schema.
Click Edit to edit existing user interface defaults. Click Create Defaults to
initialize user interface defaults for views that do not currently have user
interface defaults defined.
Dependencie
s
Displays a report showing objects referenced by this view, objects this view
references, and synonyms for this view.
SQL Displays the SQL necessary to re-create this view.
See Also:
• "Editing a View Manually (page 2-16)"
• "Compiling a View (page 2-17)"
• "Dropping a View (page 2-18)"
• "Managing User Interface Defaults (page 4-30)"
2.8.4 Editing a View Manually
When you edit a view you can edit the code manually, perform a search and replace,
and compile the view.
You can save the view as a file or drop it.
To edit a view manually:
1.
On the Workspace home page, click SQL Workshop and then Object Browser.
Object Browser appears.
Managing Views
2-16 Oracle Application Express SQL Workshop Guide

2. From the Object list, select Views.
3. From the Object Selection pane, select a view.
4. Select the Code tab.
The code editor appears.
If you edit and make changes to a view, you must compile.
See Also:
"Compiling a View (page 2-17)."
2.8.5 Using Find and Replace
Select a view from the Object Selection pane and click Find or Replace.
To use Find and Replace:
1.
On the Workspace home page, click SQL Workshop and then Object Browser.
Object Browser appears.
2. From the Object list, select Views.
3. From the Object Selection pane, select a view.
4. To perform a basic search, click the Find icon (which resembles a magnifying
glass).
5. To replace existing code, click the Replace icon (which resembles a two-sided
arrow).
2.8.6 Downloading a View
Select a view from the Object Selection pane and download a view by clicking
Download Source.
To save the current view as a file:
1. On the Workspace home page, click SQL Workshop and then Object Browser.
Object Browser appears.
2. From the Object list, select Views.
3.
From the Object Selection pane, select a view.
4.
Select the Code tab.
The code editor appears.
5.
Click Download Source.
2.8.7 Compiling a View
If you edit and make changes to a view, you must compile to save your changes.
There is no save function since this is just a view of the object within the database.
Managing Views
Managing Database Objects with Object Browser 2-17

To re-create the current view:
1. On the Workspace home page, click SQL Workshop and then Object Browser.
Object Browser appears.
2. From the Object list, select Views.
3. From the Object Selection pane, select a view.
4. Select the Code tab.
The code editor appears.
5.
Click Save & Compile.
2.8.8 Dropping a View
Select a view from the Object Selection pane, select the View or Code tab, and click
Drop.
To drop a view:
1.
On the Workspace home page, click SQL Workshop and then Object Browser.
Object Browser appears.
2.
From the Object list, select Views.
3.
From the Object Selection pane, select a view.
4.
Select the View tab or the Code tab.
5.
Click Drop.
6.
To confirm, click Finish.
2.9 Managing Indexes
An index is an optional structure associated with tables and clusters. You can create,
browse, drop an index and view reports.
You can create indexes on one or more columns of a table to speed access to data on
those columns.
When you view an index in Object Browser, the Detail pane displays a report
containing the index name, index type, table owner, table name, table type,
uniqueness, compression, prefix length, tablespace name, status, last analyzed and a
listing of the indexed columns.
Creating an Index (page 2-19)
Create an index using Object Browser.
Browsing an Index (page 2-19)
Select an index from the Object Selection pane and view different reports
about the an index.
Reports for Indexes (page 2-19)
Alternative views available when browsing an index in Object Browser.
Dropping an Index (page 2-20)
Select an index from the Object Selection pane and click Drop.
Managing Indexes
2-18 Oracle Application Express SQL Workshop Guide

2.9.1 Creating an Index
Create an index using Object Browser.
To create an index:
1. On the Workspace home page, click SQL Workshop and then Object Browser.
Object Browser appears.
2. Click the Create icon.
3.
From the list of object types, select Index.
4.
Select a table and select the type of index you want to create. Available index types
include:
•
Normal - Indexes one or more scalar typed object attributes of a table
•
Text - Creates a text index (Oracle Text)
5.
Click Next.
6. Create the index definition. Specify an index name, select one or more columns to
be indexed, and click Next.
A confirmation page appears, which displays the SQL used to create the index.
7. To confirm, click Create Index.
2.9.2 Browsing an Index
Select an index from the Object Selection pane and view different reports about the an
index.
To browse an index:
1. On the Workspace home page, click SQL Workshop and then Object Browser.
Object Browser appears.
2. From the Object list, select Indexes.
3. From the Object Selection pane, select an index.
The index appears displaying the index name, index type, table owner, table name,
table type, uniqueness, compression, prefix length, tablespace name, status, last
analyzed and a listing of the indexed columns.
4.
Click the tabs at the top of the page to view different reports about the index.
2.9.3 Reports for Indexes
Alternative views available when browsing an index in Object Browser.
Table 2-4 (page 2-20) describes all available reports for indexes.
Managing Indexes
Managing Database Objects with Object Browser 2-19

Table 2-4 Available Reports for Indexes
View Description
Object Details Displays the index name, index type, table owner, table name,
table type, uniqueness, compression, prefix length, tablespace
name, status, last analyzed and also a listing of the indexed
columns. Actions you can perform while viewing Object Details
include:
• Disable - Disables the current index
• Drop - Drops the current index
• Rebuild - Rebuilds the current index
Statistics Displays collected statistics about the current view, including
the number of rows, sample size, when the data was last
analyzed, and the compression status (enabled or disabled).
Click Analyze to refresh the displayed statistics.
SQL Displays the SQL necessary to re-create this index.
2.9.4 Dropping an Index
Select an index from the Object Selection pane and click Drop.
To drop an index:
1. On the Workspace home page, click SQL Workshop and then Object Browser.
Object Browser appears.
2. From the Object list, select Indexes.
3. From the Object Selection pane, select an index.
4. Under Object Details, click Drop.
5. To confirm, click Finish.
2.10 Managing Sequences
A sequence generates a serial list of unique numbers for numeric columns of a
database table. You can create, browse, drop, alter a sequence and view a report.
Database sequences are generally used to populate table primary keys.
Creating a Sequence (page 2-21)
Create a sequence using Object Browser.
Browsing a Sequence (page 2-21)
Select a sequence from the Object Selection pane and view different
reports about the sequence.
Reports for Sequences (page 2-22)
Alternative views available when browsing a sequence in Object
Browser.
Dropping a Sequence (page 2-22)
Select a sequence from the Object Selection pane and click Drop.
Managing Sequences
2-20 Oracle Application Express SQL Workshop Guide

Altering a Sequence (page 2-22)
Select a sequence from the Object Selection pane and click Alter.
2.10.1 Creating a Sequence
Create a sequence using Object Browser.
To create a sequence:
1. On the Workspace home page, click SQL Workshop and then Object Browser.
Object Browser appears.
2.
Click the Create icon.
3.
From the list of object types, select Sequence.
4.
For Define:
a.
Sequence Name - Enter the name of the sequence.
b.
Preserve Case - To have the final sequence name match the case entered in the
Sequence Name field, click Preserve Case.
c. Start With - Enter the number of the first sequence. The first reference to
sequence_name.nextval returns this number.
d. Minimum Value - Enter the minimum value this sequence can return.
e. Maximum Value - Enter the maximum value this sequence can return.
f. Increment By - Each call to sequence_name.nextval returns a value
greater than the last, until the maximum value is reached. Enter the value used
to increment to the next sequence number.
g. Cycle - Select this option to restart the sequence number to the minimum value
when the maximum value is reached. Note that this is not recommended if
using the sequence for primary key creation.
h. Number to Cache - For faster access, specify how many sequence values are
stored in memory.
i. Order - Specify ORDER to guarantee that sequence numbers are generated in
order of request. This option is necessary if using Real Application Clusters
(Oracle RAC).
5. Click Next.
A confirmation page appears, which displays the SQL used to create the sequence.
6.
Click Create Sequence.
2.10.2 Browsing a Sequence
Select a sequence from the Object Selection pane and view different reports about the
sequence.
To browse a sequence:
1.
On the Workspace home page, click SQL Workshop and then Object Browser.
Managing Sequences
Managing Database Objects with Object Browser 2-21

Object Browser appears.
2. From the Object list, select Sequences.
3. From the Object Selection pane, select a sequence.
The Object Details view appears.
4. Click the tabs at the top of the page to view different reports about the sequence.
2.10.3 Reports for Sequences
Alternative views available when browsing a sequence in Object Browser.
Table 2-5 (page 2-22) describes all available reports for sequences.
Table 2-5 Available Reports for Sequences
View Description
Object Details Displays details about the current sequence. You can perform
Alter and Drop in this view.
Grants Displays a list of grants associated with the sequence. Grant
details include grantee, privilege, and grant options. You can
perform Grant and Revoke in this view.
Dependencies Displays a list of objects that use (or depend) upon this
sequence.
SQL Displays the SQL necessary to re-create this sequence.
2.10.4 Dropping a Sequence
Select a sequence from the Object Selection pane and click Drop.
To drop a sequence:
1. On the Workspace home page, click SQL Workshop and then Object Browser.
Object Browser appears.
2. From the Object list, select Sequences.
3. From the Object Selection pane, select a sequence.
The Object Details view appears.
4.
Click Drop.
2.10.5 Altering a Sequence
Select a sequence from the Object Selection pane and click Alter.
To alter a sequence
1.
On the Workspace home page, click SQL Workshop and then Object Browser.
Object Browser appears.
2.
From the Object list, select Sequences.
Managing Sequences
2-22 Oracle Application Express SQL Workshop Guide

3. From the Object Selection pane, select a sequence.
The Object Details view appears.
4. Click Alter.
2.11 Managing Types
A type is a user-specified object or collection definition. You can create, browse, drop a
type and view a report.
Oracle Application Express currently only supports collection definitions. There are
two categories of Oracle collections (SQL collections):
• Variable-length arrays (VARRAY types)
• Nested tables (TABLE types)
VARRAY types are used for one-dimensional arrays, while nested table types are used
for single-column tables within an outer table.
Creating a Type (page 2-23)
Create a type using Object Browser.
Browsing a Type (page 2-24)
Select a type from the Object Selection pane and view different reports
for the type.
Reports for Types (page 2-24)
Alternative views available when viewing a type in Object Browser.
Dropping a Type (page 2-24)
Select a type from the Object Selection pane and click Drop.
See Also:
• "Oracle Database Concepts"
• "Oracle Database PL/SQL Language Reference" and for information about
collection types
2.11.1 Creating a Type
Create a type using Object Browser.
To create a collection type:
1.
On the Workspace home page, click SQL Workshop and then Object Browser.
Object Browser appears.
2.
Click the Create icon.
3.
For Name:
a.
Type Name - Enter the name of the type to be created.
b.
Preserve Case - To have the type name match the case entered in the Type
Name field, click Preserve Case.
Managing Types
Managing Database Objects with Object Browser 2-23

c. Type to Create - Specify the kind of type to create.
d. Click Next.
4. Follow the on-screen instructions.
A confirmation page appears, which displays the SQL used to create the type.
5. Click Create Type.
2.11.2 Browsing a Type
Select a type from the Object Selection pane and view different reports for the type.
To browse a collection type:
1.
On the Workspace home page, click SQL Workshop and then Object Browser.
Object Browser appears.
2.
From the Object list, select Types.
3.
From the Object Selection pane, select a type.
The Object Details view appears.
4. Click the tabs at the top of the page to view different reports for the type.
2.11.3 Reports for Types
Alternative views available when viewing a type in Object Browser.
Table 2-6 (page 2-24) describes all available reports for types.
Table 2-6 Available Reports for Types
View Description
Object Details Displays details about the selected type. To drop a type, click
Drop.
Synonyms Displays a list of synonyms for the current type.
Grants Displays a list of grants associated with the type. Grant details
include grantee, privilege, and grant options. You can perform
Grant and Revoke actions.
SQL Displays the SQL necessary to re-create this type.
2.11.4 Dropping a Type
Select a type from the Object Selection pane and click Drop.
To drop a collection type:
1.
On the Workspace home page, click SQL Workshop and then Object Browser.
Object Browser appears.
2.
From the Object list, select Types.
Managing Types
2-24 Oracle Application Express SQL Workshop Guide

3. From the Object Selection pane, select a type.
The Object Details view appears.
4. Click Drop.
5. To confirm, click Finish.
2.12 Managing Packages
A package is a database object that groups logically related PL/SQL types, items,
functions and procedures. You can create, view, edit, compile, drop, download a
package, and view a report.
Packages usually have two parts, a specification and a body. The specification is the
interface to your application. The body implements the specification.
Creating a Package (page 2-26)
Create a package using Object Browser. Select the type of package you
want to create.
Viewing a Package (page 2-27)
Select a package from the Object Selection pane and view different
reports about the package.
Reports for Packages (page 2-27)
Alternative views available when viewing a package in Object Browser.
Editing a Package Manually (page 2-28)
Select a package from the Object Selection pane and click Find or
Replace.
Compiling a Package (page 2-28)
If you edit and make changes to a view, you must compile to save your
changes.
Downloading a Package (page 2-28)
Select a package from the Object Selection pane and download a package
by clicking Download Source to save the current package as a file.
Dropping a Package While Viewing Specification (page 2-29)
Select a package from the Object Selection pane and click Drop.
Dropping a Package While Viewing the Body (page 2-29)
Select a package from the Object Selection pane, click Body tab, and click
Drop.
See Also:
• "Using PL/SQL Packages " in Oracle Database PL/SQL Language Reference
for additional information on PL/SQL packages.
• "Using PL/SQL Subprograms" in Oracle Database PL/SQL Language
Reference for information on PL/SQL subprograms
Managing Packages
Managing Database Objects with Object Browser 2-25

2.12.1 Creating a Package
Create a package using Object Browser. Select the type of package you want to create.
To create a package:
1. On the Workspace home page, click SQL Workshop and then Object Browser.
Object Browser appears.
2. Click the Create icon.
3.
From the list of object types, select Package.
4.
For Create Package, select the type of package you want to create:
•
Specification
•
Body
•
Package with methods on database table(s)
Packages usually have two parts: Specification and Body.
5. Click Next.
6. If you select Specification:
a. Package Name - Enter a package name. To preserve the case of the name you
enter, click Preserve Case.
b. Click Next.
The wizard creates a dummy package specification and displays it for editing.
c. Edit the specification and click Create Package Specification.
7. If you select Body:
a. Package - Select the package you want to create the body for and click Next.
The wizard creates a package body with stubbed out calls identified in the
specification and displays it for editing.
b. Edit the package body and click Create Package Body.
8. If you select Package with methods on database tables:
a.
Package Name - Enter a package name. To preserve the case of the name you
enter, click Preserve Case.
b.
Select up to ten tables and click Next.
The wizard creates a specification and body with insert, update, delete, and
GET APIs for the selected tables. Note that you have the option to show or
download the specification or body.
c.
To confirm, click Create Package.
Managing Packages
2-26 Oracle Application Express SQL Workshop Guide

2.12.2 Viewing a Package
Select a package from the Object Selection pane and view different reports about the
package.
When you access a package in Object Browser the specification appears.
To view a specification:
1. On the Workspace home page, click SQL Workshop and then Object Browser.
Object Browser appears.
2.
From the Object list, select Packages.
3.
From the Object Selection pane, select a package.
The Specification appears. You can also edit the code in this view.
4.
Click the tabs at the top of the page to view different reports about the package.
2.12.3 Reports for Packages
Alternative views available when viewing a package in Object Browser.
Table 2-7 (page 2-27) describes all available reports for packages.
Table 2-7 Available Reports for Packages
View Description
Specification Displays the package specification. This defines the interface to
your application. Actions you can perform include:
• Edit the code manually
•
Save & Compile
•
Find
•
Replace
•
Auto Complete
•
Undo
•
Redo
•
Download Source
•
Drop
Body Displays the package body, if one exists, for the selected
package. Actions you can perform include:
• Edit the code manually
•
Save & Compile
•
Find
•
Replace
•
Auto Complete
•
Undo
•
Redo
•
Download Source
•
Drop
Dependencies Displays objects that use (or depend on) on the current package
and objects the package depends on.
Managing Packages
Managing Database Objects with Object Browser 2-27

Table 2-7 (Cont.) Available Reports for Packages
View Description
Errors Displays errors related to the current package.
Grants Lists details of grants for the current package, including
privilege, grantee, grantable, grantor, and object name.
2.12.4 Editing a Package Manually
Select a package from the Object Selection pane and click Find or Replace.
When you edit a package, you can edit the code manually, perform a search and
replace, and compile the package.
1.
On the Workspace home page, click SQL Workshop and then Object Browser.
Object Browser appears.
2.
From the Object list, select Packages.
3.
From the Object Selection pane, select a package.
The Specification appears. You can edit the code in this view.
4.
To perform a basic search, click the Find icon (which resembles a magnifying
glass).
5.
To replace existing code, click the Replace icon (which resembles a two-sided
arrow).
2.12.5 Compiling a Package
If you edit and make changes to a view, you must compile to save your changes.
There is no save function because this is just a view of the object within the database.
To compile a package:
1.
On the Workspace home page, click SQL Workshop and then Object Browser.
Object Browser appears.
2.
From the Object list, select Packages.
3.
From the Object Selection pane, select a package.
The Specification appears.
4.
Click Save & Compile to compile the current package.
Compiling re-creates the object in the database. If the compilation fails, an error
message displays above the code.
2.12.6 Downloading a Package
Select a package from the Object Selection pane and download a package by clicking
Download Source to save the current package as a file.
To download a package:
Managing Packages
2-28 Oracle Application Express SQL Workshop Guide

1. On the Workspace home page, click SQL Workshop and then Object Browser.
Object Browser appears.
2. From the Object list, select Packages.
3. From the Object Selection pane, select a package.
The Specification appears.
4. Click Download Source to save the current package as a file.
2.12.7 Dropping a Package While Viewing Specification
Select a package from the Object Selection pane and click Drop.
To drop a package while viewing the Specification:
1.
On the Workspace home page, click SQL Workshop and then Object Browser.
Object Browser appears.
2.
From the Object list, select Packages.
3. From the Object Selection pane, select a package.
The Specification appears.
4. Click Drop.
5. To confirm, click Finish.
2.12.8 Dropping a Package While Viewing the Body
Select a package from the Object Selection pane, click Body tab, and click Drop.
To drop a package while viewing the Body:
1. On the Workspace home page, click SQL Workshop and then Object Browser.
Object Browser appears.
2. From the Object list, select Packages.
3. From the Object Selection pane, select a package.
The Specification appears.
4.
Click the Body tab.
5.
Click Drop.
6.
To confirm, click Finish.
2.13 Managing Procedures
A procedure is a subprogram that performs a specific action. You can use Object
Browser to view, create, edit, download, and drop procedures.
Creating a Procedure (page 2-30)
Create procedure using Object Browser.
Managing Procedures
Managing Database Objects with Object Browser 2-29

Browsing a Procedure (page 2-31)
Select a procedure from the Object Selection pane and view different
reports about the procedure.
Reports for Procedures (page 2-31)
Alternative views available when viewing a procedure in Object
Browser.
Editing a Procedure (page 2-32)
When you edit a procedure you can edit the code manually or perform a
search and replace.
Compiling a Procedure (page 2-33)
If you edit and make changes to a view, you must compile to save your
changes.
Downloading a Procedure (page 2-33)
Select a procedure from the Object Selection pane and click Download
Source to save the current procedure as a file.
Dropping a Procedure (page 2-33)
Select a procedure from the Object Selection pane and click Drop.
See Also:
"Oracle Database PL/SQL Language Reference"
2.13.1 Creating a Procedure
Create procedure using Object Browser.
To create a procedure:
1. On the Workspace home page, click SQL Workshop and then Object Browser.
Object Browser appears.
2. Click the Create icon.
3. From the list of object types, select Procedure.
4. For Name:
a. Procedure Name - Enter the name of the procedure.
Note:
Object names must conform to Oracle naming conventions and cannot contain
spaces, or start with a number or underscore.
b.
Specify whether to Include Arguments or Preserve Case.
c.
Click Next.
5.
For Arguments, define the arguments by specifying the following information
(optional):
Managing Procedures
2-30 Oracle Application Express SQL Workshop Guide

• Argument Name
• In/Out (the parameter mode)
• Argument Type (datatype)
• Default (value)
• Move
To add additional arguments, click Add Argument.
6. Click Next.
7.
For Define, enter PL/SQL block you want to use as the procedure body and click
Next.
A confirmation page appears.
8.
Click Create Procedure.
2.13.2 Browsing a Procedure
Select a procedure from the Object Selection pane and view different reports about the
procedure.
To browse a procedure:
1. On the Workspace home page, click SQL Workshop and then Object Browser.
Object Browser appears.
2. From the Object list, select Procedures.
3. From the Object Selection pane, select a procedure.
The Code view appears, displaying the source code for the procedure. You can edit
the code in this view.
4. Click the tabs at the top of the page to view different reports about the procedure.
2.13.3 Reports for Procedures
Alternative views available when viewing a procedure in Object Browser.
Table 2-8 (page 2-32) describes all available reports for procedures.
Managing Procedures
Managing Database Objects with Object Browser 2-31

Table 2-8 Available Views for Procedures
View Description
Code (Default) Displays the source code for the procedure. You can
edit the code in this view. Actions you can perform in this view
include:
• Edit the code manually
•
Save & Compile
•
Download Source
•
Drop
•
Undo
•
Redo
•
Find
•
Replace
•
Auto Complete
Dependencies Displays objects that use (or depend) on the current procedure
and objects the procedure depends on.
Errors Lists errors related to the current procedure.
Grants Lists details of grants for the current procedure, including
privilege, grantee, grantable, grantor, and object name.
See Also:
• "Editing a Procedure (page 2-32)"
• "Compiling a Procedure (page 2-33)"
• "Downloading a Procedure (page 2-33)"
• "Dropping a Procedure (page 2-33)"
2.13.4 Editing a Procedure
When you edit a procedure you can edit the code manually or perform a search and
replace.
Editing a Procedure Manually (page 2-32)
Select a procedure from the Object Selection pane and click Find or
Replace.
2.13.4.1 Editing a Procedure Manually
Select a procedure from the Object Selection pane and click Find or Replace.
To edit a procedure manually:
1.
On the Workspace home page, click SQL Workshop and then Object Browser.
Object Browser appears.
2.
From the Object list, select Procedures.
Managing Procedures
2-32 Oracle Application Express SQL Workshop Guide

3. From the Object Selection pane, select a procedure.
The Code view appears. You can edit the code in this view.
4. To perform a basic search, click the Find icon (which resembles a magnifying
glass).
5. To replace existing code, click the Replace icon (which resembles a two-sided
arrow).
2.13.5 Compiling a Procedure
If you edit and make changes to a view, you must compile to save your changes.
There is no save function because this is just a view of the object within the database.
To compile a procedure:
1.
On the Workspace home page, click SQL Workshop and then Object Browser.
Object Browser appears.
2.
From the Object list, select Procedures.
3. From the Object Selection pane, select a procedure.
4. Click Save & Compile to compile the current procedure.
Compiling re-creates the object in the database. If the compilation fails, an error
message displays above the code.
2.13.6 Downloading a Procedure
Select a procedure from the Object Selection pane and click Download Source to save
the current procedure as a file.
To download a procedure:
1. On the Workspace home page, click SQL Workshop and then Object Browser.
Object Browser appears.
2. From the Object list, select Procedures.
3. From the Object Selection pane, select a procedure.
4. Click Download Source to save the current procedure as a file.
2.13.7 Dropping a Procedure
Select a procedure from the Object Selection pane and click Drop.
To drop a procedure:
1.
On the Workspace home page, click SQL Workshop and then Object Browser.
Object Browser appears.
2.
From the Object list, select Procedures.
3.
From the Object Selection pane, select a procedure.
Managing Procedures
Managing Database Objects with Object Browser 2-33

4. Click Drop.
5. To confirm, click Finish.
2.14 Managing Functions
A function is a subprogram that can take parameters and return a single value. You
can use Object Browser to create, browse, edit, compile, download, drop functions and
view report.
Creating a Function (page 2-34)
Create a function using Object Browser.
Browsing a Function (page 2-35)
Select a function from the Object Selection pane and view different
reports about the function.
Reports for Functions (page 2-35)
Alternative views available when browsing a function in Object
Browser.
Editing a Function Manually (page 2-36)
Select a function from the Object Selection pane and click Edit.
Compiling a Function (page 2-37)
Select a function from the Object Selection pane click Save & Compile.
Downloading a Function (page 2-37)
Select a function from the Object Selection pane click Download Source
to save the current function as a file.
Dropping a Function (page 2-37)
Select a function from the Object Selection pane and click Drop.
See Also:
• "Oracle Database SQL Language Reference" for information about PL/SQL
functions
• "Oracle Database PL/SQL Language Reference"
2.14.1 Creating a Function
Create a function using Object Browser.
To create a function:
1.
On the Workspace home page, click SQL Workshop and then Object Browser.
Object Browser appears.
2.
Click the Create icon.
3.
From the list of object types, select Function.
4.
For Name:
a.
Function Name - Enter the name of the function.
Managing Functions
2-34 Oracle Application Express SQL Workshop Guide

Note:
Object names must conform to Oracle naming conventions and cannot contain
spaces, or start with a number or underscore.
b. Return Data Type - Select a data type.
c. Specify whether to Include Arguments or Preserve Case.
d. Click Next.
5.
For Arguments, define the arguments by specifying the following information
(optional):
•
Argument Name
•
Argument Type (datatype)
•
Default (value)
•
Move
To add additional arguments, click Add Argument.
6. Click Next.
7. For Function Body, enter PL/SQL block you want to use and click Next.
A confirmation page appears.
8. Click Create Function.
2.14.2 Browsing a Function
Select a function from the Object Selection pane and view different reports about the
function.
To view a function in Object Browser:
1. On the Workspace home page, click SQL Workshop and then Object Browser.
Object Browser appears.
2. From the Object list, select Functions.
3. From the Object Selection pane, select a function.
The Code view appears. You can edit the code in this view.
4.
Click the tabs at the top of the page to view different reports about the function.
See Also:
"Reports for Functions (page 2-35)"
2.14.3 Reports for Functions
Alternative views available when browsing a function in Object Browser.
Managing Functions
Managing Database Objects with Object Browser 2-35

Table 2-9 (page 2-36) describes all available reports for functions.
Table 2-9 Available Reports for Functions
View Description
Code (Default) Displays the source code for the function. You can
edit the code in this view. Actions you can perform in this view
include:
• Edit the code manually
•
Save & Compile
•
Find
•
Replace
•
Auto Complete
•
Undo
•
Redo
•
Download Source
•
Drop
Dependencies Displays objects that use (or depend) on the current function
and objects the function depends on.
Errors Displays errors related to the current function.
Grants Lists details of grants for the current function, including
privilege, grantee, grantable, grantor, and object name.
See Also:
• "Editing a Function Manually (page 2-36)"
• "Compiling a Function (page 2-37)"
• "Downloading a Function (page 2-37)"
• "Dropping a Function (page 2-37)"
2.14.4 Editing a Function Manually
Select a function from the Object Selection pane and click Edit.
When you edit a function you can edit the code manually, perform a search and
replace, and compile the function.
1.
On the Workspace home page, click SQL Workshop and then Object Browser.
Object Browser appears.
2.
From the Object list, select Functions.
3.
From the Object Selection pane, select a function.
The Code view appears. You can edit the code in this view.
4.
Click Edit to activate manual edit mode.
5.
To perform a basic search, click the Find icon (which resembles a magnifying
glass).
Managing Functions
2-36 Oracle Application Express SQL Workshop Guide

6. To replace existing code, click the Replace icon (which resembles a two-sided
arrow).
2.14.5 Compiling a Function
Select a function from the Object Selection pane click Save & Compile.
If you edit and make changes to a function, you must compile to save your changes.
There is no save function because this is just a view of the object within the database.
To compile a function in Object Browser:
1.
On the Workspace home page, click SQL Workshop and then Object Browser.
Object Browser appears.
2.
From the Object list, select Functions.
3.
From the Object Selection pane, select a function.
The Code view appears.
4.
Click Save & Compile to compile the current function.
Compiling re-creates the object in the database. If the compilation fails, an error
message displays above the code.
2.14.6 Downloading a Function
Select a function from the Object Selection pane click Download Source to save the
current function as a file.
To save a function to a file in Object Browser:
1. On the Workspace home page, click SQL Workshop and then Object Browser.
Object Browser appears.
2. From the Object list, select Functions.
3. From the Object Selection pane, select a function.
The Code view appears.
4. Click Download Source to save the current function as a file.
2.14.7 Dropping a Function
Select a function from the Object Selection pane and click Drop.
To drop a function in Object Browser:
1.
On the Workspace home page, click SQL Workshop and then Object Browser.
Object Browser appears.
2.
From the Object list, select Functions.
3.
From the Object Selection pane, select a function.
The Code view appears.
Managing Functions
Managing Database Objects with Object Browser 2-37

4. Click Drop.
5. To confirm, click Finish.
2.15 Managing Triggers
A database trigger is a stored subprogram associated with a database table, view, or
event. You can create, browse, edit, compile, download, drop, disable or enable a
trigger and view report.
The trigger can be called once, for example when an event occurs, or many times, for
example for each row affected by an INSERT, UPDATE, or DELETE statement.
Creating Triggers (page 2-38)
Create a trigger using Object Browser.
Browsing a Trigger (page 2-39)
Select a trigger from the Object Selection pane and view different reports
about the trigger.
Reports for Triggers (page 2-39)
Alternative views available when viewing a trigger in Object Browser.
Editing a Trigger Manually (page 2-40)
Select a trigger from the Object Selection pane and click Code.
Compiling a Trigger (page 2-41)
Select a trigger from the Object Selection pane and click Save & Compile.
Downloading a Trigger (page 2-41)
Select a trigger from the Object Selection pane and click Download
Source to save the current trigger as a file.
Dropping a Trigger (page 2-41)
Select a trigger from the Object Selection pane and click Drop.
Disabling and Enabling a Trigger (page 2-42)
Select a trigger from the Object Selection pane and click Disable or
Enable.
See Also:
• "Oracle Database Concepts"
• "Oracle Database Advanced Application Developer's Guide"
2.15.1 Creating Triggers
Create a trigger using Object Browser.
To create a trigger in Object Browser:
1.
On the Workspace home page, click SQL Workshop and then Object Browser.
Object Browser appears.
2.
Click the Create icon.
Managing Triggers
2-38 Oracle Application Express SQL Workshop Guide

3. From the list of object types, select Trigger.
4. Select a table name and click Next.
5. Select the appropriate trigger attributes, enter the trigger body, and click Next.
A confirmation page appears, which displays the SQL used to create the trigger.
6. Click Create Trigger.
2.15.2 Browsing a Trigger
Select a trigger from the Object Selection pane and view different reports about the
trigger.
To browse a trigger in Object Browser:
1.
On the Workspace home page, click SQL Workshop and then Object Browser.
Object Browser appears.
2.
From the Object list, select Triggers.
3. From the Object Selection pane, select a trigger.
The Object Details view appears.
4. Click the tabs at the top of the page to view different reports about the trigger.
See Also:
"Reports for Triggers (page 2-39)"
2.15.3 Reports for Triggers
Alternative views available when viewing a trigger in Object Browser.
Table 2-10 (page 2-39) describes all available reports for triggers.
Table 2-10 Available Reports for Triggers
View Description
Object Details (Default) Lists of the details about the current trigger. Actions
you can perform include:
•
Compile
•
Download
•
Drop
•
Disable
Managing Triggers
Managing Database Objects with Object Browser 2-39

Table 2-10 (Cont.) Available Reports for Triggers
View Description
Code Displays the source code for the trigger. You can edit the code
in this view. Actions you can perform in this view include:
• Edit the code manually
•
Save & Compile
•
Find
•
Replace
•
Auto Complete
•
Undo
•
Redo
•
Download Source
•
Drop
Errors Displays errors related to the current trigger.
SQL Displays the SQL necessary to re-create the trigger.
See Also:
• "Editing a Trigger Manually (page 2-40)"
• "Compiling a Trigger (page 2-41)"
• "Downloading a Trigger (page 2-41)"
• "Dropping a Trigger (page 2-41)"
2.15.4 Editing a Trigger Manually
Select a trigger from the Object Selection pane and click Code.
1.
On the Workspace home page, click SQL Workshop and then Object Browser.
Object Browser appears.
2.
From the Object list, select Triggers.
3.
From the Object Selection pane, select a trigger.
The Object Details view appears.
4.
Click Code tab.
5.
You can edit the code in this view. Other edit controls include:
• Find
• Replace
• Auto Complete
When you edit a trigger you can edit the code manually, perform a search and replace,
and compile the trigger.
Managing Triggers
2-40 Oracle Application Express SQL Workshop Guide

2.15.5 Compiling a Trigger
Select a trigger from the Object Selection pane and click Save & Compile.
If you edit and make changes to a function, you must compile to save your changes.
There is no save function because this is just a view of the object within the database.
Compiling re-creates the object in the database.
To compile a trigger in Object Browser:
1. On the Workspace home page, click SQL Workshop and then Object Browser.
Object Browser appears.
2.
From the Object list, select Triggers.
3.
From the Object Selection pane, select a trigger.
The Details view appears.
4.
To compile the current trigger:
•
Under Object Details, click Compile.
• Under Code, click Save & Compile.
If the compilation fails, an error message displays above the code.
2.15.6 Downloading a Trigger
Select a trigger from the Object Selection pane and click Download Source to save the
current trigger as a file.
To save the current trigger as a file:
1. On the Workspace home page, click SQL Workshop and then Object Browser.
Object Browser appears.
2. From the Object list, select Triggers.
3. From the Object Selection pane, select a trigger.
The Details view appears.
4. Click Download Source to save the current trigger as a file.
5.
To download the current trigger:
• Under Object Details, click Download.
• Under Code, click Download Source.
If the compilation fails, an error message displays above the code.
2.15.7 Dropping a Trigger
Select a trigger from the Object Selection pane and click Drop.
To drop a trigger in Object Browser:
Managing Triggers
Managing Database Objects with Object Browser 2-41

1. On the Workspace home page, click SQL Workshop and then Object Browser.
Object Browser appears.
2. From the Object list, select Triggers.
3. From the Object Selection pane, select a trigger.
The Details view appears.
4. Click Drop.
2.15.8 Disabling and Enabling a Trigger
Select a trigger from the Object Selection pane and click Disable or Enable.
To disable and enable a trigger in Object Browser:
1.
On the Workspace home page, click SQL Workshop and then Object Browser.
Object Browser appears.
2.
From the Object list, select Triggers.
3. From the Object Selection pane, select a trigger.
The Details view appears.
4. Click Disable.
Note: The Enable button is activated. If you want to enable the trigger, click
Enable.
2.16 Managing Database Links
A database link is a schema object in one database that enables you to access objects in
another database. You can create, browse, drop a database link and view report.
Once you create a database link, you can access the remote objects by appending
@dblink to the table or view name, where dblink is the name of the database link.
Creating a Database Link (page 2-42)
Create a database link using Object Browser.
Browsing a Database Link (page 2-43)
Select a database link from the Object Selection pane and view different
reports about the database link.
Reports for Database Links (page 2-43)
Alternative views available when viewing a database links in Object
Browser.
Dropping a Database Link (page 2-44)
Select a database link from the Object Selection pane and click Drop.
2.16.1 Creating a Database Link
Create a database link using Object Browser.
To create a database link:
Managing Database Links
2-42 Oracle Application Express SQL Workshop Guide

1. On the Workspace home page, click SQL Workshop and then Object Browser.
Object Browser appears.
2. Click the Create icon.
3. From the list of object types, select Database Link.
4. For Define :
a. Database Link Name - Enter the name of the database link. Database link
names must conform to Oracle naming conventions and cannot contain spaces,
or start with a number or underscore.
b.
Connect To Schema- Enter the name of the database schema on the remote
system to access.
c.
Password - Enter the password for the remote database schema.
d.
Remote Hostname or IP - Enter the hostname or IP address of the database
server you wish to access.
e.
Remote Host Port - Enter the network port number on which the Oracle Net
Listener is accepting requests. This is typically 1521.
f. Identified by - Select Service Name or SID.
If you select SID (Oracle System Identifier), enter the SID name if the remote
database is identified by a SID. If you select Service Name, enter the service
name if the remote database is identified by a service name.
5. Click Next.
6. Click Create Database Link.
2.16.2 Browsing a Database Link
Select a database link from the Object Selection pane and view different reports about
the database link.
To browse a database link:
1. On the Workspace home page, click SQL Workshop and then Object Browser.
Object Browser appears.
2. From the Object list, select Database Links.
3.
From the Object Selection pane, select a database link.
The Object Details view appears.
4.
Click the tabs at the top of the page to view different reports about the database
link.
2.16.3 Reports for Database Links
Alternative views available when viewing a database links in Object Browser.
Table 2-11 (page 2-44) describes all available reports for database links.
Managing Database Links
Managing Database Objects with Object Browser 2-43

Table 2-11 Available Reports for Database Links
View Description
Object Details (Default) Displays details about the database link. Actions you
can perform include:
•
Drop - Deletes the database link
•
Test - Tests the database link
Dependencies Displays a list of objects that use (or depend) upon this
database link.
SQL Displays the SQL necessary to re-create this database link.
2.16.4 Dropping a Database Link
Select a database link from the Object Selection pane and click Drop.
To drop a database link in Object Browser:
1.
On the Workspace home page, click SQL Workshop and then Object Browser.
Object Browser appears.
2. From the Object list, select Database Links.
3. From the Object Selection pane, select a database link.
The Object Details View appears.
4. Click Drop.
5. To confirm, click Finish.
2.17 Managing Materialized Views
A materialized view provides indirect access to table data by storing the results of a
query in a separate schema object. You can create, browse, drop a materialized view
and view report.
Unlike an ordinary view, which does not take up any storage space or contain any
data, a materialized view contains the rows resulting from a query against one or
more base tables or views. A materialized view can be stored in the same database as
its base tables or in a different database.
Materialized views are often used to improve performance, especially when storing
data locally that is sourced from tables or views using a database link. Similarly,
materialized views are often used instead of views when there are extensive
calculations or summarizations, especially on particularly large data sets. Materialized
views are refreshed at specified intervals which means the data is not always up-to-
date but queries against them are significantly faster for the examples given above.
Creating a Materialized View (page 2-45)
Create a materialized view using Object Browser.
Browsing a Materialized View (page 2-46)
Select a materialized view from the Object Selection pane and view
different reports about the materialized view.
Managing Materialized Views
2-44 Oracle Application Express SQL Workshop Guide

Reports for Materialized Views (page 2-46)
Alternative views available when viewing a materialized view in Object
Browser.
Dropping a Materialized View (page 2-47)
Select a materialized view from the Object Selection pane and click Drop.
See Also:
"Oracle Database Concepts" for information about materialized views
2.17.1 Creating a Materialized View
Create a materialized view using Object Browser.
To create a materialized view:
1.
On the Workspace home page, click SQL Workshop and then Object Browser.
Object Browser appears.
2. Click the Create icon.
3. From the list of object types, select Materialized View.
4. For Define:
a. Materialized View Name - Enter the name of the view. View names must
conform to Oracle naming conventions and cannot contain spaces, or start with
a number or underscore.
To preserve the case of the name you enter, click Preserve Case.
b. Query - Specify a query to define the view.
Tip:
To access Query Builder or SQL Commands, click the appropriate button at
the bottom of the page. The selected tool displays in a pop-up window. Once
you create the appropriate SQL, click Return to automatically close the popup
window and return to the wizard with the SQL.
c. Click Next.
A confirmation page appears, which displays the SQL used to create the
materialized view.
5.
Click Create Materialized View.
See Also:
• "Using Query Builder (page 4-18)"
• " Using SQL Commands (page 3-1)"
Managing Materialized Views
Managing Database Objects with Object Browser 2-45

2.17.2 Browsing a Materialized View
Select a materialized view from the Object Selection pane and view different reports
about the materialized view.
To view a materialized view:
1. On the Workspace home page, click SQL Workshop and then Object Browser.
Object Browser appears.
2.
From the Object list, select Materialized Views.
3.
From the Object Selection pane, select a view.
The Materialized View appears.
4.
Click the tabs at the top of the page to view different reports about the materialized
view.
2.17.3 Reports for Materialized Views
Alternative views available when viewing a materialized view in Object Browser.
Table 2-12 (page 2-46) describes all available reports for materialized views.
Table 2-12 Available Reports for Materialized Views
View Description
Materialized View (Default) Displays details about the columns in the materialized
view, including:
•
Column Name
•
Data type
•
Nullable flag
•
Default value
•
Primary key
Click Drop to delete the current materialized view.
Data Displays a report of the data in the columns. Actions you can
perform include:
•
Query - Enables you to sort by column. To restrict specific
rows, enter a condition in the Column Condition field. Use
the percent sign (%) for wildcards. From Order by, select
the columns you want to review and click Query.
•
Count Rows - Displays a report of the data in the current
table.
•
Download - Click this link to export the data as a comma-
delimited file (.csv) file.
Details Displays object details stored in DBA_SNAPSHOTS such as
updatable and status.
Grants Displays a list of grants on the current view, including grantee,
privilege, and grant options. You can perform Grant and
Revoke in this view.
Managing Materialized Views
2-46 Oracle Application Express SQL Workshop Guide

Table 2-12 (Cont.) Available Reports for Materialized Views
View Description
Dependencies Displays a list of objects that use (or depend) upon this
materialized view.
SQL Displays the SQL necessary to re-create this materialized view.
2.17.4 Dropping a Materialized View
Select a materialized view from the Object Selection pane and click Drop.
To drop a materialized view in Object Browser:
1.
On the Workspace home page, click SQL Workshop and then Object Browser.
Object Browser appears.
2.
From the Object list, select Materialized Views.
3.
From the Object Selection pane, select a view.
The Materialized View appears.
4. Click Drop.
5. To confirm, click Finish.
2.18 Managing Synonyms
A synonym is an alias for a schema object. You can create, view and drop a synonym.
Synonyms can provide a level of security by masking the name and owner of an object
and by providing location transparency for remote objects of a distributed database.
Also, they are convenient to use and reduce the complexity of SQL statements for
database users.
Creating Synonyms (page 2-47)
Create synonyms using Object Browser.
Viewing a Synonym (page 2-48)
Select a synonym from the Object Selection pane.
Dropping a Synonym (page 2-48)
Select a synonym from the Object Selection pane and click Drop.
See Also:
"Oracle Database Administrator’s Guide" for information about synonyms
2.18.1 Creating Synonyms
Create synonyms using Object Browser.
To create a synonym:
Managing Synonyms
Managing Database Objects with Object Browser 2-47

1. On the Workspace home page, click SQL Workshop and then Object Browser.
Object Browser appears.
2. Click the Create icon.
3. From the list of object types, select Synonym.
4. For Define:
a. Synonym Name - Enter a name.
b. Public or Private - Specify whether the synonym should be public or private.
c.
Schema - Select the database schema (or user name) which owns the object
upon which you want to create your synonym.
d.
Object - Enter the name of the object upon which you want to create a
synonym.
e.
Database Link - Enter the name of the database link to use if the synonym is to
be created on a remote object.
f.
Click Next.
A confirmation page appears, which displays the SQL used to create the synonym.
5. Click Create Synonym.
2.18.2 Viewing a Synonym
Select a synonym from the Object Selection pane.
To view a synonym:
1. On the Workspace home page, click SQL Workshop and then Object Browser.
Object Browser appears.
2. From the Object list, select Synonyms.
3. From the Object Selection pane, select a synonym.
The Object Details view appears displaying the following:
• Synonym Owner
• Synonym Name
• Object Owner
• Object Name
• Object Type
• Status
2.18.3 Dropping a Synonym
Select a synonym from the Object Selection pane and click Drop.
To drop a synonym in Object Browser:
Managing Synonyms
2-48 Oracle Application Express SQL Workshop Guide

1. On the Workspace home page, click SQL Workshop and then Object Browser.
Object Browser appears.
2. From the Object list, select Synonyms.
3. From the Object Selection pane, select a synonym and click Drop.
4. To confirm, click Finish.
Managing Synonyms
Managing Database Objects with Object Browser 2-49

Managing Synonyms
2-50 SQL Workshop Guide

3
Using SQL Commands
Using SQL commands you can create, edit, view, run, and delete database objects.
About SQL Commands (page 3-2)
You can use SQL Commands to create, edit, view, run, and delete
database objects.
Accessing SQL Commands (page 3-2)
Learn how to access SQL Commands.
About the SQL Commands Home Page (page 3-3)
Learn about the SQL commands home page.
Using the Command Editor (page 3-5)
You use the command editor in SQL Commands to execute SQL
commands within Oracle Application Express.
Saving an SQL Command (page 3-8)
You can save commands you enter in SQL Commands.
Copying a Command (page 3-8)
Click Saved SQL from the SQL Commands page, click the name of the
command to load into command editor, enter a name, and click Save.
Viewing Results (page 3-9)
When you execute a SQL command, the results display in the display
pane at the bottom of the SQL Commands home page.
Using Explain Plan (page 3-10)
Explain plan parses a query and records the plan that Oracle devises to
execute it.
Using Saved Commands (page 3-10)
You can access the commands you save and commands saved by other
users in the same workspace.
Using SQL Command History (page 3-11)
You use SQL Command History to access commands you have executed
in SQL Commands.
Using SQL Commands
3-1

See Also:
• "Oracle Database SQL Language Reference" for detailed information about
SQL statements and other parts of SQL, such as operators, functions, and
format models
• "Oracle Database Concepts" for conceptual information about SQL
• "SQL*Plus User's Guide and Reference" for information about SQL*Plus,
Oracle's version of SQL
• "Oracle Database Sample Schemas" for information about the HR sample
schema that is used for examples in this chapter
3.1 About SQL Commands
You can use SQL Commands to create, edit, view, run, and delete database objects.
A SQL command can contain SQL statements or PL/SQL blocks.
When using SQL Commands, remember the following:
• SQL commands created in the Query Builder can be accessed from SQL
Commands.
• Saved SQL commands must have unique names within a given workspace.
• There is no interaction between SQL Commands and SQL Scripts.
• You can cut and paste an SQL command from SQL Commands to run in the SQL
Script Editor.
Tip:
SQL commands created in the Query Builder can be accessed from SQL
Commands.
See Also:
• " Using SQL Scripts (page 5-1)"
• "Using Query Builder (page 4-18)"
3.2 Accessing SQL Commands
Learn how to access SQL Commands.
To access SQL Commands:
1.
On the Workspace home page, click SQL Workshop.
2.
Click SQL Commands.
About SQL Commands
3-2 Oracle Application Express SQL Workshop Guide
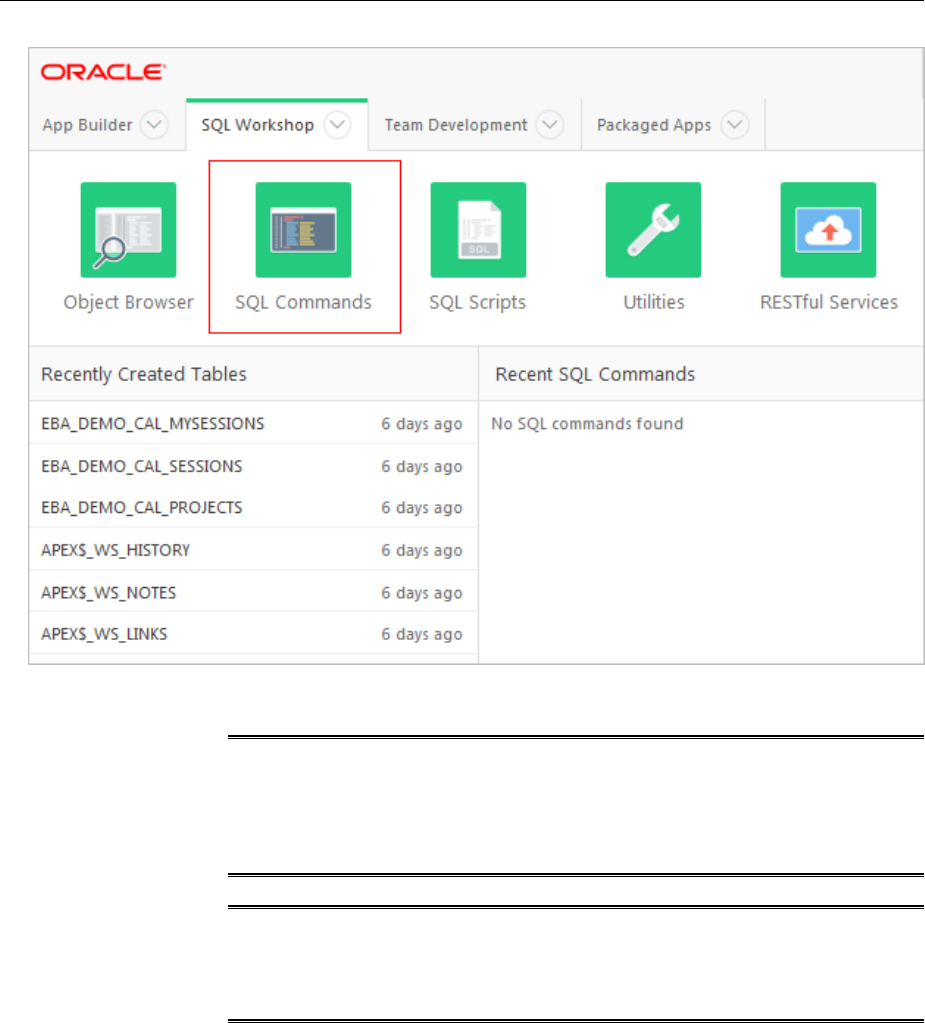
The SQL Commands home page appears.
Note:
If the instance administrator has disabled RESTful Services for this
Application Express instance, RESTful Services are not available for this
instance and the RESTful Services icon does not display.
See Also:
"Configuring SQL Workshop" in Oracle Application Express Administration
Guide
3.3 About the SQL Commands Home Page
Learn about the SQL commands home page.
The SQL Commands home page is divided into two sections: a command editor and a
display pane. You use the command editor to execute SQL commands and the display
pane to view output, saved command lists, and history lists.
About the SQL Commands Home Page
Using SQL Commands 3-3
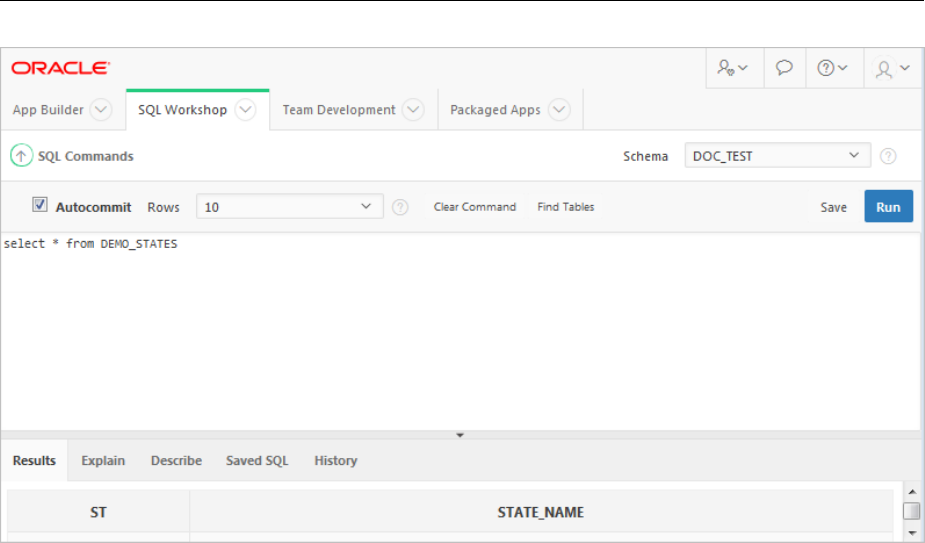
The top of the SQL Commands home page features a command editor and the
following controls:
• Autocommit. If available, click the Autocommit check box to enable autocommit
and disable transactional commands.
• Rows. Select the number of rows of output to display simultaneously up to a
maximum of 100,000. All rows of DBMS Output are displayed regardless of the
Display list setting.
• Clear Command. Use the Clear Command button to clear the text in the
command editor.
• Find Tables. Use the Find Tables button to view tables within the currently
selected schema.
• Save. Click the Save button to save the contents of the command editor, or the
currently highlighted content to a file. You are prompted to enter a name and an
optional description. The command appears in the Saved SQL list.
• Run. Click the Run button (Ctrl+Enter) to run the command in the command
editor, or the currently highlighted command in the command editor.
The display pane is at the bottom of the SQL Commands home page and features the
following five tabs:
• Results. Click the Results tab to see the results from the last successfully executed
SQL command. Click DBMS Output at the bottom of the displayed results to
display lines of DBMS output. This control only appears when there is DBMS
output to display. Click Download to export results to a comma-delimited file on
your local file system.
• Explain. Click the Explain tab to examine the execution plan used by the
optimizer for statements that make changes to the database. Objects in the output
are linked to the Object Browser. Click the linked object to view its properties in
the Object Browser.
About the SQL Commands Home Page
3-4 Oracle Application Express SQL Workshop Guide

• Describe. Enter Describe object_name and click Run to display column definitions
for a table or view, or specifications for a function or procedure in the Describe
tab. Select links in the Describe results to write that information into the command
editor. For example, click a table name to add owner.table, click a column name to
add the column name, click a procedure or function name to add the object call
with parameters, or click a package name to add the package call.
• Saved SQL. Click the Saved SQL tab to display a list of all SQL commands saved
in the current workspace. Click the command title to load it into the command
editor.
• History. Click the History tab to list your recently executed commands. Your last
200 executed commands are saved.
See Also:
• "Using the Command Editor (page 3-5)"
• "Selecting a Schema (page 1-2)"
3.4 Using the Command Editor
You use the command editor in SQL Commands to execute SQL commands within
Oracle Application Express.
Running a SQL Command (page 3-6)
Enter the SQL command you want to run in the command editor and
click Run.
About Transactions in SQL Commands (page 3-6)
Transactional mode is a stateful transaction mode where you can, for
example, perform an update, select data for review, and COMMIT or
ROLLBACK changes. It is implemented using DBMS_JOBS.
Disabling Transactional SQL Commands (page 3-6)
Check the Autocommit check box to disable transactional SQL
commands.
Enabling Transactional SQL Commands (page 3-7)
Uncheck the Autocommit check box to enable the transactional SQL
commands.
About Unsupported SQL*Plus Commands (page 3-7)
SQL Commands does not support SQL*Plus commands.
Terminating a Command (page 3-7)
You can terminate a command in SQL Commands using a semicolon (;),
a slash (/), or with nothing.
Using Bind Variables (page 3-7)
Enter values for bind variables during command execution.
Using the Find Tables Button (page 3-7)
Use the Find Tables button to view tables within the currently selected
schema.
Using the Command Editor
Using SQL Commands 3-5

See Also:
"About the SQL Commands Home Page (page 3-3)"
3.4.1 Running a SQL Command
Enter the SQL command you want to run in the command editor and click Run.
To execute a SQL Command:
1. On the Workspace home page, click SQL Workshop and then SQL Commands.
The SQL Commands page appears.
2.
Enter the SQL command you want to run in the command editor.
3.
Click Run (Ctrl+Enter) to execute the command.
Tip:
To execute a specific statement, select the statement you want to run and click
Run.
The results appear in the Results pane.
4.
To export the resulting report as a comma-delimited file (.csv), click the Download
link.
3.4.2 About Transactions in SQL Commands
Transactional mode is a stateful transaction mode where you can, for example,
perform an update, select data for review, and COMMIT or ROLLBACK changes. It is
implemented using DBMS_JOBS.
Consider the following behavior in transactional mode:
• Actions are not committed to the database until you enter an explicit COMMIT
command.
• Exiting SQL Commands terminates and rolls back the current transaction.
• A session timeout terminates and rolls back the current transaction.
Note that the Environment Setting, SQL Commands Maximum Inactivity in
minutes, sets the time before an inactive session times out. The default timeout is
60 minutes.
• The CSV Export option is not available.
See Also:
"Configuring SQL Workshop in Oracle Application Express Administration
Guide"
3.4.3 Disabling Transactional SQL Commands
Check the Autocommit check box to disable transactional SQL commands.
Using the Command Editor
3-6 Oracle Application Express SQL Workshop Guide

To disable transactional SQL commands in SQL Commands, check the Autocommit
check box. Attempting to use any transactional SQL commands such as COMMIT or
ROLLBACK when transactional mode is disabled returns an error message.
3.4.4 Enabling Transactional SQL Commands
Uncheck the Autocommit check box to enable the transactional SQL commands.
To enable transactional SQL commands, clear the Autocommit check box. Oracle
Application Express verifies that the necessary system resources are available before
entering the transactional mode. If resources are unavailable, an error message is
displayed.
3.4.5 About Unsupported SQL*Plus Commands
SQL Commands does not support SQL*Plus commands.
If you attempt to enter an SQL Command Line command such as SET ECHO or
DEFINE in SQL Commands, an error message displays.
3.4.6 Terminating a Command
You can terminate a command in SQL Commands using a semicolon (;), a slash (/), or
with nothing.
Consider the following valid alternatives:
SELECT * from emp;
SELECT * from emp
/
SELECT * from emp
The first example demonstrates the use of a semicolon (;), the second example
demonstrates using a slash (/), and the final example demonstrates a command with
no termination.
3.4.7 Using Bind Variables
Enter values for bind variables during command execution.
Bind variables are supported. You are prompted to enter values for bind variables
during command execution. Bind variables are prefixed with a colon.
For example
SELECT * FROM emp WHERE deptno = :dept
3.4.8 Using the Find Tables Button
Use the Find Tables button to view tables within the currently selected schema.
To view tables within the current schema:
1.
Navigate to SQL Commands.
2.
From the Schema list, select a schema (optional).
3.
Click Find Tables.
Using the Command Editor
Using SQL Commands 3-7

The Table Finder appears. A search bar displaying the selected schema displays at
the top of the page and contains the following controls:
• Search. Search for a table name. Enter case insensitive keywords in the Search
field and click Go. To view all tables, leave the Search field blank and click Go.
• Views. Select the Views check box and click Go to include views in the
resulting report.
• Rows. Determine how many rows display in the resulting report. To change
the number of rows that display, make a selection from the list and click Go.
The Table Finder report appears displaying the table name, the number of rows,
last analyzed date, and the object type.
4.
Select a table name.
The Table Finder report appears.
This report displays the column names, data type, length, precision, scale and the
SQL necessary to re-create the table that appears at the bottom of the page.
5.
Click Append to append SQL from the page to the existing command in the
command editor.
6. Click Replace to replace existing command in the command editor with the SQL
from the page.
3.5 Saving an SQL Command
You can save commands you enter in SQL Commands.
To save an SQL command:
1. On the Workspace home page, click SQL Workshop and then SQL Commands.
The SQL Commands page appears.
2. Enter the command in the command editor.
3. Click Save to save the command.
You are prompted to enter a name and description for the command.
4. Click Save, or click Cancel to return to the command editor without saving.
The saved command is listed in the display area.
3.6 Copying a Command
Click Saved SQL from the SQL Commands page, click the name of the command to
load into command editor, enter a name, and click Save.
To copy a SQL command:
1.
On the Workspace home page, click SQL Workshop and then SQL Commands.
The SQL Commands page appears.
2.
Click Saved SQL.
The Saved SQL list of commands appears in the display pane.
Saving an SQL Command
3-8 Oracle Application Express SQL Workshop Guide

3. Click the name of the command to load it into the command editor
4. Click Save to save the command.
5. Enter a name for the command in the Name field and click Save.
The command is copied to the new name.
3.7 Viewing Results
When you execute a SQL command, the results display in the display pane at the
bottom of the SQL Commands home page.
The results of the last executed command are available until you execute another SQL
command, or leave SQL Commands.
Accessing the Results Pane (page 3-9)
From the SQL Commands page, click the Results tab.
About the Results Pane (page 3-9)
The Results pane displays SQL command results as HTML formatted
table. The number of rows returned appears after the output, and the
time taken. DBMS output appears as plain text after the HTML
formatted results.
3.7.1 Accessing the Results Pane
From the SQL Commands page, click the Results tab.
To display SQL command results:
1. On the Workspace home page, click SQL Workshop and then SQL Commands.
The SQL Commands page appears.
2. Click the Results tab.
The HTML formatted results appear in the display pane.
3. Click DBMS Output to display plain text DBMS output results.
The DBMS Output control only appears if there are DBMS output results.
3.7.2 About the Results Pane
The Results pane displays SQL command results as HTML formatted table. The
number of rows returned appears after the output, and the time taken. DBMS output
appears as plain text after the HTML formatted results.
On the Results pane you can:
• Display DBMS output. Automatically displays HTML output or DBMS output
depending on type of SQL command entered, SQL or PL/SQL block with DBMS
output.
• Download results. Click Download to export results to a comma-delimited file on
your local file system. You are prompted to enter a name and directory for the file.
Only available for HTML output.
Viewing Results
Using SQL Commands 3-9

See Also:
"Accessing the Results Pane (page 3-9)"
3.8 Using Explain Plan
Explain plan parses a query and records the plan that Oracle devises to execute it.
By examining this plan, you can find out if Oracle is picking the right indexes and
joining your tables in the most efficient manner. It is not necessary to execute the
command to view the explain plan.
Viewing an Explain Plan (page 3-10)
From the SQL Commands page, enter or load the command whose plan
you want to view and click the Explain tab.
3.8.1 Viewing an Explain Plan
From the SQL Commands page, enter or load the command whose plan you want to
view and click the Explain tab.
To view the Explain Plan:
1.
On the Workspace home page, click SQL Workshop and then SQL Commands.
The SQL Commands page appears.
2.
Enter or load the command whose plan you want to view.
3.
Click the Explain tab.
The explain plan used by the optimizer appears in the display pane.
The Explain Plan pane shows the plan used by the Oracle Optimizer to run your
SQL command. It typically displays the Query Plan, Index Columns and Table
Columns used.
On the Explain Plan pane you can:
• View object definitions. Click the object name in Query Plan to display the
object definition in the Object Browser.
• View index definitions. Click the index name in Table Columns to display the
index definition in the Object Browser.
3.9 Using Saved Commands
You can access the commands you save and commands saved by other users in the
same workspace.
You can also access SQL commands you and other users of the same workspace saved
from the Query Builder.
Accessing Saved Commands (page 3-11)
From the SQL Commands page, click the Saved SQL tab, click the title of
the command to load it into the command editor, and click Run.
About the Saved SQL Pane (page 3-11)
The Saved SQL pane displays a list of all commands saved under the
current workspace.
Using Explain Plan
3-10 Oracle Application Express SQL Workshop Guide

3.9.1 Accessing Saved Commands
From the SQL Commands page, click the Saved SQL tab, click the title of the
command to load it into the command editor, and click Run.
To access saved SQL commands:
1. On the Workspace home page, click SQL Workshop and then SQL Commands.
The SQL Commands page appears.
2.
Click the Saved SQL tab.
The Saved SQL list of commands appears in the display pane.
3.
Click the title of the command to load it into the command editor.
The command appears in the editor.
4.
Click Run to execute the command.
See Also:
"About the Saved SQL Pane (page 3-11)"
3.9.2 About the Saved SQL Pane
The Saved SQL pane displays a list of all commands saved under the current
workspace.
The list displays commands saved from SQL Commands and SQL commands saved
from Query Builder. Saved SQL commands must have unique names in the current
workspace. The same name cannot be used in the Query Builder and SQL Commands.
Each command entry shows the owner name, the command name, a description if it
exists, the first characters of the SQL command, who last updated the command and
when.
On the Saved SQL pane you can:
• Show commands by owner - Make a selection from the Owner list to specify the
user whose commands you want to display. To view all scripts select -All Users-.
• Search for a command - Enter a command name or partial name, or enter a code
snippet in the Find field and click Go. To view all scripts, leave the Find field
blank and click Go. You control how many rows display by making a selection
from the Rows list.
• Set the Number of Output Rows - Make a selection from the Display list to
specify the number of Saved SQL commands to display simultaneously.
• Delete a command - Click the check box associated with a command and click
Delete Checked.
3.10 Using SQL Command History
You use SQL Command History to access commands you have executed in SQL
Commands.
Using SQL Command History
Using SQL Commands 3-11

Commands you have executed are stored in the command history regardless of
whether you explicitly save them.
Accessing a Command from Command History (page 3-12)
From the SQL Commands page, click the History tab.
About the History Pane (page 3-12)
The History pane displays a list of commands you have executed.
3.10.1 Accessing a Command from Command History
From the SQL Commands page, click the History tab.
To access history commands:
1.
On the Workspace home page, click SQL Workshop and then SQL Commands.
The SQL Commands page appears.
2.
Click the History tab.
The list of commands in History appears in the display pane.
3. Click the partial command displayed in the SQL column.
The command appears in the editor.
3.10.2 About the History Pane
The History pane displays a list of commands you have executed.
Each history entry shows the time the command was last executed, the first characters
of the command, and the schema in which it was executed.
On the History pane you can:
• Load a command - Click the partial command displayed in the SQL column to
load the command into the command editor. When the command loads, it also
sets the schema in which it was last executed.
Using SQL Command History
3-12 Oracle Application Express SQL Workshop Guide

4
Using Oracle Application Express Utilities
Oracle Application Express provides utilities to build SQL queries, load and unload
data from an Oracle database, generate DDL, view object reports, manage User
Interface Defaults, restore dropped database objects, compare schemas, monitor the
database, and view database details.
Using Data Workshop (page 4-2)
Data Workshop enables you to load and unload data to the database.
Generating DDL (page 4-11)
With Oracle Application Express, you can generate data definition
language (DDL) statements from the Oracle data dictionary.
Managing Methods on Tables (page 4-11)
The Managing Methods on Tables utility enables you to create an
application programming interface, or package, based on a specified
table.
Viewing Object Reports (page 4-12)
SQL Workshop Utilities includes a variety of object reports to help you
better manage the objects in your database.
Comparing Schemas (page 4-17)
You can run a report that compares database objects in two schemas,
displaying differences between them. You can compare all objects in the
schemas or limit your report to specific objects.
Using Query Builder (page 4-18)
Using Query Builder, you can search and filter database objects, select
objects and columns, create relationships between objects, view
formatted query results, and save queries with little or no SQL
knowledge.
Managing User Interface Defaults (page 4-30)
Managing user interface defaults enables you to assign default interface
properties, create default wizard, modify the table user interface
defaults, add new attributes, and export the user interface defaults.
Viewing Database Details (page 4-34)
If you have an account that has been granted a database administrator
role, you can view details about your database on the About Database
page.
Monitoring the Database (page 4-35)
The reports available on the Database Monitor page provide a database-
wide view of the database sessions, system statistics, SQL statements,
and longer operations.
Using Oracle Application Express Utilities
4-1

Using the Recycle Bin (page 4-40)
You can use the Recycle Bin to view and restore dropped database
objects.
4.1 Using Data Workshop
Data Workshop enables you to load and unload data to the database.
About the Data Load and Unload Wizards (page 4-2)
Use the Data Load and Data Unload wizards to load and unload
delimited text data to and from the database.
About Importing, Exporting, Loading, and Unloading Data (page 4-3)
You have several options when copying data between Oracle databases
or between an Oracle database and external files. Data copying is
accomplished by exporting and importing data, and by unloading and
loading data.
Import/Export/Load/Unload Options (page 4-3)
The Oracle Database and Oracle Application Express provide several
powerful options for importing, exporting, loading, and unloading data.
Accessing the Data Load/Unload Page (page 4-5)
Access the Data Load and Unload page by clicking Utilities and then
Data Workshop.
Loading Data (page 4-5)
Use the Load Data Wizard to copy and paste or upload data.
Unloading Data (page 4-9)
Use the Unload page to export the contents of a table to a text file or
XML document.
Using the Repository (page 4-10)
Loaded text data files and spreadsheets are stored in the Repository. You
can select the appropriate repository.
4.1.1 About the Data Load and Unload Wizards
Use the Data Load and Data Unload wizards to load and unload delimited text data to
and from the database.
The step-by-step wizards have the following features:
• Load or unload XML files or delimited-field text files (such as comma-delimited
(.csv) or tab-delimited files).
• Load by copying and pasting from a spreadsheet.
• Omit (skip) columns when loading or unloading.
• Load into an existing table or create a new table from the loaded data.
• When loading into a new table, the primary key can be taken from the data or
generated from a new or existing Oracle sequence.
• When loading into a new table, column names can be taken from the loaded data.
• Each time that you load from a file, file details are saved in a Text Data Load
Repository. You can access these files from within the repository at any time.
Using Data Workshop
4-2 Oracle Application Express SQL Workshop Guide

Limitations include the following:
• The wizards load and unload table data only. They do not load or unload other
kinds of schema objects.
• You can load and unload to and from your own schema only. This is also true for
users with administrator privileges.
• You can load or unload only a single table at a time.
• There are no data type limitations for unloading to text or XML files, or for
loading from XML files. However, when loading from spreadsheets (through
copy and paste) or from text files, only the following data types are supported:
NUMBER, DATE, VARCHAR2, CLOB, BINARY_FLOAT, and BINARY_DOUBLE.
Supported unload formats include:
• Text such as comma-delimited or tab-delimited data
• XML documents
See Also:
"Import/Export/Load/Unload Options (page 4-3)"
4.1.2 About Importing, Exporting, Loading, and Unloading Data
You have several options when copying data between Oracle databases or between an
Oracle database and external files. Data copying is accomplished by exporting and
importing data, and by unloading and loading data.
The following table defines these terms.
Term
Definition
Exporting Copying database data to external files for import into another Oracle
database only. The files are in a proprietary binary format.
Importing Copying data into the database from external files that were created by
exporting from another Oracle database.
Unloading Copying database data to external text files for consumption by another
Oracle database or another application (such as a spreadsheet application).
The text files are in an industry-standard format such as tab-delimited or
comma-delimited (CSV).
Loading Copying data into the database from external text files that are in either a
standard delimited format or in any of the formats that are supported by the
Oracle SQL*Loader utility.
You can export data from any Oracle Database edition (Express Edition, Standard
Edition, and Enterprise Edition) into any other edition.
4.1.3 Import/Export/Load/Unload Options
The Oracle Database and Oracle Application Express provide several powerful
options for importing, exporting, loading, and unloading data.
Using Data Workshop
Using Oracle Application Express Utilities 4-3

Table 4-1 (page 4-4) provides a summary of these options.
Table 4-1 Summary of Oracle Application Express Import/Export Options
Feature or Utility Description
Data Load/Unload wizards in Oracle
Application Express
• Easy to use graphical interface
• Loads/unloads from and to external text files
(delimited fields) or XML files
• Loads/unloads tables only, one table at a time
• Access only to schema of logged-in user
• No data filtering on upload
SQL*Loader utility • Command-line interface, invoked with sqlldr
command
• Bulk-loads data into the database from external
files
• Supports numerous input formats, including
delimited, fixed record, variable record, and
stream
• Loads multiple tables simultaneously
• Powerful data filtering capabilities
Data Pump Export and Data Pump
Import utilities
• Command-line interface, invoked with expdp
and impdp commands
• Exports and imports from one Oracle database
to another (proprietary binary format)
• Imports/exports all schema object types
• Imports/exports entire database, entire
schema, multiple schemas, multiple
tablespaces, or multiple tables
• Powerful data filtering capabilities
• High speed
Export and Import utilities • Command-line interface, invoked with exp and
imp commands
• Exports and imports from one Oracle database
to another (proprietary binary format)
• Supports XMLType data
• Does not support the FLOAT and DOUBLE data
types
• Capabilities similar to Data Pump; Data Pump
is preferred
Table 4-2 (page 4-4) provides several load, unload, import, and export scenarios and
suggests the appropriate option to use for each.
Table 4-2 Import/Export Scenarios and Recommended Options
Import/Export Scenario Recommended Option
You have fewer than 10 tables to load, the data is in
spreadsheets or tab-delimited or comma-delimited text files,
and there are no complex data types (such as objects or
multivalued fields).
Data Load/Unload wizards
in Oracle Application
Express
You have to load data that is not delimited. The records are
fixed length, and field definitions depend on column positions.
SQL*Loader
Using Data Workshop
4-4 Oracle Application Express SQL Workshop Guide

Table 4-2 (Cont.) Import/Export Scenarios and Recommended Options
Import/Export Scenario Recommended Option
You have tab-delimited text data to load, and there are more
than 10 tables.
SQL*Loader
You have text data to load, and you want to load only records
that meet certain selection criteria (for example, only records
for employees in department number 3001).
SQL*Loader
You want to import or export an entire schema from or to
another Oracle database.
Data Pump Export and
Data Pump Import
You want to import or export data from or to another Oracle
database. The data contains XMLType data and contains no
FLOAT or DOUBLE data types.
Import (imp) and Export
(exp)
See Also:
"Oracle Database Utilities" for more information on Data Pump, the Import and
Export utilities, and SQL*Loader
4.1.4 Accessing the Data Load/Unload Page
Access the Data Load and Unload page by clicking Utilities and then Data Workshop.
To access the Data Load/Unload page:
1. On the Workspace home page, click the SQL Workshop icon.
2. Click Utilities.
3. Click Data Workshop.
The Data workshop page appears.
4. Click the appropriate icon to load data, unload data, or view the repository.
4.1.5 Loading Data
Use the Load Data Wizard to copy and paste or upload data.
About Loading Data (page 4-6)
You can load data into the Oracle Application Express database in
several ways.
Loading a Text File or Spreadsheet Data (page 4-6)
You can upload a Text file or copy and paste tab-delimited data directly
into the Load Data Wizard.
Loading an XML Document (page 4-8)
Load an XML document using Load XML Data Wizard.
Using Data Workshop
Using Oracle Application Express Utilities 4-5

See Also:
"Import/Export/Load/Unload Options (page 4-3)"
4.1.5.1 About Loading Data
You can load data into the Oracle Application Express database in several ways.
• Copy and paste data from a spreadsheet.
• Upload a spreadsheet file in a delimited format (such as comma-delimited (.csv)
or tab-delimited).
Note:
Upon selecting the file to be uploaded, a data sample of the first 5 lines of the
file is displayed in the preview window. This is active by default and works
for every chosen file. You can see the data and adjust the separator and
enclosed by characters before actually uploading the data. You can do the
column mapping in the next dialog box.
• Upload a text file containing comma-delimited or tab-delimited data.
• Upload an XML document.
4.1.5.2 Loading a Text File or Spreadsheet Data
You can upload a Text file or copy and paste tab-delimited data directly into the Load
Data Wizard.
To load data from a text file:
1. On the Workspace home page, click the SQL Workshop icon.
2. Click Utilities.
3. Click Data Workshop.
4. Under Data Load, click Text Data.
The Load Data Wizard appears.
5. Under Load To, select either Existing table or New table.
6.
Under Load From, select either Upload file or Copy and paste.
• Upload file - Select to specify an existing text file to upload.
• Copy and paste - Select to create a text file to upload by performing a copy and
paste.
7.
Click Next.
8.
If you selected Upload file, under Load Data, make the following changes:
• Text File - Browse for the name of the Text File to load.
Using Data Workshop
4-6 Oracle Application Express SQL Workshop Guide

• Separator - Enter the column separator character. See field-level help for more
details.
• Optionally Enclosed By - If your data contains a delimiter character, enter it
here. See field-level help for more details.
• First row contains column names - Check this box if the first row of your data
contains column names.
• File Character Set - Select the character set in which your text file is encoded.
See field-level help for more details.
9.
If you selected Copy and paste, under Data make these changes:
•
Data - Enter the text file to upload.
•
First row contains column names - Check this box if the first row of your data
contains column names.
10.
Under Globalization, make the following changes:
•
Currency Symbol - If your data contains an international currency symbol,
enter it here.
• Group Separator - If your data contains a character that separates integer
groups, for example to show thousands and millions, enter it here.
• Decimal Character - If your data contains a character that separates the integer
and decimal parts of a number, enter it here.
Tip:
See field-level help for more details about a specific attribute.
11. Click Next.
The table Properties page appears. Before performing the data upload, this page
allows you to optionally customize the data.
12. For Table Properties, make the following changes and click Next:
• Schema - Select the schema containing the table to load.
• Table Name - Identify the table name you want to create. By default, all table
names are converted to upper case. Select Preserve Case to override this
default behavior.
• Column Names - Enter the names of the columns.
• Data Type - Select the data type for this column.
• Format - Enter the format type.
• Description - Enter the description.
• Column Length - Enter the length of the data in this column.
• Upload - Select Yes to upload data for this column. Select No to not upload
data for this column and skip to the next column.
13.
For Primary Key, make the following changes:
Using Data Workshop
Using Oracle Application Express Utilities 4-7

• Primary Key From - Define the primary key column by choosing either an
existing column or creating a new column. Options include:
– Use an existing column - If you choose an existing column you must
select the column from the columns being loaded.
– Create new column - If you choose to create a new column, you must
specify the name of the new column.
• Constraint Name - The constraint name defaults to the table name appended
with _PK. You can update the name if desired.
•
Primary Key Population - You must decide how your primary key is
populated. You either generate it from a new sequence, from a new sequence
or not at all. Options include:
–
Generated from a new sequence - If you choose a new sequence, you can
use the sequence name given or update it as necessary. The sequence is
created for you.
–
Generated from an existing sequence - If you choose an existing
sequence, you must select the sequence from those currently defined in
your schema.
If you generate the primary key from a sequence, either new or existing,
the wizard creates a trigger on the table to retrieve the next sequence value
and populate the primary key when a record is inserted.
– Not generated
14. Click Load Data.
4.1.5.3 Loading an XML Document
Load an XML document using Load XML Data Wizard.
Oracle Application Express supports XML documents in Oracle's canonical XML
format.
In Oracle's canonical XML format, each element represents a column value, each
element is named after the column, all elements that are part of the same row are
children of a <ROW> element, and all <ROW> elements are children of a <ROWSET>
element.
To load an XML document:
1. On the Workspace home page, click the SQL Workshop icon.
2.
Click Utilities.
3.
Click Data Workshop.
4.
Click XML Data.
The Load XML Data Wizard appears.
5.
Select the appropriate schema for your data and click Next.
6.
Select the table into which to load the data.
7.
Follow the on-screen instructions.
Using Data Workshop
4-8 Oracle Application Express SQL Workshop Guide

4.1.6 Unloading Data
Use the Unload page to export the contents of a table to a text file or XML document.
Unloading a Text File (page 4-9)
Use the Unload to Text Wizard to export the contents of a table to a text
file.
Unloading to an XML Document (page 4-10)
Use the Unload to XML Wizard to export the contents of a table to an
XML document adhering to the Canonical XML specification.
See Also:
"Import/Export/Load/Unload Options (page 4-3)"
4.1.6.1 Unloading a Text File
Use the Unload to Text Wizard to export the contents of a table to a text file.
For example, you could export an entire table to a comma-delimited file (.csv).
To unload a table to a text file:
1. On the Workspace home page, click the SQL Workshop icon.
2. Click Utilities.
3. Click Data Workshop.
4. Under Data Unload, click To Text.
The Unload to Text Wizard appears.
5. Select the appropriate schema.
6. Select the table to unload.
7. Highlight the columns to include, optionally enter a Where Clause to limit the
records unloaded and click Next.
8. For Options, enter the following:
• Separator - Enter the type of separator used to separate column values.
• Optionally Enclosed By - If your data contains a delimiter character, enter it
here.
• Include Column Names - Check this box to include the name of each column
in the text file.
• File Format - Select the appropriate file format.
• File Character Set - Select the character set in which your text file is encoded.
Tip:
See field-level help for more details.
Using Data Workshop
Using Oracle Application Express Utilities 4-9

9. Click Unload Data.
The File Download window appears.
10. Click Save to download the file.
4.1.6.2 Unloading to an XML Document
Use the Unload to XML Wizard to export the contents of a table to an XML document
adhering to the Canonical XML specification.
To unload a table to an XML document:
1.
On the Workspace home page, click the Utilities icon.
2.
Click Data Workshop.
3.
Under data Unload, click to XML.
The Unload to XML Wizard appears.
4.
Select the appropriate schema.
5. Select the table to unload.
6. Highlight the columns to include.
7. Optionally enter a Where Clause to limit the records unloaded, and click Unload
Data.
A browser displays the XML data.
4.1.7 Using the Repository
Loaded text data files and spreadsheets are stored in the Repository. You can select the
appropriate repository.
To access the different repositories:
1. On the Workspace home page, click the Utilities icon.
2. Click Data Workshop.
3. Under Repository, select one of the following:
• Import Repository - Displays the status of loaded Text data. Details include
file name, imported by, imported on, schema, table, bytes, and the number of
rows that were loaded successfully and the number were not.
• Spreadsheet Imports - Displays the status of loaded spreadsheet data. Details
include file name, imported by, imported on, schema, table, and the number of
rows that were loaded successfully and the number were not.
4.
To filter the display, make a selection from the Show list and click Go.
5.
To view information about a specific file, click the View icon.
6.
To delete an imported file, select it and click Delete Checked.
Using Data Workshop
4-10 Oracle Application Express SQL Workshop Guide

4.2 Generating DDL
With Oracle Application Express, you can generate data definition language (DDL)
statements from the Oracle data dictionary.
You can use these scripts to create or re-create database schema objects. The scripts can
be generated to display inline or saved as a script file. You can generate the create
scripts for all objects for a specific schema, specific object types, or specific objects.
To generate a DDL statement:
1. On the Workspace home page, click the SQL Workshop.
2.
Click Utilities.
3.
Click Generate DDL.
The Generate DDL page appears.
4.
Click Create Script.
The Generate DDL Wizard appears.
5.
Select a database schema and click Next.
6. Define the object type:
a. Output - Specify an output format. Select either Display Inline or Save As
Script File.
b. Check All - Select this option to include all object types for which to generate
DDL.
c. Object Type - Select the object types for which to generate DDL.
d. To select object names for the selected object types, click Next and follow the
on-screen instructions.
7. Click Generate DDL.
See Also:
• "Oracle Database SQL Language Reference" for information about DDL
statements
• "The Data Dictionary" in Oracle Database Concepts for information about
the data dictionary
4.3 Managing Methods on Tables
The Managing Methods on Tables utility enables you to create an application
programming interface, or package, based on a specified table.
To create a package:
1.
On the Workspace home page, click the SQL Workshop.
2.
Click Utilities.
Generating DDL
Using Oracle Application Express Utilities 4-11

3. Click Methods on Tables.
The Create Table API page appears.
4. Enter a Package name. To have the final package name match the case entered in
the Package Name field, click Preserve Case and click Next.
5. Select the table(s) for which you want to generate the PL/SQL package-based
application program interface (API) and click Next.
6. A confirmation page appears, which displays the subprogram(s) and their
description. You have the option to show or download the specification or body.
To confirm, click Create Package.
4.4 Viewing Object Reports
SQL Workshop Utilities includes a variety of object reports to help you better manage
the objects in your database.
Viewing Table Reports (page 4-12)
Use the Table reports to view specific details about the tables within
your database.
Viewing PL/SQL Reports (page 4-13)
Use the PL/SQL reports to view program unit arguments or unit line
counts and also to search PL/SQL source code.
Viewing Exception Reports (page 4-15)
Use the Exception Reports to view unindexed foreign keys and tables
without primary keys, indexes, or triggers.
Viewing Security Reports (page 4-15)
Use the Security reports to view object or column privileges granted on
database objects owned by other schemas.
Viewing All Object Reports (page 4-16)
Use the All Object reports to view objects for the selected schema.
4.4.1 Viewing Table Reports
Use the Table reports to view specific details about the tables within your database.
To view the Table reports:
1. On the Workspace home page, click the SQL Workshop.
2. Click Utilities.
3.
Click Object Reports.
The Object Reports page appears.
4.
Under Table Reports, select a report to view:
• Table Columns
• Table Comments
• Table Constraints
Viewing Object Reports
4-12 Oracle Application Express SQL Workshop Guide

• Table Statistics
• Table Storage Sizes
5. To filter a report, enter search criteria in the field provided and click Go.
6. To view reports for a different schema, select another schema from the Schema list.
See Also:
"Customizing an Interactive Report Using the Actions Menu" in Oracle
Application Express End User's Guide
4.4.2 Viewing PL/SQL Reports
Use the PL/SQL reports to view program unit arguments or unit line counts and also
to search PL/SQL source code.
Viewing Package Input and Output Parameters (page 4-13)
Use the Program Unit Arguments report to view package input and
output parameters.
Viewing the Number of Lines of Code for an Object (page 4-14)
Use the Unit Line Counts report to view the number of lines of code for
each object.
Searching PL/SQL Source Code (page 4-14)
Use the Search PL/SQL Source code page to search the text within your
PL/SQL code.
4.4.2.1 Viewing Package Input and Output Parameters
Use the Program Unit Arguments report to view package input and output
parameters.
To view the PL/SQL Unit Arguments report:
1. On the Workspace home page, click the SQL Workshop.
2. Click Utilities.
3. Click Object Reports.
The Object Reports page appears.
4. Under PL/SQL Reports, click Program Unit Arguments.
5.
To filter a report, enter search criteria in the field provided and click Go.
6.
To view reports for a different schema, select another schema from the Schema list.
See Also:
"Customizing an Interactive Report Using the Actions Menu" in Oracle
Application Express End User's Guide
Viewing Object Reports
Using Oracle Application Express Utilities 4-13

4.4.2.2 Viewing the Number of Lines of Code for an Object
Use the Unit Line Counts report to view the number of lines of code for each object.
Use this report to identify larger PL/SQL program units.
To view the Unit Line Counts report:
1. On the Workspace home page, click the SQL Workshop.
2. Click Utilities.
3.
Click Object Reports.
The Object Reports page appears.
4.
Under PL/SQL Reports, click Unit Line Counts.
The PL/SQL Unit Line Counts report appears.
5.
To view reports for a different schema, select another schema from the Schema list.
See Also:
"Customizing an Interactive Report Using the Actions Menu" in Oracle
Application Express End User's Guide
4.4.2.3 Searching PL/SQL Source Code
Use the Search PL/SQL Source code page to search the text within your PL/SQL code.
Use this report to find references to tables or functions you might be thinking of
deleting. You can also use this page to locate code when you can only recall a code
snippet.
To search for PL/SQL source code:
1. On the Workspace home page, click the Utilities icon.
2. Click Object Reports.
The Object Reports page appears.
3. Under PL/SQL Reports, click Search PL/SQL Source Code.
4. To filter the report:
a.
In From Line and To Line, enter the range of lines you want to search.
b.
Click Set.
c.
To filter the report, enter an object name and click Go.
5.
To view reports for a different schema, select another schema from the Schema
list.
Viewing Object Reports
4-14 Oracle Application Express SQL Workshop Guide

See Also:
"Customizing an Interactive Report Using the Actions Menu" in Oracle
Application Express End User's Guide
4.4.3 Viewing Exception Reports
Use the Exception Reports to view unindexed foreign keys and tables without primary
keys, indexes, or triggers.
To view Exception reports:
1.
On the Workspace home page, click the SQL Workshop.
2.
Click Utilities.
3.
Click Object Reports.
The Object Reports page appears.
4.
In the Exception Reports section, click the report you want to view.
• Tables without Primary Keys
• Tables without Indexes
• Unindexed Foreign Keys
• Tables without Triggers
5. To filter the report, enter a table name and click Go.
6. To view reports for a different schema, select another schema from the Schema list.
See Also:
"Customizing an Interactive Report Using the Actions Menu" in Oracle
Application Express End User's Guide
4.4.4 Viewing Security Reports
Use the Security reports to view object or column privileges granted on database
objects owned by other schemas.
You can also use these reports to view database role and system privileges.
To view the Security reports:
1.
On the Workspace home page, click the SQL Workshop.
2.
Click Utilities.
3.
Click Object Reports.
The Object Reports page appears.
4.
Under Security Reports, click the report you want to view:
Viewing Object Reports
Using Oracle Application Express Utilities 4-15

• Object Grants - View the privileges for an existing schema and also
understand what privileges have been granted from the selected schema to
other schemas.
• Column Privileges - View the privileges for columns within your schema and
also understand what privileges have been granted from the selected schema
to other schemas.
• Role Privileges - View the database roles that have been granted to a selected
schema. Roles are collections of various privileges.
• System Privileges - View the database privileges that have been granted to a
selected schema.
5.
To filter a report, enter search criteria in the field provided and click Go.
6.
To view reports for a different schema, select another schema from the Schema list.
See Also:
"Customizing an Interactive Report Using the Actions Menu" in Oracle
Application Express End User's Guide
4.4.5 Viewing All Object Reports
Use the All Object reports to view objects for the selected schema.
To view the All Object reports:
1. On the Workspace home page, click the SQL Workshop.
2. Click Utilities.
3. Click Object Reports.
The Object Reports page appears.
4. Under All Object Reports, select a report to view:
• All Objects - List all objects in the current schema. Displays creation date and
when the last DDL (data definition language) was performed.
• Invalid Objects - View all invalid objects in the database by object type.
• Object Creation Calendar - View all objects in a calendar format based on the
date each database object was created.
• Object Counts by Type - View the number of database objects by type for the
selected schema.
• Data Dictionary - View the data dictionary for this database.
An Oracle data dictionary is a set of tables and views used as a read-only
reference about the database. For example, a data dictionary stores information
about both the logical and physical structure of the database.
A data dictionary also stores information about valid Oracle database users,
integrity constraints for tables in the database, and the amount of space
allocated for a schema object and the amount being used.
Viewing Object Reports
4-16 Oracle Application Express SQL Workshop Guide

5. To filter a report, enter search criteria in the field provided and click Go.
6. To view reports for a different schema, select another schema from the Schema list.
See Also:
• "Customizing an Interactive Report Using the Actions Menu " in Oracle
Application Express End User's Guide
• "Oracle Database Concepts" for information about the data dictionary
4.5 Comparing Schemas
You can run a report that compares database objects in two schemas, displaying
differences between them. You can compare all objects in the schemas or limit your
report to specific objects.
To compare two schemas, both must be available to your workspace.
Examples:
• Compare DEMO_ objects by searching for that naming convention. The report
indicates if the object exists in each of the two schemas.
• Analyze the object details in the two schemas to determine why one
implementation is different. For example, the report might show that an index in
one schema has an additional column or a column with a different data type.
To compare schemas:
1. On the Workspace home page, click SQL Workshop.
2. Click Utilities.
3. Click Schema Comparison.
4. On the Schema Comparison page, make the appropriate selections to run the
comparison:
a. Schema 1 and Schema 2 - Select the schemas to compare.
b. Compare - Restrict the report to show one object type or select All to show all
database objects.
c. Search - Enter a case insensitive query for the object name.
d.
Rows - To change the number of rows that appear in the report, make a
selection from the Display list.
e.
Compare - Click Go to find the results matching your selections.
f.
Show Differences Only or Show Details - Select the type of information you
want to review.
g.
Click Compare.
Comparing Schemas
Using Oracle Application Express Utilities 4-17

4.6 Using Query Builder
Using Query Builder, you can search and filter database objects, select objects and
columns, create relationships between objects, view formatted query results, and save
queries with little or no SQL knowledge.
Query Builder's graphical user interface enables database developers to build SQL
queries without the need for manual SQL coding.
Tip:
SQL commands created in the Query Builder can be accessed from SQL
Commands.
Query Builder Home Page (page 4-19)
Learn about Query Builder home page.
Accessing Query Builder (page 4-19)
Learn how to access Query Builder.
Understanding the Query Building Process (page 4-20)
Learn how to build a query in Query Builder.
Using the Object Selection Pane (page 4-20)
Use the Object Selection pane to search for and view tables, views, and
materialized views within the current schema as well as select objects.
Using the Design Pane (page 4-21)
Learn about how to use the Design pane.
Specifying Query Conditions (page 4-24)
As you select columns within an object, you can specify conditions on
the Conditions tab.
Creating Relationships Between Objects (page 4-26)
You can create relationships between objects by creating a join.
Working with Saved Queries (page 4-28)
You can create queries and save the query for later use.
Viewing Generated SQL (page 4-29)
The SQL view presents a read-only, formatted representation of the SQL
generated by Query Builder. You can copy the SQL code that appears in
the SQL View for use in other tools such as SQL Command Processor or
App Builder.
Viewing Query Results (page 4-30)
Execute a query, once you select objects and determine what columns to
include in your query.
See Also:
• " Using SQL Commands (page 3-1)"
• "Using the Query Finder" in Oracle Application Express App Builder User’s
Guide
Using Query Builder
4-18 Oracle Application Express SQL Workshop Guide
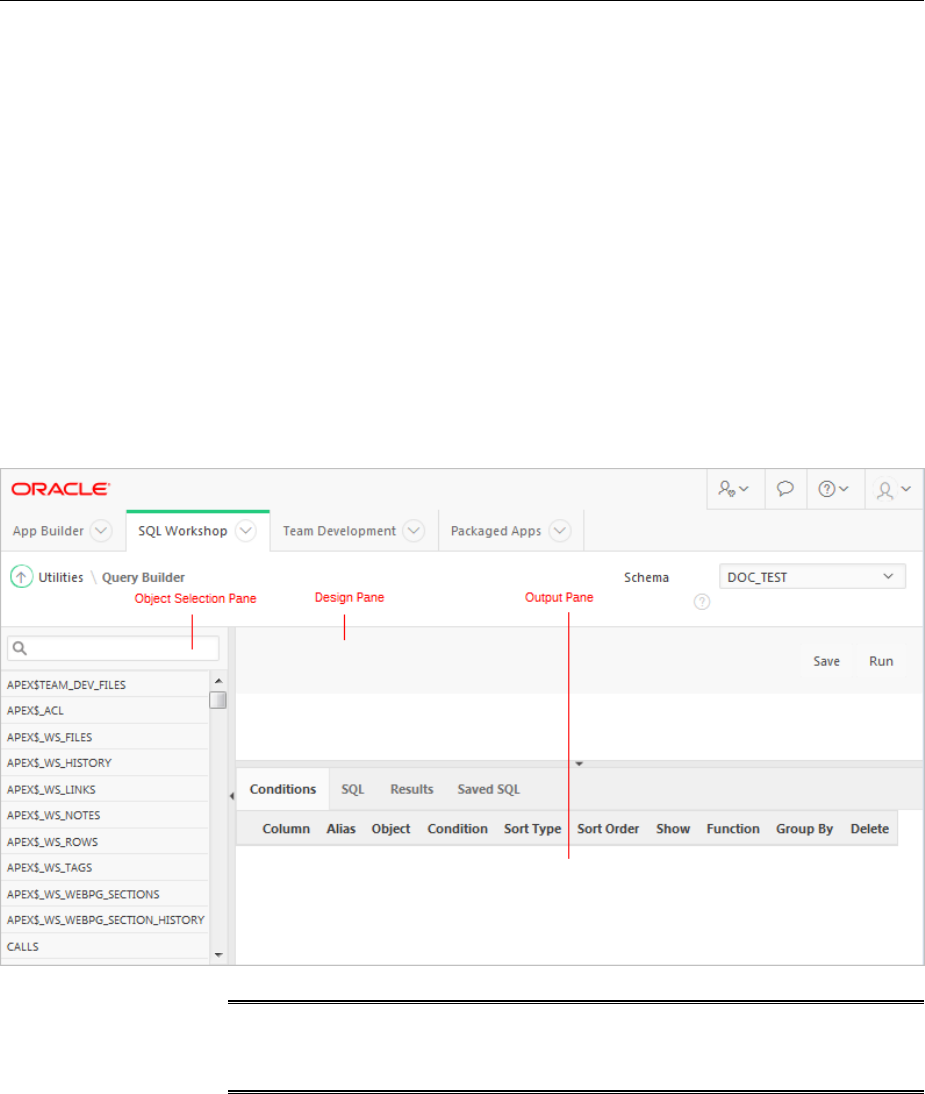
4.6.1 Query Builder Home Page
Learn about Query Builder home page.
The Query Builder page is divided into three sections:
• Object Selection pane displays on the left side of the page and contains a list
objects from which you can build queries. Only objects in the current schema
display.
• Design pane displays to the right of the Object Selection pane and above the
Conditions, SQL, Results, and Saved SQL tabs. When you select an object from the
Object Selection pane, it appears in the Design pane.
•
Output pane displays below the Design pane. Once you select objects and
columns, you can create conditions, view the generated SQL, or view query
results.
See Also:
"Selecting a Schema (page 1-2)"
4.6.2 Accessing Query Builder
Learn how to access Query Builder.
To access Query Builder:
1.
On the Workspace home page, click SQL Workshop.
2.
Click Utilities.
3.
Click Query Builder.
Using Query Builder
Using Oracle Application Express Utilities 4-19

The Query Builder home page appears.
Tip:
You can also access Query Builder from a code editor in many part of Oracle
Application Express by clicking the Query Builder button when editing a SQL
attribute.
4.6.3 Understanding the Query Building Process
Learn how to build a query in Query Builder.
To build a query in Query Builder, you perform the following steps:
1.
Select objects from the Object Selection pane.
2.
Add objects to the Design pane and select columns.
3.
Optional: Establish relationships between objects.
4.
Optional: Create query conditions.
5.
Execute the query and view results.
See Also:
• "Viewing Generated SQL (page 4-29)"
• "Working with Saved Queries (page 4-28)"
4.6.4 Using the Object Selection Pane
Use the Object Selection pane to search for and view tables, views, and materialized
views within the current schema as well as select objects.
Searching and Filtering Objects (page 4-20)
Use the Object Selection pane to search for and view tables, views, and
materialized views within the current schema.
Hiding and Restoring the Object Selection Pane (page 4-21)
You can hide the Object Selection pane by selecting the Collapse control.
Selecting Objects (page 4-21)
Use the Object Selection pane to select objects.
4.6.4.1 Searching and Filtering Objects
Use the Object Selection pane to search for and view tables, views, and materialized
views within the current schema.
To search or filter objects:
1.
On the Workspace home page, click SQL Workshop and then Query Builder.
Query Builder appears.
2.
In the search field at the top of the Object Selection pane, enter a case insensitive
query.
Using Query Builder
4-20 Oracle Application Express SQL Workshop Guide
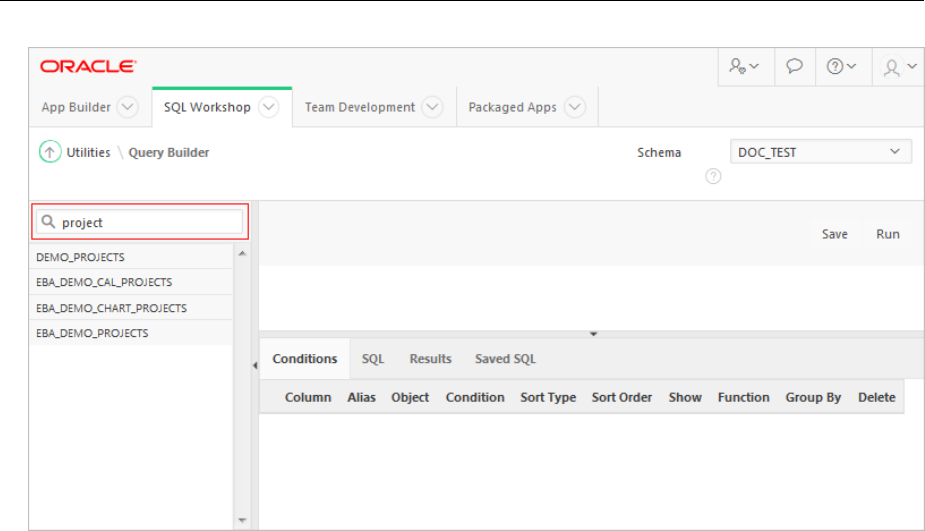
3. To view all tables or views within the currently selected schema, leave the search
field blank.
4.6.4.2 Hiding and Restoring the Object Selection Pane
You can hide the Object Selection pane by selecting the Collapse control.
The Collapse control displays on the right side of the Object Selection pane. If the
Object Selection pane displays, selecting this control hides it. Similarly, if the Object
Selection pane is hidden, selecting this control causes the pane restores it. Select the
Left Splitter (click above or below the Collapse control to manually resize the Object
Selection pane.
4.6.4.3 Selecting Objects
Use the Object Selection pane to select objects.
The Design pane displays to the right of the Object Selection pane. When you select an
object from the Object Selection pane, it appears in the Design pane. You use the
Object Selection pane to select objects (that is, tables, views, and materialized views)
and the Design pane to identify how those selected objects are used in a query.
4.6.5 Using the Design Pane
Learn about how to use the Design pane.
Information on how to use how to use the Design pane includes the following topics:
About Supported Column Types (page 4-22)
Columns of all types available in Oracle Database 10g Release (10.2) or
later display as objects in the Design pane.
Adding an Object to the Design Pane (page 4-22)
You add an object to the Design pane by selecting it from the Object
Selection pane.
Using Query Builder
Using Oracle Application Express Utilities 4-21

Resizing the Design and Results Panes (page 4-23)
As you select objects, you can resize Design and Results panes by
selecting the Bottom Splitter in the center of the page.
Removing or Hiding Objects in the Design Pane (page 4-23)
You remove or hide objects in the Design pane by selecting controls at
the top of the object.
4.6.5.1 About Supported Column Types
Columns of all types available in Oracle Database 10g Release (10.2) or later display as
objects in the Design pane.
Note the following column restrictions:
• You may only select a maximum of 60 columns for each query.
• The following column types are not selectable and cannot be included in a
generated query:
– BLOB
– NCLOB
– RAW
– LONG
– LONG RAW
– XMLType
– Any other nonscalar column types
4.6.5.2 Adding an Object to the Design Pane
You add an object to the Design pane by selecting it from the Object Selection pane.
To add an object to the Design pane:
1. On the Workspace home page, click SQL Workshop and then Query Builder.
Query Builder appears.
2. Select an object from the Object Selection pane.
Using Query Builder
4-22 Oracle Application Express SQL Workshop Guide

The selected object appears in the Design Pane. The icon next to the column name
represents the type of the column.
3.
Select the columns to be included in your query by clicking the check box to the left
of the column name.
When you select a column you are indicating it is included in the query. As you
select a column, it appears on the Conditions tab. Note that the Show check box on
the Conditions tab controls whether a column is included in query results. By
default, this check box is selected.
To select the first twenty columns, click the Table Actions icon in the upper left
corner of the object. The Actions window appears. Select Check All.
4. To execute the query and view results, click Run (Ctrl+Enter).
The Results pane displays the query results.
See Also:
"Specifying Query Conditions (page 4-24)"
4.6.5.3 Resizing the Design and Results Panes
As you select objects, you can resize Design and Results panes by selecting the Bottom
Splitter in the center of the page.
The Bottom Splitter resembles a gray horizontal rule in the center of the page. Move
the Bottom Splitter up and down to shrink and expand the Design pane.
4.6.5.4 Removing or Hiding Objects in the Design Pane
You remove or hide objects in the Design pane by selecting controls at the top of the
object.
To remove an object, select the Remove icon in the upper right corner. To temporarily
hide the columns within an object, click the Show/Hide Columns icon.
Using Query Builder
Using Oracle Application Express Utilities 4-23
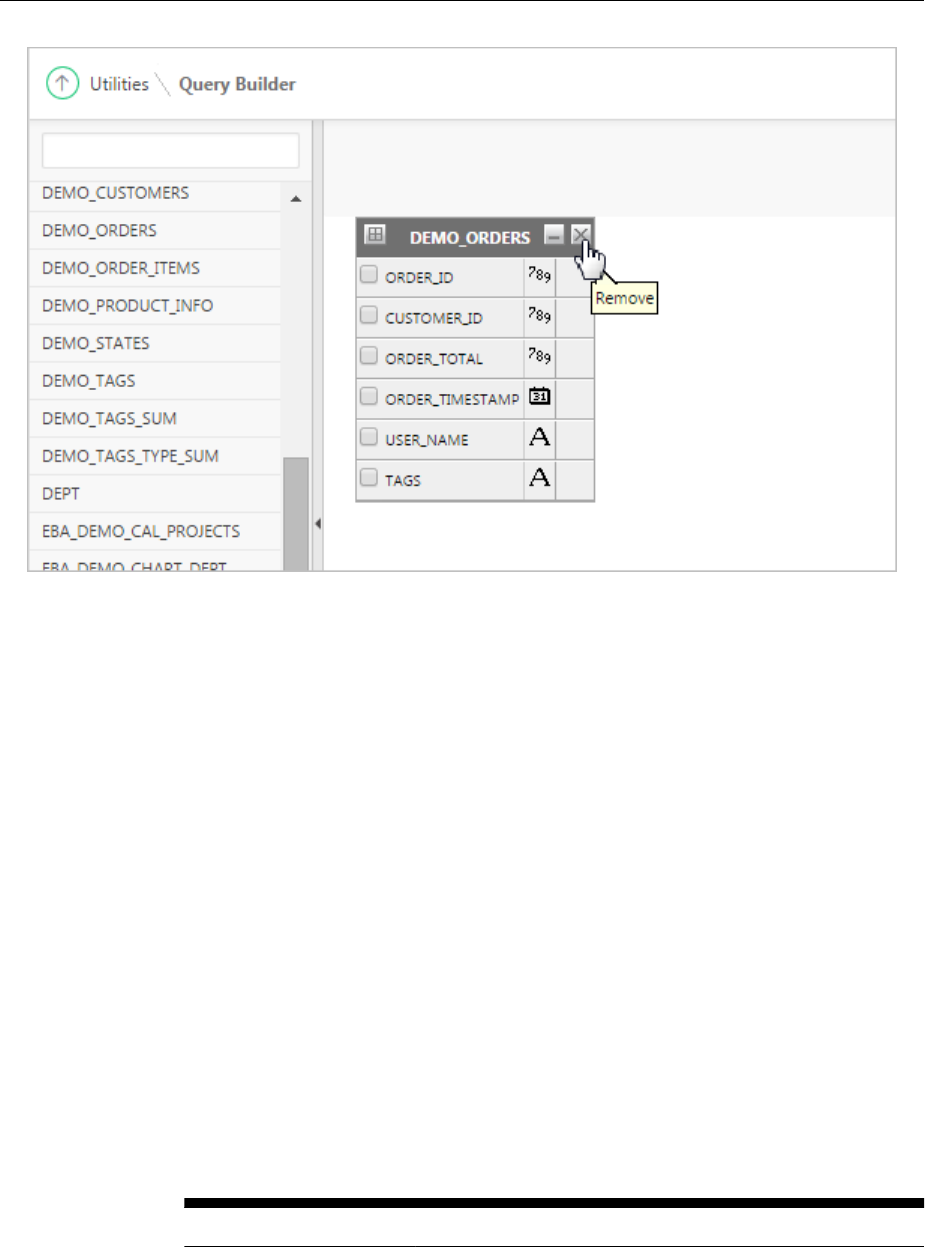
4.6.6 Specifying Query Conditions
As you select columns within an object, you can specify conditions on the Conditions
tab.
Conditions enable you to filter and identify the data you want to work with. You can
use these attributes to modify the column alias, apply column conditions, sort
columns, or apply functions.
To specify query conditions:
1. On the Workspace home page, click SQL Workshop and then Query Builder.
Query Builder appears.
2. Select an object from the Object Selection pane.
The selected object appears in the Design Pane.
3. Select the columns to be included in your query by clicking the box to the left of the
column name.
When you select a column, you are indicating you want to include it in your query.
As you select each column, it appears as a separate row in the Conditions view.
Table 4-3 (page 4-24) describes the attributes available on the Conditions tab.
Table 4-3 Conditions Tab
Condition Attribute Description
Up and Down Arrows Controls the order that the columns to be displayed in the
resulting query. Click the arrow buttons to move columns up
and down.
Column Displays the column name.
Using Query Builder
4-24 Oracle Application Express SQL Workshop Guide

Table 4-3 (Cont.) Conditions Tab
Condition Attribute Description
Alias Specify an optional column alias. An alias is an alternative
column name. Aliases make a column name more
descriptive, shorten the column name, or prevent possible
ambiguous references.
Object Specifies table or view name.
Condition Specify a condition for the column.
The condition you enter modifies the query's WHERE clause.
When specifying a column condition, you must include the
appropriate operator and operand. Consider the following
examples:
>=10
='VA'
IN (SELECT dept_no FROM dept)
BETWEEN SYSDATE AND SYSDATE + 15
Sort Type Select a sort type. Options include:
• Ascending (Asc)
• Descending (Desc)
Sort Order Enter a number (1, 2, 3, and so on) to specify the order in
which selected columns should display.
Show Select this check box to include the column in your query
results. It is not necessary to select Show to add a column to
the query for filtering only.
For example, suppose you want to create following query:
SELECT ename FROM emp WHERE deptno = 10
To create this query in Query Builder:
a. From the Object list, select emp.
b. In the Design Pane, select ename and deptno.
c. For the deptno column, in Condition enter =10 and
deselect the Show check box.
Function Select an argument function. Available functions are
dependent on the column type and include:
• NUMBER columns - COUNT, COUNT DISTINCT, AVG,
MAX, MIN, SUM
• VARCHAR2, CHAR columns - COUNT, COUNT
DISTINCT, INITCAP, LENGTH, LOWER, LTRIM, RTRIM,
TRIM, UPPER
• DATE, TIMESTAMP columns - COUNT, COUNT
DISTINCT, TO_CHAR YEAR, TO_CHAR QUARTER,
TO_CHAR MONTH, TO_CHAR DAY, TO_CHAR DAY OF
YEAR, TO_CHAR WEEK
Group By Specify columns to be used for grouping when an aggregate
function is used. Only applicable for columns included in
output.
Using Query Builder
Using Oracle Application Express Utilities 4-25

Table 4-3 (Cont.) Conditions Tab
Condition Attribute Description
Delete Deselect the column, excluding it from the query.
As you select columns and define conditions, Query Builder writes the SQL for
you.
4. To view the underlying SQL, click the SQL tab.
See Also:
"Viewing Query Results (page 4-30)"
4.6.7 Creating Relationships Between Objects
You can create relationships between objects by creating a join.
A join identifies a relationship between two or more tables, views, or materialized
views.
About Join Conditions (page 4-26)
A join condition determines how the rows from one object combine with
the rows from another object.
Joining Objects Manually (page 4-26)
You can create a join manually by selecting the Join column in the
Design pane.
Joining Objects Automatically (page 4-27)
Learn how to join objects automatically.
4.6.7.1 About Join Conditions
A join condition determines how the rows from one object combine with the rows
from another object.
When you write a join query, you specify a condition that conveys a relationship
between two objects. This condition is called a join condition.
Query Builder supports inner, outer, left, and right joins. An inner join (also called a
simple join) returns the rows that satisfy the join condition. An outer join extends the
result of a simple join. An outer join returns all rows that satisfy the join condition and
returns some or all of those rows from one table for which no rows from the other
satisfy the join condition.
See Also:
"Oracle Database SQL Language Reference" for information about join conditions
4.6.7.2 Joining Objects Manually
You can create a join manually by selecting the Join column in the Design pane.
To join two objects manually:
Using Query Builder
4-26 Oracle Application Express SQL Workshop Guide

1. On the Workspace home page, click SQL Workshop and then Query Builder.
Query Builder appears.
2. From the Object Selection pane, select the objects you want to join.
The objects display in the Design pane.
3. Identify the columns you want to join.
You create a join by selecting the Join column adjacent to the column name. The
Join column displays to the right of the datatype, beneath the Remove icon. When
your cursor is in the appropriate position, the following tooltip displays:
Click here to select column for join
4.
Select the appropriate Join column for the first object.
When selected, the Join column displays as a dark gray. To deselect a Join column,
simply select it again or press ESC.
5.
Select the appropriate Join column for the second object.
Tip:
You can also join two objects by dragging and dropping. Select a column in
the first table and then drag and drop it onto a column in another table.
When joined, a line connects the two columns.
6. Select the columns to be included in your query. You can view the SQL statement
resulting from the join by positioning the cursor over the line.
7. Click Run to execute the query.
The Results pane displays the query results.
4.6.7.3 Joining Objects Automatically
Learn how to join objects automatically.
When you join objects automatically, the Query Builder suggests logical, existing
parent and child relationships between existing columns.
To join objects automatically:
1. On the Workspace home page, click SQL Workshop and then Query Builder.
Query Builder appears.
2.
From the Object Selection pane, select an object.
The object displays in the Design pane.
3.
Click the small icon in the upper left corner of the object. Depending upon the
selected object, the icon label displays as Table Actions or View Actions.
The Actions window appears. Use the Actions window to select all columns within
the current object or objects related to the current object.
4.
In the Actions window, select the appropriate options:
Using Query Builder
Using Oracle Application Express Utilities 4-27

• Check All - Select this option to select the first twenty columns in the current
object.
• Add Parent - Displays tables that are referenced as a foreign key to the current
object.
• Add Child - Displays tables that reference the current object in a foreign key.
If using Add Parent or Add child, the selected object appears and a line connects
the foreign key columns.
5. Select additional columns to be included in your query.
You can view the SQL statement resulting from the join by positioning the cursor
over the green line.
6.
Click Run to execute the query.
The Results pane displays the query results.
4.6.8 Working with Saved Queries
You can create queries and save the query for later use.
As you create queries, you can save them by clicking the Save button in the Design
pane. Once you save a query, you can access it later in the Saved SQL view.
Tip:
The Saved SQL view only displays queries saved in Query Builder. In SQL
Commands you can view queries saved in both SQL Commands and Query
Builder.
Saving a Query (page 4-28)
Learn how to save a query.
Editing a Saved Query (page 4-29)
Once you save a query, you can access it in the Saved SQL view and
edit.
Deleting a Saved Query (page 4-29)
Learn how to delete a saved SQL query.
4.6.8.1 Saving a Query
Learn how to save a query.
To save a query:
1.
Build a query:
a.
On the Workspace home page, click SQL Workshop and then Query Builder.
Query Builder appears.
b.
Select objects from the Object Selection pane.
c.
Add objects to the Design pane and select columns.
d.
Execute the query.
2.
Click Save.
Using Query Builder
4-28 Oracle Application Express SQL Workshop Guide

3. Enter a name and description and click Save.
The saved query displays in the Saved SQL view.
Note that Query Builder does not support duplicate query names. If you open an
existing query, keep the existing name, and save it again, Query Builder over-writes
the existing query. If you change the name of an existing query and save it again,
Query Builder saves the query again under the new name.
4.6.8.2 Editing a Saved Query
Once you save a query, you can access it in the Saved SQL view and edit.
To edit a Saved SQL query:
1.
On the Workspace home page, click SQL Workshop and then Query Builder.
Query Builder appears.
2.
Select the Saved SQL tab.
3.
To filter the display, you can:
•
Make a selection from the Owner list and click Go.
• Enter a search query in the Name field and click Go.
4. To edit a query, select the appropriate name.
The saved query appears. The selected objects display in the Design pane and the
Conditions view appears.
4.6.8.3 Deleting a Saved Query
Learn how to delete a saved SQL query.
To delete a Saved SQL query:
1. On the Workspace home page, click SQL Workshop and then Query Builder.
Query Builder appears.
2. Select the Saved SQL tab.
3. Select the queries to be deleted and click Delete Checked.
4.6.9 Viewing Generated SQL
The SQL view presents a read-only, formatted representation of the SQL generated by
Query Builder. You can copy the SQL code that appears in the SQL View for use in
other tools such as SQL Command Processor or App Builder.
To access the SQL view:
1.
On the Workspace home page, click SQL Workshop and then Query Builder.
Query Builder appears.
2.
Select an object from the Object Selection pane.
The selected object appears in the Design Pane.
Using Query Builder
Using Oracle Application Express Utilities 4-29

3. Select the columns to be included in your query.
4. Click the SQL tab.
The SQL code generated by Query Builder appears.
See Also:
" Using SQL Commands (page 3-1)"
4.6.10 Viewing Query Results
Execute a query, once you select objects and determine what columns to include in
your query.
Execute a query by:
•
Clicking the Run button (or pressing Ctrl+Enter)
•
Selecting the Results tab
The Results view appears, displaying formatted query results. To export the report as
a comma-delimited file (.csv) file, click the Download link at the bottom of the page.
4.7 Managing User Interface Defaults
Managing user interface defaults enables you to assign default interface properties,
create default wizard, modify the table user interface defaults, add new attributes, and
export the user interface defaults.
About User Interface Defaults (page 4-30)
User Interface Defaults enable you to assign default user interface
properties for regions and items.
Creating User Interface Defaults for a Table (page 4-31)
If no defaults have been created for a table, use the Table Dictionary
Create Defaults wizard to automatically generate defaults based on the
database table and column definitions. After the initial defaults are
created, you can modify the individual default values.
Modifying Table User Interface Defaults (page 4-32)
Learn how to modify existing table user interface defaults.
Creating User Interface Attributes (page 4-32)
Use the Attribute Dictionary to define and add new attributes.
Modifying User Interface Attributes (page 4-33)
Modify existing user interface attributes on the Grid Edit page or by
selecting a specific column.
Exporting and Importing User Interface Defaults (page 4-33)
You export user interface defaults in the same way you export any
related application file.
4.7.1 About User Interface Defaults
User Interface Defaults enable you to assign default user interface properties for
regions and items.
Managing User Interface Defaults
4-30 Oracle Application Express SQL Workshop Guide

This wizard enables you to specify whether you want to use User Interface Defaults if
they exist. When you create a form or report using a wizard, the wizard uses this
information to create default values for region and item properties. Utilizing user
interface defaults can save valuable development time and has the added benefit of
providing consistency across multiple pages in an application. User Interface Defaults
are divided into two categories, the Table Dictionary and the Attribute Dictionary.
• The Table Dictionary enables you to specify defaults for tables and columns that
are initialized from the database definition.
• The Attribute Dictionary enables you to create defaults based on attribute or
column names, thus being usable across all tables. Attribute definitions can also
have synonyms, allowing more than one attribute to share a common definition.
When you use User Interface Defaults during creation of pages and regions, the Table
Dictionary takes priority over the Attribute Dictionary. If a table and column
combination exists, that is used rather than an attribute definition of the same name.
This can be useful, for example, when you want to have a specific label or Help text for
the CREATED_BY column in the emp table but then use more generic defaults for
CREATED_BY in another table.
4.7.2 Creating User Interface Defaults for a Table
If no defaults have been created for a table, use the Table Dictionary Create Defaults
wizard to automatically generate defaults based on the database table and column
definitions. After the initial defaults are created, you can modify the individual default
values.
To create the initial user interface defaults for tables:
1. On the Workspace home page, click the SQL Workshop.
2. Click Utilities.
3. Click User Interface Defaults.
The Dashboard page for User Interface Defaults appears.
4. Click Table Dictionary.
The Table Dictionary page displays a report of all objects in your workspace that
includes a Defaults Exist column indicating whether defaults have been created for
each object.
5. Click the object name for which you want to create defaults.
The Create Table Dictionary Defaults page appears.
6.
Click Create Defaults.
The Table Dictionary page displays a report showing that defaults exist for the
object you selected.
Note:
Synchronizing defaults with the database data dictionary creates table based
defaults for any tables in the current schema that do not have defaults yet and
adjusts those of tables that do to match the database definition.
Managing User Interface Defaults
Using Oracle Application Express Utilities 4-31

See Also:
"Modifying Table User Interface Defaults (page 4-32)"
4.7.3 Modifying Table User Interface Defaults
Learn how to modify existing table user interface defaults.
To modify existing table defaults:
1. On the Workspace home page, click the SQL Workshop.
2.
Click Utilities.
3.
Click User Interface Defaults.
The Dashboard page for User Interface Defaults appears.
4.
Click Table Dictionary.
The Table Dictionary page displays a report of all objects in your workspace. The
Defaults Exist column indicates whether defaults have been created for an object.
5. Click the object name you want to modify.
The Table and Column Properties page displays a report of column defaults.
6. Click the column name you want to modify.
The Column Defaults page displays.
7. Make modifications and click Apply Changes.
See field-level help for a description of the individual settings on this page.
Note:
A column can be removed from the Table Dictionary, thus allowing the
Attribute Dictionary defaults to be used during the creation process. For
example, when you have auditing columns where you may want the exact
same labels and help across every instance of CREATED_BY and CREATED_ON,
regardless of which table they come from, you could simply remove the
column defaults from each table for those columns.
4.7.4 Creating User Interface Attributes
Use the Attribute Dictionary to define and add new attributes.
To create an attribute:
1.
On the Workspace home page, click the SQL Workshop.
2.
Click Utilities.
3.
Click User Interface Defaults.
The Dashboard page for User Interface Defaults appears.
Managing User Interface Defaults
4-32 Oracle Application Express SQL Workshop Guide

4. Click Attribute Dictionary.
The Attribute Dictionary page displays a report of all attributes in your workspace.
5. Click Create.
The Column Details page appears.
6. Enter attribute specifications and click Create.
See field-level help for a description of the individual settings on this page.
4.7.5 Modifying User Interface Attributes
Modify existing user interface attributes on the Grid Edit page or by selecting a
specific column.
To modify an existing attribute:
1.
On the Workspace home page, click the SQL Workshop.
2.
Click Utilities.
3.
Click User Interface Defaults.
The Dashboard page for User Interface Defaults appears.
The current schema displays to the right of the breadcrumb menu.
4. Click Attribute Dictionary.
The Attribute Dictionary page displays a report of all attributes in your workspace.
5. To edit select attributes for all displayed columns:
a. Click Grid Edit.
b. Edit the appropriate attributes and click Apply Changes.
6. To edit a specific column, click the edit icon for the attribute you want to modify.
The Column Details page displays.
Note:
If you select to edit a synonym, identified by having the Synonym of column
populated, you are taken to the definition for the base column, because the
base column and all synonyms share one definition. To delete the synonym,
select the synonym within the Synonyms region. Deleting the base column
deletes the column and all synonyms.
7.
Make modifications and click Apply Changes.
See field-level help for a description of the individual settings on this page.
4.7.6 Exporting and Importing User Interface Defaults
You export user interface defaults in the same way you export any related application
file.
Managing User Interface Defaults
Using Oracle Application Express Utilities 4-33

Exporting user interface defaults from one development instance to another involves
the following steps:
1. Export the user interface defaults using the Export User Interface Defaults utility.
2. Import the exported file into the target Oracle Application Express instance.
3. Install the exported file from Export Repository.
When you export user interface defaults, all user interface defaults for the selected
schema are exported to a single script. The file contains an API call to create table hints
by making calls to the application PL/SQL API. You can use this file to import user
interface defaults to another database and Oracle Application Express instance.
See Also:
• "Exporting User Interface Defaults" in Oracle Application Express App
Builder User’s Guide
• "Importing User Interface Defaults" in Oracle Application Express App
Builder User’s Guide
• "Installing Export Files" in Oracle Application Express App Builder User’s
Guide
4.8 Viewing Database Details
If you have an account that has been granted a database administrator role, you can
view details about your database on the About Database page.
To access details about your database:
1. On the Workspace home page, click SQL Workshop.
2. Click Utilities.
3. Click About Database.
4. If prompted, enter the appropriate administrator user name and password and
click Login.
The About Database page appears.
5. To view additional information about installed options, currently used features, or
National Language Support, select one of the following check boxes and click Go:
• Version
• Settings
• Options
• National Language Support
• CGI Environment
• Parameters
Viewing Database Details
4-34 Oracle Application Express SQL Workshop Guide

4.9 Monitoring the Database
The reports available on the Database Monitor page provide a database-wide view of
the database sessions, system statistics, SQL statements, and longer operations.
You can use these reports to identify poorly performing SQL and to better understand
the workload of the database.
Tip:
To access any of the icons on the Database Monitor page, you must have an
account that has been granted a database administrator role.
Accessing Session Page Reports (page 4-35)
A session is the connection of a user to an Oracle database instance.
System Statistics (page 4-38)
Displays the System Statistics page statistics.
Viewing System Statistics (page 4-38)
Learn how to view the System Statistics page.
About Top SQL Page (page 4-39)
The top SQL statements represent the SQL statements that are executed
most often, that use more system resources than other SQL statements,
or that use system resources more frequently than other SQL statements.
Viewing Top SQL Page (page 4-39)
Use the Top SQL page to identify poorly performing SQL.
About Long Operations Page (page 4-39)
The Long Operations page displays the status of various operations that
run for longer than 6 seconds (in absolute time).
Viewing the Long Operations Page (page 4-40)
Learn how to view the Long Operations page.
4.9.1 Accessing Session Page Reports
A session is the connection of a user to an Oracle database instance.
A session lasts from the time the user connects until the time the user disconnects or
exits the database application.
Accessing Reports on the Session Page (page 4-36)
You must have database administrator privileges to access the Sessions
page.
Creating Sessions Reports (page 4-36)
The Sessions Report displays information about the current sessions in
the database.
Controlling the Number of Rows for Locks Reports (page 4-37)
The Locks report displays a report of sessions which have locks that are
blocking other session(s).
Creating Waits Reports (page 4-37)
The Waits report displays the wait events for each session.
Monitoring the Database
Using Oracle Application Express Utilities 4-35

Creating I/O Reports (page 4-37)
The I/0 report displays details about the I/O for each session.
Creating SQL Reports (page 4-37)
The SQL report displays details about the current or last SQL statement
executed for each session.
Creating Open Cursors Report (page 4-37)
The Open Cursors report displays details about the number of open
cursors for each session.
4.9.1.1 Accessing Reports on the Session Page
You must have database administrator privileges to access the Sessions page.
A session is the connection of a user to an Oracle database instance. A session lasts
from the time the user connects until the time the user disconnects or exits the
database application.
To access reports on the Sessions page:
1.
On the Workspace home page, click SQL Workshop.
2. Click Utilities.
3. Click Database Monitor.
4. Click Sessions.
5. If prompted, enter the appropriate database administrator user name and
password and click Login.
The Sessions page appears.
6. To view a report, select one of the following tabs at the top of the page:
• Sessions
• Locks
• Waits
• I/O
• SQL
• Open Cursors
4.9.1.2 Creating Sessions Reports
The Sessions Report displays information about the current sessions in the database.
Use the controls at the top of page to narrow the view:
• Search. Enter search criteria and click Go. For search details, click the Search label.
• Status. Select a status and click Go.
• Show. Select how many columns to display and click Go.
• Rows. Select the number of rows to appear in the report and click Go.
Monitoring the Database
4-36 Oracle Application Express SQL Workshop Guide

To view session details, click the Session ID (SID). The Session Details page appears.
To remove the current session, navigate to the Session Details page and click Kill
Session.
4.9.1.3 Controlling the Number of Rows for Locks Reports
The Locks report displays a report of sessions which have locks that are blocking other
session(s).
To control the number of rows that appear, make a selection from the Rows list and
click Go.
4.9.1.4 Creating Waits Reports
The Waits report displays the wait events for each session.
Use the controls at the top of page to narrow the view:
• Search. Enter search criteria and click Go. For search details, click the Search label.
• Status. Select a status and click Go.
• Show. Select how many columns to display and click Go.
• Rows. Select the number of rows to appear in the report and click Go.
To view session details, click the Session ID (SID). The Session Details page appears.
To remove the current session, click Kill Session.
4.9.1.5 Creating I/O Reports
The I/0 report displays details about the I/O for each session.
Use the controls at the top of page to narrow the view:
• Search. Enter search criteria and click Go. For search details, click the Search label.
• Rows. Select the number of rows to appear in the report and click Go.
To view session details, click the Session ID (SID). The Session Details page appears.
To remove the current session, click Kill Session.
4.9.1.6 Creating SQL Reports
The SQL report displays details about the current or last SQL statement executed for
each session.
Use the controls at the top of page to narrow the view:
• Search. Enter search criteria and click Go. For search details, click the Search label.
• Status. Select a status and click Go.
• Show. Select how many columns to display and click Go.
• Rows. Select the number of rows to appear in the report and click Go.
To view session details, click the Session ID (SID). The Session Details page appears.
To remove the current session, click Kill Session.
4.9.1.7 Creating Open Cursors Report
The Open Cursors report displays details about the number of open cursors for each
session.
Monitoring the Database
Using Oracle Application Express Utilities 4-37

Use the controls at the top of page to narrow the view:
• Search. Enter search criteria and click Go. For search details, click the Search label.
• Status. Select a status and click Go.
• Rows. Select the number of rows to appear in the report and click Go.
To view details about a specific open cursor count, click the numeric link under the
Open Cursor Count column.
To view session details, click the Session ID (SID). The Session Details page appears.
To remove the current session, click Kill Session.
4.9.2 System Statistics
Displays the System Statistics page statistics.
The System Statistics page displays statistics for:
•
Physical I/O. A physical I/O is an I/O that requires disk access. This report
displays disk access statistics for physical reads and writes.
•
Logical I/O. A logical I/O is an I/O that is satisfied in memory or disk. Displays
the sum of buffer reads which might be consistent gets or current mode gets. Redo
is the buffer in the SGA that contains information about changes.
• Memory Statistics. Displays memory consumption of the database.
• Time Statistics. Shows various times consumed by the database.
• SQL Cursor Statistics. Displays statistics about the cursors in the Oracle database.
• Transaction Statistics. Shows the number of transactions performed.
4.9.3 Viewing System Statistics
Learn how to view the System Statistics page.
To view the System Statistics page:
1. On the Workspace home page, click SQL Workshop.
2. Click Utilities.
3. Click Database Monitor.
4. Click System Statistics.
5.
If prompted, enter the appropriate administrator user name and password and
click Login.
The System Statistics page appears.
Additional controls on the System Statistics page include:
• Refresh Report - Refreshes the System Statistics report.
• Save Statistics - Saves the current report.
Monitoring the Database
4-38 Oracle Application Express SQL Workshop Guide

• Show delta between current and saved values - Click this check box to display
actual statistic values, or display deltas between a saved value and the current
value.
See Also:
"Oracle Database Performance Tuning Guide"
4.9.4 About Top SQL Page
The top SQL statements represent the SQL statements that are executed most often,
that use more system resources than other SQL statements, or that use system
resources more frequently than other SQL statements.
Use the Top SQL page to identify poorly performing SQL.
4.9.5 Viewing Top SQL Page
Use the Top SQL page to identify poorly performing SQL.
To view the Top SQL page:
1. On the Workspace home page, click the SQL Workshop.
2. Click Utilities.
3. Click Database Monitor.
4. Click Top SQL.
5. If prompted, enter the appropriate administrator user name and password and
click Login.
The Top SQL page appears. Use the search fields and lists and the top of the page
and click Go to narrow the display. For details on each field or list, click the label.
6. To access the SQL Plan page, click the View icon.
The SQL Plan page appears, containing the following sections:
• Query Plan - Contains a color coded explain plan. Note that unindexed
columns display in red.
• SQL Text - Displays the full text of the SQL statement.
• Indexes - Displays all indexes on the table in the query. There is a checkmark
when that index is used in the query.
• Table Columns - Shows all columns on all tables or views in the query.
4.9.6 About Long Operations Page
The Long Operations page displays the status of various operations that run for longer
than 6 seconds (in absolute time).
These operations currently include many backup and recovery functions, statistics
gathering, and query execution, and more operations are added for every Oracle
release.
Monitoring the Database
Using Oracle Application Express Utilities 4-39

4.9.7 Viewing the Long Operations Page
Learn how to view the Long Operations page.
To view the Long Operations page:
1. On the Workspace home page, click the SQL Workshop.
2. Click Utilities.
3. Click Database Monitor.
4.
Click Long Operations.
5.
If prompted, enter the appropriate administrator user name and password and
click Login.
See Also:
"V$SESSION_LONGOPS in Oracle Database Reference"
4.10 Using the Recycle Bin
You can use the Recycle Bin to view and restore dropped database objects.
When you drop a table, the space associated with the table is not immediately
removed. The Oracle database renames the table and places it and any associated
objects in the Recycle Bin. You can recover objects in the Recycle Bin at a later time.
Note:
The Recycle Bin feature is only available if you run with an Oracle 10g or later
database.
Managing Objects in the Recycle Bin (page 4-40)
Once you select an object and view the Object Details page, you can
choose to purge the object or restore the object by clicking the
appropriate button.
Emptying the Recycle Bin Without Viewing the Objects (page 4-41)
You can empty the Recycle Bin without viewing the objects by using
Purge Recycle Bin option.
4.10.1 Managing Objects in the Recycle Bin
Once you select an object and view the Object Details page, you can choose to purge
the object or restore the object by clicking the appropriate button.
You can view objects in the Recycle Bin on the Dropped Objects page.
To view objects in the Recycle Bin:
1.
On the Workspace home page, click the SQL Workshop.
2.
Click Utilities.
Using the Recycle Bin
4-40 Oracle Application Express SQL Workshop Guide

3. Click Recycle Bin.
4. Click Dropped Objects.
The Dropped Objects page appears.
5. To filter the report, select an object type, enter the object name in the Original
Name field, and click Go.
6. To view object details, click the object name.
The Object Details page appears.
7.
To restore the current object, click Restore Object.
8.
To permanently delete the current object, click Purge Object.
4.10.2 Emptying the Recycle Bin Without Viewing the Objects
You can empty the Recycle Bin without viewing the objects by using Purge Recycle
Bin option.
To empty the Recycle Bin without viewing the objects:
1. On the Workspace home page, click SQL Workshop.
2. Click Utilities.
3. Click Recycle Bin.
4. Click Purge Recycle Bin.
The Purge Recycle Bin page appears.
5. Confirm your request by clicking Purge Recycle Bin again.
Using the Recycle Bin
Using Oracle Application Express Utilities 4-41

Using the Recycle Bin
4-42 SQL Workshop Guide

5
Using SQL Scripts
Use SQL scripts to create, edit, view, run, and delete script files.
About SQL Scripts (page 5-2)
A SQL script is a set of SQL commands saved as a file in SQL Scripts.
Accessing SQL Scripts (page 5-2)
Learn how to access SQL Scripts.
About the SQL Scripts Page (page 5-3)
The SQL Scripts page displays an interactive report of all SQL scripts
created by the current user.
About the Tasks List (page 5-5)
A Tasks list displays on the right side of the SQL Scripts page.
Creating a SQL Script (page 5-5)
Learn about different ways of creating a SQL script.
Using the Script Editor (page 5-6)
You use the Script Editor to add content to a new script, to edit existing
scripts, and to run and delete scripts in the script repository.
Deleting a SQL Script (page 5-8)
You can delete scripts from the Script Repository by deleting selected
scripts from the SQL Scripts page, or deleting the current script in the
Script Editor.
Copying a SQL Script (page 5-9)
You can copy a script in the Script Repository by saving it with a new
name.
Executing a SQL Script (page 5-10)
You can execute scripts stored in the Script Repository. You can submit a
script for execution either from the Script Editor or from the SQL Scripts
page.
Viewing SQL Script Results (page 5-11)
You use the Manage Script Results page to view and delete script results.
Exporting and Importing SQL Scripts (page 5-12)
You can transfer scripts from your current Script Repository to a Script
Repository in a different workspace by using the Export and Import
tasks.
Viewing Script and Result Quotas (page 5-14)
You can view the script limits in the current workspace on the Script
Quotas page.
Using SQL Scripts
5-1

5.1 About SQL Scripts
A SQL script is a set of SQL commands saved as a file in SQL Scripts.
A SQL script can contain one or more SQL statements or PL/SQL blocks. You can use
SQL scripts to create, edit, view, run, and delete database objects.
When using SQL Scripts, remember the following:
• SQL*Plus commands in a SQL script are ignored at runtime.
• There is no interaction between SQL Commands and SQL scripts.
• You can cut and paste a SQL command from the SQL Script editor to run it in SQL
Commands.
• SQL scripts does not support bind variables.
See Also:
• " Using SQL Scripts (page 5-1)"
• " Using SQL Commands (page 3-1)"
• "About Long Operations Page (page 4-39)"
5.2 Accessing SQL Scripts
Learn how to access SQL Scripts.
To access SQL Scripts:
1. On the Workspace home page, click SQL Workshop and then SQL Scripts.
About SQL Scripts
5-2 Oracle Application Express SQL Workshop Guide

The SQL Scripts page appears.
Note:
If the instance administrator has disabled RESTful Services for this
Application Express instance, RESTful Services are not available for this
instance and the RESTful Services icon does not display.
See Also:
• "Configuring SQL Workshop" in Oracle Application Express Administration
Guide
• "About the SQL Scripts Page (page 5-3)"
• " Using SQL Commands (page 3-1)"
• "About Long Operations Page (page 4-39)"
5.3 About the SQL Scripts Page
The SQL Scripts page displays an interactive report of all SQL scripts created by the
current user.
If you are a workspace administrator, this page displays all SQL scripts created by
workspace users. You can alter the layout of report data by choosing the columns you
About the SQL Scripts Page
Using SQL Scripts 5-3
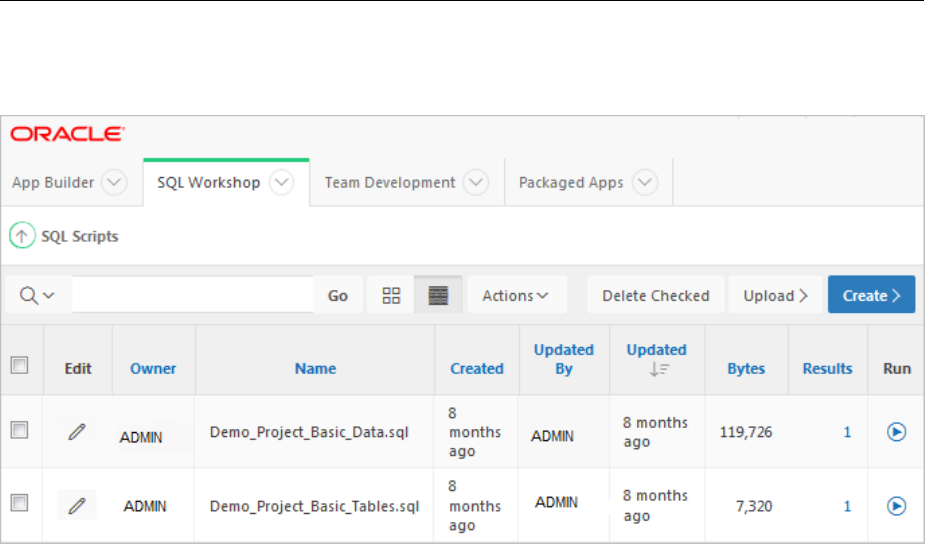
are interested in, applying filters, highlighting, and sorting. You can also define
breaks, aggregations, different charts, group bys, and add your own computations.
A search bar displays at the top of every interactive report and includes the following
features:
• Select Columns to Search - This icon resembles a magnifying glass. Click this icon
to narrow your search to specific columns. To search all columns, select All
Columns.
• View Icons - Displays each script as an icon identified by the script name.
• View Report - Displays each script as a line in a report. Each line includes a check
box to enable the selection of scripts for deletion, an edit icon to enable the script
to be loaded into the script editor, the script name, the script owner, when the
script was last updated and by who, the size in bytes, the number of times the
script has been run linked to the run results, and an icon to enable the script to be
run.
Reports view offers the following additional controls:
– Delete Checked - In Reports view, select the check box associated with the
script you want to delete and click Delete Checked.
– Sort - In Reports view, click a column heading to sort the listed scripts by that
column.
• Upload - Click Upload to upload a script from your local file system into SQL
Scripts.
• Create - Click Create to create a script in the Script Editor.
About the SQL Scripts Page
5-4 Oracle Application Express SQL Workshop Guide

See Also:
• "Deleting a SQL Script (page 5-8)"
• "Uploading a SQL Script (page 5-6)"
• "Creating a SQL Script (page 5-5)"
• "Selecting a Schema (page 1-2)"
• "Customizing Interactive Reports" in the Oracle Application Express App
Builder User’s Guide
5.4 About the Tasks List
A Tasks list displays on the right side of the SQL Scripts page.
The Task list contains the following links:
•
Manage Results - enables you to view, search, and display results.
•
Show Quotas - displays the Script Quotas page. The Script Quotas page shows
the maximum size of a single result, the maximum size of all results, the quota
used and the quota free. It also shows the maximum size of a SQL Script.
• Export - enables you to export multiple scripts from the current SQL Script
Repository for import into SQL Scripts in a different workspace. The scripts you
select to export are encoded in a single export script written to your local file
system. The export script is named workspace_name_script.sql by default.
• Import - enables you to import a script exported by this workspace, or a different
workspace. Import only imports scripts encoded in an export script created using
Export. The export script to import must be accessible on your local file system.
See Also:
• "Viewing SQL Script Results (page 5-11)"
• "Exporting and Importing SQL Scripts (page 5-12)"
• "Accessing SQL Scripts (page 5-2)"
5.5 Creating a SQL Script
Learn about different ways of creating a SQL script.
You can create a script in the Script Repository by:
Creating a SQL Script in the Script Editor (page 5-5)
Learn how to create SQL script in the Script Editor.
Uploading a SQL Script (page 5-6)
Learn how to upload a SQL script from your local file system.
5.5.1 Creating a SQL Script in the Script Editor
Learn how to create SQL script in the Script Editor.
About the Tasks List
Using SQL Scripts 5-5

To create an SQL script in the Script Editor:
1. On the Workspace home page, click SQL Workshop and then SQL Scripts.
The SQL Scripts page appears.
2. Click the Create button.
The Script Editor appears.
3. In Script Name, enter a name for the script. Script name extensions are optional.
4. Enter the SQL statements, PL/SQL blocks you want to include in your script.
Remember that SQL*Plus commands are ignored at runtime.
5.
Click Create.
The SQL Scripts page appears listing your newly saved script.
5.5.2 Uploading a SQL Script
Learn how to upload a SQL script from your local file system.
To upload a script from your local file system:
1.
On the Workspace home page, click SQL Workshop and then SQL Scripts.
The SQL Scripts page appears.
2.
Click the Upload button.
The Upload Script dialog appears.
3.
For Upload Script:
a.
File - Browse to locate the script you want to upload.
b.
Script Name - Optionally enter a new name in the Script Name field. This
name displays in the Script Repository.
c.
File Character Set - Select the character set in which the script is encoded.
d.
Click Upload.
The SQL Scripts page appears listing your newly uploaded script.
Tip:
The script is parsed during runtime. When parsed, ignored statements such as
SQL*PLUS commands are listed. Any invalid SQL is identified only in results.
If a script of the same name exists, you are prompted to rename it.
See Also:
"Creating a SQL Script in the Script Editor (page 5-5)"
5.6 Using the Script Editor
You use the Script Editor to add content to a new script, to edit existing scripts, and to
run and delete scripts in the script repository.
Using the Script Editor
5-6 Oracle Application Express SQL Workshop Guide

Editing an Existing Script (page 5-7)
Learn how to edit an existing SQL script.
Script Editor Controls (page 5-8)
Controls and buttons available within the Script Editor.
5.6.1 Editing an Existing Script
Learn how to edit an existing SQL script.
To edit a SQL script:
1.
On the Workspace home page, click SQL Workshop and then SQL Scripts.
The SQL Scripts page appears.
2.
You can load a script into the editor as follows:
• In Icons view, click the script icon.
•
In Report view, click the Edit icon.
The Script Editor appears.
3. Edit the script.
Note that new lines are automatically indented to the previous line start column.
Other features of the Script Editor include:
• Undo - Use to undo the last edit.
• Redo - Use to reapply the last undone edit.
• Find - Click the Find icon (which resembles a magnifying glass) to perform a
basic search.
• Replace - Click the Replace icon (which resembles a two-sided arrow) to
replace existing code.
• Cut, Copy, and Paste - Use standard edit controls to cut, copy and paste
content in the Script Editor.
• Auto Complete - Click the Auto Complete icon to complete the command.
4. Click Apply Changes to save your script.
The SQL Scripts page appears.
You can test your script during editing by running the script to reveal errors.
See Also:
• "Executing a SQL Script (page 5-10)"
• "Viewing SQL Script Results (page 5-11)"
Using the Script Editor
Using SQL Scripts 5-7

5.6.2 Script Editor Controls
Controls and buttons available within the Script Editor.
Table 5-1 (page 5-8)describes the buttons and controls available within the Script
Editor
Table 5-1 Buttons and Controls within the Script Editor
Button Descriptions
Cancel Cancel the editing session and exit the Script Editor without
saving changes made since the last save.
Download Saves a copy of the current script to your local file system. Enter
a name for the script on your local file system and a directory
path.
Delete Removes the current script from the Script Repository.
Save Saves the currently script. Save is disabled if you edit the Script
Name. Instead use Apply Changes.
Apply Changes Saves the script and returns to the SQL Scripts report.
Run Submits the script for execution.
Undo (Ctrl+Z) Removes, or undoes, the most recent line edit made in the
Script Editor.
Redo (Ctrl+Y) Repeats the most recent line edit made in the Script Editor.
Find (Ctrl+F) Click the Find icon (which resembles a magnifying glass) to
perform a basic search.
Replace (Ctrl+Shift+F) Click the Replace icon (which resembles a two-sided arrow) to
replace existing code.
See Also:
• "Deleting a SQL Script (page 5-8)"
• "Executing a SQL Script (page 5-10)"
5.7 Deleting a SQL Script
You can delete scripts from the Script Repository by deleting selected scripts from the
SQL Scripts page, or deleting the current script in the Script Editor.
Deleting Scripts from the SQL Scripts Page (page 5-9)
Learn how to delete scripts from the SQL Scripts page.
Deleting a Script in the Script Editor (page 5-9)
Learn how to delete a script in the Script Editor.
Deleting a SQL Script
5-8 Oracle Application Express SQL Workshop Guide

5.7.1 Deleting Scripts from the SQL Scripts Page
Learn how to delete scripts from the SQL Scripts page.
To delete scripts from the SQL Scripts page:
1. On the Workspace home page, click SQL Workshop and then SQL Scripts.
The SQL Scripts page appears.
2. Click the View Report icon.
Reports view appears.
3.
Select the scripts to be deleted.
To select individual scripts, click the check box to the left of the script name. To
select all scripts visible in the current page, click the check box in the column
heading.
4.
Click Delete Checked to permanently remove the selected scripts from the Script
Repository.
5. When prompted to confirm the delete action, click OK.
5.7.2 Deleting a Script in the Script Editor
Learn how to delete a script in the Script Editor.
To delete a script in the Script Editor:
1. On the Workspace home page, click SQL Workshop and then SQL Scripts.
The SQL Scripts page appears.
2. Open the script you want to delete in the Script Editor.
3. Click Delete to permanently remove the script from the Script Repository.
4. When prompted to confirm the delete action, click OK.
5.8 Copying a SQL Script
You can copy a script in the Script Repository by saving it with a new name.
To copy a script:
1.
On the Workspace home page, click SQL Workshop and then SQL Scripts.
The SQL Scripts page appears.
2.
Open the script into the Script Editor.
3.
In Script Name, enter a new script name.
4.
Click Apply Changes.
The SQL Scripts page appears listing the new script.
Copying a SQL Script
Using SQL Scripts 5-9

5.9 Executing a SQL Script
You can execute scripts stored in the Script Repository. You can submit a script for
execution either from the Script Editor or from the SQL Scripts page.
When you submit a script for execution, the Run Script page appears. It displays the
script name, when it was created and by whom, when it was last updated and by
whom, the number of statements it contains, and its size in bytes. It also lists unknown
statements such as SQL*Plus commands that are ignored during execution.
If a script does not contain any runnable statements, the Run control does not display.
Executing a SQL Script in the Script Editor (page 5-10)
Learn how to execute a script in the Script Editor.
Executing a SQL Script from the SQL Scripts Page (page 5-11)
Learn how to execute a script from the SQL Scripts page.
See Also:
"About Long Operations Page (page 4-39)"
5.9.1 Executing a SQL Script in the Script Editor
Learn how to execute a script in the Script Editor.
To execute a script in the Script Editor:
1. Open the script you want to execute in the Script Editor.
2. Click Run in the Script Editor.
The Run Script page appears. This page displays information about the script and
lists statements in error preventing execution, or statements such as SQL*Plus
commands that are ignored when the script is executed.
Available options on the Run Script page include:
• Cancel - returns you to the SQL Scripts page without executing the script.
• Run Now - to submit the script for execution.
• Run in Background - runs the script using DBMS_SCHEDULER rather than
submitting for execution. This option is useful for long running scripts.
3.
Click Run Now to submit the script for execution.
The Manage Script Results page appears listing script results.
4.
To view script results, click View Results.
Executing a SQL Script
5-10 Oracle Application Express SQL Workshop Guide

See Also:
• "Using the Script Editor (page 5-6)"
• "Viewing SQL Script Results (page 5-11)"
5.9.2 Executing a SQL Script from the SQL Scripts Page
Learn how to execute a script from the SQL Scripts page.
To execute a script from the SQL Scripts page:
1.
On the Workspace home page, click SQL Workshop and then SQL Scripts.
The SQL Scripts page appears.
2.
Click the View Report icon.
Reports view appears.
3.
In the far right column, click the Run icon for the script you want to execute.
Tip:
If the script does not contain any runnable statements, an error icon displays.
The Run Script page appears. This page displays information about the script and
lists statements in error preventing execution, or statements such as SQL*Plus
commands that are ignored when the script is executed.
Available options on the Run Script page include:
• Cancel - returns you to the SQL Scripts page without executing the script.
• Run Now - to submit the script for execution.
4. Click Run Now to submit the script for execution.
The Manage Script Results page appears listing available results for the script.
5. Click the View Results icon in the far right column.
See Also:
"Viewing SQL Script Results (page 5-11)"
5.10 Viewing SQL Script Results
You use the Manage Script Results page to view and delete script results.
To view script results:
1.
On the Workspace home page, click SQL Workshop and then SQL Scripts.
The SQL Scripts page appears.
2.
On the Tasks list, click Manage Results.
Viewing SQL Script Results
Using SQL Scripts 5-11

The Manage Script Results page appears, listing available results for the script.
3. Click the View Results icon in the far right column.
The Results page appears.
The Results page displays the script name and status (Complete, Canceled,
Executing or Submitted), and lists the statements executed.
4. On the Results page, select a View option and click Go:
• Detail - Displays the Results in a report.
•
Summary - Displays a Summary page. From the Rows list, select the number
of Rows to display. Select a column heading to sort the listed values by that
column.
5.
Click Edit Script to load the script into the Script Editor.
See Also:
"Using the Script Editor (page 5-6)."
5.11 Exporting and Importing SQL Scripts
You can transfer scripts from your current Script Repository to a Script Repository in a
different workspace by using the Export and Import tasks.
Exported scripts are encoded in a single file on your local file system. Once exported,
you then log in to another workspace and import the file. During import, the file is run
to re-create the scripts in the current Script Repository.
By default, the Export SQL Scripts page lists all scripts in the Script Repository created
by the current user. There are two panes on the Export SQL Scripts page, the Scripts
pane and the Scripts to Export pane. You use the Scripts pane to select scripts to
export. Then, you use the Scripts to Export pane to finalize the scripts to export, to
choose a name for the export script, and to save the selected scripts in the export script
on your local file system. You use the Import Scripts pane to select the export script
containing the scripts to import.
Copying Scripts to an Export Script (page 5-12)
Learn how to copy scripts to an export script.
Importing Scripts (page 5-13)
Learn how to import the listed scripts into the current Script Repository.
5.11.1 Copying Scripts to an Export Script
Learn how to copy scripts to an export script.
To copy scripts to an export script:
1.
On the Workspace home page, click SQL Workshop and then SQL Scripts.
The SQL Scripts page appears.
2.
On the Tasks list, click Export.
The Export SQL Scripts page appears.
Exporting and Importing SQL Scripts
5-12 Oracle Application Express SQL Workshop Guide
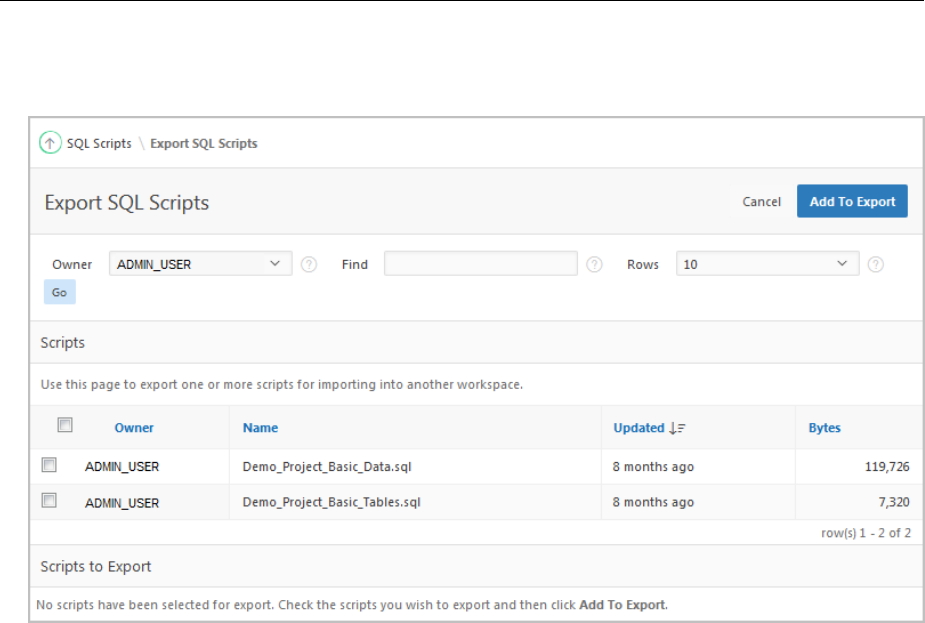
3. Select the scripts you want to export. To select all displayed scripts, click the
column head check box.
4. Click Add to Export.
The selected scripts are added to the list of scripts in the Scripts to Export pane.
5. Enter a name for the export script in the File Name field.
The default script name is workspace_name_script.sql.
6. Click Export All to export the scripts to the export script.
You are prompted to enter the directory where you want to save the export script.
5.11.2 Importing Scripts
Learn how to import the listed scripts into the current Script Repository.
To import scripts:
1. On the Workspace home page, click SQL Workshop and then SQL Scripts.
The SQL Scripts page appears.
2.
On the Tasks list, click Import.
The Import Scripts pane appears.
3.
Browse to export script you want to import to the Script Repository.
4.
Click Next to list the scripts in the export script.
The Import Scripts page appears. The Action column indicates whether the
imported script is new, or whether it replaces an existing script of the same name.
5.
Click Import Script(s) to import the listed scripts into the current Script Repository.
Exporting and Importing SQL Scripts
Using SQL Scripts 5-13

The SQL Scripts page appears listing the imported scripts.
5.12 Viewing Script and Result Quotas
You can view the script limits in the current workspace on the Script Quotas page.
To view the Script Quotas page:
1. On the Workspace home page, click SQL Workshop and then SQL Scripts.
The SQL Scripts page appears.
2.
On the Tasks list, click Show Quotas.
The Script Quotas page appears and displays the following limits:
• Result Quota in Bytes:
–
Maximum Script Result Size - The maximum size in bytes of a single
script result. This size is set by an Oracle Application Express instance
administrator and cannot be changed from within the workspace.
– Quota for All Script Results - The maximum size in bytes of all results in
this workspace. This size is set by an Oracle Application Express instance
administrator and cannot be changed from within the workspace.
– Used - The number of bytes currently used in this workspace.
– Free - The number of bytes currently free in this workspace.
– Quota - A usage bar illustrating the percentage of quota currently used.
• Script Quota in Bytes:
– Maximum Script Size - The maximum size in bytes of a single script. The
size is set by the Oracle Application Express instance administrator and
cannot be changed within the Workspace.
3. Click Cancel to return to the SQL Scripts page.
Viewing Script and Result Quotas
5-14 Oracle Application Express SQL Workshop Guide

6
Enabling Data Exchange with RESTful
Services
RESTful Services enable the declarative specification of RESTful services used to
access the database.
These services work with the Oracle REST Data Services (formerly known as Oracle
Application Express Listener) to enable the consumption of these services. This section
describes how to create, edit and delete RESTful Services.
Note:
Your workspace administrator controls whether RESTful services are enabled.
If disabled, the RESTful Services icon does not display.
What Is REST? (page 6-2)
Representational State Transfer (REST) is a style of software architecture
for distributed hypermedia systems such as the World Wide Web.
About RESTful Services (page 6-2)
RESTful Services enable an application to publish Web services that are
accessed by other applications to exchange data.
RESTful Service Requirements (page 6-3)
You must have Oracle REST Data Services release 2.0 or later as your
web listener and enabled RESTful Services either at the workspace or
instance-level by an administrator.
Accessing RESTful Services (page 6-3)
Learn how to access RESTful Services.
How to Create the RESTful Service Module Example (page 6-4)
Learn how to create the RESTful service module example.
Managing RESTful Service Modules (page 6-18)
A RESTful Service Module is a grouping of common templates, known
as resource templates, under a common Uniform Resource Identifier
(URI) prefix.
Managing Resource Templates (page 6-27)
Resource templates are a means of grouping URIs and associating them
with a particular RESTful Service Module.
Managing Resource Handlers (page 6-29)
A resource handler is a query or an anonymous PL/SQL block
responsible for handling a particular HTTP method.
Enabling Data Exchange with RESTful Services
6-1

See Also:
"Controlling RESTful Services for a Workspace" in Oracle Application Express
Administration Guide
6.1 What Is REST?
Representational State Transfer (REST) is a style of software architecture for
distributed hypermedia systems such as the World Wide Web.
A service is described as RESTful when it conforms to the tenets of REST. Although a
full discussion of REST is outside the scope of this document, a RESTful Service has
the following characteristics:
• Data is modelled as a set of resources. Resources are identified by URLs.
• A small set of operations are used to manipulate resources (for example, PUT,
POST, GET, DELETE).
• A resource can have multiple representations (for example, a blog might have a
HTML representation and a RSS representation).
• Services are stateless and since it is likely that the client wants to access related
resources, these should be identified in the representation returned, typically by
providing hypertext links.
6.2 About RESTful Services
RESTful Services enable an application to publish Web services that are accessed by
other applications to exchange data.
The data exchange for a RESTful Service follows the Representational State Transfer
(REST) architectural style. For example, you can configure a RESTful Service to return
all employee names for a particular department.
For each Web service you want your application to provide, you must configure a
RESTful Service Module. This module is a grouping of common templates, known as
resource templates under a common Universal Resource Identifier (URI) prefix. For
each method associated with the same resource template prefix that you want to
expose through this Web service, you must define a resource handler. For instance, if
you want to provide a method to return data and another to store data, you must
define a resource handler for each operation.
When you create a RESTful Service, you supply the necessary information about the
structure of the request, response and operation to be performed including:
• A URI Template identifying the set of resources the service provides
• One or more HTTP methods that the service supports along with the SQL query
or PL/SQL block to be performed. There are four HTTP methods including GET,
DELETE, POST and PUT. Only one handler per HTTP method is permitted. For
example, the empinfo resource handler can only have one resource handler using
GET, and only one using PUT.
• HTTP Header values that should be bound to parameters of the query block
• Parameters expected by the Web service
• Type of input expected by the Web service
What Is REST?
6-2 Oracle Application Express SQL Workshop Guide

• The format of the response
This section describes how to configure RESTful Services. If you want your application
to use a Web service, you must configure RESTful Web References.
See Also:
• "Implementing Web Services" in Oracle Application Express App Builder
User’s Guide
• "How to Create the RESTful Service Module Example (page 6-4)"
6.3 RESTful Service Requirements
You must have Oracle REST Data Services release 2.0 or later as your web listener and
enabled RESTful Services either at the workspace or instance-level by an
administrator.
In order for the RESTful Service utility to be available and function properly, the
following requirements must be met:
• Your configuration uses Oracle REST Data Services release 2.0 or later as your
web listener.
• An administrator has enabled RESTful Services either at the workspace or
instance-level.
Tip:
The Oracle XML DB HTTP Server with the embedded PL/SQL gateway and
Oracle HTTP Server with mod_plsql do not support RESTful Services.
• The Oracle REST Data Services version 2.0 or higher must be used. The Oracle
XML DB HTTP Server with the embedded PL/SQL gateway and Oracle HTTP
Server with mod_plsql do not support this functionality.
See Also:
• "Installing Oracle REST Data Services" in Oracle REST Data Services
Installation and Developer Guide
• "Controlling RESTful Services for a Workspace"
• "Configuring SQL Workshop" in Oracle Application Express Administration
Guide
• Oracle REST Data Services Installation and Developer Guide
6.4 Accessing RESTful Services
Learn how to access RESTful Services.
To access RESTful Services:
1.
On the Workspace home page, click SQL Workshop.
RESTful Service Requirements
Enabling Data Exchange with RESTful Services 6-3
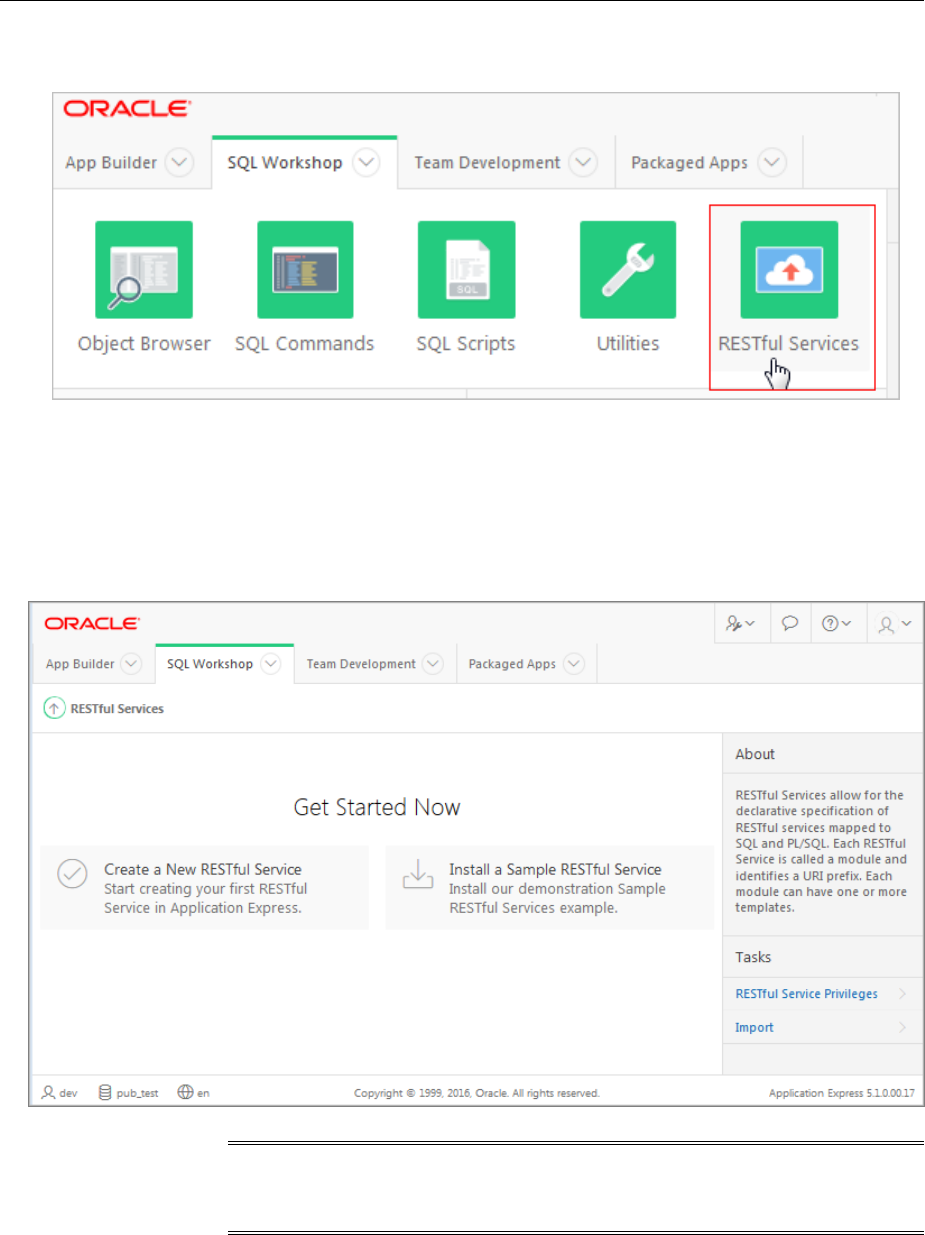
2. Click RESTful Services.
The RESTful Services home page appears.
In a new workspace, the bottom of the page displays two regions: Create a New
RESTful Service and Install a Sample RESTful Service. Click these regions to
create a new RESTful Service or install a sample RESTful Service demonstration
application. Once you create RESTful service or install the demonstration example
these regions disappear.
See Also:
"Creating a RESTful Service Module (page 6-20)"
6.5 How to Create the RESTful Service Module Example
Learn how to create the RESTful service module example.
How to Create the RESTful Service Module Example
6-4 Oracle Application Express SQL Workshop Guide

Oracle Application Express workspace by default has an example RESTful Service
Module, oracle.example.hr.
About the Example RESTful Service Module (oracle.example.hr) (page 6-5)
Every workspace includes the example RESTful Service Module,
oracle.example.hr.
Returning the Result Set in CSV Format (empinfo/) (page 6-8)
You can build and test your own example RESTful Service Module that
retrieves data in CSV format.
Retrieving Data Based on a Parameter (employees/{id}) (page 6-9)
You can add and test your own resource template that retrieves
employee data based on a parameter.
Returning the Result Set in JSON Format with Pagination Set (employees/)
(page 6-11)
You can add and test your own resource template that retrieves data in
JSON format and demonstrates pagination.
Returning the Result Set as a Feed (employeesfeed/) (page 6-12)
You can add and test your own resource template that displays return
data as a feed.
Returning the Result Set Based on a PL/SQL Block (empsecformat/{empname})
(page 6-13)
You can add and test your own resource template that uses a PL/SQL
block to format results.
Updating Data Based on a Parameter (employees/{id}) (page 6-15)
You can add and test your own resource template that updates
employee data based on a parameter.
6.5.1 About the Example RESTful Service Module (oracle.example.hr)
Every workspace includes the example RESTful Service Module,
oracle.example.hr.
This module provides example resource templates and resource handlers that
implement several different methods to retrieve and display employee information
from the emp table. To access the oracle.example.hr module, see “ Accessing
RESTful Services”.
How to Create the RESTful Service Module Example
Enabling Data Exchange with RESTful Services 6-5
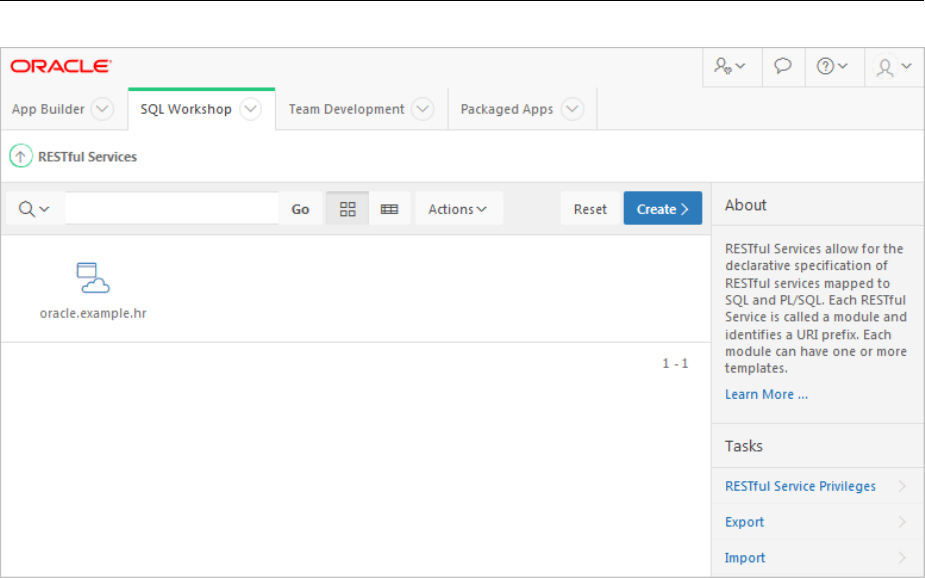
The oracle.example.hr module consists of several resource templates. Each
resource template demonstrates a different way of retrieving information and
formatting the returned results.
How to Create the RESTful Service Module Example
6-6 Oracle Application Express SQL Workshop Guide
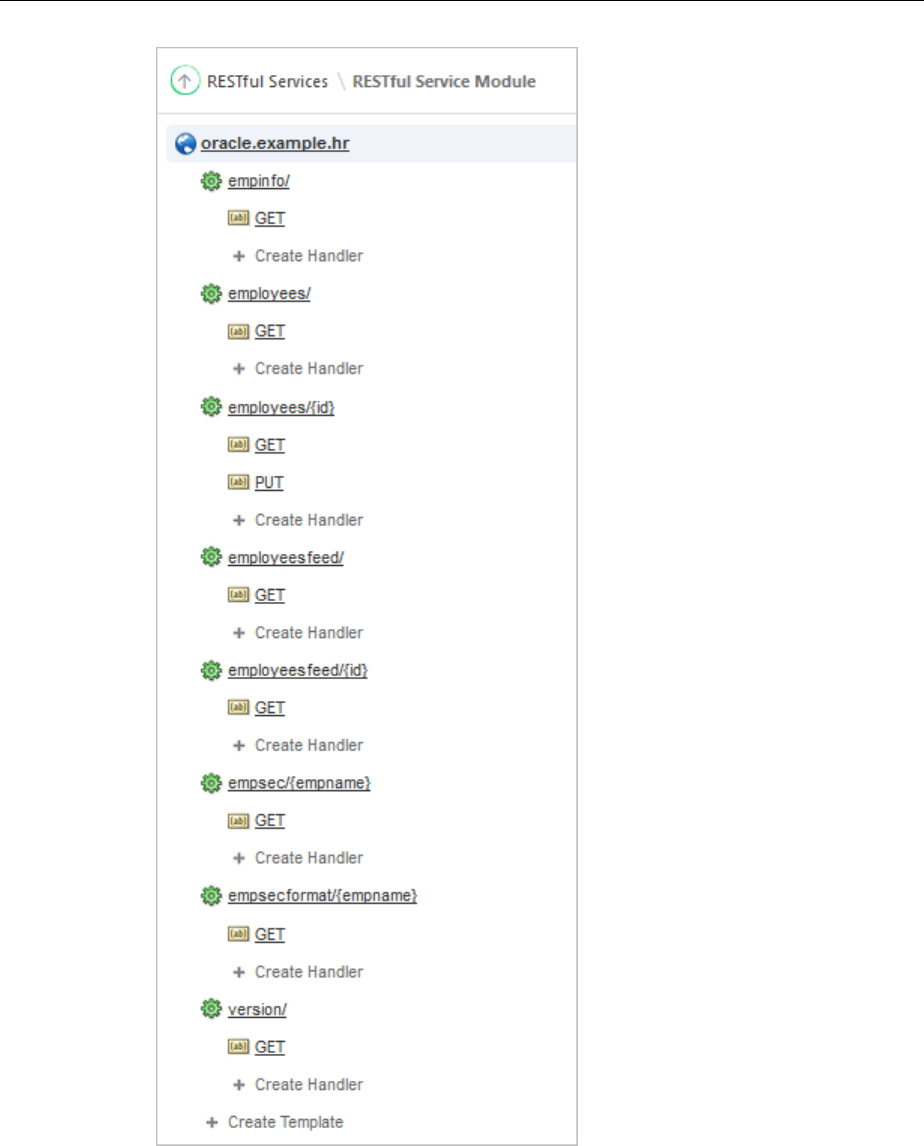
The following results are expected for each oracle.example.hr resource template
when the respective GET resource handler is invoked:
• empinfo/ - Employee information from the employees emp table is returned in
CSV format.
• employees/ - Employee information from the employees emp table is displayed
in JSON format with Pagination Size set to 7. A first, previous and next link is
provided to page through the results.
How to Create the RESTful Service Module Example
Enabling Data Exchange with RESTful Services 6-7

• employees/{id} - Employee information from the employees emp table for a
specified id is returned. The curly bracket identifies the parameter sent as part of
the URI.
• employeesfeed/ - Employee information from the employees emp table is
returned as a JSON Feed.
• employeesfeed/{id} - Employee information from the employees emp table
for a specified id is displayed in JSON format. The curly bracket identifies the
parameter sent as part of the URI.
• empsec/{empname} - Employee information for a specified employee name,
empname, is returned and displayed in JSON. The curly bracket identifies the
parameter sent as part of the URI.
• empsecformat/{empname} - Employee information for a specified employee
name, empname, is returned and formatted based on the execution of a PL/SQL
block. The curly bracket identifies the parameter sent as part of the URI.
The following result is expected for the employees/[id] resource template when
the PUT resource handler is invoked:
• employees/{id} - Employee information from the employees emp table for a
specified id is updated. The curly bracket identifies the parameter sent as part of
the URI. A status code is returned, which can be use to verify the success of the
request.
See Also:
• "Accessing RESTful Services (page 6-3)"
• Oracle Learning Library for additional RESTful Service examples. Go to:
http://www.oracle.com/oll/apex
6.5.2 Returning the Result Set in CSV Format (empinfo/)
You can build and test your own example RESTful Service Module that retrieves data
in CSV format.
The oracle.example.hr module includes the empinfo/ resource template to
demonstrate a RESTful Service that returns data in CSV format. In this example, all the
employee data from the emp table is returned by using a SQL Query.
To build and test your own example RESTful Service Module that retrieves data in
CSV format:
1.
On the Workspace home page, click SQL Workshop and then RESTful Services.
The RESTful Services home page appears.
2.
Click Create.
3.
For Name, enter my.example.demo.
4.
For URI Prefix, enter demo/. This is the base of the Uniform Resource Identifier
(URI) that is used to access this RESTful Service.
5.
Under Add a Resource Template, for URI Template enter empinfo/.
How to Create the RESTful Service Module Example
6-8 Oracle Application Express SQL Workshop Guide

6. Under Add a Resource Handler, for Method select GET.
The Resource Handler settings appear.
7. Make the following selections and entries:
• Source Type - Select Query. Executes a SQL Query and transforms the result
set into either a JavaScript Object Notation (JSON) or CSV representation,
depending on the format selected. This option is only available when the
HTTP method GET has been selected
• Format - Select CSV.
•
Source - Enter the following:
select * from emp
8.
Click Create Module.
The RESTful Service Module page displays.
9.
Under empinfo/, click the GET resource handler.
10.
Click Test.
An Opening dialog appears, allowing you to open or save the CSV file containing
the results of executing the resource handler source SQL query.
11. Select Save File and click OK.
12. Open the saved file in Microsoft Excel or another editor to view the contents of the
CSV file.
All data from the emp table is included in the CSV file.
Note:
If your results are not correct, compare your empinfo GET resource handler
with the oracle.example.hr empinfo GET resource handler.
13. Click Apply Changes.
6.5.3 Retrieving Data Based on a Parameter (employees/{id})
You can add and test your own resource template that retrieves employee data based
on a parameter.
The oracle.example.hr module includes the employees/{id} resource template
to demonstrate a RESTful Service that returns one row of data in JSON format based
on the specified id.
For other example resource templates that return results based on a specified
parameter see the employeesfeed/{id}, empsec/{empname} and
empsecformat/{empname} resource templates for the oracle.example.hr
Service Module.
To add and test your own resource template that retrieves employee data based on a
parameter:
How to Create the RESTful Service Module Example
Enabling Data Exchange with RESTful Services 6-9

1. On the Workspace home page, click SQL Workshop and then RESTful Services.
The RESTful Services home page appears.
2. Click the RESTful Service Module you want to add the resource template to.
The RESTful Service Module page appears.
3. At the bottom of the left panel, click Create Template.
The Resource Template options appear on the right.
4. For URI Template, enter employees/{id}.
5.
Click Create.
The employees/{id} resource template displays on the left panel.
6.
Under the employees/{id} resource template, click Create Handler.
The Resource Handler options appear.
7.
Make the following selections and entries:
• Method - select GET.
• Source Type - select Query One Row. Executes a SQL Query returning one
row of data into a JSON representation. This option is only available when the
HTTP method GET has been selected
• Requires Secure Access - select No.
• Pagination Size - Leave blank. In this case, there's no need to set pagination
since only one record is retrieved.
• Source - enter the following:
select * from emp where empno = :id
8. Click Create.
The GET Handler appears under the employees/{id} resource template on the
left panel.
9. Click Set Bind Variables.
10. For Bind Variable Value, enter 7876.
11. Click Test.
A dialog appears showing the results for the employee record with an employee id
of 7876 displays.
Note:
If your results are not correct, compare your employees/{id} GET resource
handler with the oracle.example.hr employees/{id} GET resource
handler.
How to Create the RESTful Service Module Example
6-10 Oracle Application Express SQL Workshop Guide

6.5.4 Returning the Result Set in JSON Format with Pagination Set (employees/)
You can add and test your own resource template that retrieves data in JSON format
and demonstrates pagination.
The oracle.example.hr module includes the employees/ resource template to
demonstrate a RESTful Service that returns data in JSON format. This example is
returning the Result Set in JSON Format with Pagination Set Using Pagination Bind
Variables. The Pagination bind variables are :row_offset and :row_count.
For other example resource templates that return results in JSON format see the
empsec/{empname} resource template for the oracle.example.hr Service
Module.
To add and test your own resource template that retrieves data in JSON format and
demonstrates pagination:
1.
On the Workspace home page, click SQL Workshop and then RESTful Services.
The RESTful Services home page appears.
2.
Click the RESTful Service Module you want to add the resource template to.
The RESTful Service Module page appears.
3. At the bottom of the left panel, click Create Template.
The Resource Template options appear on the right.
4. For URI Template, enter employees/.
5. Click Create.
The employees/ resource template displays on the left panel.
6. Under the employees/ resource template, click Create Handler.
The Resource Handler options appear.
7. Make the following selections and entries:
• Method - Select GET.
• Source Type - Select Query.
• Format - Select JSON.
• Requires Secure Access - Select No.
• Pagination Size - Enter 7.
• Source - Enter the following:
select empno "$uri", empno, ename
from (
select emp.*
, row_number() over (order by empno) rn
from emp
) tmp
where rn between :row_offset and :row_count
How to Create the RESTful Service Module Example
Enabling Data Exchange with RESTful Services 6-11

8. Click Create.
The GET Handler appears under the employees/ resource template on the left
panel.
9. Click Test.
The JSON results display. Notice the uri:{$ref} for each item invokes the
employees/{id} RESTful Service for the id specified in the link.
Note:
If your results are not correct, compare your employees/ GET resource
handler with the oracle.example.hr employees GET resource handler.
10.
Click the first uri:{$ref} link in the link for empno 7369.
The individual employee record for 7369 displays.
11.
Click the Back button in your browser.
The original JSON results appear listing 7 employees.
12. Click the next{$ref} link to navigate to the next page of data.
The next 7 rows display with links to the first, previous and the next page.
6.5.5 Returning the Result Set as a Feed (employeesfeed/)
You can add and test your own resource template that displays return data as a feed.
The oracle.example.hr module includes the employeesfeed/ resource template
to demonstrate a RESTful Service that returns empno and ename values from the emp
table and displays them as a feed.
A feed resource handler executes a SQL query and transforms the results into a JSON
Feed representation. Each item in the feed contains a summary of a resource and a
hyperlink to a full representation of the resource. The first column in each row in the
result set must be a unique identifier for the row and is used to form a hyperlink of the
form: path/to/feed/{id}, with the value of the first column being used as the value for
{id}. The other columns in the row are assumed to summarize the resource and are
included in the feed. A separate resource template for the full representation of the
resource should also be defined.
To add and test your own resource template that displays return data as a feed:
1.
On the Workspace home page, click SQL Workshop and then RESTful Services.
The RESTful Services home page appears.
2.
Click the RESTful Service Module you want to add the resource template to.
The RESTful Service Module page appears.
3.
At the bottom of the left panel, click Create Template.
The Resource Template options appear on the right.
4.
For URI Template, enter employeesfeed/.
How to Create the RESTful Service Module Example
6-12 Oracle Application Express SQL Workshop Guide

5. Click Create.
The employeesfeed/ resource template displays on the left panel.
6. Under the employees resource template, click Create Handler.
The Resource Handler options appear.
7. Make the following selections and entries:
• Method - select GET.
• Source Type - select Feed.
•
Requires Secure Access - select No.
•
Pagination Size - enter 25.
•
Source - enter the following:
select empno, ename from emp order by deptno, ename
8.
Click Create.
The GET resource handler appears under the employeesfeed/ resource template
on the left panel.
9. Click Test.
The results display a feed for each employee in the emp table.
Note:
If your results are not correct, compare your employeesfeed/ GET resource
handler with the oracle.example.hr employeesfeed GET resource
handler.
6.5.6 Returning the Result Set Based on a PL/SQL Block (empsecformat/{empname})
You can add and test your own resource template that uses a PL/SQL block to format
results.
The oracle.example.hr module includes the empsecformat/{empname}
resource template to demonstrate a RESTful Service that returns the results of an SQL
Query formatted by a PL/SQL block.
To add and test your own resource template that uses a PL/SQL block to format
results:
1.
On the Workspace home page, click SQL Workshop and then RESTful Services.
The RESTful Services home page appears.
2.
Click the RESTful Service Module you want to add the resource template to.
The RESTful Service Module page appears.
3.
At the bottom of the left panel, click Create Template.
The Resource Template options appear on the right.
How to Create the RESTful Service Module Example
Enabling Data Exchange with RESTful Services 6-13

4. For URI Template, enter empsecformat/{empname}.
5. Click Create.
The empsecformat/{empname} resource template displays on the left panel.
6. Under the empsecformat/{empname} resource template, click Create Handler.
The Resource Handler options appear.
7. Make the following selections and entries:
•
Method - Select GET.
•
Source Type - Select PL/SQL.
•
Requires Secure Access - Select No.
•
Pagination Size - Leave blank.
•
Source - enter the following:
DECLARE
prevdeptno number;
total_rows number;
deptloc varchar2(20);
deptname varchar2(20);
CURSOR getemps is select * from emp
start with ename = :empname
connect by prior empno = mgr
order siblings by deptno, ename;
BEGIN
sys.htp.htmlopen;
sys.htp.headopen;
sys.htp.title('Hierarchical Department Report for Employee '||:empname);
sys.htp.headclose;
sys.htp.bodyopen;
for emprecs in getemps
loop
if l_employee.deptno != prevdeptno or prevdeptno is null then
select dname, loc
into deptname, deptloc
from dept
where deptno = l_employee.deptno;
if prevdeptno is not null then
sys.htp.print('</ul>');
end if;
sys.htp.print('Department ' || apex_escape.html(deptname) || '
located in ' || apex_escape.html(deptloc) || '<p/>');
sys.htp.print('<ul>');
end if;
sys.htp.print('<li>' || apex_escape.html(l_employee.ename) || ', ' ||
apex_escape.html(l_employee.empno) || ', ' ||
apex_escape.html(l_employee.job) || ', ' ||
apex_escape.html(l_employee.sal) || '</li>');
prevdeptno := l_employee.deptno;
total_rows := getemps%ROWCOUNT;
How to Create the RESTful Service Module Example
6-14 Oracle Application Express SQL Workshop Guide

end loop;
if total_rows > 0 then
sys.htp.print('</ul>');
end if;
sys.htp.bodyclose;
sys.htp.htmlclose;
END;
8. Click Create.
The GET resource handler appears under the empsecformat/{empname}
resource template on the left panel.
9.
Click Set Bind Variables.
10.
For the empname parameter, enter ADAMS.
11.
Click Test.
The results display formatted results for Adams.
Note:
If your results are not correct, compare your empsecformat/{empname}
GET resource handler with the oracle.example.hr empsecformat/
{empname} GET resource handler.
6.5.7 Updating Data Based on a Parameter (employees/{id})
You can add and test your own resource template that updates employee data based
on a parameter.
The oracle.example.hr module includes the employees/{id} resource template
to demonstrate a RESTful Service that updates one row of data in JSON format based
on the specified id, and returns a HTTP status code, to verify the success of the
request.
To add and test your own resource template that updates employee data based on a
parameter:
1. On the Workspace home page, click SQL Workshop and then RESTful Services.
The RESTful Services home page appears.
2. Click the RESTful Service Module you want to add the resource template to.
The RESTful Service Module page appears.
3.
At the bottom of the left panel, click Create Template.
The Resource Template options appear on the right.
4.
For URI Template, enter employees/{id}.
5.
Click Create.
The employees/{id} resource template displays on the left panel.
How to Create the RESTful Service Module Example
Enabling Data Exchange with RESTful Services 6-15

6. Under the employees/{id} resource template, click Create Handler.
The Resource Handler options appear.
7. Make the following selections and entries:
• Method - select PUT.
• Source Type - select PL/SQL. Executes an anonymous PL/SQL block and
transforms any OUT or IN/OUT parameters into a JSON representation. This
option is only available when the HTTP method selected is one of the
following: DELETE, PUT, POST.
•
MIME Types Allowed - Leave blank. In this case, there is no need to set a list
of MIME types allowed in the HTTP request.
•
Requires Secure Access - select No.
•
Source - enter the following:
begin
update emp set ename = :ename,
job = :job,
hiredate = :hiredate,
mgr = :mgr,
sal = :sal,
comm = :comm,
deptno = :deptno
where empno = :id;
:status := 200;
:location := :id;
exception
when others then
:status := 400;
end;
8. Click Create.
The PUT Handler appears under the employees/{id} resource template on the
left panel.
9. Click Create Parameter.
10. Make the following selections and entries:
• Name - Enter ID
• Bind Variable Name - Enter ID
• Access Method - Select IN
• Source Type - Select HTTP Header
• Parameter Type - Select String
11.
Click Create.
12.
Click Create Parameter.
13.
Make the following selections and entries:
• Name - Enter X-APEX-FORWARD
How to Create the RESTful Service Module Example
6-16 Oracle Application Express SQL Workshop Guide

• Bind Variable Name - Enter Location
• Access Method - Select OUT
• Source Type - Select HTTP Header
• Parameter Type - Select String
14. Click Create.
15. Click Create Parameter.
16. Make the following selections and entries:
•
Name - Enter X-APEX-STATUS-CODE
•
Bind Variable Name - Enter Status
•
Access Method - Select OUT
•
Source Type - Select HTTP Header
•
Parameter Type - Select Integer
17. Click Create.
Note:
The Test and Set Bind Variables buttons are only available for testing GET
resource handlers. Install the Sample REST Services application, to test the
behaviour of the PUT resource handler.
18. Click Packaged Apps tab.
19. Click Sample REST Services sample application.
20. Click Install Packaged App, and complete the install wizard to install the sample
application in your workspace.
21. Run the Sample REST Services application, logging in using your APEX
Authentication login credentials.
22. Click Simple Report menu item from the navigation menu to the left.
23. Edit the information for employee BLAKE by clicking on the edit pencil icon for that
employee.
A dialog appears showing the employee record for employee BLAKE. Using the
dialog, the data can be changed and saved back to the REST service using a PUT
request. The API apex_web_service.make_rest_request is used to call the
PUT request.
24.
In the dialog box, make the following update:
• Salary - 3000
25.
Click Apply Changes.
How to Create the RESTful Service Module Example
Enabling Data Exchange with RESTful Services 6-17

The dialog should close, and the row of data for employee BLAKE should be
updated to set salary to 3000 on the Simple Report, with a success message “REST
PUT request sent – changes applied.” displayed at the top of the page.
Note:
If your results are not correct, compare your employees/{id} PUT resource
handler with the oracle.example.hr employees/{id} PUT resource
handler.
6.6 Managing RESTful Service Modules
A RESTful Service Module is a grouping of common templates, known as resource
templates, under a common Uniform Resource Identifier (URI) prefix.
The specification of a URI prefix is optional. If defined for the RESTful Service
Module, it is prepended to all resource templates. A priority value is used to choose
between resource templates when their patterns both match a single request URI. In
such cases, the resource template with the highest priority value is chosen.
Installing a Sample RESTful Service Module (page 6-19)
Learn how to create a Sample RESTful Service Module.
Creating a RESTful Service Module (page 6-20)
Learn how to create a RESTful Service Module.
Editing a RESTful Service Module (page 6-21)
A RESTful Service Module can have associated resource templates and
resource handlers. During the edit process for a particular RESTful
Service Module, you can make changes to any of the associated resource
templates and resource handlers.
Deleting a RESTful Service Module (page 6-22)
Deleting a RESTful service module removes the module along with all
resource templates and resource handlers associated with this module.
Managing RESTful Service Privileges (page 6-23)
Privileges to access RESTful Service Modules can be restricted to
Application Express users that belong to an Application Express user
group.
Assigning Privileges to RESTful Service Modules (page 6-23)
Learn how to assign privileges to RESTful Service Modules.
Creating a RESTful Service Privilege (page 6-24)
You can create a RESTful Service Privilege to restrict access to specified
users for one or more RESTful Service Modules.
Editing a RESTful Service Privilege (page 6-25)
You can modify a RESTful Service Privilege. Changes to the specified
Protected Modules will be reflected in the Required Privilege setting on
the RESTful Service Module page for affected modules.
Deleting a RESTful Service Privilege (page 6-25)
You can remove a RESTful Service Privilege. After deleting the privilege,
any RESTful Service Modules that were protected by this privilege will
be unprotected until reassigned another privilege.
Managing RESTful Service Modules
6-18 Oracle Application Express SQL Workshop Guide

Exporting a RESTful Service Module (page 6-26)
RESTful Service Module meta data can be exported to a file in SQL script
format. The exported file can be imported on the same instance or
another compatible instance of Application Express.
Importing a RESTful Service Module (page 6-26)
RESTful Service Module meta data that has been exported to a file in
SQL script format can be imported. The imported module must have
been exported on the same instance or another compatible instance of
Application Express.
6.6.1 Installing a Sample RESTful Service Module
Learn how to create a Sample RESTful Service Module.
Note:
You can install a sample RESTful service only when you create new
workspace.
To create a Sample RESTful Service Module:
1. On the Workspace home page, click SQL Workshop and then RESTful Services.
The RESTful Services home page appears.
2. Click Install a Sample RESTful Service.
3. Fill in the appropriate fields and select the appropriate options. Mandatory fields
are marked with a red asterisk (*). To learn more about a specific option, see the
field-level help.
4. Specify the following RESTful Service Module settings:
• Name (required) - Specify the RESTful Service Module name.
• URI Prefix - Specify the URI prefix.
• Origins Allowed - Specify a comma-separated list of origins that are permitted
to access the resource template.
• Status - Select Published to make this service available for use, otherwise
select Not Published.
• Pagination Size - Specify the size of the pagination window. For database
queries, this is the number of rows to return.
• Required Privilege - Select the user privilege required to access this service
module.
5.
To add a resource template to this module, specify the following under Add a
Resource Template:
• URI Template - Enter the URI template to identify your Uniform Resource
Identifier. A URI template is simple syntax for describing URIs, for example:
example/{id}
Managing RESTful Service Modules
Enabling Data Exchange with RESTful Services 6-19

• Priority - Specify the resource template's evaluation order. Higher numbers are
evaluated first.
• Entity Tag - Specify how the ETag HTTP Header for the resource is generated.
See field-level help for further details.
• Entity Tag Query - Specify the SQL SELECT statement that returns one
column and one row that is to be used to generate a custom entity tag. This
option is only visible when the user selects Query for the Entity Tag.
6. If you want to add a resource handler to the resource template, specify the
following under Add a Resource Handler:
•
Method - Specify the HTTP method to be used for the resource handler.
Options include: GET, DELETE, POST, PUT. See field-level help for further
details.
•
Source Type - Select the source implementation for the selected HTTP method.
Options include: Query, Query One Row, PL/SQL, Feed, Media Resource.
•
Format - Define how results are returned. Options include: JSON, CSV.
•
Source - Specify the SQL query or PL/SQL block responsible for handling the
selected HTTP method.
Note:
To define additional resource handlers, complete the Resource Handler
Creation wizard and then edit the created resource handler.
7. Click Create.
The RESTful Service Module page appears.
6.6.2 Creating a RESTful Service Module
Learn how to create a RESTful Service Module.
To create a RESTful Service Module:
1. On the Workspace home page, click SQL Workshop and then RESTful Services.
The RESTful Services home page appears.
2. Click Create.
3.
Fill in the appropriate fields and select the appropriate options. Mandatory fields
are marked with a red asterisk (*). To learn more about a specific option, see the
field-level help.
4.
Specify the following RESTful Service Module settings:
• Name (required) - Specify the RESTful Service Module name.
• URI Prefix - Specify the URI prefix.
• Origins Allowed - Specify a comma-separated list of origins that are permitted
to access the resource template.
Managing RESTful Service Modules
6-20 Oracle Application Express SQL Workshop Guide

• Status - Select Published to make this service available for use, otherwise
select Not Published.
• Pagination Size - Specify the size of the pagination window. For database
queries, this is the number of rows to return.
• Required Privilege - Select the user privilege required to access this service
module.
5. To add a resource template to this module, specify the following under Add a
Resource Template:
•
URI Template - Enter the URI template to identify your Uniform Resource
Identifier. A URI template is simple syntax for describing URIs, for example:
example/{id}
•
Priority - Specify the resource template's evaluation order. Higher numbers are
evaluated first.
•
Entity Tag - Specify how the ETag HTTP Header for the resource is generated.
See field-level help for further details.
• Entity Tag Query - Specify the SQL SELECT statement that returns one
column and one row that is to be used to generate a custom entity tag. This
option is only visible when the user selects Query for the Entity Tag.
6. If you want to add a resource handler to the resource template, specify the
following under Add a Resource Handler:
• Method - Specify the HTTP method to be used for the resource handler.
Options include: GET, DELETE, POST, PUT. See field-level help for further
details.
• Source Type - Select the source implementation for the selected HTTP method.
Options include: Query, Query One Row, PL/SQL, Feed, Media Resource.
• Format - Define how results are returned. Options include: JSON, CSV.
• Source - Specify the SQL query or PL/SQL block responsible for handling the
selected HTTP method.
Note:
To define additional resource handlers, complete the Resource Handler
Creation wizard and then edit the created resource handler.
7.
Click Create.
The RESTful Service Module page appears.
6.6.3 Editing a RESTful Service Module
A RESTful Service Module can have associated resource templates and resource
handlers. During the edit process for a particular RESTful Service Module, you can
make changes to any of the associated resource templates and resource handlers.
To edit a RESTful Service Module:
Managing RESTful Service Modules
Enabling Data Exchange with RESTful Services 6-21

1. On the Workspace home page, click SQL Workshop and then RESTful Services.
The RESTful Services home page appears.
2. Click the name of the module you want to edit.
The RESTful Service Module edit page appears.
Note:
Use the RESTful Service tree on the left pane to view, edit and create resource
templates and resource handlers.
3.
To edit RESTful Service Module settings, make changes to the fields on the right
pane under RESTful Services Module.
4.
To edit a resource template:
a.
Select the resource template you want to edit on the RESTful Service tree on
the left panel. The resource template options appear on the right panel.
b.
Make your changes.
c. Click Apply Changes.
5. To edit a resource handler:
a. Select the resource handler you want to edit on the RESTful Service tree. The
resource handler options appear on the right panel.
b. Make your changes.
c. Click Apply Changes.
6. Click Apply Changes.
See Also:
• "Creating a RESTful Service Module (page 6-20)"
• "Adding a Resource Template (page 6-27)"
• "Adding a Resource Handler (page 6-29)"
6.6.4 Deleting a RESTful Service Module
Deleting a RESTful service module removes the module along with all resource
templates and resource handlers associated with this module.
To delete a RESTful Service Module:
1.
On the Workspace home page, click SQL Workshop and then RESTful Services.
The RESTful Services home page appears.
2.
Click the name of the module you want to delete.
The RESTful Service Module page appears.
Managing RESTful Service Modules
6-22 Oracle Application Express SQL Workshop Guide

3. Click Delete.
4. Click OK to confirm.
The RESTful Services home page appears.
6.6.5 Managing RESTful Service Privileges
Privileges to access RESTful Service Modules can be restricted to Application Express
users that belong to an Application Express user group.
To protect RESTful Service Modules by assigning RESTful Service Privileges:
1.
Define an Application Express user group using Application Express
Administration.
2.
Create a RESTful Service Privilege based on one or more user groups.
3.
Specify which RESTful Service Modules are protected by this privilege.
See Also:
• "Using Groups to Manage Application Express Users" in Oracle
Application Express Administration Guide
• "Creating a RESTful Service Privilege (page 6-24)"
• "Assigning Privileges to RESTful Service Modules (page 6-23)"
• "Editing a RESTful Service Privilege (page 6-25)"
• "Deleting a RESTful Service Privilege (page 6-25)"
6.6.6 Assigning Privileges to RESTful Service Modules
Learn how to assign privileges to RESTful Service Modules.
There are a couple of ways to assign privileges to RESTful Service Modules:
• During the creation or editing of a RESTful Service Module, you can specify the
privilege for the module.
• During the creation or editing of a RESTful Service Privilege, you can specify the
module or modules protected by this privilege.
Note:
After a RESTful Service Privilege is deleted, all RESTful Service Modules
protected by that privilege are unprotected.
Managing RESTful Service Modules
Enabling Data Exchange with RESTful Services 6-23

See Also:
• "Creating a RESTful Service Module (page 6-20)"
• "Editing a RESTful Service Module (page 6-21)"
• "Creating a RESTful Service Privilege (page 6-24)"
• "Editing a RESTful Service Privilege (page 6-25)"
• "Deleting a RESTful Service Privilege (page 6-25)"
6.6.7 Creating a RESTful Service Privilege
You can create a RESTful Service Privilege to restrict access to specified users for one
or more RESTful Service Modules.
A RESTful Service Privilege can include users belonging to one or more user groups.
RESTful Service Modules protected by this privilege display the privilege name for
Required Privilege on the RESTful Service Module page.
To create a RESTful Service Privilege:
1. On the Workspace home page, click SQL Workshop and then RESTful Services.
The RESTful Services home page appears.
2. Under Tasks, click the RESTful Services Privileges link.
The RESTful Service Privileges page appears.
3. Click Create.
The RESTful Service Privileges Details page appears.
4. For Name, enter a name to identify the privilege.
5. For Label, enter a label value to identify the privilege.
6. For Assigned Groups, select the user groups this privilege is assigned to.
7. For Description, enter a description of this privilege.
8. For Protected Modules, use the arrows to select the modules this privilege is
assigned to.
9.
Click Create.
The RESTful Service Privileges page appears.
10.
To verify the privilege has been assigned to the appropriate modules:
a.
Click RESTful Services in the breadcrumb.
The RESTful Services page appears.
b.
Click the protected RESTful Service Module.
The RESTful Service Module page appears.
Managing RESTful Service Modules
6-24 Oracle Application Express SQL Workshop Guide

c. Make sure the Required Privilege displays the created RESTful Service
Privilege.
d. Repeat these verification steps to ensure all modules assigned to this privilege
are protected.
6.6.8 Editing a RESTful Service Privilege
You can modify a RESTful Service Privilege. Changes to the specified Protected
Modules will be reflected in the Required Privilege setting on the RESTful Service
Module page for affected modules.
To edit a RESTful Service Privilege:
1.
On the Workspace home page, click SQL Workshop and then RESTful Services.
The RESTful Services home page appears.
2.
Under Tasks, click the RESTful Services Privileges link.
The RESTful Service Privileges page appears.
3. Click a RESTful Service Privilege.
The RESTful Service Privileges Details page appears.
4. Make modifications.
5. Click Apply Changes.
The RESTful Service Privileges page appears.
6.6.9 Deleting a RESTful Service Privilege
You can remove a RESTful Service Privilege. After deleting the privilege, any RESTful
Service Modules that were protected by this privilege will be unprotected until
reassigned another privilege.
To delete a RESTful Service Privilege:
1. On the Workspace home page, click SQL Workshop and then RESTful Services.
The RESTful Services home page appears.
2. Under Tasks, click the RESTful Services Privileges link.
The RESTful Service Privileges page appears.
3.
Click a RESTful Service Privilege.
The RESTful Service Privileges Details page appears.
4.
Click Delete.
The RESTful Service Privileges page appears.
Managing RESTful Service Modules
Enabling Data Exchange with RESTful Services 6-25

6.6.10 Exporting a RESTful Service Module
RESTful Service Module meta data can be exported to a file in SQL script format. The
exported file can be imported on the same instance or another compatible instance of
Application Express.
To export a RESTful Service module:
1. On the Workspace home page, click SQL Workshop and then RESTful Services.
The RESTful Services home page appears.
2.
Under Tasks, click the Export link.
The Export RESTful Services page appears.
3.
For RESTful Service, perform one of the following:
• To export one module, select the module name.
•
To export all modules, select All Services.
4. Click Export.
The Opening dialog appears.
5. Select export options.
6. Click OK.
See Also:
"Importing a RESTful Service Module (page 6-26)"
6.6.11 Importing a RESTful Service Module
RESTful Service Module meta data that has been exported to a file in SQL script
format can be imported. The imported module must have been exported on the same
instance or another compatible instance of Application Express.
Note:
If the imported module contains a RESTful Service name that exists in this
workspace, the existing RESTful Service is deleted and replaced with the
definition from the imported module.
To import a RESTful Service module:
1.
On the Workspace home page, click SQL Workshop and then RESTful Services.
The RESTful Services home page appears.
2.
Under Tasks, click the Import link.
The Import RESTful Services page appears.
Managing RESTful Service Modules
6-26 Oracle Application Express SQL Workshop Guide

3. For Import File, browse to and select the import file.
4. For File Character Set, select the character set used by the import file.
5. Click Import.
The RESTful Services page appears.
See Also:
"Exporting a RESTful Service Module (page 6-26)."
6.7 Managing Resource Templates
Resource templates are a means of grouping URIs and associating them with a
particular RESTful Service Module.
Resource templates can have one or more resource handlers. Only one resource
handler per HTTP method is permitted. For example, a resource template can have
only one GET method, only one DELETE method and so on.
Adding a Resource Template (page 6-27)
Learn how to add a resource template to a RESTful Service Module.
Editing a Resource Template (page 6-28)
Learn how to edit a resource template.
Deleting a Resource Template (page 6-28)
Deleting a resource template removes the template along with all
resource handlers associated with this template.
6.7.1 Adding a Resource Template
Learn how to add a resource template to a RESTful Service Module.
To add a resource template to a RESTful Service Module:
1.
On the Workspace home page, click SQL Workshop and then RESTful Services.
The RESTful Services home page appears.
2.
Click the RESTful Service for which you want to create a resource template.
3.
On the RESTful Service tree, click Create Template.
The resource template settings appear on the right panel.
4.
Fill in the appropriate fields and select the appropriate options. Mandatory fields
are marked with a red asterisk (*). To learn more about a specific option, see the
field-level help.
5.
Specify the following:
• URI Template - Enter the URI template to identify your Uniform Resource
Identifiers. A URI template is simple syntax for describing URIs, for example:
example/{id}
• Priority - Specify the template's evaluation order. Higher numbers are
evaluated first.
Managing Resource Templates
Enabling Data Exchange with RESTful Services 6-27

• Entity Tag - Specify how the ETag HTTP Header for the resource is generated.
See field-level help for further details.
• Entity Tag Query - Specify the SQL SELECT statement that returns one
column and one row that is to be used to generate a custom entity tag. This
option is only visible when the user selects Query for the Entity Tag.
6. Click Create.
6.7.2 Editing a Resource Template
Learn how to edit a resource template.
To edit a resource template:
1.
On the Workspace home page, click SQL Workshop and then RESTful Services.
The RESTful Services home page appears.
2.
Click the name of the module the resource template you want to edit belongs to.
The RESTful Service Module page appears.
3.
On the RESTful Service tree, click the resource template you want to edit.
The selected resource template is highlighted on the RESTful Service tree and the
corresponding resource template settings appear on the right panel.
4.
Make the changes you want.
5.
Click Apply Changes.
See Also:
"Adding a Resource Template (page 6-27)"
6.7.3 Deleting a Resource Template
Deleting a resource template removes the template along with all resource handlers
associated with this template.
To delete a resource template:
1.
On the Workspace home page, click SQL Workshop and then RESTful Services.
The RESTful Services home page appears.
2.
Click the name of the module you want to update.
The RESTful Service Module page appears.
3.
On the RESTful Service tree, click the resource template you want to delete.
The resource template settings appear on the right panel.
4.
Click Delete.
5.
Click OK to confirm.
The RESTful Service Module appears.
Managing Resource Templates
6-28 Oracle Application Express SQL Workshop Guide

6.8 Managing Resource Handlers
A resource handler is a query or an anonymous PL/SQL block responsible for
handling a particular HTTP method.
Multiple resource handlers can be defined for a resource template, however only one
resource handler can be defined for a HTTP method.
Parameters to a resource handler can be manually defined to bind HTTP headers to
the resource handler, or to cast a URI template parameter to a specific data type.
Parameters declared in the URI template are implicitly passed to the resource handler.
For example, a resource handler might need to know the value of the HTTP Accept-
Language header in order to localize the generated representation.
Adding a Resource Handler (page 6-29)
Learn how to add a resource handler to a resource template.
Editing a Resource Handler (page 6-31)
Learn how to edit a resource handler.
Deleting a Resource Handler (page 6-31)
Learn how to delete a resource handler.
6.8.1 Adding a Resource Handler
Learn how to add a resource handler to a resource template.
To add a resource handler to a resource template:
1. On the Workspace home page, click SQL Workshop and then RESTful Services.
The RESTful Services home page appears.
2. Click the RESTful Service you want to add a resource handler to.
The RESTful Service Module page appears.
3. On the left panel, under the associated resource template, click Create Handler.
The resource handler settings appear on the right panel.
4. Fill in the appropriate fields and select the appropriate options. Mandatory fields
are marked with a red asterisk (*). To learn more about a specific option, see the
field-level help.
5. Under Resource Handler, specify the following:
• Method - Specify the HTTP method to be used for the resource handler. See
field-level help.
• Source Type - Identify the strategy type used to generate the resource. See
field-level help.
• Requires Secure Access - Identify whether the resource should be accessed
over a secure channel, for example, HTTPS. Set to Yes if secure access is
required
• Pagination Size - Identify the size of the pagination window. For database
queries, this is the number of rows to return.
Managing Resource Handlers
Enabling Data Exchange with RESTful Services 6-29

6. Under Source, enter the SQL query or PL/SQL block responsible for handling the
selected HTTP method. Click Example at the bottom of the page for further details.
7. Click Create.
The RESTful Services Module page appears.
8. To add parameters to the resource handler:
a. Click Create Parameter.
The parameter settings appear on the Resource Handler Parameter panel.
b.
For Name, enter the identifying parameter name.
c.
For Bind Variable Name, enter the parameter bind variable name used within
the SQL query or PL/SQL block.
d.
For Access Method, select the HTTP method. Options include IN, IN/OUT, or
OUT. URI Template parameters can only be IN. A value of IN for a header
parameter implies the header will be present in the HTTP request. A value of
IN/OUT indicates the value will be present in both the HTTP request and
response. A value of OUT indicates the value will only be present in the HTTP
response.
e. For Source Type, select the parameter source type.
f. For Parameter Type, select the data type of the parameter.
g. Click Create.
The resource handler page appears with the added parameter included under
Parameters at the bottom of the right panel.
h. For each parameter you want to add, repeat the above steps in this subsection.
9. To test the behavior of the resource handler:
a. Click Apply Changes.
b. If you have bind variables in your SQL query or PL/SQL block, click Set Bind
Variables and define the bind variables before testing.
c. Click Test.
A new window appears displaying the JSON result of executing the RESTful
Service. The URL used in the test is composed of the value of the URI prefix
and URI Template, along with any parameters.
Note:
The Test button and Set Bind Variables test options should only be used for
the testing of GET methods, and not for the testing of the other three
supported methods: PUT, POST, DELETE.
Managing Resource Handlers
6-30 Oracle Application Express SQL Workshop Guide

Note:
To make the test results easier to read, the installation of a JSON Viewer in
your browser is recommended.
6.8.2 Editing a Resource Handler
Learn how to edit a resource handler.
To edit a resource handler:
1.
On the Workspace home page, click SQL Workshop and then RESTful Services.
The RESTful Services home page appears.
2.
Click the name of the Resource Service Module the resource handler belongs to.
The RESTful Service Module page appears.
3.
On the RESTful Service tree, click the resource handler you want to edit.
The resource handler settings appears on the right panel.
4. Make the changes you want.
5. Click Apply Changes.
The RESTful Service Module page appears.
See Also:
"Adding a Resource Handler (page 6-29)"
6.8.3 Deleting a Resource Handler
Learn how to delete a resource handler.
To delete a resource handler:
1. On the Workspace home page, click SQL Workshop and then RESTful Services.
The RESTful Services home page appears.
2. Click the name of the module the resource handler belongs to.
The RESTful Service Module page appears.
3.
On the RESTful Service tree, click the resource handler you want to delete.
The resource handler settings appear on the right panel.
4.
Click Delete.
5.
Click OK to confirm.
The RESTful Service Module appears.
Managing Resource Handlers
Enabling Data Exchange with RESTful Services 6-31

Managing Resource Handlers
6-32 SQL Workshop Guide

Index
C
Create Lookup Table, 2-13
D
data
exporting from database, 4-9
loading, 4-2
loading into database, 4-5
unloading, 4-2, 4-9
data dictionary, browsing, 4-16
Data Workshop, 4-2
database
loading data into, 4-2
monitoring, 4-35
unloading data from, 4-2
database definition language, generating DDL
statements, 4-11
database link
browsing, 2-43
creating, 2-42
testing, 2-43
Database Monitor
I/O, 4-37
Locks, 4-37
Long Operations, 4-39
Open Cursors, 4-37
Sessions, 4-36
SQL, 4-37
Top SQL, 4-39
Waits, 4-37
database objects
purging, 4-40
restoring, 4-40
database security
Column Privileges report, 4-15
Role Privileges report, 4-15
System Privileges report, 4-15
DDL
about, 4-11
generating, 4-11
E
Explain Plan
about, 3-10
using, 3-10
Export XML Wizard, 4-10
exporting data
summary of available methods, 4-4
F
function
browsing, 2-35
compiling, 2-37
creating, 2-34
downloading, 2-37
dropping, 2-37
editing, 2-36
I
I/O report, 4-37
importing data, summary of methods, 4-4
index
browsing, 2-19
creating, 2-19
disabling, 2-19, 2-20
dropping, 2-20
rebuilding, 2-19, 2-20
statistics about, 2-20
L
Load Data Wizard, 4-6
Load XML Wizard, 4-8
Locks report, 4-37
M
materialized view
browsing, 2-46
creating, 2-45
dependent objects, 2-47
Index-1

materialized view (continued)
dropping, 2-47
list of grants, 2-46
report of data, 2-46
sort by column, 2-46
viewing object details, 2-46
O
Object Browser
accessing, 2-2
creating objects, 2-6
Hide Objects control, 2-5
hiding Object Selection pane, 2-5
managing database links, 2-42
managing functions, 2-34
managing indexes, 2-18
managing materialized views, 2-44
managing packages, 2-25
managing procedures, 2-29
managing sequences, 2-20
managing tables, 2-6
managing triggers, 2-38
managing types, 2-23
managing views, 2-13
searching for objects, 2-4
synonyms, 2-47
Object Reports
All Objects, 4-16
All Objects report, 4-16
Column Privileges report, 4-15
Data Dictionary, 4-16
Exception Reports, 4-15
Invalid Objects, 4-16
Object Calendar, 4-16
Object Counts by Type, 4-16
PL/SQL Source Code report, 4-14
Role Privileges report, 4-15
System Privileges report, 4-15
objects
purging, 4-40
restoring, 4-40
Open Cursors report, 4-37
Oracle Optimizer, Explain Plan, 3-10
P
package
Auto Complete, 2-27
compiling, 2-28
creating, 2-26
downloading, 2-27, 2-28
dropping, 2-29
editing, 2-27, 2-28
Find, 2-27
grants for, 2-28
package (continued)
object dependencies, 2-27
package body, 2-27
related errors, 2-28
Replace, 2-27
viewing, 2-27
procedure
browsing, 2-31
compiling, 2-33
creating, 2-30
downloading, 2-33
dropping, 2-33
editing, 2-32
editing manually, 2-32
finding, 2-31
replacing, 2-31
Q
Query Builder
about, 4-19
accessing, 4-19
creating joins automatically, 4-27
creating joins manually, 4-26
filtering objects, 4-20
hiding objects in Design Pane, 4-23
Object Selection pane, 4-21
removing objects in Design Pane, 4-23
resizing panes, 4-23
Saved SQL tab, 4-29
searching for objects, 4-20
supported column types, 4-22
Table Actions, 4-27
View Actions, 4-27
R
Recycle Bin
purging, 4-40
searching, 4-40
using, 4-40
viewing objects, 4-40
reports
Data Dictionary, 4-16
database objects, 4-16
exception reports, 4-15
PL/SQL Source Code, 4-14
Representational State Transfer (REST), 6-2
resource handler
adding, 6-29
deleting, 6-31
editing, 6-31
resource template
adding, 6-27
deleting, 6-28
editing, 6-28
Index-2

resource template (continued)
managing, 6-27
RESTful services
about, 6-2
about oracle.example.hr, 6-5
accessing, 6-3
creating, 6-19, 6-20
deleting, 6-22
editing, 6-21
example, 6-5
exporting, 6-26
importing, 6-26
managing, 6-18
managing privileges, 6-23
managing resource handlers, 6-29
managing resource templates, 6-27
requirements, 6-3
using, 6-1
results, 5-5
S
schema
selecting, 1-2
scripts
creating in editor, 5-6
deleting from editor, 5-9
deleting from SQL Scripts page, 5-9
executing, 5-10
executing from SQL Scripts page, 5-11
executing in editor, 5-10
export, 5-5
exporting, 5-12
importing, 5-12
results, 5-5
SQL Script editor, 5-7
uploading to another account, 5-5
uploading to SQL Scripts, 5-6
viewing repository quotas, 5-14
Security reports
Column Privileges report, 4-15
Object Grants, 4-15
Role Privileges, 4-15
System Privileges, 4-15
sequence
altering, 2-22
browsing, 2-21
creating, 2-21
dependent objects, 2-22
dropping, 2-22
grants associated with, 2-22
sequence, 2-22
Session report, 4-36
session, killing, 4-36
SQL Commands
home page, 3-3
SQL Commands (continued)
running Explain Plan, 3-10
transaction support, 3-6
SQL report, 4-37
SQL Scripts
accessing, 5-2
creating script in editor, 5-6
deleting script from editor, 5-9
deleting script from SQL Scripts home page, 5-9
executing script from SQL Scripts page, 5-11
executing script in editor, 5-10
exporting scripts, 5-12
importing scripts, 5-12
script editor, 5-7
SQL Scripts page, 5-3
uploading script, 5-6
viewing quotas, 5-14
SQL Scripts page
accessing Manage Script Results, 5-5
Show Quotas, 5-5
Task list, 5-5
SQL Scripts page Task list
export scripts, 5-5
uploading scripts, 5-5
SQL Workshop
about, 1-1
icons, 1-1
overview, 1-1
selecting a scheme, 1-2
SQL Workshop home page
icons, 1-1
selecting a schema, 1-2
SQL*Plus command support, 3-7
SQL*Plus commands, unsupported, 3-7
synonym
creating, 2-47
dropping, 2-48
viewing, 2-48
T
tab-delimited file
loading, 4-6
tables
add column, 2-12
browsing, 2-10
constraints, 2-11
copy, 2-13
creating, 2-7
drop column, 2-12
dropping, 2-13
editing, 2-12
exporting user interface defaults, 4-33
exports data to spreadsheet, 2-11
grants on, 2-11
indexes associated, 2-11
Index-3

tables (continued)
insert row, 2-10
modify column, 2-12
remove all rows, 2-13
rename, 2-12
rename column, 2-12
report of number of rows, 2-11
sort by column, 2-10
statistics about, 2-11
user interface defaults, 2-11
viewing data, 2-11
text file, loading, 4-6
transaction support, 3-6
trigger
browsing, 2-39
compiling, 2-41
creating, 2-38
disabling, enabling, 2-42
downloading, 2-41
dropping, 2-41
editing, 2-40
type
browsing, 2-24
creating, 2-23
dropping, 2-24
grants associated with, 2-24
list of synonyms, 2-24
U
Unload to Text Wizard, 4-9
Unload to XML Wizard, 4-10
utilities
about, 4-1
comparing schemas, 4-1
generating DDL, 4-1
loading data, 4-1
utilities (continued)
monitoring the database, 4-1
restoring dropped objects, 4-1
unloading data, 4-1
viewing database details, 4-1
viewing object reports, 4-1
Utilities, Data Dictionary, 4-16
V
view
browsing, 2-15
compiling, 2-17
creating, 2-14
dropping, 2-18
editing, 2-16
grants associated with, 2-16
objects referenced by, 2-16
report of data, 2-16
user interface defaults, 2-16
W
Waits report, 4-37
wizards
copying and pasting tab-delimited data, 4-6
exporting contents of table, 4-9
exporting text file, 4-9
exporting XML, 4-10
importing text, 4-6
importing XML, 4-8
X
XML document
exporting to, 4-10
loading, 4-8
Index-4
