
+48/+6'23+480('7!02,!+48/+6'23+480('7!02,!
!%#&'.+% 02,3!%#&'.+% 02,3
1'/&5%#4+0/#-'3052%'3 '7!02,+480--')'0('%*/0-0)8
'6+3+0/*#14'233'/4+#-31'%430(*83+%#-'3+)/'6+3+0/*#14'233'/4+#-31'%430(*83+%#-'3+)/
#/&.1-'.'/4#4+0/0('-#4+0/#-#4#$#3'3#/&.1-'.'/4#4+0/0('-#4+0/#-#4#$#3'3
#4+#/##-854#
#48#/#
3*7+/#48#/#2#8#/#
!'7!02,+480--')'0('%*/0-0)8
07&0'3#%%'33404*+3702,$'/'94805'453,/07
02'+/(02.#4+0/#$0544*+3702,#4*4413#%#&'.+%702,3%5/8'&5/8"0'23
+3%06'2#&&+4+0/#-702,3#4*4413#%#&'.+%702,3%5/8'&5
*+3702,+3.#&'15$-+%-8#6#+-#$-'$84*'+48/+6'23+480('7!02,!
0/4#%4%#&'.+% 02,3%5/8'&5
1
Chapter 4. Security
Data are valuable resources which must be protected from unauthorized access, either intentional or
accidental. The terms of access to data are specified in the security portion of the business rules. Security
business rules are supposed to define:
Who (which users or applications) can access data in the database?
What portion of data each entitled user can access?
What operations each entitled user can perform on this data?
Security measures of the database and database applications must correspond to these requirements. In this
chapter, we discuss the features of DBMSs that are used for implementing database security.
Database security measures are only a part of the complex technological security support in today’s
information systems (IS). In addition to technological measures, security is supported by various
administrative approaches and routines. This chapter concentrates on securing the data within the database.
Database Security
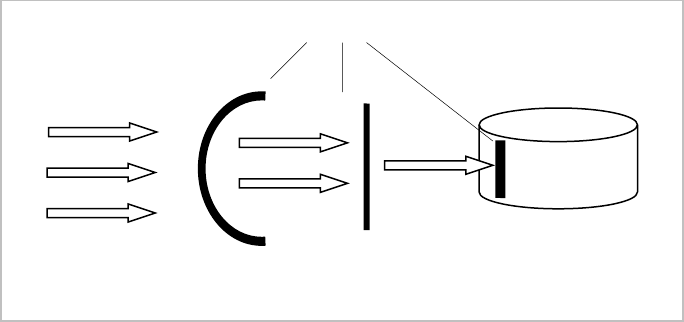
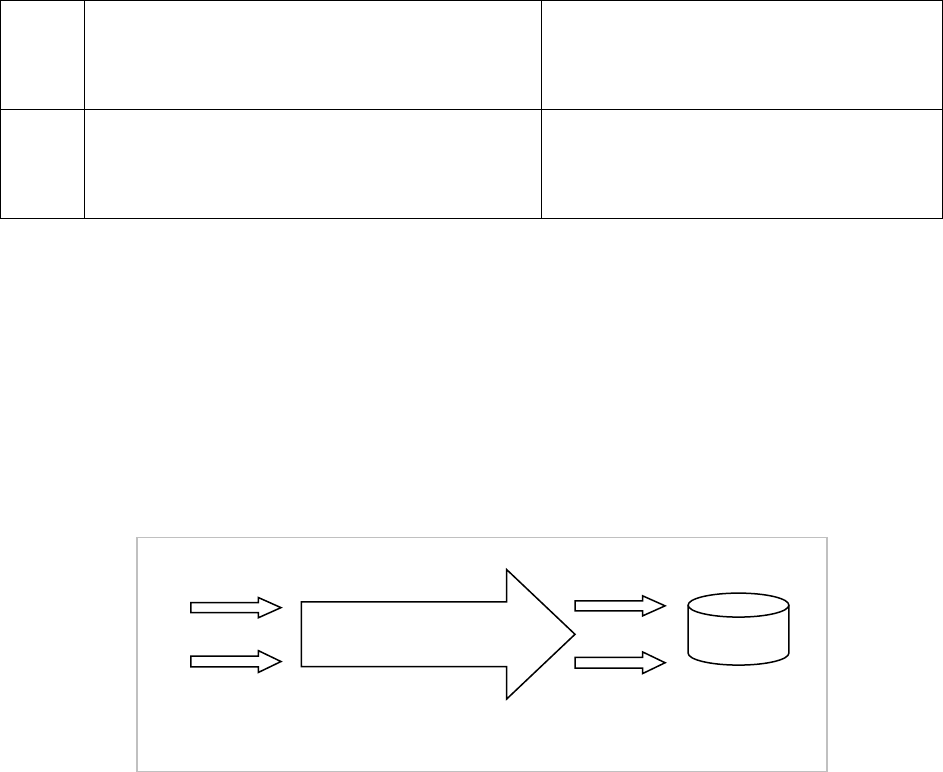
The security of data is supported at several different levels, including network, application, and database
(Figure 1).
This chapter focuses on security measures implemented in the database. Although security implemented
outside the database plays an important role, it is crucial to understand that this outer security shield is not
sufficient to protect the data and cannot substitute for the in-database security. The main shortcoming of the
outer security shield is that it can be bypassed.
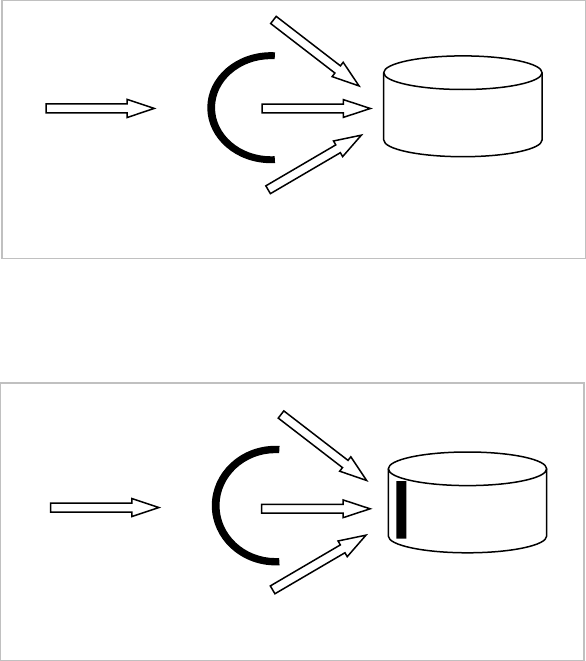
For example, let’s say for the sake of argument that the user John is not allowed to access the database and
the user Scott can access some portions of the data in the database. The application through which users
work with the database implements the required security rules: (a) John cannot log into the application at all,
(b) Scott can use the application, but his access to data is restricted by this application. However, there are no
special security measures implemented in the database to prevent John or Scott from accessing data that they
are not supposed to access. Therefore, if John or Scott decide to use another application, e.g. SQL*Plus in
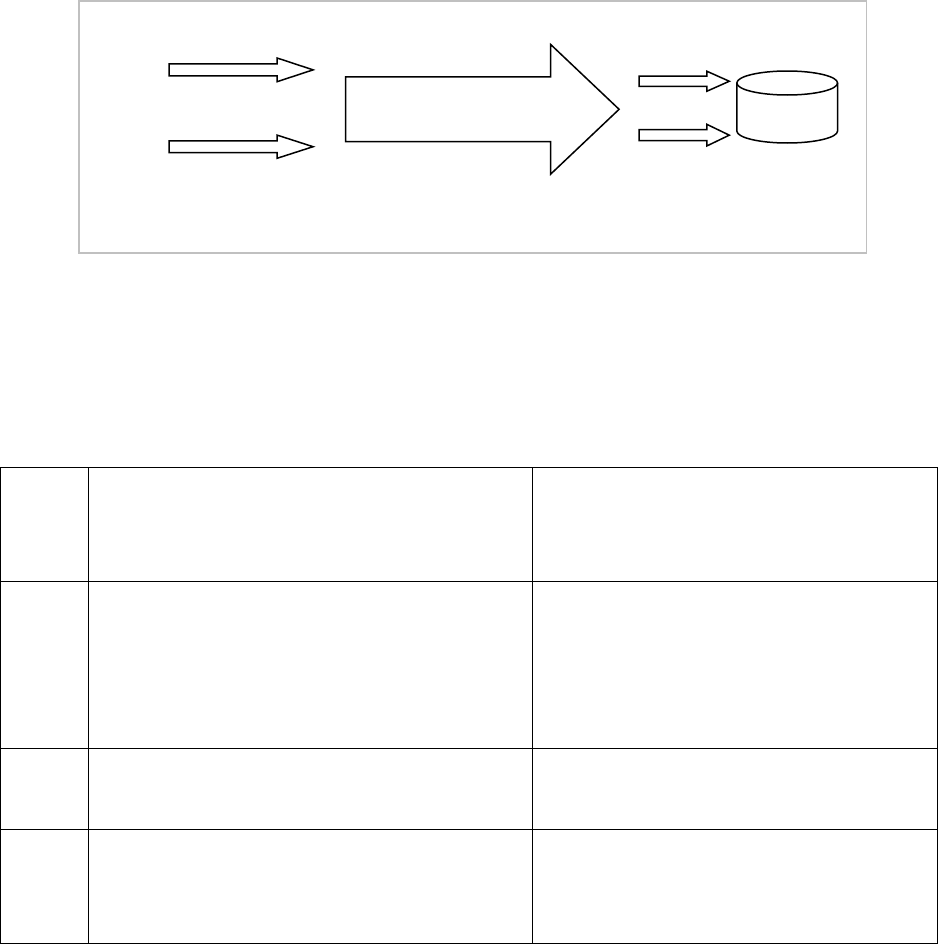
Oracle, they may be able to access the restricted data. As Figure 2 shows, relying on outer security measures
(like security implemented in the application) and not enforcing the in-database security can lead to security
Figure 1. Multiple security shields in an IS.
Security shield
Database
Data access
2
breaches.
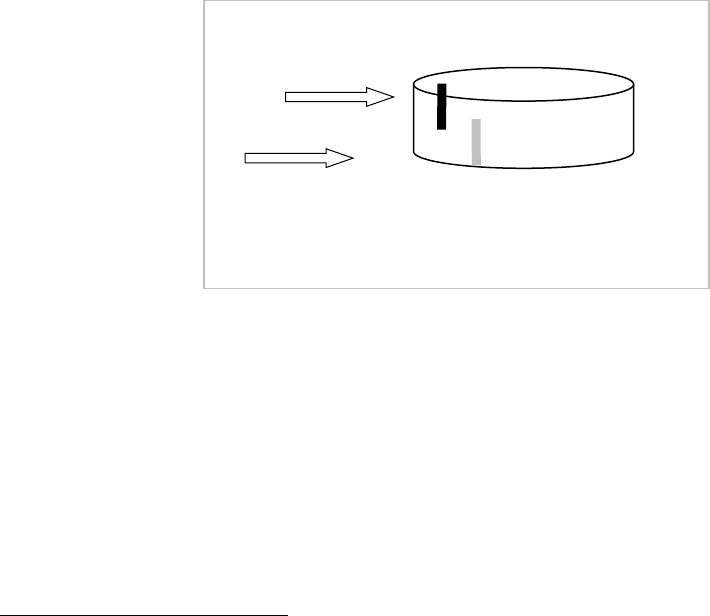
In-database security measures (Figure 3) cannot be bypassed and hence make the overall data protection
more reliable.
Another advantage of implementing security in the database is that security policies are applied once, instead
of being implemented repeatedly in different applications on the database.
Data security must be supported within the database.
To satisfy user requirements on data security, security measures must specify which users can perform which
operations and on what data.
Database security is about ensuring that only authorized users can perform allowed
operations on the data.
Security measures define certain relationships between users, operations, and data
.
The required security can be
ensured by checking whether the triplet of access (user, operation, data object) is valid. For example, if the
user John requests data about the age of employees from the table Employee, the system checks whether John
has the permission to select from the attribute Age of the table Employee
.
This chapter discusses security and protection from security threats such as theft and fraud, loss of
confidentiality, and loss of privacy; all of which are violations of valid relationships between a user and
operations the user can perform on particular data.
In some text books the discussion of security includes such issues as integrity and availability of data. We
Figure 2. Bypassing security measures outside the database.
Database
Data access
Figure 3. Reliability of database security measures.
Database
Data access
3
want to emphasize the difference between the concepts of security, and integrity and availability.
The integrity of data is the correspondence of data to specific structural or action-oriented business rules. It
must be supported by the appropriate implementation of integrity constraints
1
, and it cannot be enforced by
security measures. For example, if according to a business rule which states that the values of the attribute
Age in the table Employee has to be between 18 and 65, then the CHECK constraint on the attribute Age
will guarantee the integrity of this attribute. However, the CHECK constraint does not implement any
security control. If the security of data requires that only the user John can modify the attribute Age, then
security measures have to prevent any other user from changing values of this attribute. On the other hand,
security measures are not related to integrity – even with a successful implementation of security, but without
the corresponding integrity constraint, the user John can make a mistake while entering data into the Age
attribute and violate the correctness of data.
Security measures shield data from unauthorized access, while integrity measures protect data from any
authorized changes that can violate the correctness of the data (Figure 4). However, in some cases integrity
can be additionally enforced with the help of security tools. For example, in Chapter 3 on distrbituted design
we discussed integrity in the distributed database. For vertical fragmentation, inserting and deleting data has
to be performed on all fragments, and it is recommended that the direct insert and delete operations on
fragments should not be allowed. Instead, users should execute special procedures that implement the
inserting and deleting of data into all fragments. Although these special procedures are implementing secure
access, they also ensure the integrity of the data.
The availability of data is discussed in detail in Chapter 7. The database and other components of the IS have
to be reliable to provide the availability of the data. If the database is unavailable, security measures cannot
change the situation and make data available to those who are authorized to use it. On the other hand, when
data is available via a properly functioning IS, it is important to secure the data and ensure that unauthorized
users cannot access it (Figure 5).
1
Either by the declarative integrity constraints in a table definition, such as PRIMARY KEY, FOREIGN
KEY, CHECK, or with the help of triggers.
Security
Shield
Integrity
Shield
Scott
John
Database
Figure 4. Security and Integrity.
4
Security measures provided by DBMSs include:
Authentication of users. Authentication measures define users who are entitled to work with a database and
their credentials which the DBMS uses to authenticate users trying to get access to a database.
Authorization of access to data. For users who are authenticated by the database, authorization measures
define the kind of actions that these users can perform on that database.
Most DBMSs support a special method of protecting data – encryption. Encryption is the encoding of data
by special procedures. Interpretation of encrypted data without the corresponding decryption key is difficult.
Even if users can access the data, they will not be able to interpret and use the data.
In this chapter we will limit our discussions to the authentication and authorization tools of DBMSs.
The Basic Tools for Implementing Security
Users and Schemas
The first part in the security triplet of access is the user. When a user is trying to access a database resource,
first the database must recognize or authenticate the user. The user name and password are the primary
authentication tools. User authentication can be enhanced by additional measures, such as limiting the
number of attempts to log into the database with incorrect user names/passwords, locking access to the
database for a user after the submission of a certain number of incorrect passwords, or specifying an
expiration date of the user’s identification, and other means.
Users are objects of the database (not included in any schema). As with every other database object, a new
user has to be created in the database, and then the user’s identification information must be specified. This
involves security issues such as who can create new database users? Can any registered database user create
new users? Let us assume that there is a user, e.g. the database administrator, who can create users. Later in
the chapter, we will discuss the special privileges needed for managing other users. The administrator creates
the user Scott and assigns him the password ‘tiger’:
Admin> CREATE USER Scott IDENTIFIED BY tiger;
After a user is created, establishing relationships between the user, database objects and operations has to be
provided.
The fact that a user is registered in the database does not mean that he can perform any operation – for every
action, which is possible in the database, the user must be given explicit permission or privilege. Privileges for
John
John
Scott
Database
Scott
Security
Shield
≈
≈
Database
Figure 5. Security and Availability.
5
operations are granted to users, e.g. granting a connection to a database in Oracle is performed as:
Admin> GRANT CREATE SESSION TO Scott;
As security involves users, actions, and data objects, a user may be granted the privilege to perform an action
on all objects of a particular type, e.g. the following statement allows the user Scott to create tables:
Admin> GRANT CREATE TABLE TO Scott;
Creation of any other object of the database: view, snapshot, index, trigger, etc. must be explicitly granted, if
allowed.
Privileges, once given, can be taken away:
Admin> REVOKE CREATE TABLE FROM Scott;
All objects created by a particular user
2
, belong to this user, or, in other words, the user is the owner of these
objects. These objects compose the user’s schema (Figure 6). The name of the schema is the same as the
name of the user. Note that not all users of the database have schemas – only those who have objects. If a
user is allowed to create objects, e.g. tables, this implies that the user can perform all other legal operations on
the created objects, e.g. DROP, ALTER, SELECT, INSERT, DELETE, and UPDATE on the tables.
A user does not need privileges to manipulate objects from his schema.
Having been given the database account, the create session and create table privileges, Scott can now get
access to the database, create his tables and manipulate them. Scott does not see and cannot access any object
from schemas of other users of the database, e.g. objects of John, without getting special privileges for access.
When accessing an object from another schema, the user has to specify the full object name, which is
composed of the schema name and the object name. For example, if Scott wants to access the table
Department in John’s schema, the following request will not be successful:
Scott> SELECT * FROM Department;
Instead of accessing John’s table, Scott will see data of his own table Department because if the name of an
2
Or on the user’s behalf by a user who has such special privileges.
Figure 6. Users and Schemas.
User Scott
Schema
of John
Schema of
Scott
Department
Department
User John
6
object is not prefixed by the schema name, the system looks for the object in the schema of the user who
issues the request. Scott will be able to see data from John’s table Department with the help of the following
statement:
Scott> SELECT * FROM John.Department;
Whether this request is successful depends on the privileges granted to Scott on John’s table Department.
Schemas are an efficient database security tool; they restrict users’ access to objects that do not belong to
them.
A user must be explicitly granted privileges for a particular type of access to an object of another user. The
owner of the object (or users with special privileges that are discussed later) can grant such privileges. With
the following statement, John can grant Scott the privilege to select from the table Department from his
schema (note that here John refers to his table and does not need to prefix the table name by the name of the
schema).
John> GRANT SELECT ON Department TO Scott;
With only this privilege granted, Scott cannot modify data in John’s table Department as for each new action
on John’s table, Scott needs a corresponding privilege.
Users need privileges for every operation on every data object owned by another user.
When being granted a particular privilege, a user may be authorized to pass this privilege to other users with
the help of the WITH GRANT option. By the following command, John not only grants Scott the privilege to
select from his table, but also gives him the right to grant this privilege to other users:
John> GRANT SELECT ON Department TO Scott WITH GRANT OPTION;
Now Scott can grant the privilege to select from the table Department from John’s schema to other users:
Scott> GRANT SELECT ON John.Department TO Adam;
The WITH GRANT option has to be used with caution because it can lead to uncontrollable spreading of
privileges and possible violations of security requirements.
Often users need access privileges for only some columns of a table. For example, John reconsiders the
privileges of Scott and wants to limit Scott to seeing only the attributes deptCode and deptName from his
table Department. This can be performed by first revoking Scott’s current privilege and then granting
privileges on only the specific columns needed as shown below:
John> REVOKE SELECT ON Department FROM Scott;
John> GRANT SELECT deptCode,deptName ON Department TO
Scott;
Roles
Often numerous users of the database require similar privileges, e.g. accountants of the financial office of a
company usually need similar access to data. It is difficult and time consuming to repeat the same granting
7
actions for every user. For simplification of handling security issues, most DBMSs include a separate object
role (or user group). Role is a set of privileges. After a role is created and some privileges are granted to the role,
then the role (as the set of privileges) can be granted to users or other roles (Figure 7). For example,
accountants of the financial office need several privileges on John’s table Department. After creating the role
for this group of users and granting to this role all required privileges, a new user-accountant can receive the
needed privileges through one granting statement, like Scott in the example below:
Admin> CREATE ROLE Accountant;
John> GRANT SELECT, INSERT ON Department TO Accountant;
Admin> GRANT Accountant TO Scott;
Through the role Accountant, Scott was granted two privileges: SELECT and INSERT on John’s table
Department. This is equivalent to executing two direct corresponding GRANT commands.
Not only is it easier to pass privileges to numerous users through roles, but roles also make privilege
management easier. If security requirements for a group of users change, these changes applied to the
corresponding roles will be automatically reflected in privileges of the users who have been granted the roles.
For example, if a new privilege is added to the role Accountant, then the privilege is automatically passed to
user Scott and all other users through the role Accountant:
John> GRANT UPDATE ON Department TO Accountant;
Scott> UPDATE John.Department SET …;
In other words, at any given moment, a user who has been granted a particular role has the privileges
associated with that role at that moment.
Compare this to the situation when SELECT and INSERT ON Department are granted to Scott and many
other users-accountants directly:
John> GRANT SELECT, INSERT ON Department TO Scott;
If one of these two privileges needs to be revoked from this group of users, multiple revoke operations – for
each user in the group – needs to take place.
Object and System Privileges
In the previous sections, a data object from the triplet (user, action, data object) was a particular object of a
specific schema. Privileges on particular objects are called object
privileges, e.g. the following statement grants
Figure 7. Users, roles and privileges.
Accountant
Users
Roles
Privileges
Scott
John
Adam
8
Scott the privilege to select from the Department table:
Admin> GRANT SELECT ON Department TO Scott;
It is also possible to give a privilege on all data objects of a particular class in one statement, e.g. the following
statement grants Scott the privilege to select from all tables:
Admin> GRANT SELECT ON ANY TABLE TO Scott;
Such privileges are called system privileges. Without any additional permission, Scott will be able to select data
from all tables of other users. System privileges also include such privileges as CREATE USER, CREATE
ROLE, CREATE TABLE, and other privileges for special operations. System privileges have to be granted
with caution.
Now we can answer the question raised at the beginning of the chapter – which users can create other users
or roles? Users with the system privileges CREATE USER and CREATE ROLE can perform these
operations. But who grants these users the system privileges?
The process of installation of a database usually includes the creation of a number of users with special
privileges and roles, and with predefined passwords
3
. In Oracle, for example, one such user is SYS who has
all privileges, including privileges to create other users and grant these users privileges. Usually, SYS creates a
number of user accounts for database administrators and grants them system privileges. Then, these users can
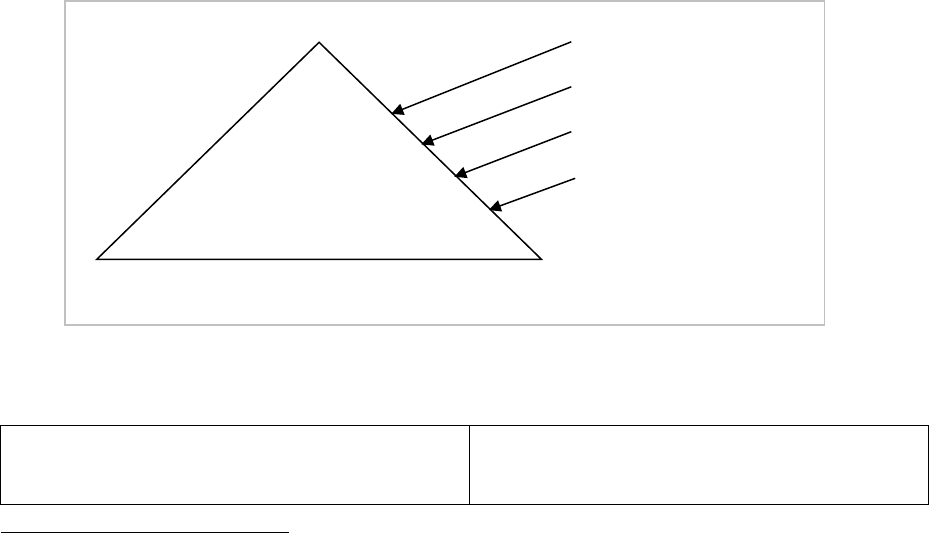
manage the other users of the database. We can think of the security system as a pyramid: from fewer users
with many privileges to a larger number of users with fewer privileges – see Figure 8. Please note that on
different levels we have different kinds of privileges: mostly system privileges on higher levels and mostly
object privileges on lower levels.
The following scenario illustrates creation of the security pyramid:
SYS> CREATE USER DBA1 IDENTIFIED BY lion;
SYS> GRANT CREATE USER TO DBA1;
…
SYS creates a user account that will perform
administrative task, e.g. creating user accounts.
3
The passwords have to be changed upon installation.
SYS
DBAs
Dev elop ers
Application Users
All privileges
Many system privileges
Some system privileges
and object privileges
Some object privileges
Figure 8. Security Pyramid.

9
DBA1> CREATE USER scott IDENTIFIED BY
tiger;
DBA1> GRANT CONNECT TO scott;
DBA1> GRANT CREATE TABLE TO scott;
…
DBA1 creates an account for a database developer
who will need to create different database objects.
DBA1> CREATE USER john IDENTIFIED BY
panther;
DBA1> GRANT CONNECT TO john;
DBA1 creates an account for a database user who
will be using objects created by developers.
Scott> CREATE TABLE foo (…);
Scott> GRANT SELECT ON foo TO john;
…
Scott creates a table and grants some privileges on
this table to John.
We discussed how object privileges are passed from one user to another – the owner of an object can grant
privileges on operations on the object to other users with the grant option. System privileges can be passed to
other users when they are granted with the ADMIN OPTION, e.g. the administrator grants Scott the privilege
to create users and to grant this privilege to other users:
Admin> GRANT CREATE USER TO Scott WITH ADMIN OPTION;
Now Scott can grant (revoke) the privilege to create users to (from) other users. It is not recommended to
give privileges with the admin option to regular (non-administrative) users of the database.
Database Objects and Security
Usually, security requirements are more complicated than the requirements mentioned in the previous
section, and the basic security tools are not sufficient to implement all the requirements. Other database
objects, such as views and procedures, are often used for enhancing security.
Views
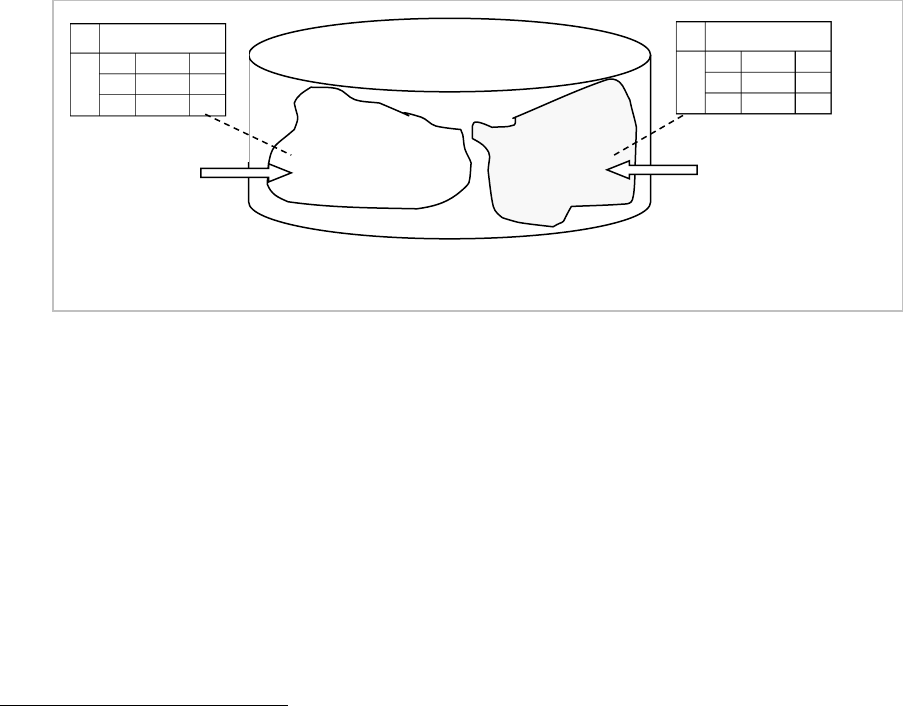
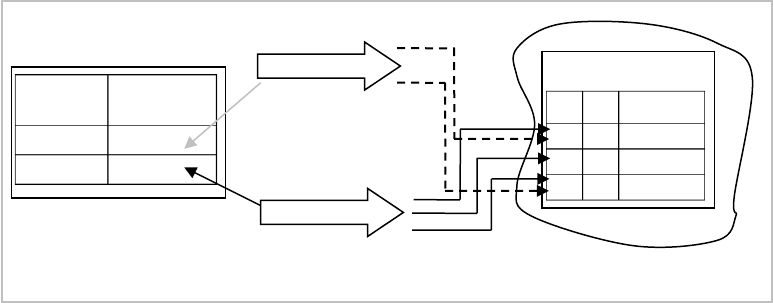
With the security measures discussed before, the finest grain of security that can be achieved is a column of a
table. However, in many cases, users are required to access only particular rows of a table. For example, for
the table Department in the Manufacturing Company database, users from Cleveland can access only the
rows of the departments located in Cleveland.
Such security requirements can be implemented with the help of views. In Chapter 2 we showed how views
are used to implement the transparency of the data in the centralized database and the transparency of the
fragmentation in the distributed database. Views are also an important tool for implementing security.
In the case where a user is supposed to access only certain data in a table, the user should not be granted
access to the table (or might have privileges revoked on the table in case the user was previously granted the
privileges). Instead, the user can be granted access to a view defined on the table. If a view is defined on
particular columns and rows of the table, the user would be able to access only these columns and rows
through the view (Figure 9).
View processing includes transforming the query on the view into the query on the view definition. For
example, the user John creates a view and grants reading privileges on the view to Scott (while revoking the
reading privileges on the whole table):
10
John> CREATE VIEW vw_Department AS
SELECT deptCode, DeptName
FROM Department WHERE location = ‘Cleveland’;
John> REVOKE SELECT ON Department FROM Scott;
John> GRANT SELECT ON vw_Department TO Scott;
Now Scott can select only from the view:
Scott> SELECT * FROM John.vw_Department;
In Scott’s request, the name of the view is substituted by the view definition and the request is transformed
into the following query:
SELECT * FROM
(SELECT deptCode, DeptName
FROM John.Department WHERE location = ‘Cleveland’);
With such a security solution, Scott cannot see data beyond the view definition.
Views can be used for data modification as well. If in addition to the select privilege, Scott is granted the
update privilege on the view, he can update data in the table Department through the view:
John> GRANT UPDATE ON vw_Department TO Scott;
Scott> UPDATE John.vw_Department SET deptName = ‘New name’
WHERE deptCode = ‘004’;
Views can prevent passing data inconsistent with the view definition into the view’s table. This is
accomplished with the help of CHECK OPTION. Let us redefine the view vw_Department:
John> CREATE VIEW vw_Department AS
SELECT deptCode, DeptName
FROM Department WHERE location = ‘Cleveland’
WITH CHECK OPTION CONSTRAINT Department_Cleveland;
Now the check option constraint will control the data inserted into the table through the view corresponding
to the view’s conditions. For example, after Scott is granted the insert privilege on the view, his first insert
into the table Department will be successful, while the second will fail because the inserted value ‘Boston’ for
Figure 9. Views as a security tool.
Department
User
Scott
View
11
the attribute location is inconsistent with the view’s constraint location = ‘Cleveland’:
John> GRANT INSERT ON vw_Department TO Scott;
Scott> INSERT INTO John.vw_Department VALUES
(‘999’, ‘Accounts Payable’, ‘Cleveland’); (succeeds)
Scott> INSERT INTO John.vw_Department VALUES
(‘888’, ‘Accounts Receivable’, ‘Boston’); (fails)
Definitions of views may be more complicated, e.g. can include joins or aggregates. Each DBMS has specific
limitations on the possibilities of modifying data through complex views.
Stored Procedures
In Chapter 2 we discussed how stored procedures are used for implementing transparency of allocation and
distribution. Stored procedures are also used for support of data security. Like views, procedures provide
indirect access to specific portions of a table’s data when full access to the table is not allowed.
Consider the security requirements that were supported with the help of the view in the previous section –
Scott can access only data about the Cleveland departments from John’s table Department. To implement
these requirements using stored procedures, we create two procedures – for updates and inserts on the table:
John> CREATE PROCEDURE update_Cleveland
(par_deptCode CHAR, par_deptName VARCHAR2) AS
BEGIN
UPDATE Department SET deptName = par_deptName
WHERE deptCode = par_deptcode AND location =
‘Cleveland’;
END;
John> CREATE PROCEDURE insert_Cleveland
(par_deptCode CHAR, par_deptName VARCHAR2) AS
BEGIN
INSERT INTO Department
VALUES (par_deptCode, par_deptName,
‘Cleveland’);
END;
The user Scott is denied the privileges of performing direct operations on the table Department and is
granted the privileges to execute these procedures. Note that the procedure for updates – update_Cleveland –
ensures that the updated department is located in Cleveland (if the department is located in another city or
does not exist, no rows are updated). The second procedure for inserts – insert_Cleveland – assigns
Cleveland as the location for the new department.
John> GRANT EXECUTE update_Cleveland, insert_Cleveland
TO Scott;
Scott> EXEC John.insert_Cleveland (‘999’, ‘Accounts
Payable’);
Parameters of this procedure call are passed to the INSERT statement of the procedure and the following
12
insert takes place:
INSERT INTO John.Department
VALUES (‘999’, ‘Accounts Payable’, ‘Cleveland’);
Procedures enable the implementation of complicated security requirements that cannot be supported by the
basic security measures or views.
Synonyms
In the previous sections we showed that the objects used for implementing transparency – views and
procedures – can be effective security tools because through them, users can get access to specific portions of
data of the table without getting access to the whole table. Another transparency object – synonym – is not
used for implementing security because it is just an additional name for a database object and users can access
the synonym only if they have the corresponding access privileges on the object itself. For example, if John
creates a public synonym for his table Department, other users will need privileges on the table in order to
access the synonym. Below, Scott succeeds in accessing the synonym, while Adam who does not have access
privileges on the table, fails:
John> CREATE PUBLIC SYNONYM syn_Department FOR
Department;
John> GRANT SELECT ON Department TO Scott;
Because we used the option PUBLIC in the definition of the synonym, all users will be able to see and use it
without referring to the schema of Scott (most of the other objects do not have this option).
Scott> SELECT * FROM syn_Department; (succeeds)
Adam> SELECT * FROM syn_Department; (fails)
Synonyms cannot enhance security – synonyms of an object have the same security measures as the object.
Security and Transparency
Views and procedures – objects that are used for implementing security of the database – are also used for
the support of data transparency. Though technically transparency and security are different features of the
database, there is a logical connection between them. If users are not allowed to access a particular database
resource, this resource has to be transparent to them. By sustaining security we can achieve transparency, and
we can use transparency for implementing security. However, while transparency is a highly desirable feature
of the database, security is a required one.
Let us again discuss views and see how they can not only enforce security, but can also make security
measures less dependent on database changes. If we define security measures on views, and not on tables, we
enforce the transparency of the data for these security measures. For example, the table Department is in
John’s schema, and Scott is running an application that accesses this table. If for some reason the table is
moved to another schema or is renamed, then the application has to be changed, as well as the security
measures – see Figure 10a).
If there is a tier of views (see discussion of transparency in Chapter 2), and security measures are defined on
those views, then changes to the table will only cause a redefinition of the views and can be transparent to the
13
security measures and applications see Figure 10b).
Additional Security Measures
In many DBMSs security is enhanced by additional measures:
Limiting resources: Often administrators establish limits on users’ resources consumption, such as CPU
time, memory, storage and other resources, to prevent the excessive use of resources.
User accounts management: It is recommended to manage users’ accounts by setting expiration dates and
requiring regular modifications of passwords, control of passwords’ complexity, etc.
Auditing: Often various database activities are audited – information about users’ actions is recorded in
the database. Audit information can help in discovering security breaches.
Security in the Distributed Database
In a distributed database, each component database should have the required security measures for access of
local users. If the database is accessed remotely (from another database), the database has to authenticate the
access and check whether it is authorized. Therefore, when users need to access data from several databases,
in addition to the local authentication of users and authorization of local access, developers have to
implement distributed security, which includes remote user authentication and distributed authorization of
access throughout all component databases.
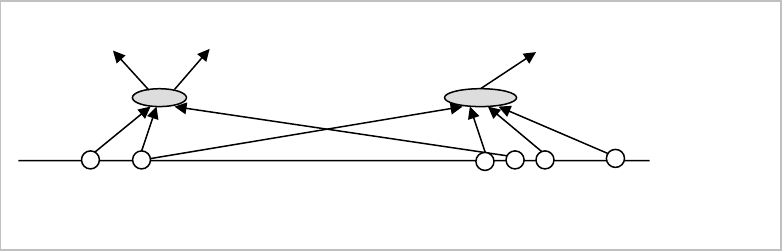
Remote User Authentication
We will call the site from which a user is working, the local site, and the site which the user tries to access, the
remote site. If a user who is working on the local site is accessing data in the remote database, the local
database sends identification information to the remote database. Here, the local database is perceived by the
remote database as a user requesting access. The local site can identify itself in several different ways:
1. As a specific user of the remote database. For example, the Boston database is always authenticated in the New
York database as the user John. Any user of the Boston database who tries to access the New York
database is authenticated there as John. This approach requires the user John to be created in the New
York database (Figure 11).
Figure 10. Security measures on tables and views.
a)
Table
Department
Schema of John
Admin>
GRANT SELECT ON
John.Department
TO Scott;
Scott>
SELECT * FROM
John.Department;
Admin>
GRANT SELECT ON
John.vw_Department TO
Scott;
Scott>
SELECT * FROM
John.vw_Department;
Admin>
GRANT SELECT ON
New.Department TO Scott;
Scott>
SELECT * FROM
New.Department;
Table
Department
View
vw_Department
b)
14
2. As a local user who is requesting remote access. For example, for Scott’s request, the Boston database is
authenticated by the New York database as Scott, and for John’s – as John. In this case, local users who
need remote access must be replicated in the New York database (Figure 12).
3. As one or more of the local users. Identification information depends on the local user requesting remote
access and the type of access. For example, in some situations, Scott’s request to the New York database
results in authentication of the Boston database as Scott and in others – as John. Depending on how
Scott is accessing the remote database, users Scott or John must be replicated in the New York database
(Figure 13).
Distributed Authorization of Access
If a user is authenticated by a remote database, the user’s access to the remote data will be defined by
authorization rules.
Authorization for remote access cannot be established from the local database – each database manages
authorization autonomously. Combining authentication methods and replication of users with authorization
rules on the remote site can produce multiple security scenarios.
Figure 13. Authentication as one or more of the local users.
NY
Boston
Users:
Scott, John, …
Users:
Scott, John…
Scott
Scott
Scott
John
John
Figure 11. Authentication as a specific local user.
NY
Boston
Users:
Scott, Adam, …
Users:
John,…
Scott
Adam
Scott
Figure 12. Authentication as a requesting user.
NY
Boston
John
Users:
Scott, John, …
Users:
Scott, John, …
Scott
John

15
Consider the situation when the local database identifies itself as a local user and requests a remote resource
as in Figure 4-12. The local user Scott who is replicated in the remote database requests data from his table
Employee in the New York database:
Scott> SELECT * FROM Employee@ny;
The New York database receives this as a request from Scott and authenticates it. After that, Scott is allowed
to access the remote table Employee from his schema.
The scenario is different for the situation when the local database identifies itself as a specific local user as in
Figure 11. The request that originates from Scott reaches the New York database as a request from John.
Because the table name in the request is not prefixed by a schema name, the remote database will look into
John’s schema and hence the request will be unsuccessful.
For the request to be successful, the following two considerations have to be made:
Scott has to rewrite the request as:
Scott> SELECT * FROM Scott.Employee@ny;
The user John has to be granted a corresponding privilege on Scott’s table Employee in the remote
database (by Scott or another authorized user):
GRANT SELECT ON Scott.Employee TO John;
Authorization of access in the remote database depends on how the local database authenticates itself. On the
other hand, the way the remote database permits access for local users determines the solution for
authentication of the local database. Analysis of several different distributed security solutions in Oracle are
discussed later in this chapter.
Distribution and Security
The support of security for distributed and centralized database solutions is different. Recall how we
discussed restricting Scott’s access to particular rows of the table Department with the help of a view or
procedure in the centralized database. If we consider the distributed solution from Chapter 3 (when each site
has a fragment of the table Department with local departments), then security measures will be different. We
will not need views or procedures to limit access to specific rows; instead, Scott will be a local user of the
Cleveland database and will have privileges to access the Cleveland fragment of the table Department. We
should also ensure that Scott does not have access to the New York and Boston databases.
Security Measures in Oracle
Basic Features
Basic security in Oracle is supported by users, schemas, and granting (revoking) privileges. The following
example demonstrates some basic security features.
Admin:
CREATE USER Scott IDENTIFIED BY
tiger;
GRANT CREATE SESSION TO Scott;
Administrator creates the user Scott and grants
him the privilege to log into the database.

16
Scott:
CREATE TABLE Emp
(ID NUMBER,
name VARCHAR2(30));
Insufficient
privileges
Scott successfully logs into the database. After
that, he tries to create a table and fails because he
does not have the corresponding privilege.
Admin:
GRANT CREATE TABLE TO Scott;
Administrator grants Scott the privilege to create
tables.
Scott:
CREATE TABLE Employee
(ID NUMBER PRIMARY KEY,
name VARCHAR2(30));
Scott creates a table.
Admin:
CREATE USER Adam IDENTIFIED BY
lion;
GRANT CREATE SESSION TO Adam;
Administrator creates the user Adam and grants
him the privilege to log into the database.
Adam:
SELECT * FROM Scott.Emp;
Table or view does
not exist
Adam tries to select from the table Employee in
Scott’s schema, but without the required privilege
he does not see the table.
Scott:
GRANT SELECT ON Employee TO
Adam;
Scott grants Adam the privilege to select from his
table.
Adam:
SELECT * FROM Scott.Employee;
0 rows selected
Adam successfully accesses the table (the table is
empty).
Scott:
SELECT * FROM Employee;
0 rows selected
Scott selects from his table with the same result
as Adam.
Scott:
REVOKE SELECT ON Employee FROM
Adam;
Scott revokes from Adam the privilege to select
from the table.
Adam:
CREATE TABLE Proj
(pno NUMBER PRIMARY KEY,
ID NUMBER REFERENCES
Scott.Employee)
Insufficient
privileges
Adam wants to create a table and fails because he
does not have sufficient privileges.
Scott:
GRANT CREATE TABLE TO Adam;
Insufficient
privileges
Scott wants to grant Adam the privilege to create
tables and fails because he does not have the
privileges to grant the create table privilege to
other users (he was granted the create table
privilege without admin option).
Admin:
GRANT CREATE TABLE TO Adam;
Administrator grants the privilege for creating
tables to Adam.

17
Adam:
CREATE TABLE Proj
(pno NUMBER PRIMARY KEY,
ID NUMBER REFERENCES
Scott.Employee);
Table or view does
not exist
Adam’s second attempt to create a table fails
because he references the table from another
schema without having the required privileges.
Scott:
GRANT REFERENCES ON
Scott.Employee TO Adam;
Scott allows Adam to reference his table
Employee.
Adam:
SELECT * FROM Scott.Employee;
Table or view does
not exist
Adam tries to select from Scott’s table and fails
because this privilege has been revoked.
Adam:
CREATE TABLE proj
(pno NUMBER PRIMARY KEY,
ID NUMBER REFERENCES
Scott.Employee);
Adam succeeds in creating a table with the
reference to the table of Scott.
Previous demonstrations of using views and procedures for implementing security were provided in Oracle.
Roles and PUBLIC Pseudo-User
In addition to the basic functionality, roles in Oracle have some special properties:
Roles granted to a particular user can be dynamically enabled or disabled, which enables control of the
user’s privileges depending on the situation. For example, if the user Scott opens a session and starts an
application, all roles granted to him may be disabled by the statement SET ROLE NONE. All previously
granted roles can be enabled by SET ROLE ALL. A particular role can be enabled by SET ROLE role.
Roles can be protected by passwords. When enabling a role, a user must specify the password assigned to
the role:
CREATE ROLE Accountant IDENTIFIED BY tiger;
Special secure application roles can be enabled only by authorized PL/SQL packages. This mechanism
restricts the enabling of such roles to the invoking application.
Oracle has three predefined roles with different sets of system privileges: CONNECT, RESOURCE, and
DBA. These roles can be granted to users, e.g. the following statement grants the user Adam the role
CONNECT and with it such privileges as ALTER SESSION, CREATE CLUSTER, CREATE
DATABASE LINK, CREATE SEQUENCE, CREATE SESSION, CREATE SYNONYM,
CREATE TABLE, CREATE VIEW:
GRANT CONNECT TO Adam;
In Oracle, there is a pseudo-user named PUBLIC who is not a regular user as it cannot have a schema. A
privilege or role granted to PUBLIC will be given to every user – past, present, and future. Therefore,
privileges should be granted to PUBLIC with caution.
18
Authentication
The database authenticates a user by name and password:
CREATE USER Scott IDENTIFIED BY tiger;
Additionally, users can be authenticated by the operating system. Oracle relies on the operating system
authentication and does not require the user to authenticate himself if they are created as:
CREATE USER John IDENTIFIED EXTERNALLY;
Another way to authenticate a user is the proxy authentication. A proxy user is a user who is allowed to
connect to the database on behalf of another user. If a user needs a proxy connection, this user is given few
privileges such as the privilege to connect to the database. After the user connects to the database, the
database opens a second--a proxy--session on this user’s behalf. In the commands below we create the user
Adam and grant him the privilege to connect to the database. After that we make the user Scott a proxy user
for Adam. Now, if Adam connects to the database, the database will create a session as the user Scott on
behalf of Adam. This Scott session that was created on behalf of Adam is subject to all of the rules and
privileges of the user Scott – it can only do what Scott is allowed to do.
CREATE USER Adam IDENTIFIED BY lion;
GRANT CREATE SESSION TO Adam;
ALTER USER Scott GRANT CONNECT THROUGH Adam;
The proxy user authentication introduced in Oracle 10g provides help in resolving the security problems that
exist in some enterprise multi-tier applications. Often a user logs into a client application and then relies on
the application to login on his behalf in the database. Applications often use pre-spawned Oracle connections
that are created by a single Oracle user ID with the generic name, e.g. the user Sap for the SAP application
rather than using thousands of different user ids. Unfortunately, when the end-users connect anonymously
through a proxy application, there is no end-user level auditing and security through traditional security tools
like granting privileges or using roles.
With Oracle proxy users, though the application connects to the database using the generic user name, the
end-user’s authentication information is also carried to the database with the help of the enhanced SQL
command that allows proxy:
CONNECT Sap[Scott]/tiger
The application generic database user is created as before. However, we do not grant this user any privileges
except the privilege to connect to the database. For example, for the SAP application:
CREATE USER Sap IDENTIFIED BY lion;
GRANT CREATE SESSION TO Sap;
Additionally, we create end-user database accounts with all required privileges and define these accounts as
proxy accounts for the application account:
ALTER USER Scott_ny GRANT CONNECT THROUGH Sap;
19
When the user Scott connects to the application, the application logs into the database (as Sap in our
example) and then the database connects Scott into the database. This way the database preserves control
over all actions of Scott and can provide an audit trail on Scott’s actions. This is schematically shown in
Figure 14.
INSTEAD OF Triggers
Earlier, when discussing views, we mentioned that not all views allow for modifications thus limiting their
usage for implementing security and transparency. For example, the views that contain set operators,
DISTINCT operator, aggregate or analytic functions, GROUP BY, ORDER BY, most joins, and some
other constructs cannot be modified directly.
To overcome this limitation, Oracle introduced INSTEAD OF trigger.
For example, to limit access to data about employees of Boston we have the view that is based on the join of
two tables:
CREATE OR REPLACE VIEW vw_Empl_Boston AS
SELECT e.emplID, e.emplName, d.deptCode, d.deptName
FROM Employee e INNER JOIN Department d
ON e.deptCode = e.deptCode
WHERE location = ‘Boston’;
Because we want to be able to update data about employees through this view, we need to create the
INSTEAD OF trigger as shown below (the example illustrates updates of the employees’ names; for updates
of other attributes the trigger needs to be expanded):
CREATE OR REPLACE TRIGGER trig_vw_Empl_Boston
INSTEAD OF UPDATE ON vw_Empl_Boston
FOR EACH ROW
BEGIN
UPDATE employee
SET emplName = :NEW.emplName
WHERE emplID = OLD:emplID;
END;
With this trigger, when a user tries to update the view
Figure 14. Proxy connections.
Users:
Sap, Scott,
John…
Scott
John
Sap
Scott
John

20
UPDATE vw_Empl_Boston SET emplName = ‘John’ WHERE emplID = 123;
the system starts the trigger that will perform
UPDATE employee SET emplName = ‘John’ WHERE emplID = 123;
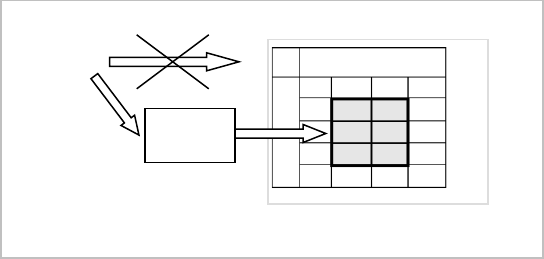
Fine-Grained Access Control
In many cases, the discussed security tools are not enough to implement the required security support.
Imagine a bank application through which users, who are bank customers, access their bank accounts.
Obviously, none of them can get access to the whole table (or tables) with data about accounts. If we try to
apply the views solution and create a view for each user, the database will contain thousands of views, if not
more, and maintenance of such a database will be extremely expensive.
We may think of using procedures, e.g. a procedure for depositing or withdrawing money on an account.
Assume that there is the table Account (accountNumb, balance) with data about balances on customers’
accounts. Here is a simple example of such a procedure:
DBA> CREATE PROCEDURE test
(par_account NUMBER, par_sum NUMBER) AS
BEGIN
UPDATE Account
SET balance = balance + par_sum
WHERE accountNumb = par_account;
END;
The procedure has two parameters: the first defines the account number of the customer, the second – the
amount of the deposit. The bank application passes the account number and the amount of deposit to the
procedure which then executes the UPDATE statement.
For example, if a customer with account 12345 wants to deposit $100, the application will perform the
following procedure call:
EXEC dba.test(12345, 100);
This call will pass the parameters into the procedure and the following UPDATE statement will be executed:
UPDATE dba.Account SET balance = balance + 100
WHERE accountNumb = 12345;
With the help of this procedure we can limit customers to accessing the data of their accounts only. Each
customer will be granted the privilege to execute the procedure (either individually as below or through a
role):
GRANT EXEC ON test TO Scott;
Though the solution looks elegant, there is a problem caused by the fact that a user’s authentication is not
performed in the database, but in the application. The application defines the account of a user and passes
this information to the procedure. Suppose that the account 12345 belongs to Scott. Now imagine the
situation when user John with the account number 67890 (who also can execute the procedure) connects to
the database through another application, e.g. SQL*PLUS, and then issues the following two statements, the
21
first of which, resulting in withdrawing $1000 from Scott’s account, violates security requirements:
John> EXEC dba.test(12345, -1000);
EXEC dba.test(67890, 1000);
This is a good demonstration of what we warned about in the beginning of the chapter – security
implemented in the application can be bypassed.
Oracle has special tools for implementing fine-grained access control when using views is impractical and
procedures do not guarantee the needed protection. Security requirements are implemented through special
functions called security policies. Security policies are attached to tables or views and every time a user issues
a DML statement on the secured table or view, Oracle attaches the policy to the statement. Attachment of
the policy is performed transparently to the user. Fine-grained access control allows for context-dependent
and row-based security control (see Figure 15).
Fine-grained access is implemented with the help of the supplied package DBMS_RLS. Packages are objects
of the database, which are composed of procedures, functions, and definitions of types and variables. Oracle
has a number of supplied packages, which support additional functionality of the database. Procedures of the
DBMS_RLS package allow specifying the table or the view to which the policy is added, the name of the
policy, the function which implements the policy, the type of statement to which the policy applies (SELECT,
INSERT, UPDATE, or DELETE), and some additional information.
The following example explains how Oracle security policies work for the example of the bank application.
Assume that in addition to the table Account there is the table Customer(name, accountNumb, …)with
information about customers.
1. Define what predicate has to be added to each statement. In our case, we need a predicate that ensures
that a customer accesses data from his account only. If a customer has logged into the database using his
name, then the following predicate will return the customer’s account number, which can later be used to
restrict access to data (the system variable USER contains the name of the current user):
accountNumb = (SELECT accountNumb
FROM Customer
WHERE name = USER);
Figure 15. Fine-grained secure access with the help of policies.
Scott
SELECT
Policie
s
Transformed SELECT
Account
Schema of DBA
22
2. Create a function that returns this predicate. With the help of the package DBMD_RLS we attach the
function to the table Account as a security policy for any DML statement, so that this function adds the
predicate to every DML statement on the table Account (for details see Oracle documentation).
3. Because of the attached security policy, for every statement on the table Account, Oracle calls the
function that implements the policy and modifies the statement by attaching the predicate to it. For
example, a simple select by Scott on the table Account will be transformed in the following way:
SELECT * FROM Account
WHERE accountNumb =
(SELECT accountNumb FROM Customer WHERE name = SCOTT);
4. Oracle executes the dynamically modified statement, and because of the added predicate, the user can
access only the account associated with his name.
Fine-grained access control is based on database authentication of users and is more reliable than the
procedural solutions discussed before. This tool supports what is called a Virtual Private Database in which
each user sees his own private portion of the database.
Label Security
The Oracle Label Security feature is built upon the fine-grained control features; it is useful in situations
similar to the following. Imagine a table with a company’s documents of different security levels – from
documents that can be accessed by all users to documents which have strongly restricted access. For example,
the table Document below contains two types of rows: rows that can be accessed by all users and rows that
can be accessed by employees of the company only.
docID
docName
docLabel
1
Company profile
Public
2
Company payroll
Internal
3
Company partners
Public
…
We use labels in the following way:
Define how to label the rows according to their security type, e.g. ‘Public’ and ‘Internal’, and keep the
labels in a new column docLabel.
Define security levels for all labels by assigning numbers; higher numbers mean more restrictions. In our
case, the value ‘Internal’ implies more restrictions than the value ‘Public’, and we assign 10000 to ‘Public’
and 20000 to ‘Internal’.
Define security policies on the column docLabel and its values, and attach them to the table Document.
Associate security labels with users.
A user’s request to data is transformed by adding the respective security predicate defined on the labels of the
column docLabel. For example:
User Scott is associated with the label ‘Public’.
His request to the table Document is transformed by adding a conditional clause that allows him to
access rows that have security levels lower than or equal to level 10000 of the ‘Public’ value. He can
access only the records labeled ‘Public’.
23
User John is associated with the label ‘Internal’, and he is able to access rows with the security levels
lower than or equal to 20000 or, in our case, all rows of the table.
Figure 16 shows associations between users, labels, and security levels.
Note that if there are only few security levels, then we can apply the views solution – create a view for each
security level using the column docLabel and grant users the privileges on corresponding views.
Additional Measures
Profiles and Limiting Resources
The management of security measures in Oracle can be enhanced by user profiles. A profile defines
additional password constraints and computer resources limitations. In the following profile, the password
constraints the maximum number of attempts to log in as 3, the account lock time after 3 unsuccessful
attempts as 1 day, and the number of days the same password can be used for authentication as 30 days. The
resources part of the profile defines that a user can have an unlimited number of concurrent sessions, not
more than 30 seconds on each CPU call, and be connected to a database for not longer than 45 minutes:
CREATE PROFILE clerk LIMIT
FAILED_LOGIN_ATTEMPTS 3
PASSWORD_LOCK_TIME 1
PASSWORD_LIFE_TIME 30
SESSIONS_PER_USER UNLIMITED
CPU_PER_CALL 3000
CONNECT_TIME 45;
The administrator can create different profiles for different groups of users. After a profile is assigned to a
user, the user’s password will be managed according to the password parameters of the profile, and while
working with the database the user will be subject to the profile resources limitations:
ALTER USER Scott PROFILE clerk;
Auditing
Auditing activities on the database can help to recognize unauthorized access. In addition to customized
Figure 16. Labels and security.
John
SELECT
Scott
SELECT
Account
Label
Public
Internal
Public
Schema of DBA
Label
Security
Level
Public
10000
Internal
20000
24
auditing usually implemented in triggers, Oracle supports standard auditing with the help of the SQL
command AUDIT. In the first of the following examples, auditing is assigned for select operations on any
table, and in the second – for any select and update operation performed by users Scott and John:
AUDIT SELECT TABLE;
AUDIT SELECT TABLE, UPDATE TABLE BY Scott, John;
Audit records include such information as the operation that was audited, the user performing the operation,
and the date and time of the operation. For further analysis, audit records are stored in the data dictionary
table called DBA_AUDIT_TRAIL, or in operating system files.
To audit occurrences of a SQL statement, you must have AUDIT SYSTEM system privilege. To audit
operations on a schema object, the object you choose for auditing must be in your own schema or you must
have AUDIT ANY system privilege.
Privileges and the Data Dictionary
The data dictionary contains information about security measures implemented in the database, such as the
users and the objects they have privileges to access, the allowed type of access, the owners of these objects,
who granted the privileges, and other similar information. For example the user Scott can see his object
privilege to select from Adam’s table Test that was granted to Scott by user SYS without the grant option
from the dictionary view USER_TAB_PRIVS:
Scott> SELECT * FROM user_tab_privs;
GRANTEE OWNER TABLE_NAME GRANTOR PRIVILEGE GRANTABLE
------- ----- ---------- ------- --------- ---------
SCOTT ADAM TEST SYS SELECT NO
The view USER_ROLE_PRIVS shows information about a user’s roles. The following example shows that
Scott was granted two system roles CONNECT and RESOURCE, both without the admin option:
Scott> SELECT * FROM user_role_privs;
USERNAME GRANTED_ROLE ADMIN_OPTION DEFAULT OS_
-------- ------------ ------------ ------- ----
SCOTT CONNECT NO YES NO
SCOTT RESOURCE NO YES NO
Administrators can see users’ object privileges in the view DBA_TAB_PRIVS, system privileges in the view
DBA_SYS_PRIVS, and roles in the view DBA_ROLE_PRIVS.
Oracle Database Vault
Oracle Database Vault enhances the database security features by offering the ability to restrict the access of
users with system privileges. Additionally, it permits controlling actions depending on the context of access,
such as the time, the computer where the request originates, etc. The features of the Vault are described in
the Appendix 4.
25
Security in the Distributed Oracle Database
In the distributed Oracle database separate databases can “see” other databases through database links.
Oracle provides several types of links. The type of a database link in the distributed database depends on
security requirements.
Information about the links available to a user is contained in the view ALL_DB_LINKS.
Types of Database Links
The database link defines the logical connection or the communication path from one database to another.
When a user tries to access a remote database via the link, Oracle opens a database session in the remote
database on behalf of the request of the local user. There are two types of database links: private and public.
The type of a link defines which local users can get to the remote database with the help of the link (Figure
17).
Private Links
Private database links can be created in a particular schema. Only the owner of the private link can use it to
connect to the remote database directly (Figure 18).
In the following example, Scott creates a private link to the New York database and tries to delete a row from
the remote table Employee. Note that because the name of the table is not prefixed with the name of the
schema, it means that Scott is trying to delete records from his table Employee in the New York database
through his private link
4
. Scott can use his private link to access objects from other schemas in the New York
database if he has corresponding privileges. User John cannot use the private link of Scott.
4
Scott must be replicated in the New York database.
Figure 18. Using private links directly.
Scott
John
Remote database
NY
Private Link
?
NY
Remote database
Link
Figure 17. User on the initiating end of a link.

26
Scott:
CREATE DATABASE LINK ny USING
ny.ourcompany.us.com;
Scott creates a private database link.
Scott:
DELETE FROM Employee@ny
WHERE ID = 12345;
1 rows processed
Scott uses the link to access his table in the remote
database.
Scott:
SELECT * FROM
Adam.Employee@ny;
Table or view
doesn’t exist
Scott uses the link to access data from the
Employee table in Adam’s schema in the remote
database and fails because he does not have the
required privilege.
John:
DELETE FROM Employee@ny
WHERE ID = 67890;
Not enough
privileges to use
the link
John tries to use the private link of Scott and fails.
Only the owner of the private link can use the link directly in remote requests.
The advantage of the private link is its security. Only the user who is the owner of the link can get to the
remote database through this link directly. Later in this chapter we will show how under certain conditions a
private link can enable other users of the local database to get connected to the remote database.
Public Links
Public database links make a remote database visible to any user of the local database.
In the next example, John, using the public link created by Scott, succeeds in reaching the remote database
where he is authenticated as John. His first request fails because he does not have the table Employee in his
schema. His second request to Scott’s table Employee succeeds. Note that for this example Scott and John
must be replicated in the New York database, and John must be granted the privilege to select from Scott’s
table Employee.
Scott:
CREATE PUBLIC DATABASE LINK ny USING
ny.ourcompany.us.com;
Scott creates a public database link.
John:
DELETE FROM Employee@ny
WHERE ID = 12345;
Table or view doesn’t
exist
John uses the link to access the remote table
Employee and fails because he does not have
such table in his schema.
John:
DELETE FROM Scott.Employee@ny
WHERE ID = 12345;
1 rows processed
John succeeds in using the link to access the
remote table Employee in Scott’s schema.
Any local user can use the public link for remote requests.
27
Public links are less secure than the private links, but with the help of one public link the administrator can
enable all local users to access the remote database. Note that the required security still can be managed by
appropriate authorizations in the remote database.
Security Options for Database Links
The type of the link – private or public – defines who in the local database can use the link and get access to
the remote database. Another property of the link – the security option – specifies how the local database
identifies itself to the remote database, or, in other words, who is the user associated with at the destination
end of the link (Figure 19).
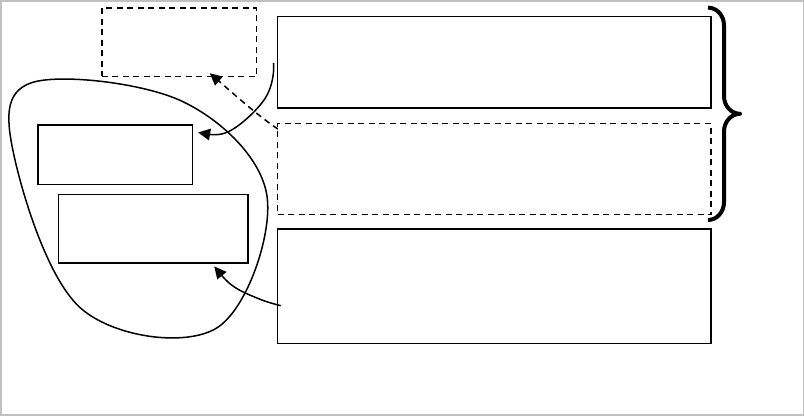
Fixed User Database Links
The fixed user database link specifies the credentials of a user who will be connected to the remote database.
If the fixed user database link is used:
Users of the local database connect to the remote site as the fixed user.
They establish a connection to the fixed user’s schema in the remote database (Figure 20).
Users of the fixed user link should not be replicated in the remote database.
In the following example, every user of the local database who tries to connect to the remote database is
authenticated in the remote database as Scott/tiger. Note that Adam accesses
Scott’s table Employee in the remote database without specifying Scott’s schema because he is authenticated
by the remote database as Scott.
?
Local database
Figure 19. Users on the destination end of a link.
Link
Remote database
John
Scott
Scott
Scott
Figure 20. Fixed user links.
Fixed User Link
28
John:
CREATE PUBLIC DATABASE LINK ny USING
ny.ourcompany.us.com CONNECT TO Scott
IDENTIFIED BY tiger;
John creates a public database link with the
fixed user security option.
Adam:
DELETE FROM Employee@ny
WHERE ID = 12345;
0 rows processed
Adam uses the public link and accesses
Scott’s table Employee in the remote
database as Scott.
The disadvantages of the fixed links are: 1) all users of the local database can access the remote objects for
which the fixed user has authorizations, and 2) the local user is authenticated as the fixed user on the remote
site, and the fixed user’s privileges rather than the actual user’s privileges on the remote site are in effect. This
can compromise the security of the distributed database.
Connected User Database Links
The connected user database link does not include any user credentials in the definition of the link. The
remote database uses the local credentials of the connected user. For example, if Scott connects to the remote
database, he is always authenticated there as Scott (Figure 21).
Users of the connected user link – their names and passwords – must be replicated in
the remote database.
To create a connected user database link, you simply omit the CONNECT TO clause. The following example
creates a connected user database link:
CREATE PUBLIC DATABASE LINK ny USING ny.ourcompany.us.com;
Among other considerations, the connected user link is used when users need to perform specific operations
in both databases, e.g., create tables.
Current User Database Links
Oracle supports an interesting security option – current user – that connects to the remote database as one of
local users, but not necessarily as the user who requests remote access. The current user database link is
specified by the CURRENT_USER option:
CREATE DATABASE LINK ny USING ny.ourcompany.us.com;
CONNECT TO CURRENT_USER;
Figure 21. Connected user links.
John
Scott
Scott
John
Remote database
Connected User Link
29
When a local user is requesting a remote resource directly, the current user link acts like the connected user
link. That means the local database sends the credentials of the local user to the remote database. The local
user in this case has to be replicated in the remote database. If, on the other hand, a local user tries to access
the remote resource indirectly – through a local procedure that contains the remote request – then the local
database presents itself to the remote database as the owner of the procedure. For example, in the local
database Scott has the stored procedure test which contains a remote request, and he has granted the privilege
to execute this procedure to John. When John executes the procedure, the link within the procedure sees
Scott (not John) as the current user of the database. Figure 22 shows how users from the local site are
authenticated on the remote site through the current user link.
The current user security option can make private links available to users who execute procedures belonging
to the same schema as the private link. In the following example, user John fails to use the private link of
Scott directly, but succeeds in using it indirectly through Scott’s procedure. John does not have to be
replicated on the remote site because the remote database authenticates the owner of the procedure – the
user Scott.
Scott:
CREATE DATABASE LINK ny USING
ny.ourcompany.us.com
CONNECT TO CURRENT_USER;
Scott creates a private link with the current
user security option.
Scott:
CREATE PROCEDURE test (par_ID NUMBER)
AS
BEGIN
DELETE FROM Employee@ny
WHERE ID = par_ID;
END;
GRANT EXECUTE ON test TO John;
Scott creates a stored procedure and grants
the privilege to execute it to John.
John:
DELETE FROM scott.Employee@ny
WHERE ID = 12345;
(Access is denied)
John tries to use the private link directly and
fails because the link is private.
John:
EXEC Scott.test (12345);
Procedure successfully
completed
John uses the private link indirectly through
the procedure of Scott and succeeds.
Note that with the connected user security option in the procedure of Scott, John will be authenticated in the
John
John
Figure 22. Current user links.
DELETE …
EXEC Scott.proc…
John
Scott
Remote database
Current User Link

30
remote database as John.
It is important to remember that the type of the link or its security option by themselves do not address
security requirements; we always need to consider a combination of the link, and authentication and
authorization of access in the remote database.
Examples: Implementing Security Measures in the Centralized and
Distributed Databases
The Centralized Database
Consider the following security measures for the centralized implementation of the database for the
Manufacturing Company case:
1. Prepare roles for users who work with local data (departments and employees) of the three cities.
2. Create a role for users who work with all data.
3. Create views to enable secure access to portions of the local data (in the example below we create views
on the table Department only).
4. Create views for users of all the data. Remember that views support not only security, but also
transparency of data. These views are not required by security requirements, but they definitely enhance
the transparency of the database and the applications’ independence from possible database changes.
5. Grant the required privileges to the roles.
6. Create the users of local data.
7. Create the users of all the data.
8. Grant roles to the users.
1.
CREATE ROLE Clerk_Boston;
CREATE ROLE Clerk_NewYork;
CREATE ROLE Clerk_Cleveland;
2.
CREATE ROLE Manager;
3.
CREATE VIEW vw_Department_Boston AS
SELECT * FROM Department WHERE location = ‘Boston’;
CREATE VIEW vw_Department_NewYork AS
SELECT * FROM Department WHERE location = ‘New York’;
CREATE VIEW vw_Department_Cleveland AS
SELECT * FROM Department WHERE location = ‘Cleveland’;
4.
CREATE VIEW vw_allDepartments AS
SELECT * FROM Department;
5.
GRANT SELECT, INSERT, UPDATE, DELETE ON vw_Department_Boston TO
Clerk_Boston;
GRANT SELECT, INSERT, UPDATE, DELETE ON vw_Department_NewYork TO
Clerk_NewYork;
GRANT SELECT, INSERT, UPDATE, DELETE ON vw_Department_Cleveland TO
Clerk_Cleveland;
GRANT SELECT, INSERT, UPDATE, DELETE ON vw_allDepartments TO
Manager;
6.
CREATE USER John IDENTIFIED BY abc;
31
CREATE USER Smith IDENTIFIED BY def;
CREATE USER Scott IDENTIFIED BY uvw;
7.
CREATE USER Adam IDENTIFIED BY xyz;
8.
GRANT Clerk_Boston TO John;
GRANT Clerk_NewYork TO Smith;
GRANT Clerk_Cleveland TO Scott;
GRANT Manager TO Adam;
The Distributed Database
For the distributed solution of Chapter 3 we need to implement the local security measures in each database
and the distributed security measures for users of the application that accesses all the data and is executed
from the New York database. In the example below, we will discuss the security measures of the Boston and
New York databases (the security measures in the Cleveland and Boston databases are similar):
1. Consider the necessary database links. In our case, some users of the New York database access the
Boston database, while users of the Boston database access only local data. We need the database link
from the New York database to the Boston database. Assuming that there are a few users of the New
York database who work with Boston data, we will create a connected user link.
2. Create a role for users who work with local data in each database.
3. Create a role for users who access all data in the New York database.
4. Create local views in each database.
5. Create views that implement transparency of distribution in the New York database (because only New
York users need access to all the data).
6. Grant required privileges to the roles.
7. Create users of local data in each database.
8. Create users of all the data in the New York database.
9. Grant corresponding roles to the users in each database.
Boston
New York
1.
CREATE PUBLIC DATABASE LINK boston USING
Boston.ourcompany.us.com;
2.
CREATE ROLE Clerk;
CREATE ROLE Clerk;
3.
CREATE ROLE Manager;
4.
CREATE VIEW vw_Department AS
SELECT * FROM Department;
CREATE VIEW vw_Department AS
SELECT * FROM Department;
5.
CREATE VIEW vw_allDepartments
5
AS
SELECT * FROM Department UNION
SELECT * FROM Department@boston;
6.
GRANT SELECT, INSERT, UPDATE, DELETE
ON vw_Department TO Clerk;
GRANT SELECT, INSERT, UPDATE, DELETE ON
vw_Department TO Clerk;
GRANT SELECT, INSERT, UPDATE, DELETE ON
5
Remember, in this demonstration we are considering only two databases, that is why the view is based on the
union of two fragments. In the actual situation the view will be based on the union of all three fragments.

32
vw_allDepartments TO Manager;
7.
CREATE USER John IDENTIFIED BY abc;
CREATE USER Smith IDENTIFIED BY def;
8.
CREATE USER Adam IDENTIFIED BY xyz;
9.
GRANT Clerk TO John;
GRANT Clerk TO Smith;
GRANT Manager TO Adam;
Summary
Securing data or preventing unauthorized access to data is a crucial feature of any database and database
application. Though a database application usually features protection for data access, the most reliable way
of securing of data is to provide for it in the database itself, where security measures are integrated with data
and cannot be bypassed. DBMSs offer tools for implementing various security requirements.
Securing data means ensuring that only authorized users perform allowed operations on the data. Databases
enforce security measures by authentication and authorizations control. Authentication is performed with the
help of user names and passwords. An entitled user receives the database user name and is assigned the
authentication information associated with it, such as a password and profile.
Database users have to be authorized to perform database operations. Authorization is performed through
granting permissions or privileges for specific operations on particular data. Authorization can also be
performed through the granting of groups of privileges, called roles.
A user who is granted privileges to create database objects is considered the owner of the objects he creates
or, in other words, these objects belong to the owner’s schema. The owner does not need to be granted
privileges to perform legal operations on the objects, e.g. a user who created a table can alter or drop it, as
well as manipulate data in it. Other users, however, cannot access an object without the owner’s permission –
a granted object privilege. Each type of access to an object requires a corresponding privilege, for example, if
a user is granted the privilege to select from a table, this does not enable him to manipulate data in the table.
In addition to object privileges there are system privileges that enable users to perform a particular operation
on all objects of a specified class. For example, a user can be given the privilege to select from any database
table. In this case, to access data from a particular table the user does not need the permission of the table’s
owner. Other examples are the privileges to create database objects, e.g. tables, views, users, etc.
Often, it is necessary to limit a users’ access to specific portions of data in a table. This is accomplished with
the help of views and procedures. Users are not authorized to access the table directly; instead, they are
granted privileges to access a view or use a procedure. These views and procedures are implemented in such a
way that they restrict the users’ access to a portion of data from the table.
Special DBMS tools support fine-grained access to data. Such tools allow for implementing security control
that is context-dependent and row-based.
In the distributed database, security measures include local authentication of users and local authorization of
access combined with authentication of separate databases that are communicating with each other.
A traditional sequence of steps for implementing security measures is the following:
33
Analyzing security requirements and implementation of the database. Research the requirements on access to data
in the database and how the database is implemented. Security measures depend on the implementation
of the database, e.g. whether it is centralized or distributed.
Implementing connection of databases. If the database is distributed, define databases that need to access other
databases and implement connections. Utilize the properties of database connections of the particular
DBMS to enhance security solutions depending on the needs for remote access. For example, in Oracle,
use the different types and security options for links to maintain distributed security in the easiest way
depending on how many local users need remote access and what their remote access needs are.
Creating roles. Create roles for groups of users depending on their different needs in data.
Creating views and procedures. Create views and procedures that implement transparency and maintain data
security depending on the data access needs.
Granting privileges to roles. Grant privileges for various types of access on the views and procedures of the
previous step to the roles.
Creating users. For users of the database, create user accounts with authentication information.
Granting roles to users. Grant required roles to users.
Implementing fine-grain security. If necessary, implement fine-grain security measures using special features of
the DBMS.
Data can be additionally protected by DBMS encryption tools.
Database security measures are only a part of the complex technical security support in the IS. Technical
security measures must be enhanced by various non-technical security procedures and rules.
Review Questions
How is the database for your course project protected from access by other students?
How can a professor get access to the data of all his or her students?
Why is it important to implement security support in the database?
What are basic security measures? Describe how they work and the situations in which it is reasonable to
apply each of them.
What is user authentication?
How do roles help in managing the database security?
What are schemas? Explain how schemas secure access to data.
What is authorization of access?
What are object and system privileges?
What are the approaches to implementing fine-grain security measures?
What are the main security problems in the distributed database?
How does Oracle provides connections to remote databases?
How can local data be protected from remote access?
What is the difference between public and private links?
How do the security options of links in Oracle implement security of access to remote data?
Practical Assignments
1. Describe the possible scenarios for using private and public links with different security options.
2. For one of your tables:
a. Define how to protect the table from access by other users.
b. Provide the possibility for another user to access data from the table.
c. Provide the possibility for another user to access definite rows of the table.
34
d. Provide the possibility for another user to create a table with reference to your table.
3. Specify the creation of a user with some administrative responsibilities, e.g. creating database users.
4. Consider the security requirements for students who take database courses and need to implement
database projects; and professors who teach these courses and need to check the students’ database
projects. Suggest security measures for the students and professors.
5. Describe security measures for different scenarios of access to a table in a centralized database:
a. All users access the same part of the table.
b. Several different groups of users need to access different parts of the table.
c. Numerous users have to access different parts of the table.
6. For each of the following situations describe different scenarios of security implementation and explain
the benefits and disadvantages of each approach (use different types of links, replication of users, and
various authorization schemes):
a. You have table A in one database, and table B in another database. User X must have access to
table A and must be prevented from access to table B.
b. You have a table in the remote database. Local users should be able to access this table on the
remote site, and should be prevented from accessing other remote objects in your or other
schemas on the remote database.
c. In the remote database, you have the table A and user X has the table B. Local users should be
able to access Table A and Table B on the remote site, but should be prevented from accessing
any other remote object.
d. You must have access to any remote object of user X.
e. Several local users need access to multiple different objects of the remote database.
f. Most local users need access to several objects of the remote database.
g. All local users need access to different objects of the remote database.
7. Implement the required security for one of the case assignments of Appendix 1:
a. For a centralized solution, consider creating views, procedures, and roles.
b. For a distributed solution, build local security measures for each database, define appropriate
database links, and enable the necessary remote access.
