
Oracle FLEXCUBE Information Server Environment Setup
Oracle FLEXCUBE Universal Banking
Release 12.0.3.0.0
[April] [2014]

Table of Contents
1. ORACLE FLEXCUBE INFORMATION SERVER ENVIRONMENT SETUP ...................................... 1-1
1.1 INTRODUCTION ......................................................................................................................................... 1-1
1.2 ORACLE FLEXCUBE INFORMATION SERVER SETUP ON SAME INSTANCE ............................................... 1-1
1.2.1 Prerequisites ........................................................................................................................................ 1-1
1.2.2 Creating Oracle FLEXCUBE Reporting Schema (FRS)...................................................................... 1-1
1.2.3 Executing Scripts ................................................................................................................................. 1-1
1.2.4 Executing Script in Target Schema ...................................................................................................... 1-2
1.2.5 Executing Script in Source Schema ..................................................................................................... 1-2
1.2.6 Execution of Invalids ........................................................................................................................... 1-2
1.2.7 Installing dynamic packages and configuring batch in Source Schema .............................................. 1-2
1.2.8 Updating MDTB_BATCH_INFO table with the source and target details: ........................................ 1-2
1.3 ORACLE FLEXCUBE INFORMATION SERVER SETUP ON DIFFERENT INSTANCES .................................... 1-2
1.3.1 Prerequisites ........................................................................................................................................ 1-2
1.3.2 Creating Oracle FLEXCUBE Reporting Schema (FRS)...................................................................... 1-4
1.3.3 Executing Scripts ................................................................................................................................. 1-4
1.3.4 Executing Script in Target Schema ...................................................................................................... 1-5
1.3.5 Executing Script in Source Schema ..................................................................................................... 1-5
1.3.6 Execution of Invalids ........................................................................................................................... 1-5
1.3.7 Installing dynamic packages and configuring batch in Source Schema .............................................. 1-5
1.3.8 Updating MDTB_BATCH_INFO table with the source and target details ......................................... 1-5
1.4 RPD CHANGES ......................................................................................................................................... 1-5
1.4.1 RPD Connection Changes ................................................................................................................... 1-5
1.4.2 RPD Deployment ................................................................................................................................. 1-7
1.5 REPORTS DEPLOYMENT .......................................................................................................................... 1-11

1-1
1. Oracle FLEXCUBE Information Server
Environment Setup
1.1 Introduction
This document explains the steps for one time installation of Oracle FLEXCUBE Information
Server reporting. The setup consists of the following two schemas that can be created on either
same or different servers:
FIC-HOST – This is set up by the Oracle FLEXCUBE Universal Banking Installer
FIC-REPORTING - This is set up manually.
One section of this document explains the steps to create FIC-REPORTING schema and the
grants/rights required in Oracle FLEXCUBE and FRS Reporting schema if the setup is done on
two schemas of the same database. The other section of his document covers all the steps
needed to setup the transportable tablespace functionality. Transportable tablespace is used in
the scenario where FIC-HOST and FIC-REPORTING schemas are on different
servers/databases in the Oracle FLEXCUBE Information Server environment
1.2 Oracle FLEXCUBE Information Server Setup on Same Instance
1.2.1 Prerequisites
Following are the prerequisites for creating the database
1. Be ready with the Oracle FLEXCUBE schema. This schema is henceforth referred as the
source schema.
2. Prepare the Oracle FLEXCUBE Reporting Schema (FRS). This is henceforth referred as the
target schema.
3. In the source schema, grant the following privileges for running the scripts:
Grants 1.txt
1.2.2 Creating Oracle FLEXCUBE Reporting Schema (FRS)
You need to create a new Oracle FLEXCUBE Reporting Schema in the database of Oracle
FLEXCUBE. This schema is henceforth referred as the target schema.
Once the schema is created, compile the objects in following locations:
DDLs - MAIN\DATABASE\FIC
SVN - FCUBS 12.0.2.0.0\FIC-REPORTING
1.2.3 Executing Scripts
Once the schemas are ready and the privileges are granted, you need to run the required scripts
in the source and target schema.
1-2
The installer script of the source schema has dependency on the target schema tables. You
must first run successfully the script for the target schema.
1.2.4 Executing Script in Target Schema
The user who has logged into the target schema should have the necessary rights to create
public synonyms and grant permissions.
Once you have logged in, run the following script in the target schema.
FIC-REPORTING-1.sql
1.2.5 Executing Script in Source Schema
The user who has logged into the source schema should have the necessary rights to create
public synonyms and grant permissions.
Once you have logged in, run the following script in source schema.
FIC-HOST-1.sql
1.2.6 Execution of Invalids
Once the above scripts are executed in the corresponding schemas, compile the invalid objects in
both the schemas as the objects are inter-dependent.
It is only after the objects in FRS schema are in place and all the public synonyms and their
grants have been created that all packages, procedures and functions will compile and be ready
for use. This especially applies to the procedure Schedule_Batch_Jobs, compiled in Oracle
FLEXCUBE schema, which has direct dependency on public synonym MDTB_BATCH_INFO of
the same table name situated in FRS Schema.
1.2.7 Installing dynamic packages and configuring batch in Source Schema
Run the below script in source schema. This will install the dynamic packages and will configure
the intraday batch.
FIC-HOCT-2.sql
1.2.8 Updating MDTB_BATCH_INFO table with the source and target details:
Run the update statement on MDTB_BATCH_INFO in target schema for the following columns:
mdtb_batch_update.sql
Proceed directly to section 1.4 after finishing the above setup.
1.3 Oracle FLEXCUBE Information Server Setup on Different
Instances
1.3.1 Prerequisites
Following are the prerequisites for creating the setup

1-3
1. Be ready with the Oracle FLEXCUBE schema. This schema is henceforth referred as the
source schema.
2. Prepare the Oracle FLEXCUBE Reporting Schema (FRS). This is henceforth referred as the
target schema.
3. In the source schema, grant the following privileges for running the scripts and to enable
tablespace export permissions:
Grants_Src.txt
4. In the Target schema, grant the following privileges for running the scripts and code for
enabling the TTS functionality:
Grants_Tgt.txt
5. The Source Platform (FIC-HOST) and Target Platform (FIC-REPORTING) should be
compatible in terms of Endian Format in case the platforms are different. If this is not the
case then we first have to make the Endian format of the data-file belonging to the tablespace
we want to transport, same.
6. The source and target database must use the same character set and national character set.
7. It has to be made sure that all the objects to be imported via the tablespace are present in
that tablespace and that the tablespace is self contained, which means that all the constraints
of the tables should also be in the same tablespace. Currently this functionality supports
movement of only one data-file. The create tablespace script has been attached for reference
along with the script to grant quota on that new tablespace and to move the Staging tables
from the default tablespace to the newly created tablespace. The
‘create_new_tablespace_script.sql’ and ‘grant_quota_on_new_tablespace.sql’ files should be
run from SYS user and ‘StgTablesMoveToNewTablespace.sql’ should be run from Oracle
FLEXCUBE user. Please make sure to put ‘AUTOEXTEND ON’ for the tablespace datafile
create_new_tablespace_script.sql
grant_quota_on_new_tablespace.sql
StgTablesMoveToNewTablespace.sql
8. FOLLOWING DIRECTORIES MUST BE CREATED ,also Grant read, write, execute on all
the below oracle directories to their respective Source and Target schemas
SOURCE_DB_BACKUP_DIR (To be created on Source Db Schema(Oracle FLEXCUBE
Schema) where backup is taken)
TARGET_DATA_DIRECTORY (To be created on Target Db server (FRS Schema). This
is where the data-file of the imported tablespace gets created)
TARGET_DUMP_DIRECTORY (This directory should point to folder location in target
server(FRS Schema). where dump file copied from source db is copied)
SOURCE_DATA_DIRECTORY (This directory should point to folder location where data
file of the Tablespace to be exported resides in the source database(Oracle FLEXCUBE
Schema))
SOURCE_DUMP_DIRECTORY(This directory should point to folder location where the
exported dump file is created after tablespace export(Oracle FLEXCUBE Schema))
9. Following DATABASE LINKS must be created: Use the attached Database Link creation
script

1-4
DB_Link_Creation_Script.sql
A database link from target to source referring Oracle FLEXCUBE schema.
A database link from source to target referring FRS schema.
10. All the necessary parameters in table MDTM_OTHER_PROGRAM_INFO against the
PROGRAM_NAME=’ PRG_TTS_JOB’ have to be updated. The parameter_name column
values are fixed but caution must be taken to populate the parameter_value columns as per
the environment set up. Kindly use the ‘update_tts_program_info.sql’ file below to execute
the update and MDTM_PTHER_PRORGAM_INFO_UPDATE.xlsx for reference and info.
Please see in which order the updates have to run and what values have to be updated
according to environment. Make sure that parameters for data file and dump file for Source
and Target should be same.
MDTM_OTHER_PROGRAM_INFO_UPDATE
update_TTS_program_info.sql
11. The ENABLED_FLAG column value for scheduler programs, PRG_COMPILE_FRS and
PRG_TTS_JOB should be updated to from ‘N’ to ‘Y’ in the table MDTM_SCHEDULER_INFO
12. The following units must have been compiled in the respective schemas of the two database
servers in order for synonyms to be created properly.
1. Units Compiled In Oracle FLEXCUBE Schema:
Procedure ALTER_TTS_READ_WRITE
Procedure TTS_EXPORT
Procedure INSERT_TTS_LOG
2. Units Compiled In FRS Schema:
Procedure COMPILE_ALL_DYNAMIC_OBJECTS
Procedure TTS_IMPORT
Procedure INSERT_TTS_LOG
Procedure TRANSPORT_TABLESPACE_WRAPPER
1.3.2 Creating Oracle FLEXCUBE Reporting Schema (FRS)
You need to create a new Oracle FLEXCUBE Reporting Schema in the database of Oracle
FLEXCUBE. This schema is henceforth referred as the target schema.
Once the schema is created, compile the objects in following locations:
DDLs - MAIN\DATABASE\FIC
SVN - FCUBS 12.0.2.0.0\FIC-REPORTING
1.3.3 Executing Scripts
Once the schemas are ready and the privileges are granted, you need to run the required scripts
in the source and target schema.
The installer script of the source schema has dependency on the target schema tables. You
must first run successfully the script for the target schema.
1-5
1.3.4 Executing Script in Target Schema
The user who has logged into the target schema should have the necessary rights to create
public synonyms and grant permissions. Once you have logged in, run the following script in the
target schema. Use the appropriate Schema name and Database Link name (as created in
Section 1.3.1(Prerequisites) Step 9) for parameters.
FIC-REPORTING-2.sql
1.3.5 Executing Script in Source Schema
The user who has logged into the source schema should have the necessary rights to create
synonyms and grant permissions. Use the appropriate Database Link (as created in Section
1.3.1(Prerequisites) Step 9) and Schema names as parameters. Once you have logged in, run
the following script in source schema.
FIC-HOST-3.sql
1.3.6 Execution of Invalids
Once the above scripts are executed in the corresponding schemas, compile the invalid objects in
both the schemas as the objects are inter-dependent.
1.3.7 Installing dynamic packages and configuring batch in Source Schema
Run the below script in source schema. This will install the dynamic packages and will configure
the intraday batch.
FIC-HOST-2.sql
1.3.8 Updating MDTB_BATCH_INFO table with the source and target details
Run the update statement on MDTB_BATCH_INFO in target schema for the following columns:
mdtb_batch_update.sql
1.4 RPD Changes
The RPD changes are not specific to the kind of EIS-MIS setup that has to be done(Same or
different box). Therefore this section remains unchanged.
1.4.1 RPD Connection Changes
1. Open RPD using OBIEE Administration Tool
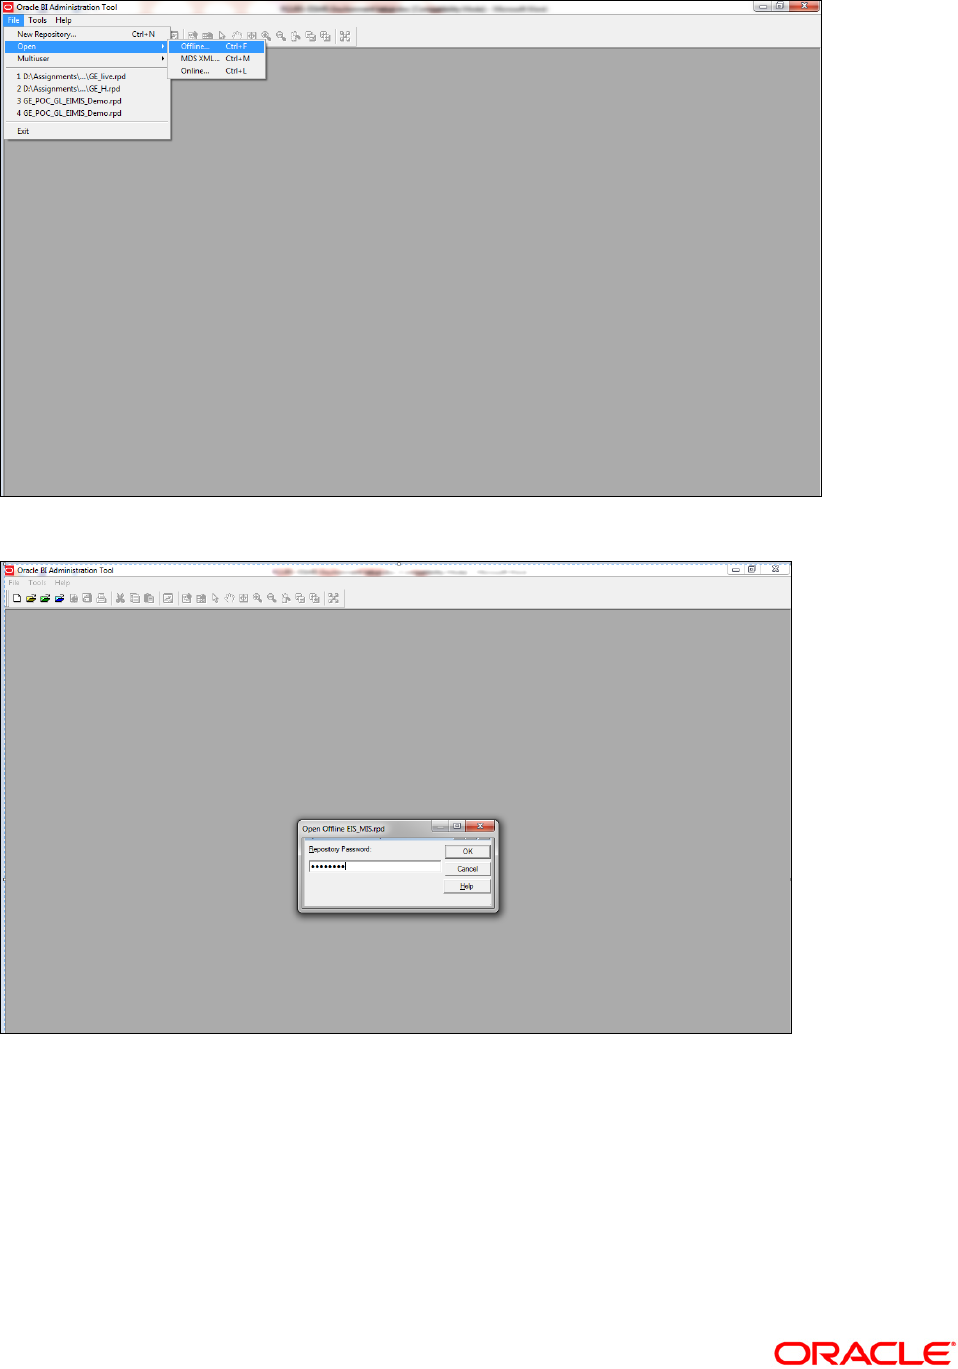
1-6
2. Enter Password: weblogic123
3. Double click on connection pool
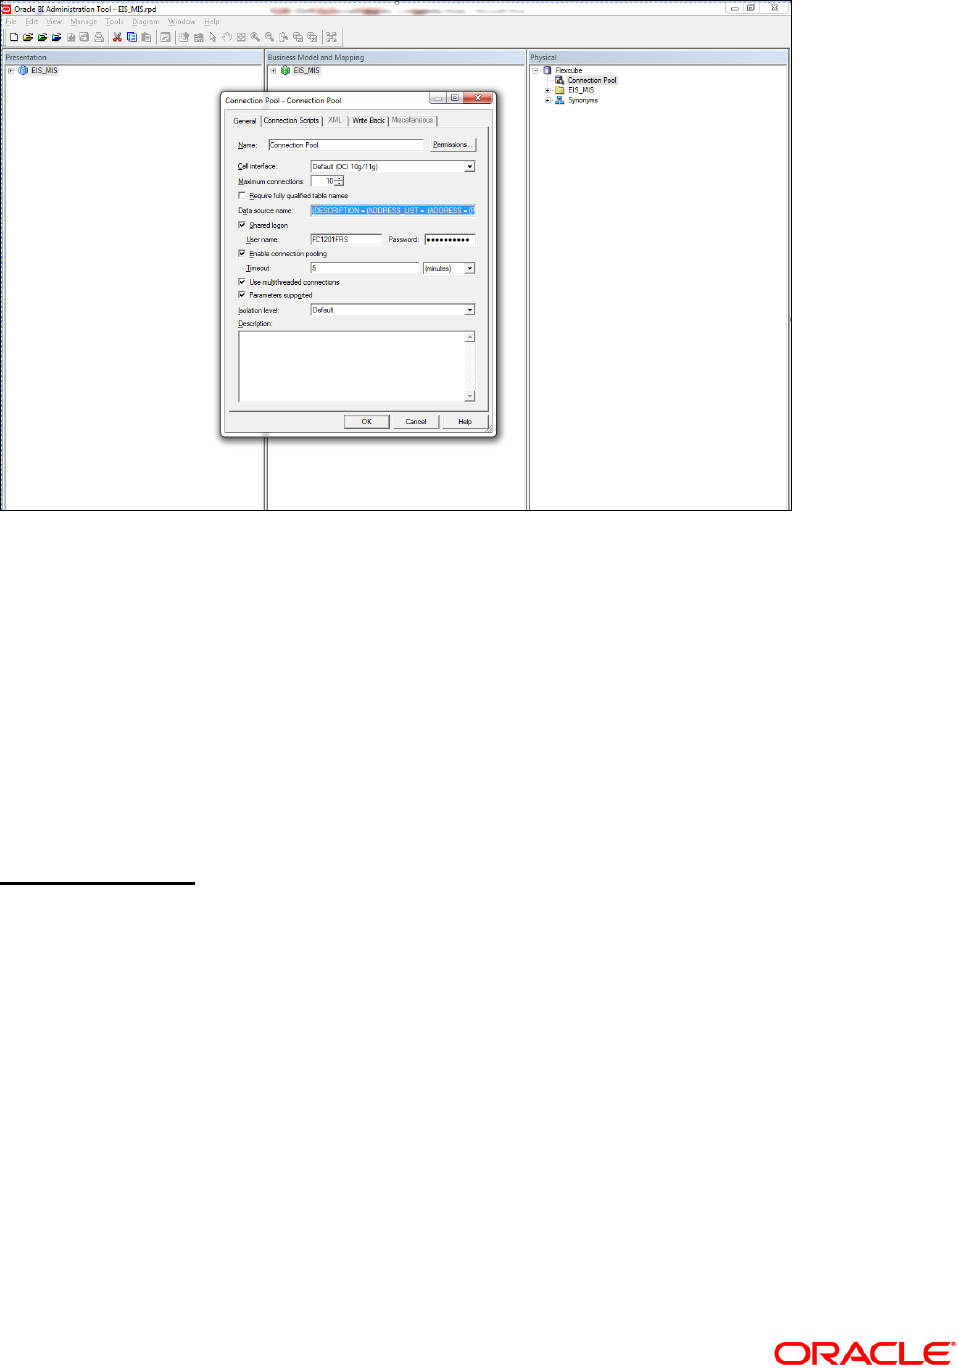
1-7
Make sure Call Interface is OCI 10g/11g
Change Data source name for the marked info given in the below format.
(DESCRIPTION = (ADDRESS_LIST = (ADDRESS = (PROTOCOL = TCP)(HOST =
<Host Address>)(PORT = <Port>)))(CONNECT_DATA = (SERVICE_NAME
<Servicename>) ) )
Enter FRS schema <User name> and <Password> and click ok and provide the same
password when prompted
Click Save Button
Place the saved rpd file ‘EIS_MIS.rpd’ from Rpd folder and copy under the path like here
<OBIEE
Instancehome>/foundation/OracleBIServerComponent/coreapplication_obis1/repository
1.4.2 RPD Deployment
1. Login to OBIEE Enterprise Manager
Eg: http://ofss220331.in.oracle.com:7001/em/
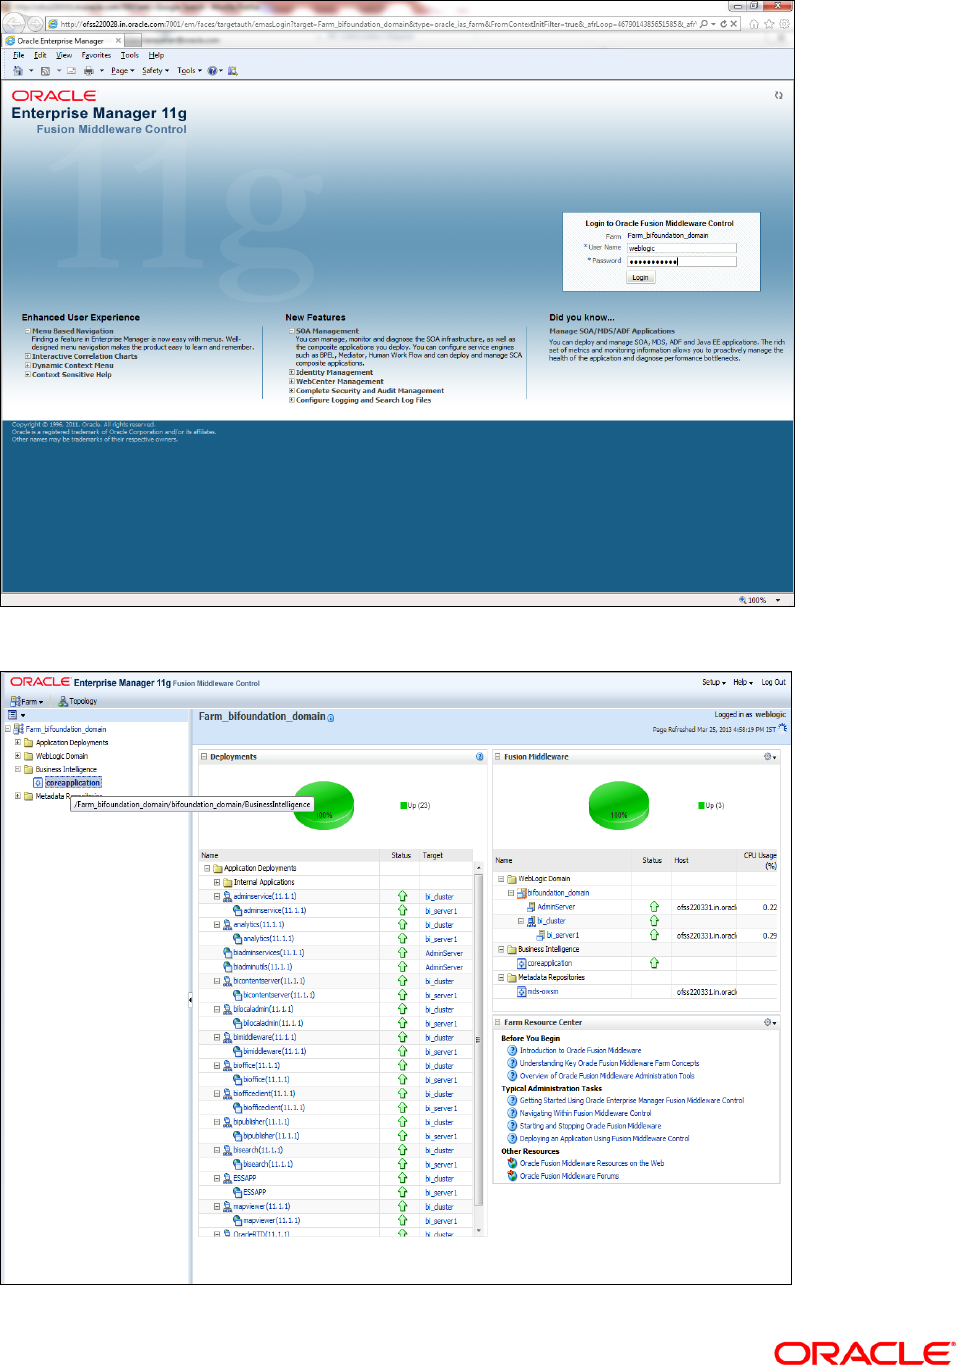
1-8
2. Click ‘core application’ under Business Intelligence Folder as shown here:
1-9
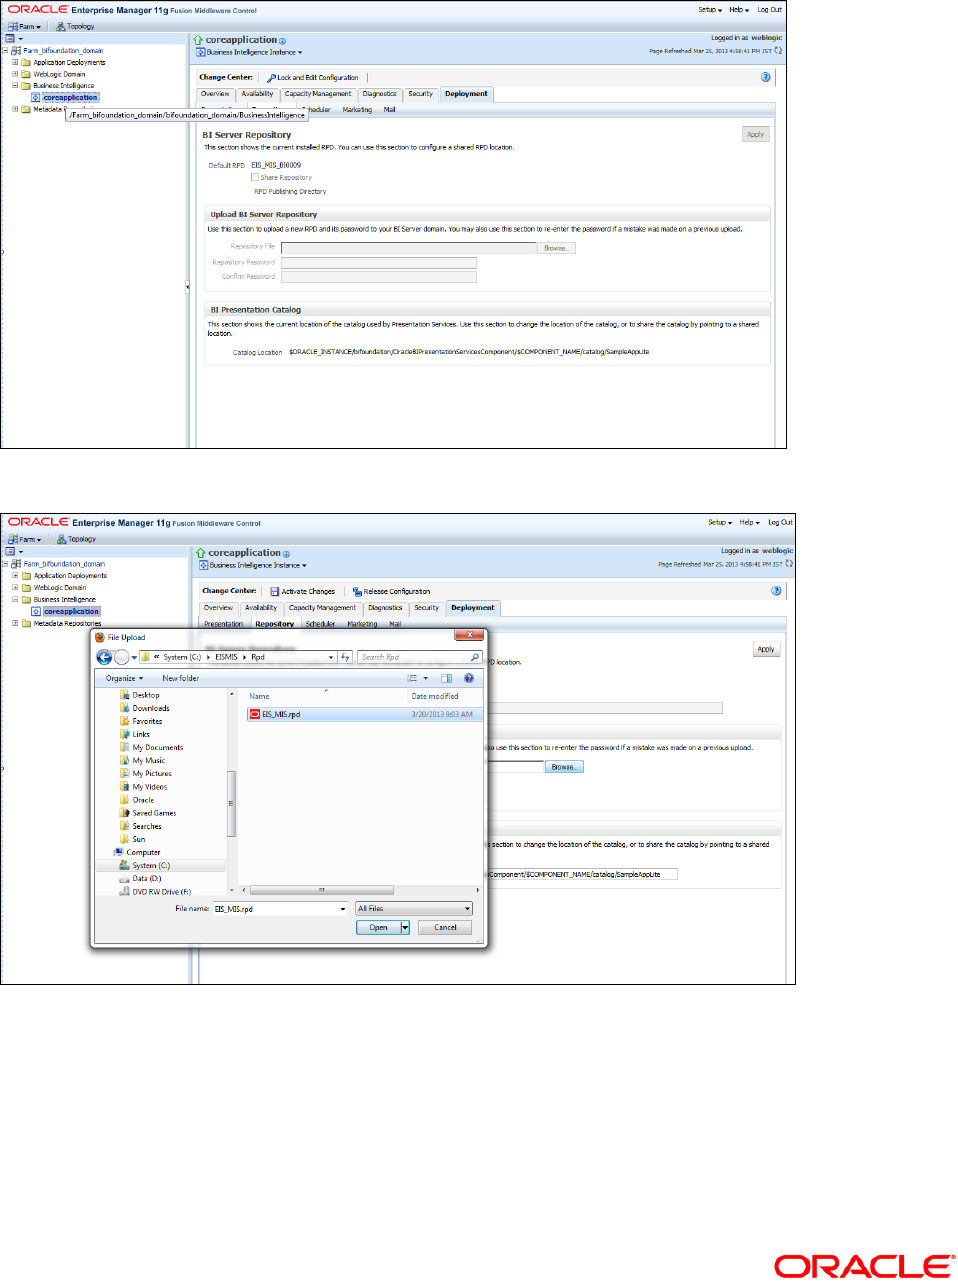
3. Click ‘Lock and Edit’ and go to Deployment Tab
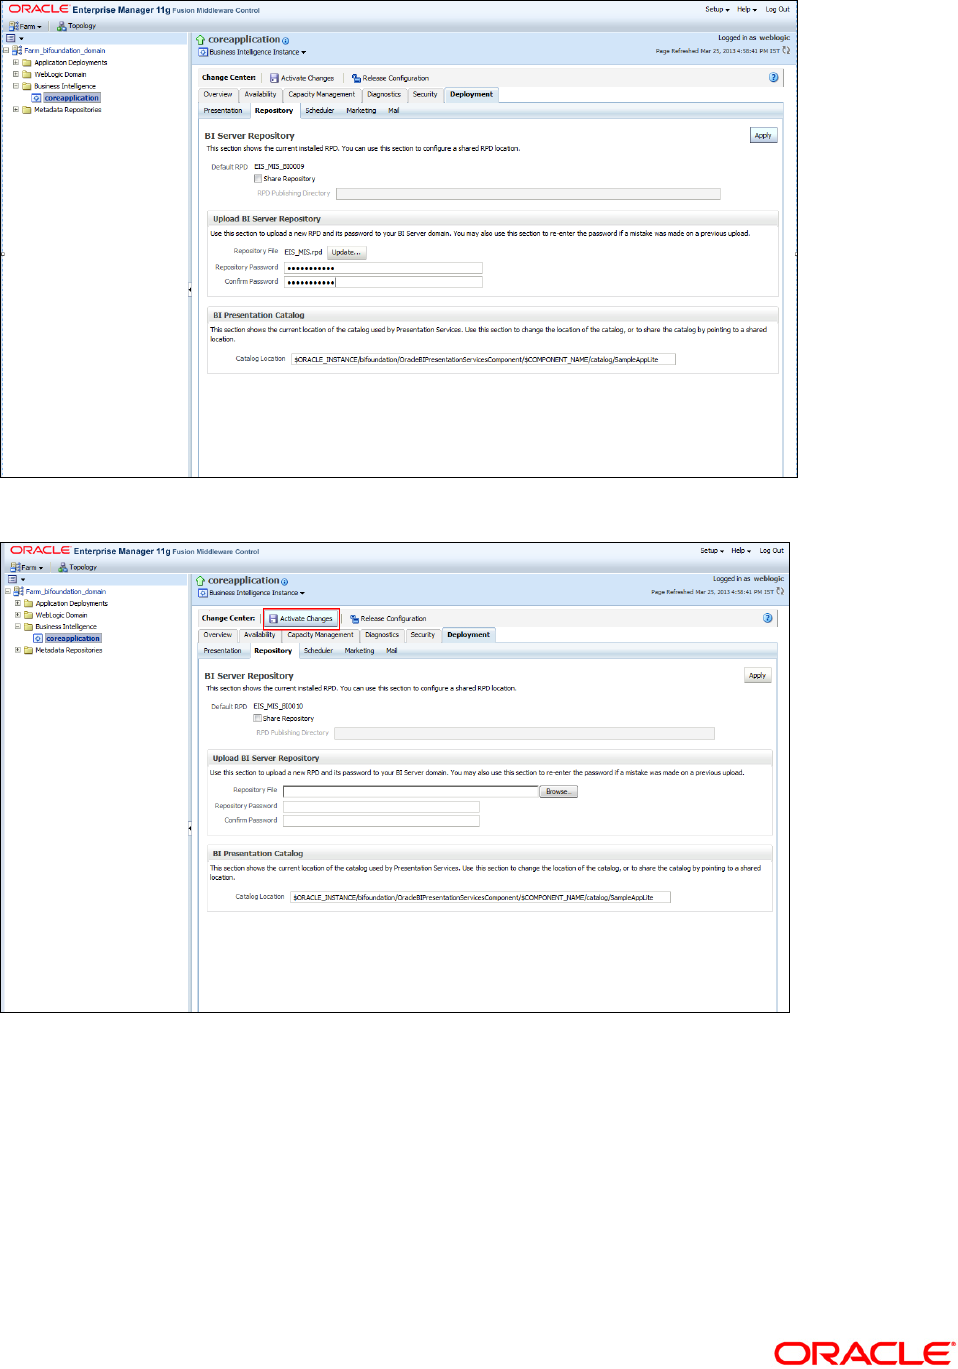
4. Click ‘Browse’ and select the Rpd to make it online.
5. Give the password as weblogic123/weblogic123 as below:
1-10
6. Click ‘Apply’.
7. Click ‘Activate Changes’.
1-11
1.5 Reports Deployment
1. Copy the Report files under the path, here you need to copy flexcube+information+server
(complete Folder) and flexcube+information+server.atr file.
<OBIEE Instance Home >/bifoundation/OracleBIPresentationServicesComponent/
coreapplication_obips1/catalog/SampleAppLite/root/shared
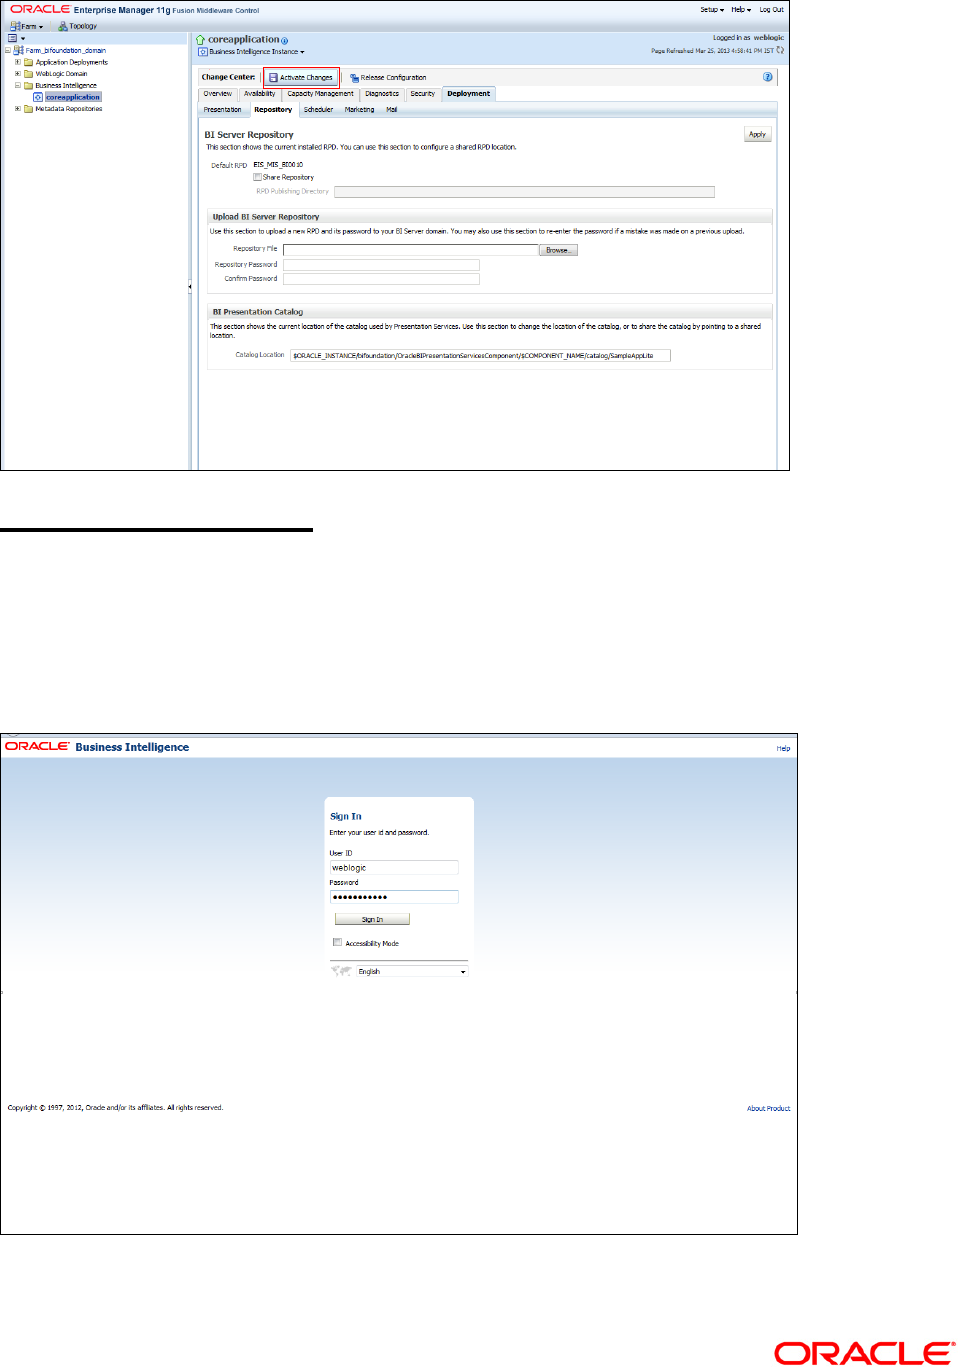
2. Go to the Browser and go to analytics url to login as here.
1-12
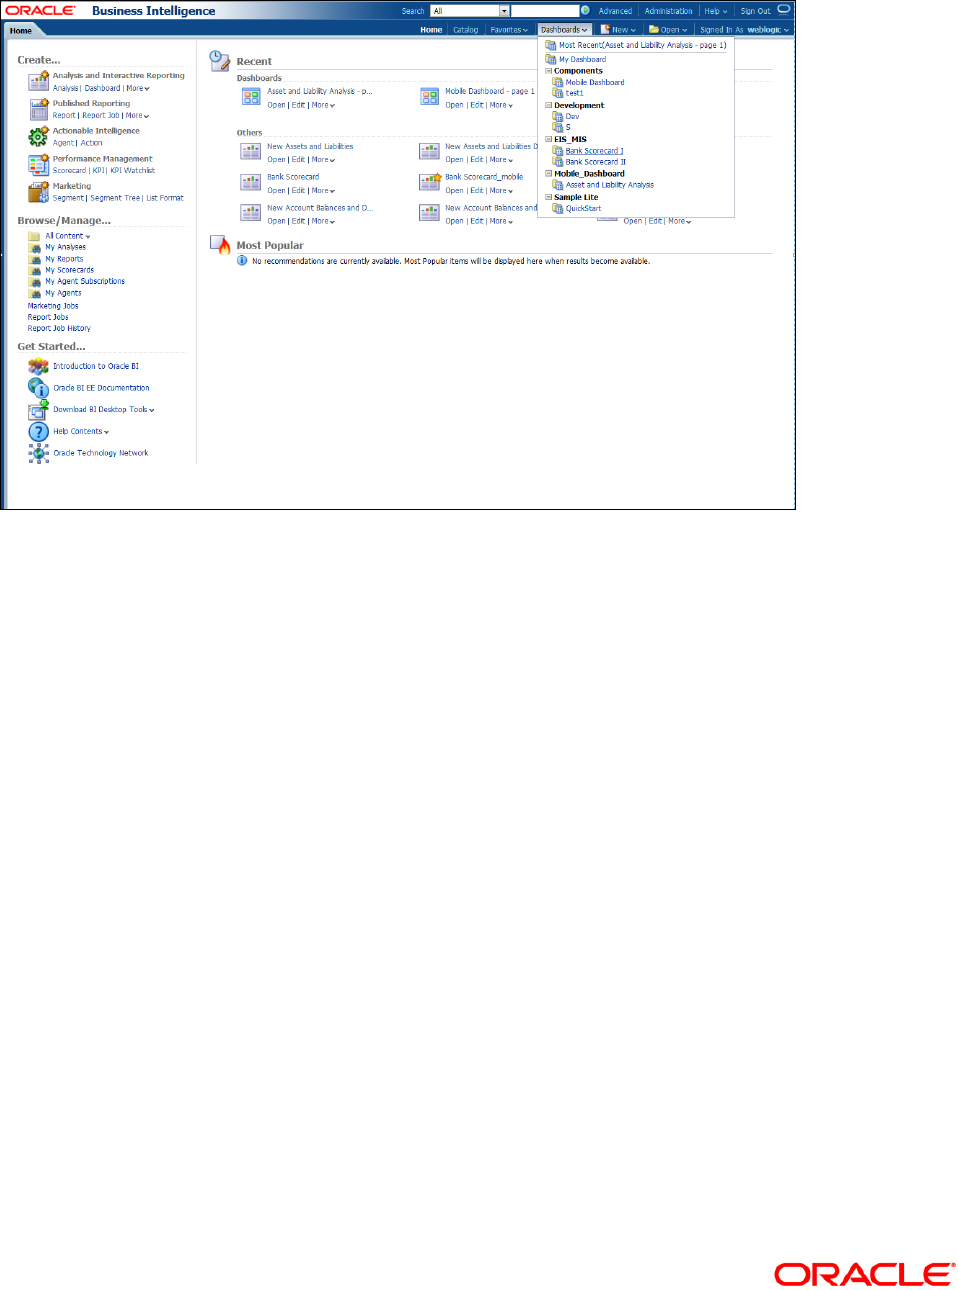
3. Go to Dashboards and should be able to see Dashboards ‘Bank Scorecard 1’ and Bank
Scorecard 2’ as here and click on it view accordingly.

Oracle FLEXCUBE Information Server Environment Setup
[April] [2014]
Version 12.0.3.0.0
Oracle Financial Services Software Limited
Oracle Park
Off Western Express Highway
Goregaon (East)
Mumbai, Maharashtra 400 063
India
Worldwide Inquiries:
Phone: +91 22 6718 3000
Fax:+91 22 6718 3001
www.oracle.com/financialservices/
Copyright © [2012], [2014], Oracle and/or its affiliates. All rights reserved.
Oracle and Java are registered trademarks of Oracle and/or its affiliates. Other names may be trademarks of their
respective owners.
U.S. GOVERNMENT END USERS: Oracle programs, including any operating system, integrated software, any programs
installed on the hardware, and/or documentation, delivered to U.S. Government end users are "commercial computer
software" pursuant to the applicable Federal Acquisition Regulation and agency-specific supplemental regulations. As
such, use, duplication, disclosure, modification, and adaptation of the programs, including any operating system,
integrated software, any programs installed on the hardware, and/or documentation, shall be subject to license terms and
license restrictions applicable to the programs. No other rights are granted to the U.S. Government.
This software or hardware is developed for general use in a variety of information management applications. It is not
developed or intended for use in any inherently dangerous applications, including applications that may create a risk of
personal injury. If you use this software or hardware in dangerous applications, then you shall be responsible to take all
appropriate failsafe, backup, redundancy, and other measures to ensure its safe use. Oracle Corporation and its affiliates
disclaim any liability for any damages caused by use of this software or hardware in dangerous applications.
This software and related documentation are provided under a license agreement containing restrictions on use and
disclosure and are protected by intellectual property laws. Except as expressly permitted in your license agreement or
allowed by law, you may not use, copy, reproduce, translate, broadcast, modify, license, transmit, distribute, exhibit,
perform, publish or display any part, in any form, or by any means. Reverse engineering, disassembly, or decompilation of
this software, unless required by law for interoperability, is prohibited.
The information contained herein is subject to change without notice and is not warranted to be error-free. If you find any
errors, please report them to us in writing.
This software or hardware and documentation may provide access to or information on content, products and services
from third parties. Oracle Corporation and its affiliates are not responsible for and expressly disclaim all warranties of any
kind with respect to third-party content, products, and services. Oracle Corporation and its affiliates will not be
responsible for any loss, costs, or damages incurred due to your access to or use of third-party content, products, or
services.
