PureConnect®PureConnect®
2023 R32023 R3
Generated:
09-November-2023
Content last updated:
28 - November- 2019
See Change Log for summary of
changes.
PureConnect ReportingPureConnect Reporting
Technical ReferenceTechnical Reference
AbstractAbstract
This technical reference describes the PureConnect reporting process,
including advanced reporting features.
For the latest version of this document, see the PureConnect
Documentation Library at: http://help.genesys.com/pureconnect.
For copyright and trademark information, see
https://help.genesys.com/pureconnect/desktop/copyright_and_trademark_information.htm.
1

2
5
5
5
5
6
6
6
6
6
6
6
6
7
7
7
8
8
8
8
8
9
9
9
9
11
12
12
13
14
14
14
14
14
15
15
15
16
17
18
18
19
20
22
22
24
25
25
25
26
27
27
27
29
30
31
31
32
33
33
Table of ContentsTable of Contents
Table of Contents
Interaction Reporting in CIC
Interaction Reporter
Report Manager in Interaction Administrator
Interaction Report Assistant in IC Business Manager
Where to find Interaction Reporting information
IC Business Manager Getting Started Help
Interaction Reporter Help
Report Management Help
Interaction Report Assistant Help
PureConnect Customer Care Self Help
PureConnect Data Dictionary
Sample Reports for Interaction Reporter
PureConnect Licensing Technical Reference
CIC Installation and Configuration Guide
Interaction Administrator Help
Overview of the CIC Reporting Process
PMQ Logging
Report Logging Process Summary
CIC Server Parameters
Report Log Purging for Large Databases
Using CIC Server Parameters with a Report Log
Custom Logging
Logs
Log Details
Interaction Administrator
Overview of Crystal Report Templates in CIC
Customization Requirements for Crystal Reports
Crystal Reports version compatibility
Editing a CIC Report
CIC Report Templates
PureConnect Data Dictionary
Before customizing Interaction Reporter Crystal Reports
Opening templates and connecting to report logs
Connecting your report template to the correct log
Determining which tables are in a report log
Determining the contents of a log
Viewing the Details of Report Logs in Interaction Administrator
Activating and deactivating logs
CIC Report Editing for Crystal Reports
Configuring a Custom Crystal Report in Report Management
Examples of Edited Reports
Changing a formula
Replacing a field
Copying a formula from one report to another
Merging Reports
Using Custom Columns in the Logs
Managing call attributes
Step One: Interaction Designer - Set the Values of Custom Call Attributes
Step Two: Interaction Designer - Get the Values of Custom Call Attributes
Step Three: Assign Variables and Add Values to Custom Columns
Step Four: Display your custom call attribute in a Crystal Report template
Using Crystal Reports
Displaying your custom call attribute in a new report template
Logging Custom Passthrough
LCP Example
Another LCP Example
Custom Counters
CIC Report Groups and Statistic Groups (STIDs)
Report Groups
2

33
34
34
34
35
36
37
38
38
38
38
38
39
39
40
40
40
44
45
47
49
51
51
54
54
55
55
55
55
55
55
55
55
56
56
56
56
56
56
56
56
56
57
57
57
57
57
57
57
57
57
57
57
58
58
59
59
59
59
60
60
60
61
62
Report Group Tools
Statistics Groups
Statistics Group Tools
Gathering Statistics
STID summary
Multi-site Reporting
Option 1
Appendix A: How statistics are generated for each log
Calls
Chats
Agent, Queue, Line and Line Group Queues
User Status Changes
Appendix B: CIC Reporting Tools Design
Introduction
Overview of Tools
Common Parameters
Known Export Limitations
Report Print Tool
Report Export File Tool
Report e-mail tool
Report HTML Export Tool
Special Export Options
Explanation of Special Options
Apendix C: Reporting Terms Glossary
Appendix C: Reporting Terms Glossary
Appendix D: CIC Report Guidelines (Crystal Reports)
Text Font Defaults
Page Defaults
Font Defaults
Data Defaults
Printer Defaults
Report (Page) Header
Report Title
Parameters (from left)
Logo (flush right)
Header Separator
Section Header
Group Label(s)
Summary Data
Column Headers
Text Body
Group Columns
Graph Defaults
X-axis data labels
Graph Type
Warning Messages
Section Footer
Summary Data
Group Footer
Summary Separator
Report Footer
No Border Lines
Left Text Object
Center Text Object
Right Text Object
Appendix E: Reporting Log Relationships and Report Use Guidelines
General Types of Report Logging
Call Detail Data
Queue Statistics Data
Agent/User Status Data
Line and Line Group
Administrative
Configuration Mirror Data
Appendix F: Including Ex-Agents in Reports
3

63
64
65
65
65
67
67
67
68
68
69
69
69
69
70
70
72
73
74
74
74
75
Appendix G: Parameter Types for Custom Crystal Reports
Appendix H:U2LININSUPPORTU.DLL Function Calls
Appendix I: Parser Functionality
Data Types
Operators
Precedence
Constants
Functions
Parser Errors
Execution Errors
Appendix J: Internet Enabled Reporting
Configure Internet enabled reporting in Interaction Administrator
Configure reports for your CIC server
Configure the data source
Internet Enabled Reporting need to bypass Certificate checking if SSL/TLS is not enabled
Extra configuration for Oracle data source
Connection String Formats
Configuration Behavior
Appendix K: Report Log Purging for Large Databases
Large Database Purge Method
Adding the Server Parameter
Change Log
4

Interaction Reporting in CICInteraction Reporting in CIC
Customer Interaction Center provides several reporting options, available in IC Business Manager, to help customers with their
reporting requirements. The reporting applications include:
Interaction Reporter
Report Manager in Interaction Administrator
Interaction Report Assistant in IC Business Manager
The following is a brief description of the IC Business Manager reporting modules and how to access them.
Interaction ReporterInteraction Reporter
Interaction Reporter, an add - on module for IC Business Manager, allows you to generate pre-defined reports. Depending on the
report, Interaction Reporter uses the ActiveReports 6 or Crystal Reports reporting runtime. Using a report filter, simply configure the
report parameters and run the report. You can save a report filter to use again, and you can export a filter to a file.
Depending on the report, when viewing a report, you can use the Report Viewer toolbar to annotate a report, print a report, and
export a report for distribution. You can also customize your Interaction Reporter Workspace to display multiple Views.
Report Manager in Interaction AdministratorReport Manager in Interaction Administrator
Report Management allows you to configure reports that were created using ActiveReports and Crystal Reports. The reports
configured in Report Management are run in Interaction Reporter in IC Business Manager. The Report Management Report
Configuration page allows you to edit and manage metadata related to a report.
Interaction Report Assistant in IC Business ManagerInteraction Report Assistant in IC Business Manager
Interaction Report Assistant is a reporting tool that allows you to create a special report that you design. You choose the data and
the layout, and generate a customized report that uses your specifications. You can edit and update the wizard selections for the
reports you create, and print or export the output for distribution. This easy-to-use reporting tool contains
packages
of data for you
to choose from. You simply select the
layout
for your report and Interaction Report Assistant guides you through your selection
options to create the special report you need. You can also save your report queries to use again.
5

Where to find Interaction Reporting informationWhere to find Interaction Reporting information
Reporting information is included in technical references, user’s guides, and Helps. These documents are available in the
PureConnect Documentation Library on your CIC server.
Customer Interaction Center (CIC) supports two interaction management client applications. This documentation uses the term
"CIC client" to refer to either Interaction Connect or Interaction Desktop.
The latest version of these documents can also be accessed from the PureConnect Documentation Library on the PureConnect
Web site at:
https://help.genesys.com/cic
The following technical references, user’s guides, Help and links can provide additional reporting information.
IC Business Manager Getting Started HelpIC Business Manager Getting Started Help
For assistance in using IC Business Manager Workspaces and Views, see the Getting Started Help. To access this Help, from the IC
Business Manager Help menu, click Getting StartedGetting Started.
Interaction Reporter HelpInteraction Reporter Help
To learn about generating Interaction Reporter's pre-defined reports and using report filters, see the Interaction Reporter Help. When
working with Interaction Reporter filters or reports, press F1 for contextual Help. You can also access Interaction Reporter Help
from the IC Business Manager Help menu.
Report Management HelpReport Management Help
For more information about Report Management, see the Interaction Administrator Help.
Interaction Report Assistant HelpInteraction Report Assistant Help
To learn about designing special reports in Interaction Report Assistant, when working in the Interaction Report Assistant wizard,
press F1 for Help.
To read more about generating custom reports, editing and updating queries, and printing or exporting the report for distribution, see
the
Interaction Report Assistant User’s Guide
.
PureConnect Customer Care Self HelpPureConnect Customer Care Self Help
The Self Help section of the PureConnect Customer Care Web site provides more in-depth architectural-focused troubleshooting
information categorized by topic and component. Each section provides architectural insight, common problems and solutions,
what to collect for problems, and how to troubleshoot.
PureConnect Data DictionaryPureConnect Data Dictionary
The online
PureConnect Data Dictionary
provides a concise and detailed description of the database tables CIC uses to store and
generate reports on historical data. This includes information stored for interactions, queue statistics, agent and user activity, line
and line groups, administrative changes, and other Interaction Administrator configuration information. This data dictionary also
contains information on Custom Logging. It also assists you in understanding the structure and contents of CIC tables.
Sample Reports for Interaction ReporterSample Reports for Interaction Reporter
The
Sample Reports for Interaction Reporter
document includes examples of actual reports generated by Interaction Reporter.
6

PureConnect Licensing Technical ReferencePureConnect Licensing Technical Reference
The
PureConnect Licensing Technical Reference
describes the system management for licensing PureConnect products. It includes
steps for managing license information using the Activation File Management tool. You can access the tool on the My Support
Dashboard at https://genesyspartner.force.com/customercare/GenesysCommunityLogin. You must have the appropriate
credentials to access this portal.
CIC Installation and Configuration GuideCIC Installation and Configuration Guide
See the
PureConnect Installation and Configuration Guide
for information on installing and configuring report applications.
Interaction Administrator HelpInteraction Administrator Help
See the Interaction Administrator Help for information on basic report logs that store all line, call, and user related CIC interaction
data. Information for Report Logs is accessed under System Configuration. Information for configuring report tables and
parameters, multi-language support, and custom attributes is also available in the Interaction Administrator Help.
7

Overview of the CIC Reporting ProcessOverview of the CIC Reporting Process
Customer Interaction Center (CIC) uses the powerful and comprehensive features of Persistent Message Queue (PMQ) in the
logging process, if you are storing your data in an Oracleor SQL Serverdatabase.
PMQ LoggingPMQ Logging
All CIC report data logging is performed through Persistent Message Queuing (PMQ). Logging is the mechanism by which CIC
moves reporting data from the CIC server to the database. If you are going to use CIC's Reporting option and have a database
server, PMQ is the logging mechanism.
PMQ is embedded within the CIC application on a CIC server with a connection to a database server. No prerequisite software,
separate logging server, or external delivery is necessary. PMQ is a store-and-forward system that guarantees delivery of data
between networked applications. For detailed information on PMQ, see the
PureConnect Installation and Configuration Guide
in the
PureConnect Documentation Library.
Report Logging Process SummaryReport Logging Process Summary
This section provides background information to read before beginning to customize or configure CIC's reporting features. It also
describes the major components involved and reveals their role in CIC's reporting process. Depending on your topology, the report
logging process might differ from the following summary. In this summary, we use SQL Server as our database.
Automated logging functionality is responsible for logging most CIC data. Instead of using handlers to log data, CIC uses a parser
and executor to define values, relative to log data, and assigns values to output columns. Along with this automated functionality,
you can make customizations to your reporting system through handlers.
Each log extends the parser and executor to include support for identifiers specific to the log. In the Call Detail log, CallCall
AttributeAttribute is an identifier that returns the string value of a CIC call attribute that CIC provides as a parameter. For example,
)
sets the
column equal to the content of the call's attribute.
CIC uses two server parameters to control the assignment, or custom binding, of values to fields in the CIC report tables (or logs):
ServerReportLogCustomOutputMapNServerReportLogCustomOutputMapN (where N = Interaction Administrator LogID #)
CIC dynamically processes the value of this parameter to bind the columns if the OutputMap is valid. If the OutputMap is not
valid, CIC uses the original default mapping and ignores the custom output map. CIC records any errors to the event and trace
logs.
ServerReportLogAutoNServerReportLogAutoN (where N = Interaction Administrator Log ID #)
CIC uses this parameter to deactivate the automated logging in the event that the logging is not operating correctly. CIC
provides this parameter merely as a mechanism to turn off the automated logging functionality. Set the value to anything other
than YY, YesYes , TT, TRUETRUE , or 11 (not case-sensitive) to deactivate automated processing of a log.
After gathering the generated statistics, the CIC server sends the captured data to PMQ, then to the CIC logging process. CIC
Logging Service reads the data that is written to the actual queue. CIC Logging Service acts as a bridge that connects the CIC server
to the SQL Server or Oracle Database through the PMQ.
Some logs require some data manipulation by CIC Logging Services before they can be stored in the database. This is done by
stored procedures and it is CIC Logging Services responsibility to determine how the data interfaces to the database via PMQ. CIC
Logging Services has the intelligence to know that certain newer logs require a stored procedure as opposed to table insert
invocations.
CIC uses the UseExternalTranProviderFo rPurgingUseExternalTranProviderFo rPurging server parameter to avoid a five minute timeout that prevents purging from
working on large databases. For more information, see Appendix K:Report Log Purging for Large Databases.
CIC Server ParametersCIC Server Parameters
Report Log Purging for Large DatabasesReport Log Purging for Large Databases
8

Note that CIC’s automated logging replaces the previous functionality of the CallDisconnectMonitor handler. Automated logging
operates on call data and processes the information or values to Log ID 11. You control the Call Detail log using:
ServerReportLogAuto11ServerReportLogAuto11 and ServerReportLo gCustomOutputMap11ServerReportLogCustomOutputMap11.
Custom logging is CIC's term for specifying what data is logged under each column in the report database. Several tables in the CIC
database provide extra unused columns. Use Custom logging to specify what is logged to these columns. See "Custom Logging to
Report Tables" in the
PureConnect Data Dictionary
for information on activating and deactivating custom logging. This document is
available in the Technical Reference Documents section of the PureConnect Documentation Library, or it can be downloaded from
our PureConnect Customer Care Web site.
LogsLogs
CIC stores the logs in the database you configured during installation. The content of these logs is detailed in the
PureConnect
Data Dictionary
.
For detailed information on reporting logs and database tables, see the
PureConnect Data Dictionary
in the PureConnect
Documentation Library.
For each report log configured in Interaction Administrator there is a tool available for use within handlers. More information on
logging tools can be found in Appendix B: CIC Reporting Tools Design.
Interaction Administrator Change Notification Lo gInteraction Administrator Change Notification Lo g
This log contains details about changes made using the Interaction Administrator program.
IC Change Notification Lo gIC Change Notification Lo g
This log contains details of the change notifications transmitted by the Admin Server and tracks all changes to DS. This log
is turned off by default. It produces enormous volumes of information - every DS change - not just IA changes. Because of
the potential size of this log, it's a good tool for diagnosing problems.
IC Application Login Logo ut Change LogIC Application Login Logo ut Change Log
This log contains data (for example, the date and time of the event, user ID, application name, success or failure code and
machine name) about user login and logout activities per application.
Interaction Custom Attributes LogInteraction Custom Attributes Log
This log contains custom attributes about the interaction. This log contains details inserted from StatServer.
Interaction Summary and Detail Lo gInteraction Summary and Detail Lo g
This log contains summary and detail statistics about the interaction.
Interaction Wrap - up LogInteraction Wrap - up Log
This log contains segmented wrap - up code for the interaction.
User To Workgroup RelationshipsUser To Workgroup Relationships
This log contains a mirror image of users and their workgroup membership as you have them currently configured in CIC.
This table is not used on any of the CIC reports.
Line Co nfiguration Mirro rLine Co nfiguration Mirro r
This log contains a mirror image of the lines as you have them currently configured in CIC.
Line Group co nfigurationLine Group co nfiguration
This log contains a mirror image of the line groups as you have them currently configured in CIC.
Line Group to Lines Relationship Mirro rLine Group to Lines Relationship Mirro r
This log contains a mirror image of the line group to lines relationship as they are currently configured in CIC.
Account Code Mirro rAccount Code Mirro r
Using CIC Server Parameters with a Report LogUsing CIC Server Parameters with a Report Log
Custom LoggingCustom Logging
Log DetailsLog Details
9

This log contains a mirror image of the account codes as they are currently configured in CIC. This table is not used on any
of the CIC reports.
Agent Activity LogAgent Activity Log
This log contains details of individual status changes. It is updated each time an agent manually changes phone status,
such as lunch, available, or gone home.
Interval Line Group StatisticsInterval Line Group Statistics
This log contains interval statistics for line groups configured for reporting in CIC.
Interval Line StatisticsInterval Line Statistics
This log contains interval statistics for lines configured for reporting in CIC.
Fax Envelope Histo ryFax Envelope Histo ry
The Fax Envelope History Log table records all fax attempts made in the CIC system. The attempts can either be successful
or fail to transmit the fax. CIC tracks each fax by its envelope ID, call ID, and fax ID.
IVR Histo ryIVR Histo ry
This log contains historical data about activity within the IVR.
IVR IntervalIVR Interval
This log contains IVR navigation data that is accumulated and reported on a configurable interval.
Agent Queue Activation HistoryAgent Queue Activation History
This log contains data about each agent's activation and deactivation change history in each queue. It records an entry each
time the agent is activated or deactivated from a workgroup with a queue, where the agent is a member of that workgroup.
Pre 4.0 Wrap-Up StatisticsPre 4.0 Wrap-Up Statistics
This log contains legacy data.
Agent Queue Statistics IntervalAgent Queue Statistics Interval
This log contains details inserted from StatServer.
Statistics Group IntervalStatistics Group Interval
This log contains details inserted from StatServer. It is similar to Agent Queue Statistics Interval Log except that the agent
values are not present because statistics groups are not associated with agents.
Workgroup Queue Statistics IntervalWorkgroup Queue Statistics Interval
This log contains details inserted from StatServer. It is similar to Agent Queue Statistics Interval Log, but contains
information on workgroup/queue for which there was activity, or agents logged in to the system.
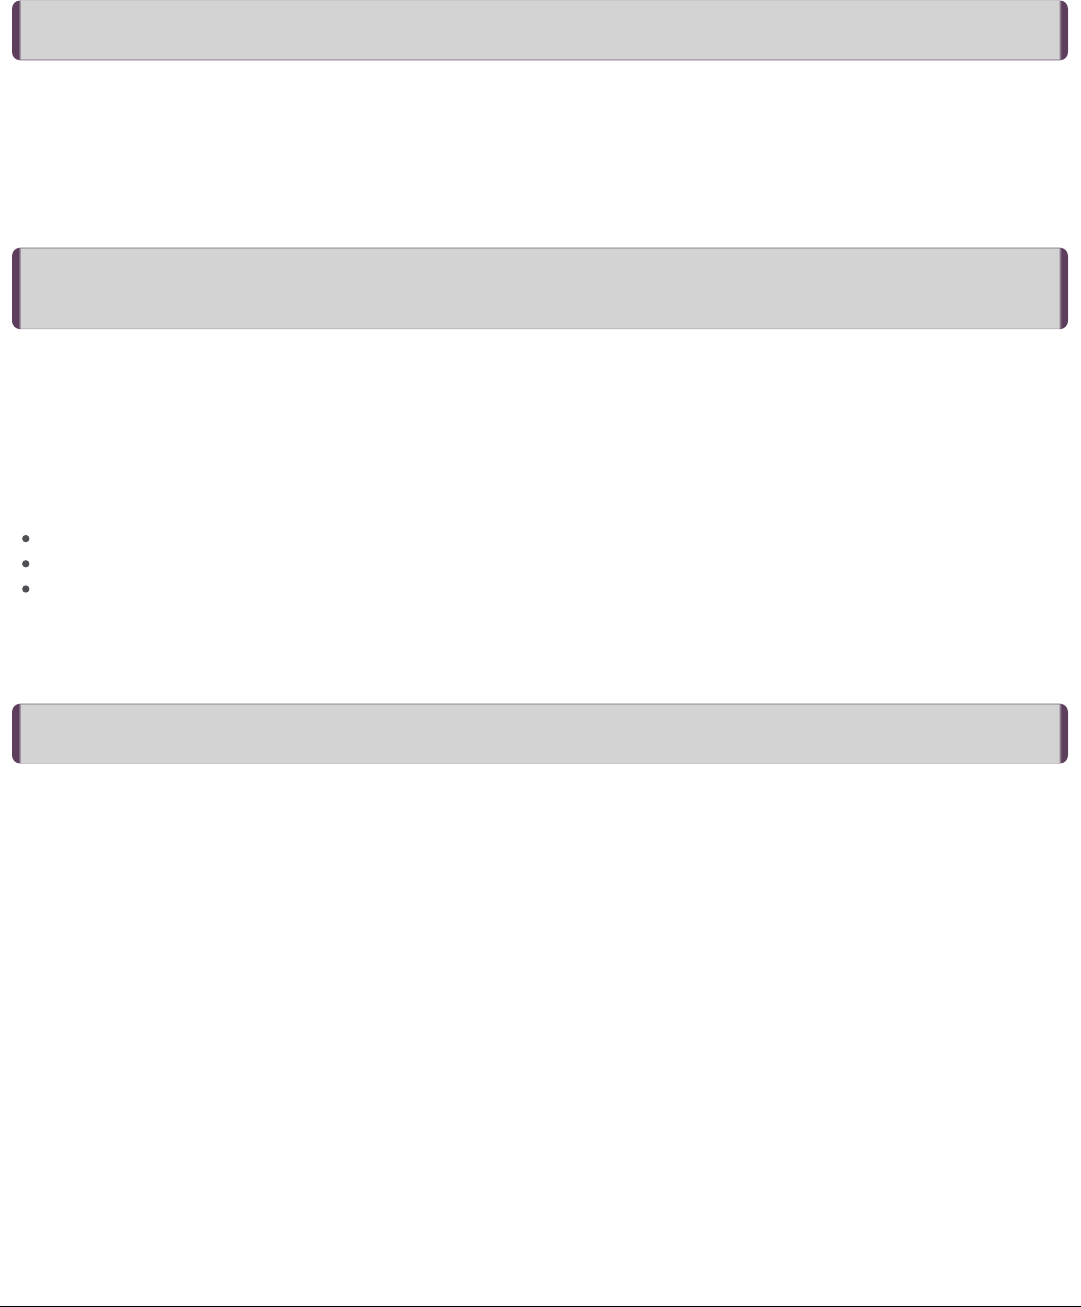
Custom PassthroughCusto m Passthro ugh
This is a special log that is inactive by default. Before the feature can be used, the log must be activated and selected in the
Interaction Administrator Server configuration.
10

Interaction AdministratorInteraction Administrator
If you are customizing or creating new reports, some work will be done from the Interaction Administrator. From the Interaction
Administrator, you can perform the following report configurations:
Mark logs as active or inactive
Configure reports in Report Management
Create and modify server and system parameters that control the location of reports and logs
Change the interval at which CIC generates statistics
11

Overview of Crystal Report Templates in CICOverview of Crystal Report Templates in CIC
CIC provides many reports to help you analyze interactions and resource usage. These reports retrieve statistics recorded in the
report logs. We have tried to anticipate where and how you will need this information, and the reports that ship with CIC will
probably meet most of your needs. In some cases, you might want to customize the reports that ship with CIC, or create new
reports. This section offers the background and procedural information needed to customize and create Interaction Reporter
Crystal Reports. For more information on CIC report layout, see Appendix D: CIC Report Guidelines (Crystal Reports).
Customization Requirements for Crystal ReportsCustomization Requirements for Crystal Reports
Crystal Reports Runtime, for viewing standard, prepackaged reports generated from CIC, is installed when running the IC Business
Manager Applications install when Interaction Supervisor is selected. If you want to edit, customize, or create new reports, you
must purchase the full Crystal Reports software package.
NoteNote
If you want to use Crystal Reports to make customizations to CIC reports, you will need the DLL file U2LININSUPPORTU.DLL.
This DLL is installed on any workstation where you run the IC Business Manager Applications install with Interaction Supervisor
selected. This file must be accessible to Crystal Reports to do your customizations. Put the DLL in the
%CommonProgramFiles%\Crystal Decisions\xxx\bin, where xxx will vary depending on the version of Crystal Reports used. For
example, if using CR9.0, xxx will equal 2.0. Our install program automatically installs the file in this path, so no additional steps
need to be taken, except expanding the path. If, for example, you are using CR10.0, xxx will equal 2.5, and you will need to copy
the file into the directory.
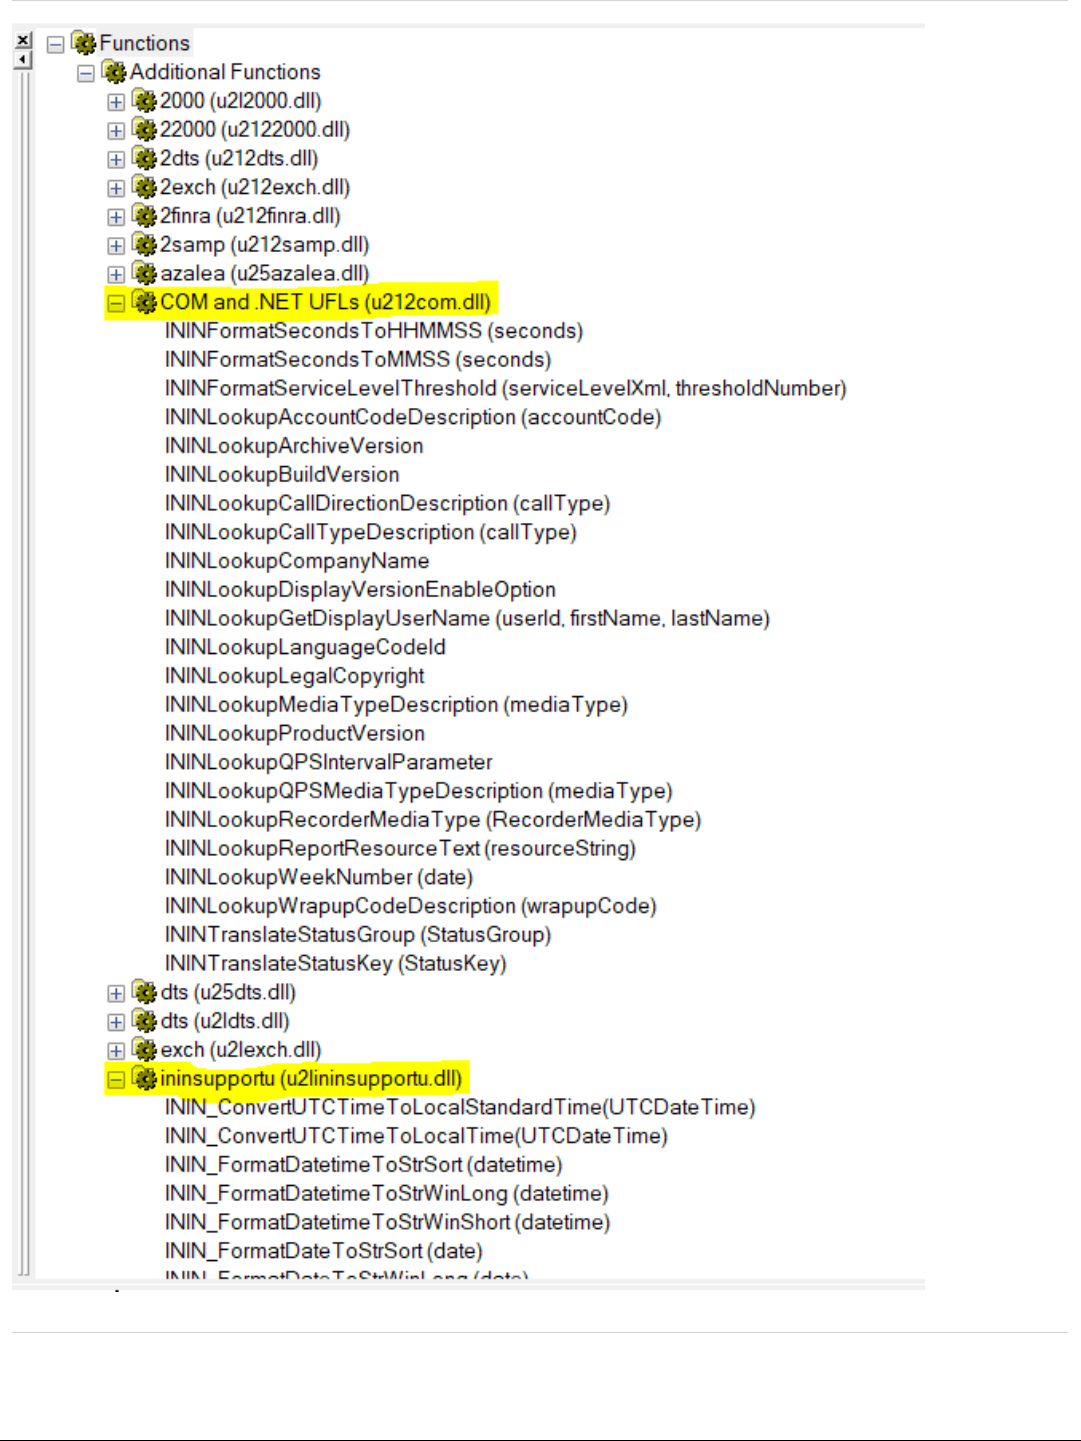
For more information about the functions contained in U2LININSUPPORTU.DLL, see Appendix H.
The User need to copy u212com.dll, ININ.Reporting.Historical.Engine.CrystalUFL.dll and U2LININSupportU.dll to the following
folders:
C:\Program Files (x86)\SAP BusinessObjects\Crystal Reports for .NET Framework 4.0\Common\SAP BusinessObjects
Enterprise XI 4.0\win32_x86
C:\Program Files (x86)\SAP BusinessObjects\SAP BusinessObjects Enterprise XI 4.0\win32_x86
C:\Program Files (x86)\Common Files\Crystal Decisions\2.0\bin
The files are by default copied by the ICBM installer in the first folder, but not in the last two folders. The last two folders are
actually searched by Crystal Reports Designer to load the functions in the Formula window. Since CR Designer searches only
the last two folders, it does not load the functions if dll files missing in those two folders..
u212com.dll file is a Crystal report runtime file, ININ.Reporting.Historical.Engine.CrystalUFL.dll and U2LININSupportU.dll are
CIC files and any specific CIC version installer will contain these files. These files can also be copied from the first folders to
the other two folders manually (administrator privilege required).
12
If you are using another software package, which uses a Crystal Reports install that accompanies the software, for example, Aspect
eWRFm, it could cause IC Business Manager reports to fail on that machine. This is due to a Crystal Reports limitation and cannot
Crystal Reports version compatibilityCrystal Reports version compatibility
13

be corrected by Genesys. Crystal Reports has the following documentation that describes their limitations on this issue, "Can we
install multiple versions of Crystal Reports on the same computer?"
https://apps.support.sap.com/support/knowledge/public/en/1216278
NoteNote
Our reporting system uses Crystal Reports 2013. As a result, any Crystal Reports versions listed in the above referenced article that
conflict with Crystal Reports 2013 will cause issues when running reports in IC Business Manager.
Editing a CIC ReportEditing a CIC Report
To edit CIC reports, you must perform these additional steps:
1. If necessary, copy the U2LININSUPPORTU.DLLU2LININSUPPORTU.DLL to the directory as described in the previous Note.
2. To extend the path in a Windows environment, right click on My ComputerMy Computer and click PropertiesProperties . On the system Properties
dialog, click Advanced system settingsAdvanced system settings , and click E nvironment Environment VariablesVariables . In the System VariablesSystem V ariables box, scroll down and
select PathPath, and click E ditEdit . In the Edit System VariableEdit System Variable dialog, select the text in the Variable ValueVariable V alue field and go to the end
of the string. At the end of the string, add the path to where IC Business Manager applications are installed on your
workstation. Typically, this location is C:\Program Files\Interactive Intelligence.
3. Restart the Crystal Reports designer application.
WarningWarning: Do not modify or customize reports on the CIC server.
CIC Report TemplatesCIC Report Templates
Associated with each CIC report is a Crystal Reports template. For example, CIC reports use templates with the RPT file extension.
These templates provide framework for displaying the statistical information in the logs. Templates also contain formulas that
calculate information displayed in the report. The Crystal Report templates for each report are located on the CIC server in a
directory called Reports. Map a drive to the CIC server containing the Reports directory. When you open a template, you must point
to the log that contains the data used in the template.
PureConnect Data DictionaryPureConnect Data Dictionary
The PureConnect Data Dictionary details the contents of each of the report logs located on the CIC server. The CIC report
templates retrieve information from these logs anytime someone runs a report. Each variable field in a template is either pulling
data directly from the log, or contains a formula that calculates a number based on information found in a log. Use the data
dictionary to quickly determine the contents and function of a field in a template. If you are customizing or creating new reports,
use the data dictionary to determine what information to retrieve from the logs.
Before customizing Interaction Reporter Crystal ReportsBefore customizing Interaction Reporter Crystal Reports
Before you begin customizing reports or creating new reports, you should have a thorough understanding of how reporting works in
CIC. Be sure to read the background information in the first section of this document, and be sure that you are familiar with the
report logs and how they are generated.
Note CIC Reporting has limited support for generating subreports.
Opening templates and connecting to report logsOpening templates and connecting to report logs
After you install Crystal Reports, you can edit the report templates. These templates reside in the\IC_reports directory on your CIC
server and have RPT extensions. Before you open a template for editing, make sure you copy the template to another area and
rename it. You will need to make sure the renamed report template is pointing to the correct report log. You can also use this
procedure to connect your report templates to the report logs.
After using the following procedure to connect your template to the report logs, you can run your report from Crystal Reports to test
changes you make to the template. You also have access to all of the tables within that report log. For a description of these
tables, refer to the
PureConnect Data Dictionary
, located in the Technical Reference Documents section of the PureConnect
Documentation Library at:
https://help.genesys.com/cic.
14
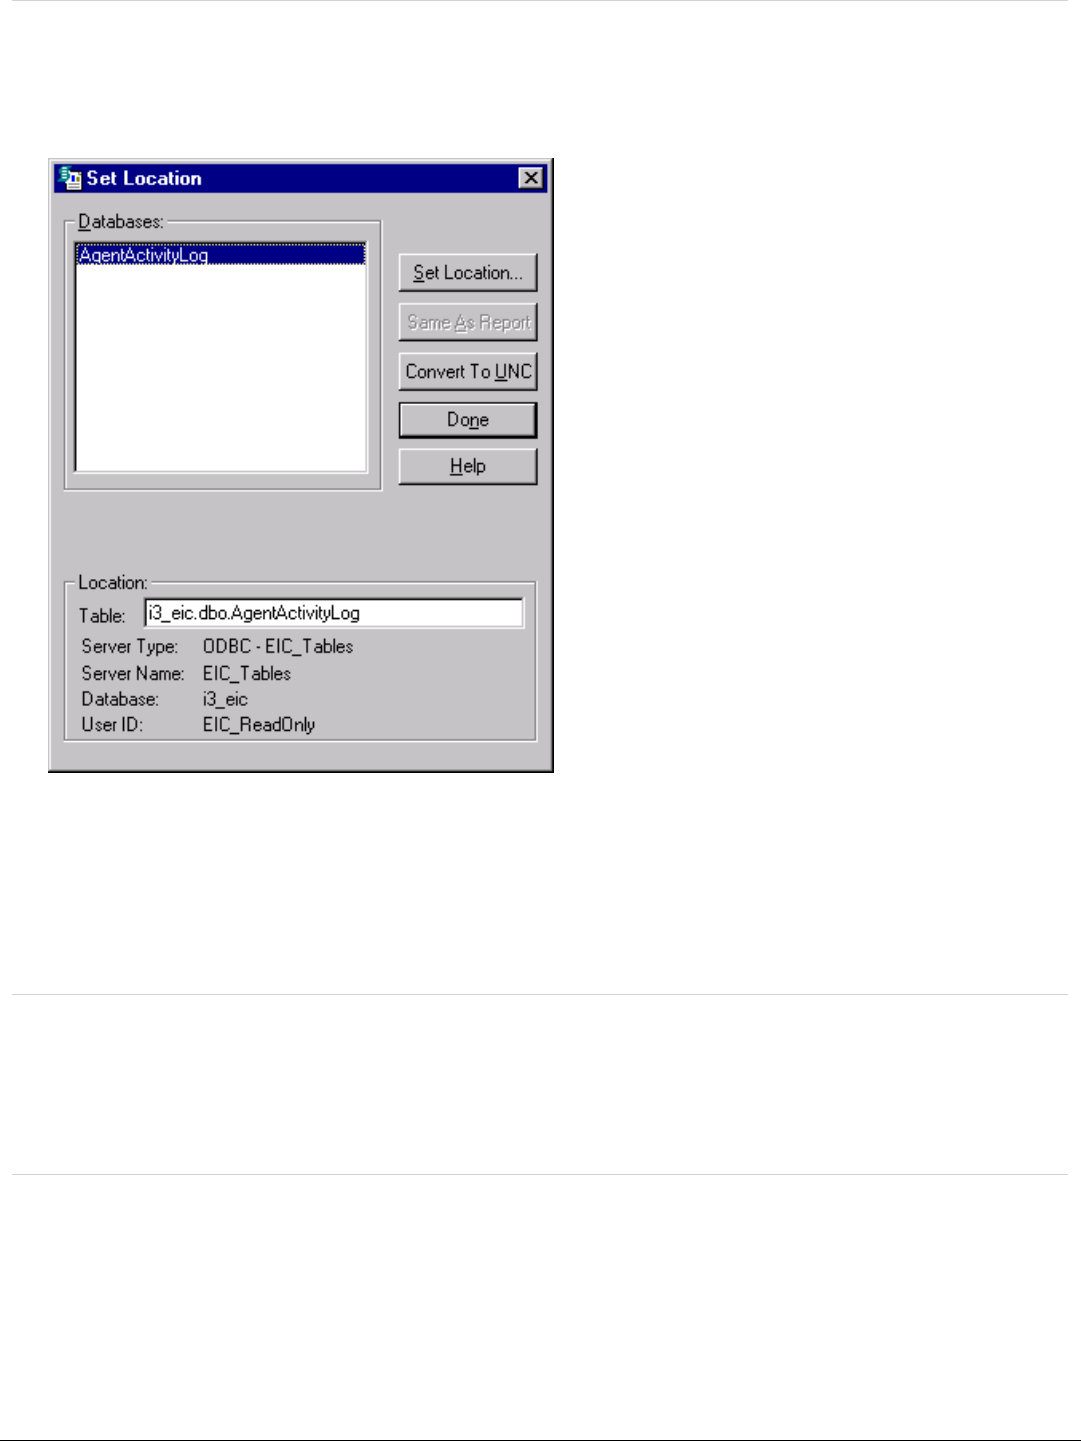
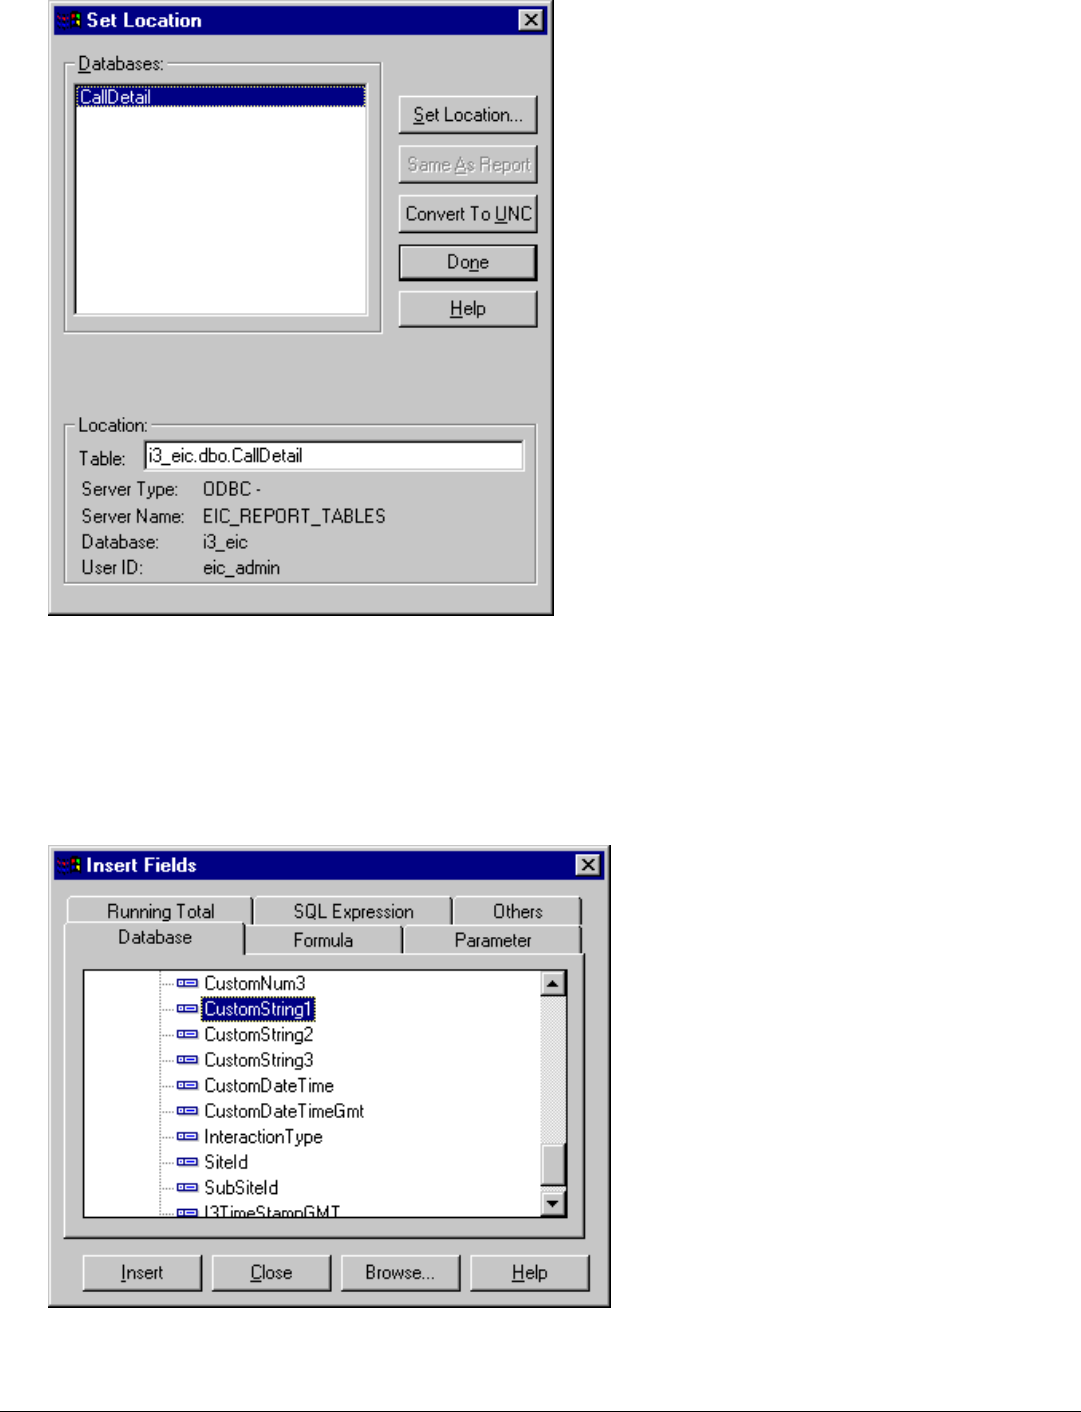
1. From the Crystal Reports Database menu, choose Set Dataso urce Set Datasource LocationLo cation. The Set Location dialog box appears. This
dialog shows the logs from which this report retrieves information. It also displays the Table, Server Type, Server Name,
Database, and User ID. When you first open the renamed report template, specify the location of the log on the CIC server.
The set location dialog box shows you the databases to which your report template connects
2. If you need to specify the location of the report log, click Set Locatio nSet Location in the dialog box. The Data Explorer dialog box is
displayed.
3. Under ODBC, browse through the items and choose the table you want to use. You have now specified the location of the log
from which your report template retrieves information. You can now run your report from Crystal Reports to test any changes
you make to your template. You also have access to all of the tables within that CIC log. For a description of these tables, refer
to the
PureConnect Data Dictionary
in the PureConnect Documentation Library.
Perhaps the quickest way to determine the contents of the predefined report logs included with CIC is to look in the PureConnect
Data Dictionary . This document lists the contents of all CIC report logs. If you've made changes to these logs, however, you can
also determine the contents of a log using Crystal Reports, using the following procedure. Be sure your template is pointing to the
appropriate databases using the previous procedure.
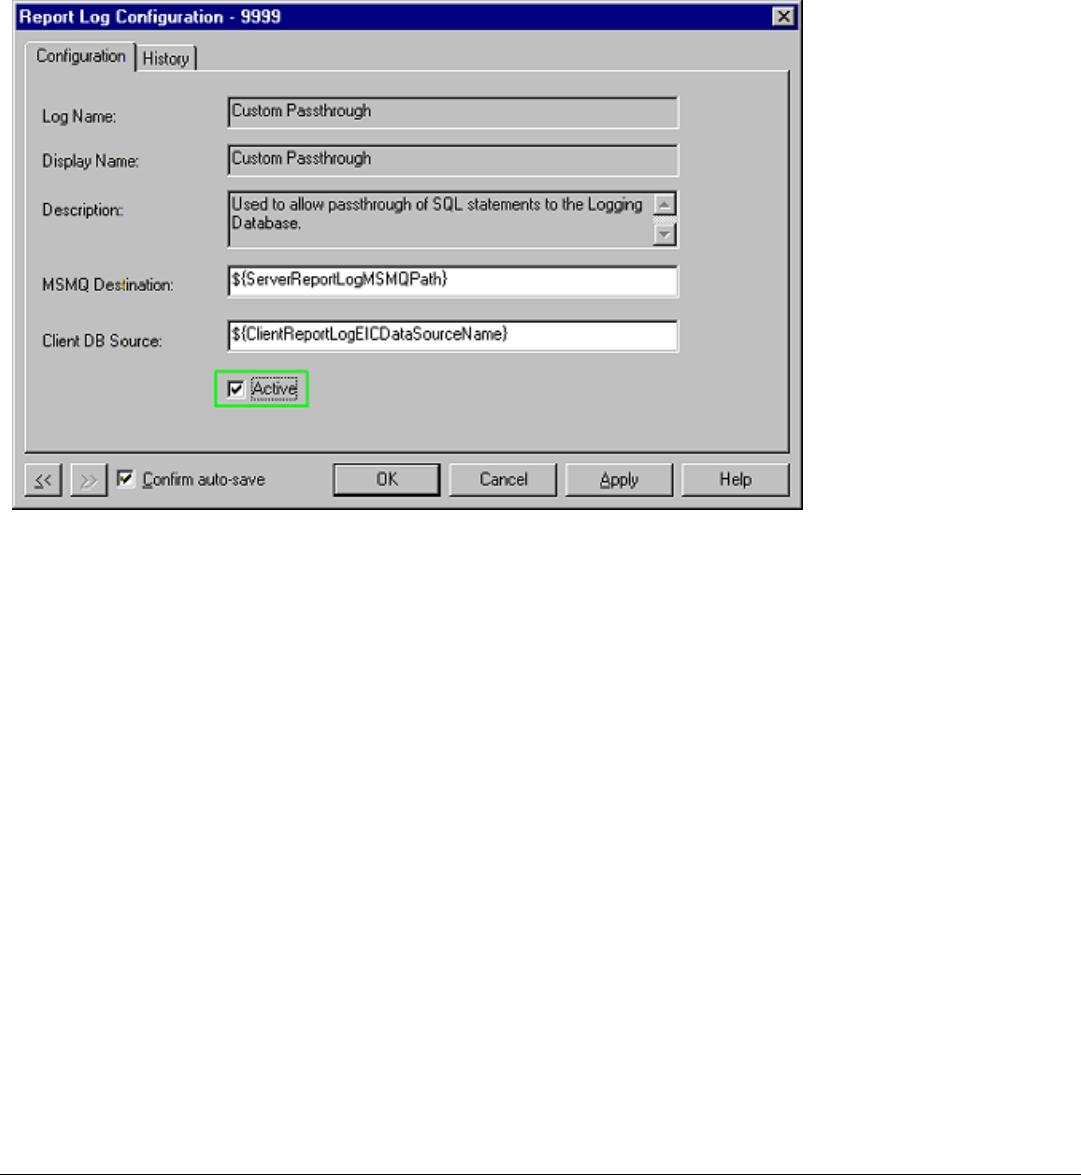
1. From the Crystal Reports InsertInsert menu, choose FieldField. The Field Explorer dialog box appears. This dialog box displays each field
within the log (under Database Fields), and any formulas (under Formula Fields) or parameters (under Parameter Fields) for the
report.
Connecting your report template to the correct logConnecting your report template to the correct log
Determining which tables are in a report logDetermining which tables are in a report log
Determining the contents of a logDetermining the contents of a log
15
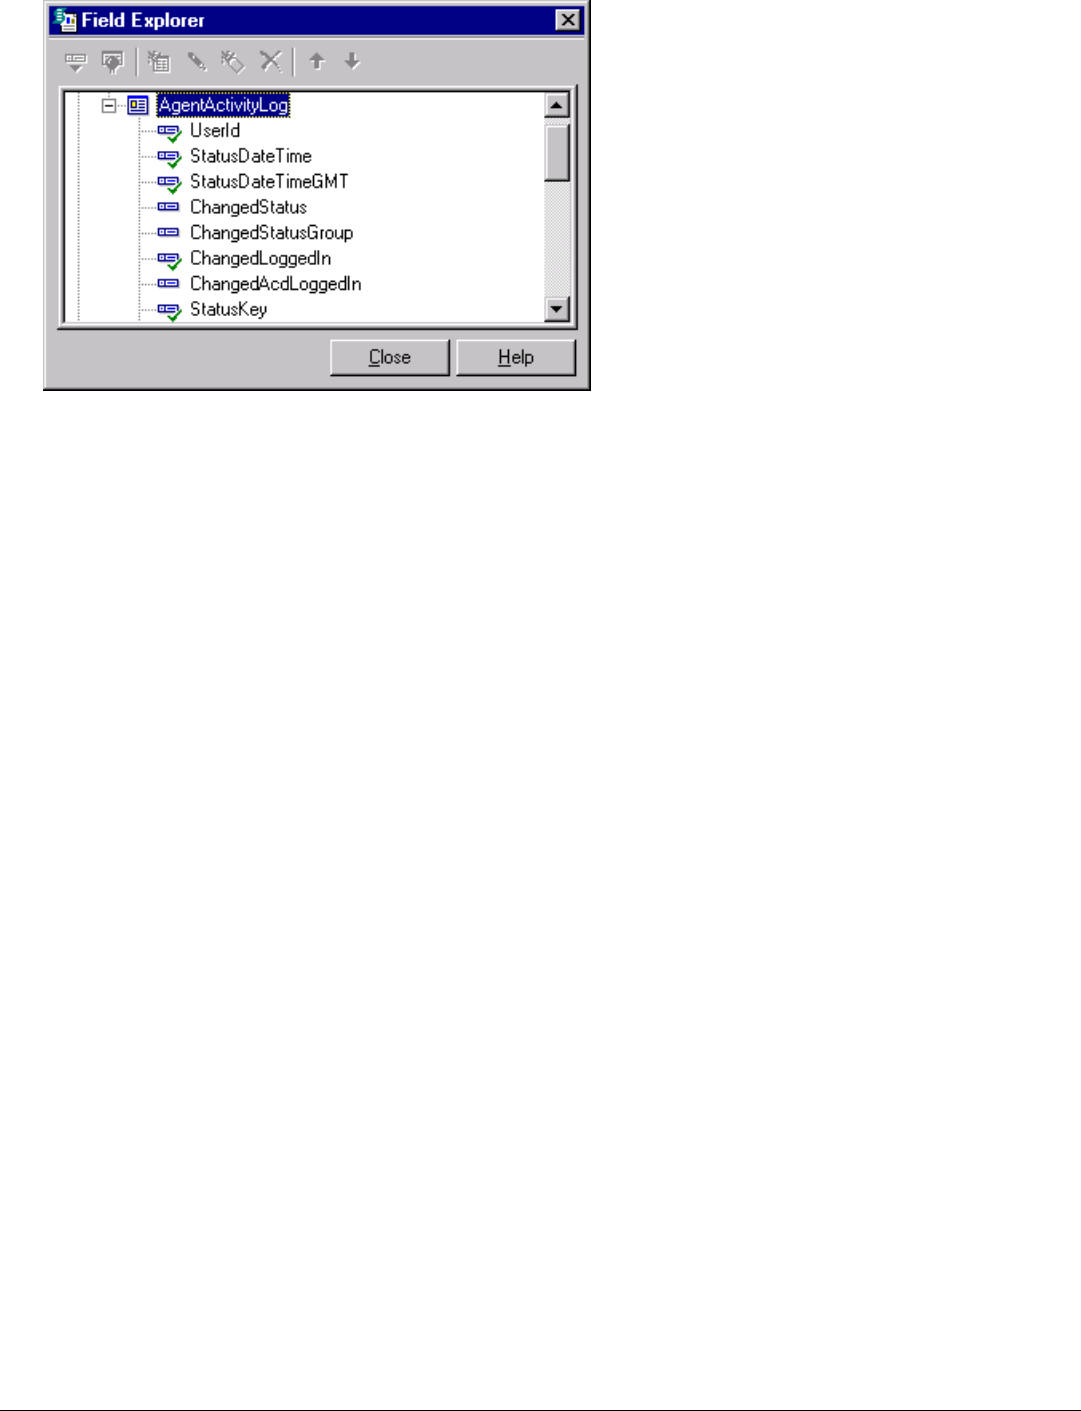
2. The Field Explorer dialog shows the fields available in a report log
Viewing the Details of Report Logs in Interaction AdministratorViewing the Details of Report Logs in Interaction Administrator
From Interaction Administrator, you can view all kinds of configuration information for the existing CIC logs. This information
includes the log's name, the frequency at which statistics are generated for that log, the type of columns collected for the log, and
many other details. Use the following procedure to examine a CIC report log's configuration.
To view the details of a report log's configuration
1. From Interaction Administrator, select the Report Lo gsRepo rt Logs container. All the logs currently configured for CIC appear in the right -
pane of Interaction Administrator. Note that only numbers appear for the default logs that ship with CIC. This is done to assist
localization.
2. Double-click one of the log names that appear in the list in the right pane. That report log's configuration dialog appears. From
this dialog box, you can view the configuration details for the log.
16

Activating and deactivating logsActivating and deactivating logs
Use this procedure to activate or deactivate a log.
To activate or deactivate a log
1. From Interaction Administrator, under System Configuration, select Report Lo gsReport Logs . The list of Log IDs appears.
2. Double-click on a report log to display its configuration dialog.
3. Select the ActiveActive box to activate the log, or clear the box to deactivate the log. Use the pages in this dialog to configure the
report log.
17
CIC Report Editing for Crystal ReportsCIC Report Editing for Crystal Reports
The following information describes how to customize CIC's reporting features, including adding, changing, and deleting fields and
formulas in existing reports.
Configuring a Custom Crystal Report in Report ManagementConfiguring a Custom Crystal Report in Report Management
Use this procedure to configure a custom Crystal Report torun in Interaction Reporter in IC Business Manager.
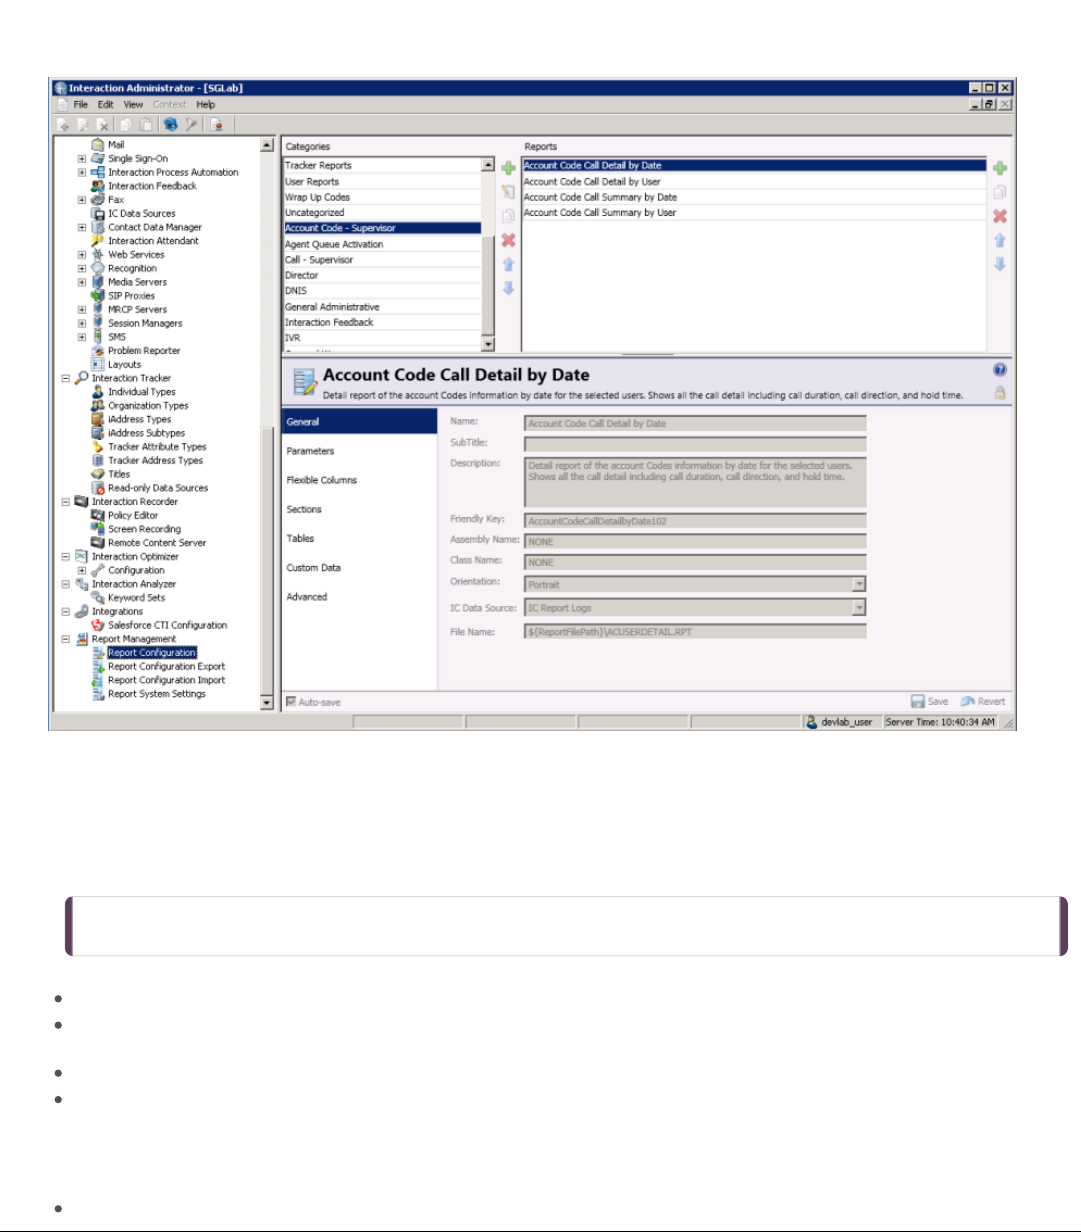
1. In Interaction Administrator under Report Management, select Repo rt Co nfigurationReport Configuration. The Report Configuration page appears
on the right.
2. In the master view under Categories, identify the category you want to use for the custom report. You can select an existing
category or add a category (for example, you can add the Custom Reports category).
3. Copy an existing report into an existing category or copy an existing report from an existing category to the category you
created. For example, you identify the existing Account Code Call Detail by Date Crystal Report in the Account Code -
Supervisor category as a report similar to the custom report. Copy the existing report to the Custom Reports category that you
created. The new report appears in the Custom Reports category as Account Code Call Detail by Date (Copy).
TipTip: The report that you copy must have a report type of Crystal Report. You can identify the report type in the Advanced
tab in the detail view.
4. In the detail view for the new report, select GeneralGeneral . Update the following information:
NameName - Enter the name of the custom report as you would like it appear in the Navigation Pane in IC Business Manager.
DescriptionDescriptio n - Enter a brief, one-sentence description of the new report. This description appears next to the name of the
report in the Navigation Pane in IC Business Manager.
Friendly KeyFriendly Key - Enter a unique value that easily identifies the new report in the database.
File NameFile Name Enter the Crystal Report template for the new report.
5. In the detail view for the new report, select ParametersParameters. Use the existing parameters from the report that you copied if they
apply to the new report. You can add a parameter to the report, change an existing parameter, or delete a parameter from the
report. Determine whether to update the following information if you add a parameter or change an existing parameter:
The Class NameClass Name on the General tab indicates the parameter type.
18

The SourceSource on the Data tab indicates whether the report prompts a user to enter a value for the parameter.
The Data TypeData Type on the Data tab indicates the type (for example, string, numeric, Boolean, and date) of data that the
parameter expects.
The Default ValueDefault Value on the Data tab indicates the default value for the parameter.
The ParameterParameter TypeType field on the Miscellaneous tab indicates whether to use the parameter as a filter.
The User Contro l Class NameUser Co ntro l Class Name field on the Miscellaneous tab indicates the user control type that corresponds to the
parameter type on the General tab. Refer to
Appendix G: Parameter Types
for more information.
The Column NameColumn Name on the SQL Table Columns tab indicates the name of the parameter in the Crystal template that maps
to the data in the database column.
Note Note You can configure report parameters that limit which data users see based on the ACLs to which they have
access. Secure report parameters are available for all Crystal Reports that use queue parameters. For additional
information on configuring secure report parameters, see the Help topic Co nfigure Co nfigure secure report parameterssecure report parameters in the
Interaction Administrator Help.
Note Note Localization behavior of parameter fields displayed in a report can be changed by adding _Display to the end of
the parameter name in the Crystal RPT file. This will force the value displayed in the report to be the same as that
entered by the user running the report instead of the localized value based on CIC's region.
6. In the detail view for the new report, select TablesTables to add the tables and views that the report uses.
7. In the detail view for the new report, select Custo mCustom DataData to identify any custom data that the report uses.
8. In the detail view for the new report, select AdvancedAdvanced. Update the following information:
Repo rt VisibleRepo rt Visible Select the check box so that the report appears in IC Business Manager.
Repo rt TypeRepo rt Type Select CrystalCrystal ReportRepo rt .
Require ACLRequire ACL Select the check box to use an Access Control List for the report.
9. When you finish entering the configuration information, click SaveSave .
After you configure a custom report, provide a CIC user access to run the report. In Interaction Administrator, configure the Default
User, Workgroup, or User container to have access to the report.
Examples of Edited ReportsExamples of Edited Reports
We have compiled some of the most common report edits, such as adding, changing, or deleting fields or formulas in existing CIC
reports, to give you a guideline for your report customization needs. These examples are only possible if you are working with
reports that query data from exactly the same database tables.
For the examples in this section, we use the
User Summary by Date
report (usersummary.rpt) and the
User Call Detail
report
(userdetail.rpt).
CIC ships with many Crystal Report templates. These templates are stored in a Reports directory on your CIC server. Use one of
these templates to display the custom call attribute you created.
Note
When you customize reports, you also make several ODBC configuration changes. The reporting install creates an EIC_TABLES
ODBC data source on the machine where the install is executed. However, this data source does not contain all of the
information needed to connect to the CIC reporting tables so that you can edit reports. Use the ODBC data source configuration
wizard, as shown in the following figure, to correctly configure this for use with Crystal reports.
19
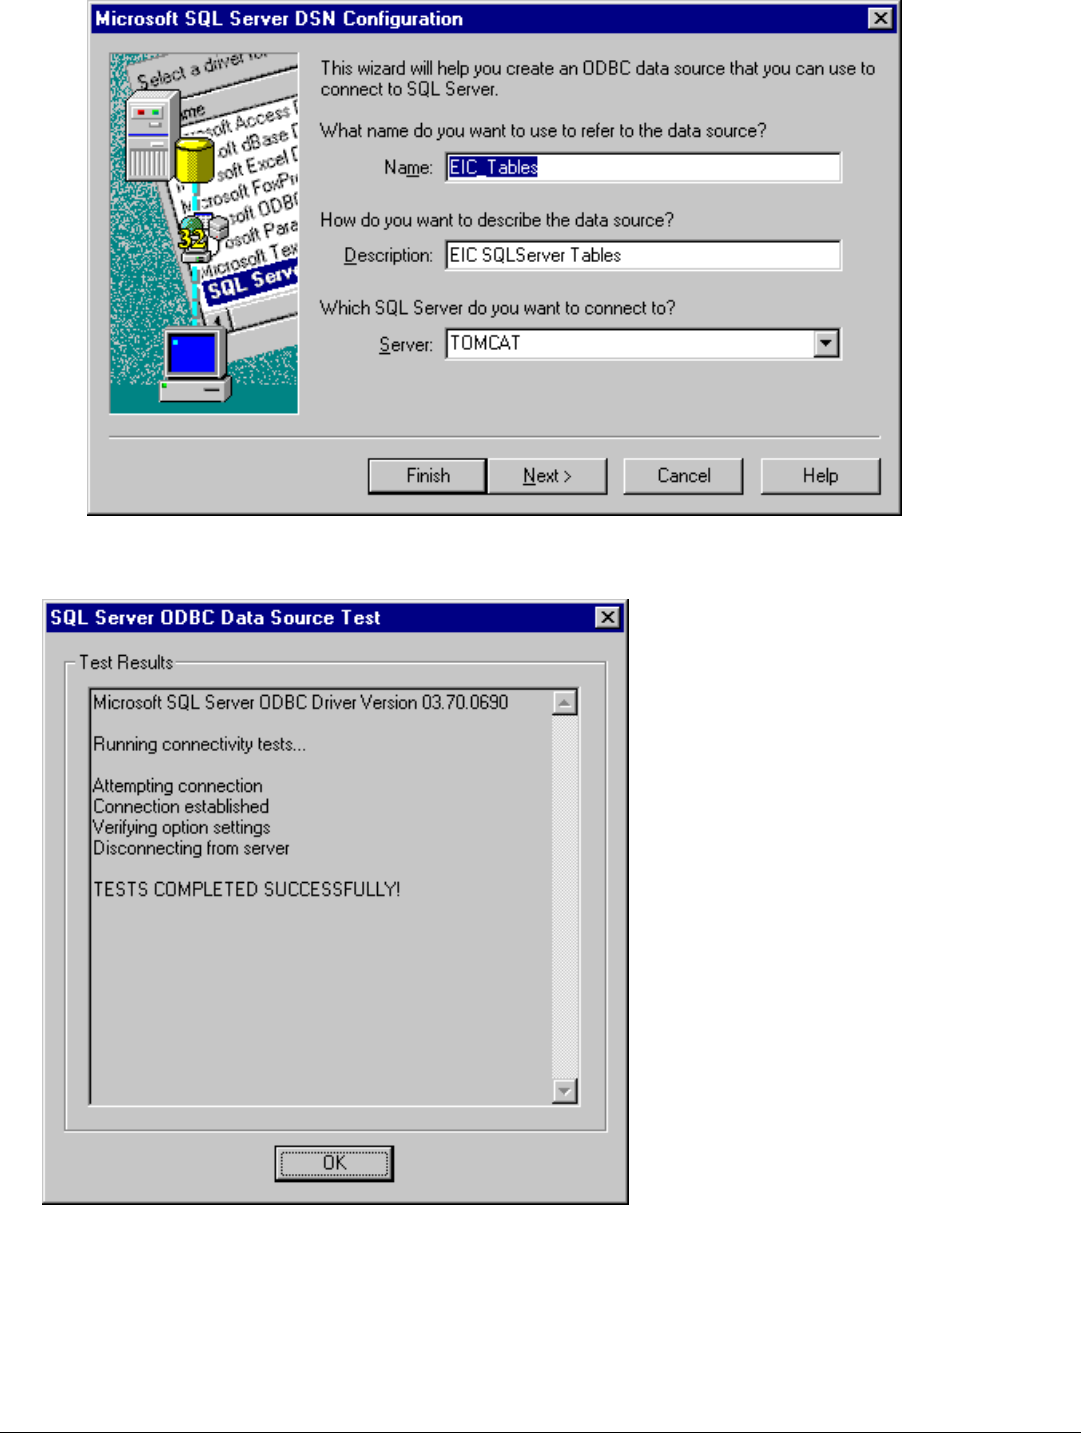
Set the correct SQL Server, network protocol, and default database (i3_eic), and then execute the data source test, as shown in the
following figure.
After you complete this configuration, the data source will be available from within Crystal. You are now ready to run Crystal
Reports.
Changing a formulaChanging a formula
In this first example, we'll change the average call duration formula to maximum call duration in the standard CIC report template
for the User Summary by Date report. Open usersummary.rpt in Crystal Reports. The rpt files are located on the CIC server at
I3\IC\Reports.
20
Important Note
You do not want to overwrite the standard CIC template. Before you begin, copy the report to a new working location, or from
the FileFile menu, click Save AsSave As , and save the report under a new name.
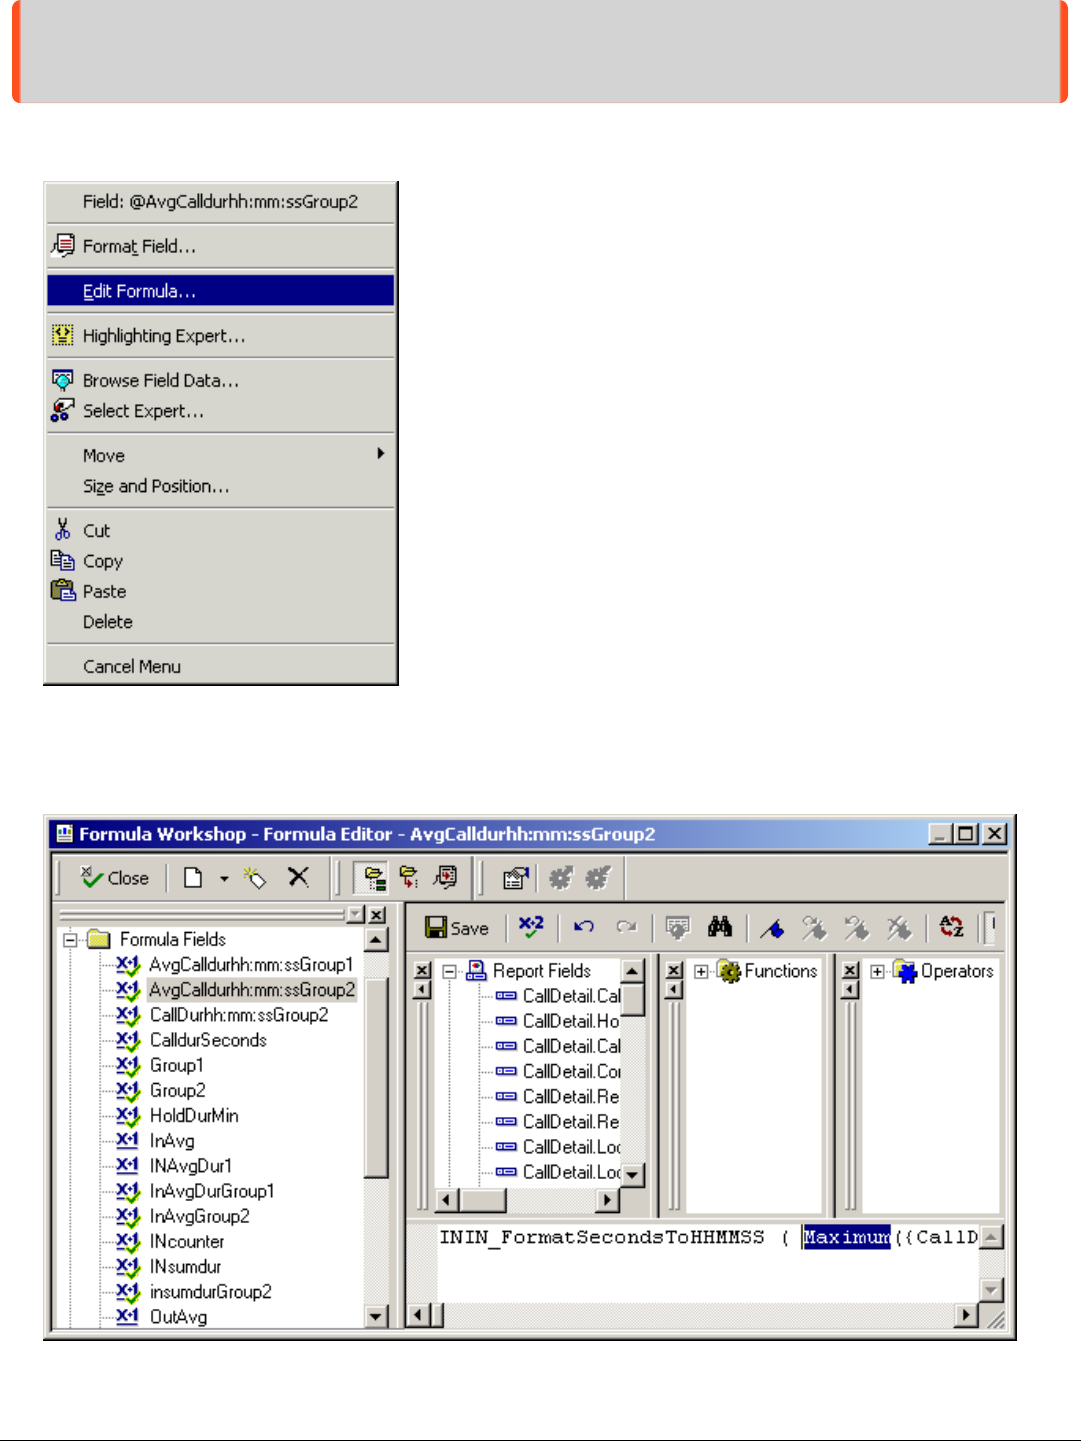
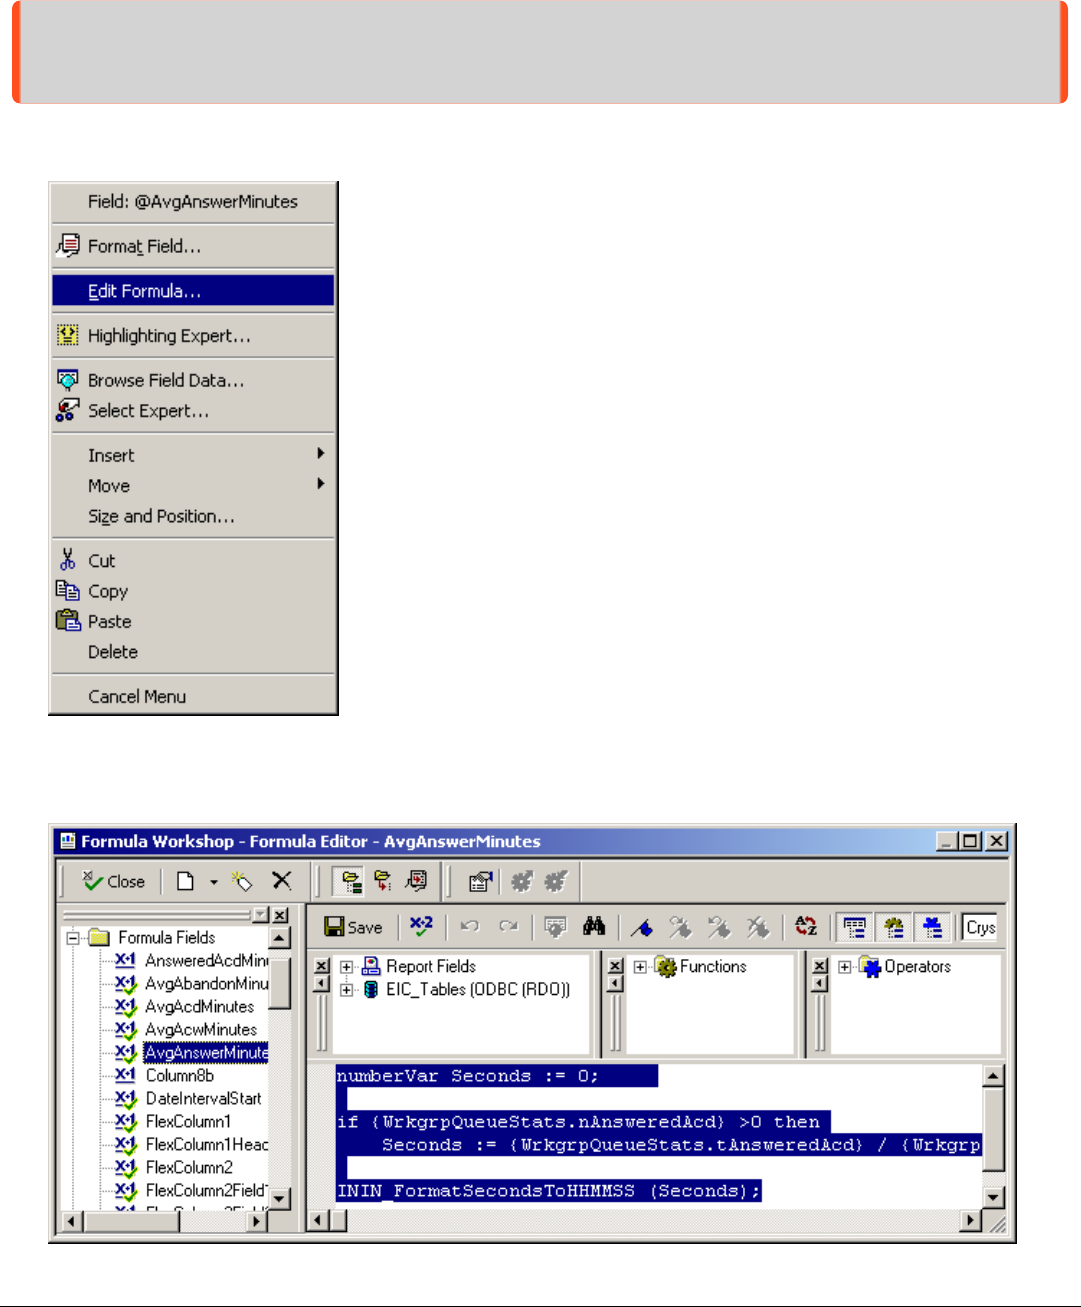
1. Right-click the average call duration field located in Group Footer 2, and select Edit FormulaE dit Fo rmula on the drop-down menu as shown
in the following figure.
Right-click a field to show the available actions.The associated dialog box is displayed.
The Formula Editor allows you to change the existing formula.
2. In the Formula Editor, highlight SumSum and type MaximumMaximum. Delete all characters beyond the "/". The formula should now read as
follows:
ININ_FormatSecondsToHHMMSS ( Maximum({CallDetail.CallDurationSeconds},{@Group2})
21
3. Right-click the formula name and change it to reflect MaximumMaximum instead of SumSum . Save your changes.
Replacing a fieldReplacing a field
In this example, we will replace the Remote NameRemo te N ame field with the Call TypeCall Type field in the standard CIC report template for the
User
Detail
report. Open userdetail.rpt in Crystal Reports.
Important Note
Before you begin, copy the report to a new working location, or from the FileFile menu, click Save AsSave As , and save the report under a
new name. You do not want to overwrite the standard CIC template.
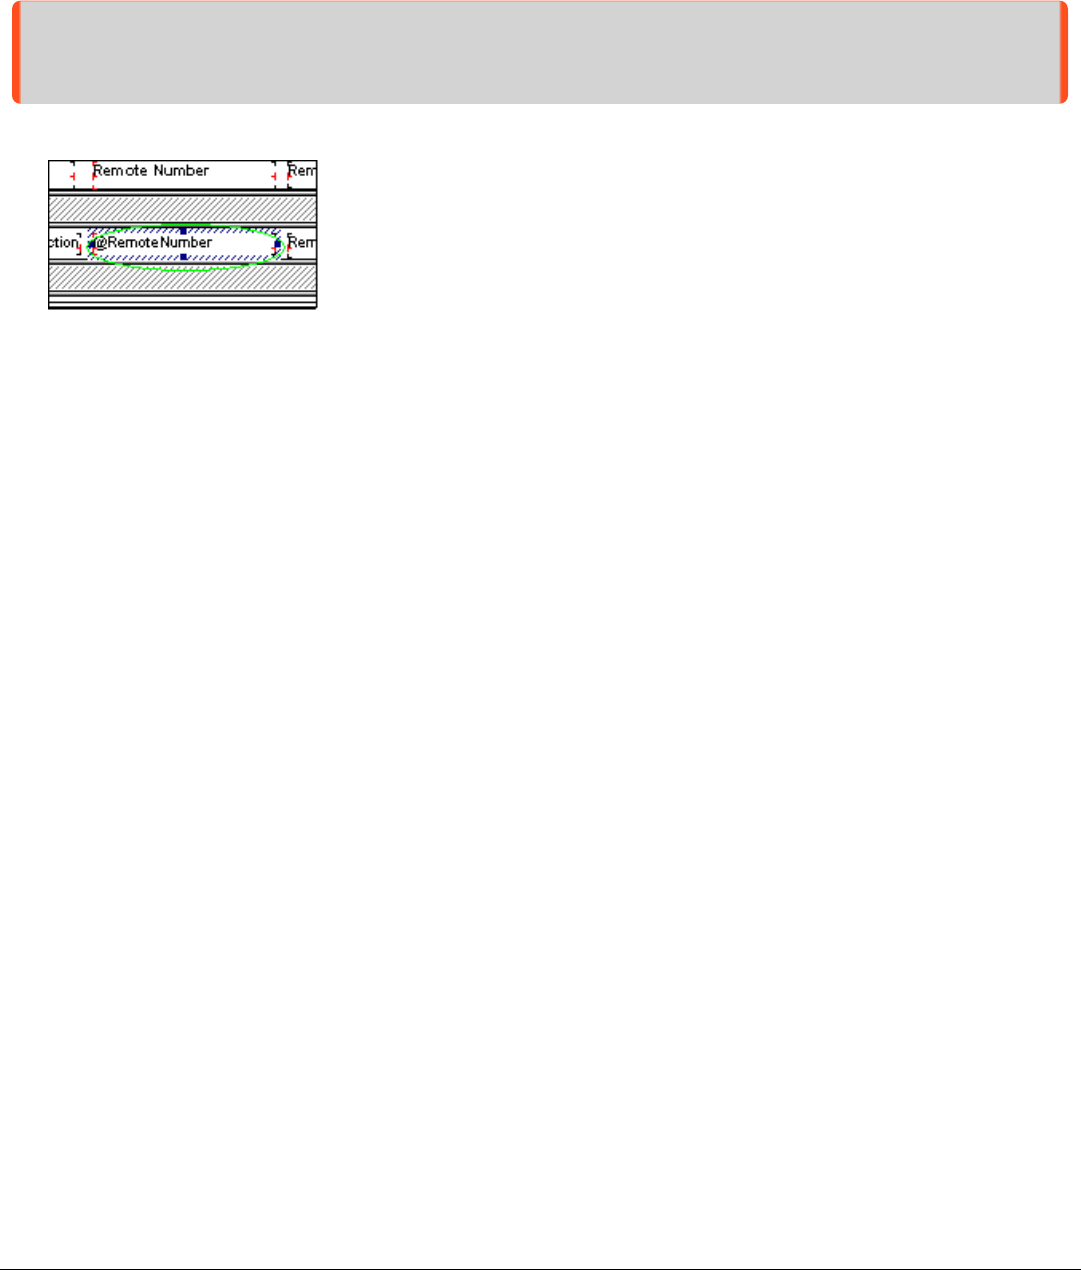
1. Click the Remote Name field, as shown in the following figure, located in the DetailsDetails section, and then click DeleteDelete .
Select the field you want to replace in the Details section.
2. Double-click the report column heading Remote NameRemote Name, to change the name to Call TypeCall Type .
3. Insert a new database field in the Details section. In the Insert Insert FieldField box, right-click the Call TypeCall Type field and drag the field to
the Details section under the Call Type column. Save your changes.
22
Copying a formula from one report to anotherCopying a formula from one report to another
In this example, we will copy the Average Speed of AnswerAverage Speed of Answer formula from the
Queue Period Statistics Workgroup Daily Detail
report, to the
Queue Period Statistics Service Level
Reports. Open both the QperiodDailyQueueActivity.rpt and the
QperiodIwrkgrpsvclvl.rpt templates in Crystal Reports.
Important Note
Before you begin, copy the report to a new working location, or from the FileFile menu, click Save AsSave As , and save the report under a
new name. You do not want to overwrite the standard CIC template.
1. In the QperiodDailyQueueActivity.rpt template, locate the Average Speed of AnswerAverage Speed o f Answer formula by right - clicking the field and
selecting Edit FormulaEdit Formula from the drop - down menu, as shown in the following figure.
Right-click the Average Speed of Answer formula and select edit formula from the menu.
2. Highlight the formula in the Formula Editor as shown below in the next figure, and press Ctrl+ CCtrl+C to copy.
3. Switch windows to the service level report template and add a new column header, Average Speed o f AnswerAverage Speed of Answer. Press Ctrl+VCtrl+V
to paste the formula into the DetailsDetails section under this new heading. Save your changes to your new report.
23

Merging ReportsMerging Reports
To merge two or more reports, copy fields and formulas as explained earlier in the section "Copying a formula from one report to
another topic." Remember, this is only possible if the reports query data from the same database tables.
Note
Merging reports or adding and copying formulas to Service Level reports can be tricky. Keep in mind there are multiple group
levels. The formulas will differ on each level because Crystal Reports requires a formula to be added and modified for each
grouping in order to properly calculate at each group level.
When you copy formulas to a new report, be sure to check if there are references to additional formulas or statistics. If so,
make sure these formulas or statistics are located in this new report.
24
Using Custom Columns in the LogsUsing Custom Columns in the Logs
In some cases, you might want to report on information that is captured but not reported on or stored permanently. To do this, you
will need to use the Custo m Columns Custom Co lumns feature of the
Call Detail Record Log
and
Queue Period Statistics Log
. Before using the
Custom Columns feature, study your tables in Interaction Administrator so that you can plan and design highly functional handlers.
Managing call attributesManaging call attributes
In this example of managing call attributes, we will add a custom value to the Call Detail Record Log. We will set our own call
attribute and assign values to this attribute.
Creating and assigning values to custom columns is a way of storing information with a call as it moves through the system, while
being processed by multiple handlers. Calls already have many attributes when they are created, including Call ID, Direction, and
Type.
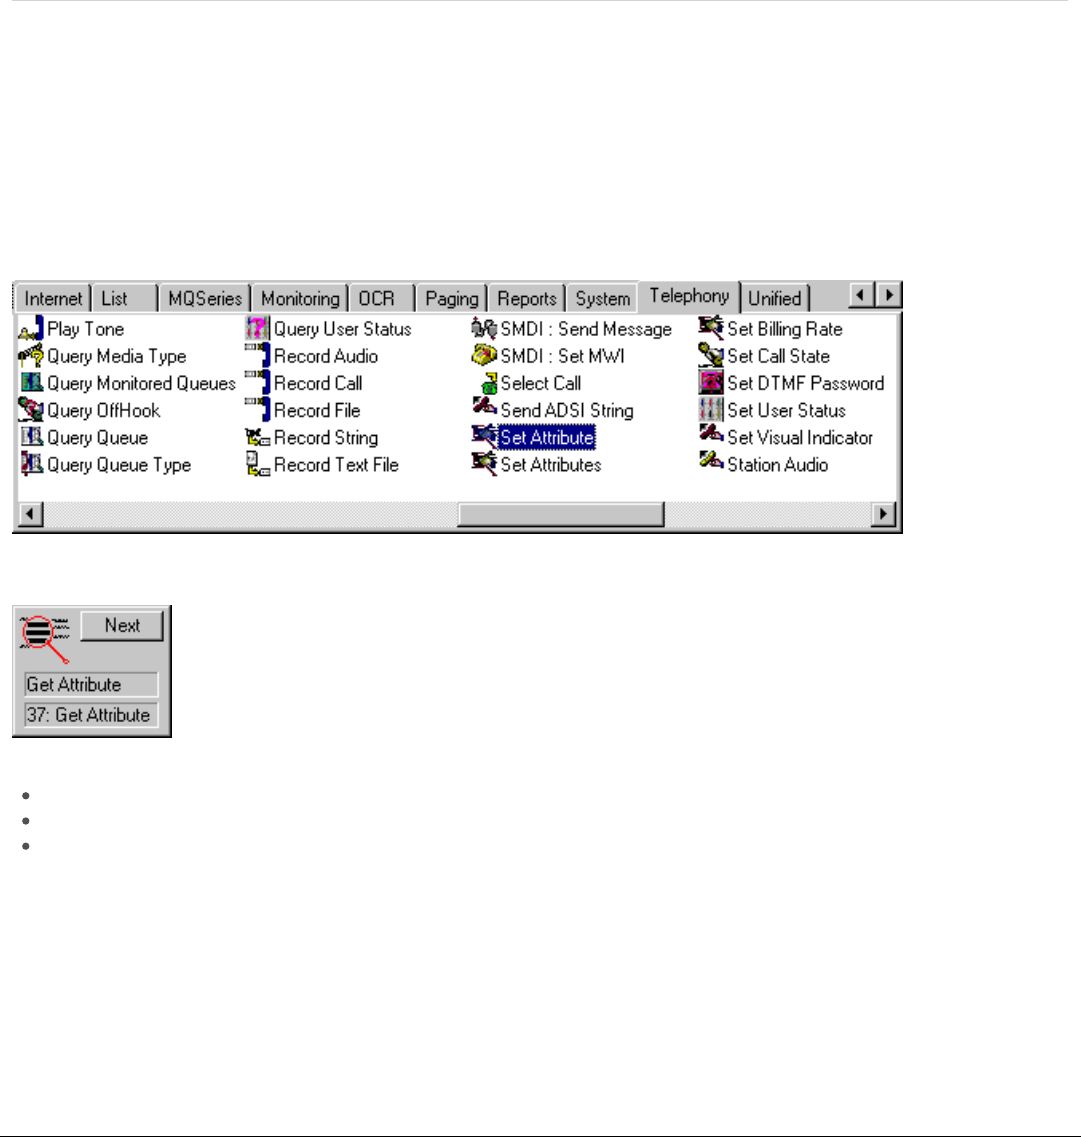
The tool we will use for creating and assigning call attributes is Set Attribute (a Telephony tool) shown in the following figure. Using
Set Attribute, you can create a new call attribute and assign a value to that attribute. You will use a Set Attribute step for each
attribute you want to assign. In this example we will use the Set Attribute tool in a monitor handler that starts when there is a new
incoming call.
First, open the handler in Interaction Designer and double - click the Set Attribute tool.
When you double-click the Set AttributeSet Attribute tool, Interaction Designer places the object for this tool in your handler.
Right-click the tool object, and select Properties. Enter the following information in the property page parameters:
Enter the Call Attribute NameCall Attribute Name in the Inputs properties page.
Enter the Call Attribute ValueCall Attribute Value in the Inputs properties page.
Click OKOK to save your changes.
You have now created and assigned a new call attribute. Next, put the variable in scope for this new call attribute by using Get
Attribute.
Step One: Interaction Designer - Set the Values of Custom Call AttributesStep One: Interaction Designer - Set the Values of Custom Call Attributes
25
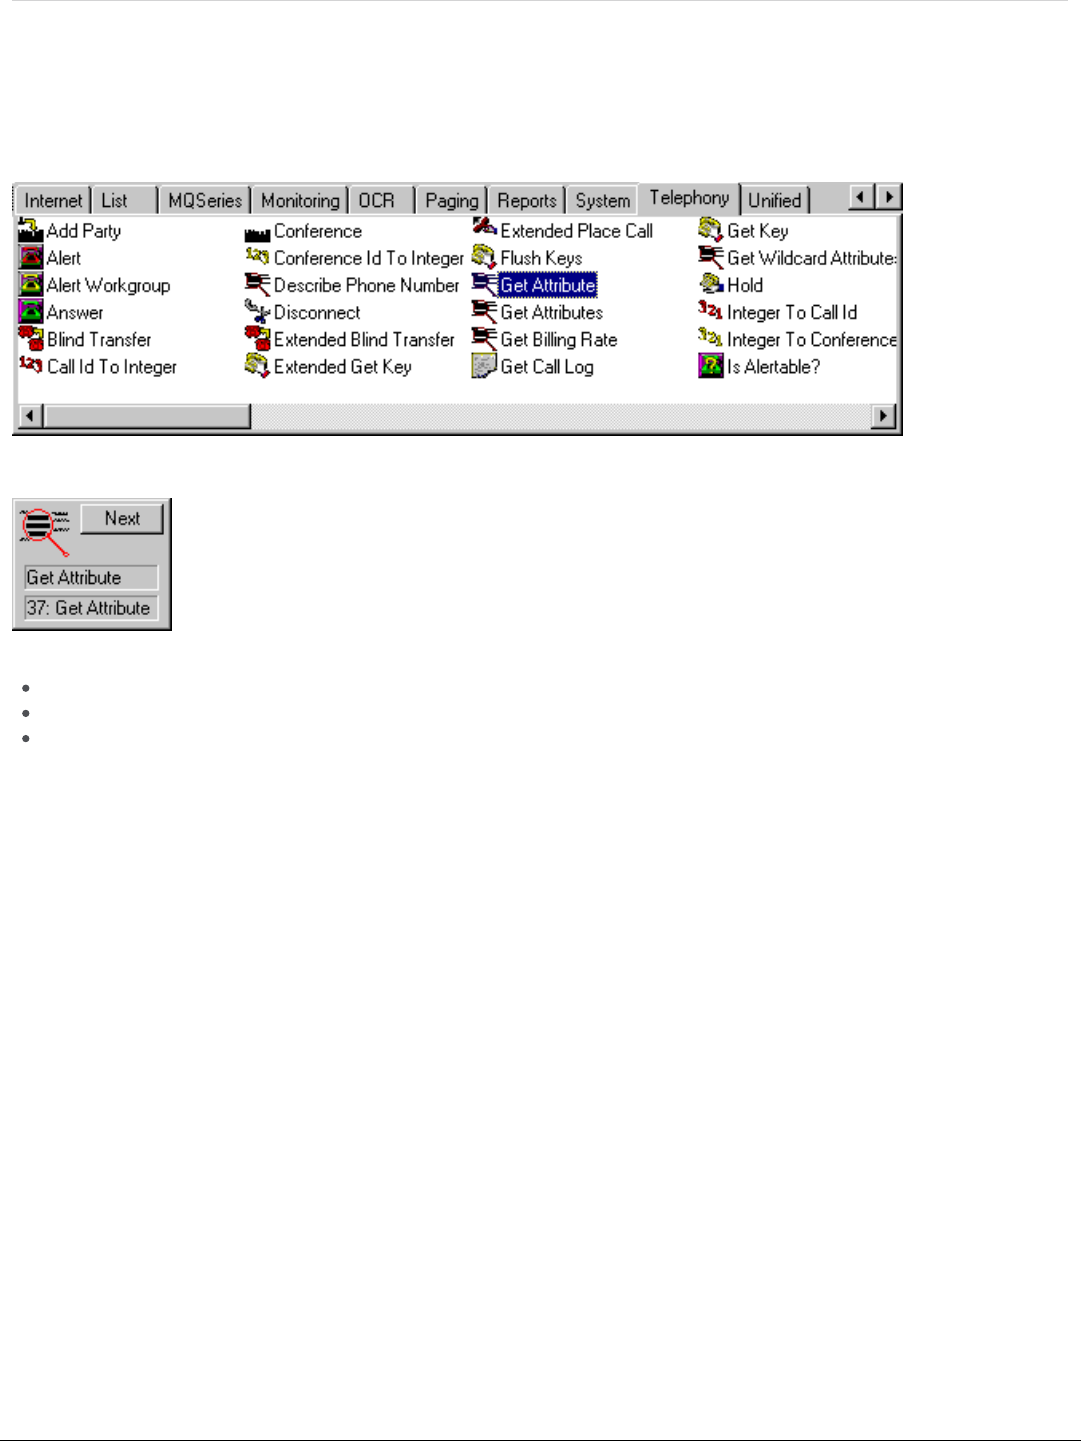
The tool we will use for getting or retrieving the new call attribute is Get AttributeGet Attribute , another Telephony tool as shown in the
following diagram. Using Get Attribute, you can retrieve the new call attribute value. You will use a Get Attribute step for each
attribute value you want to retrieve. We will use the Get Attribute tool in a monitor handler that starts after the call disconnects.
In Interaction Designer Telephony tools, double-click on the Get Get AttributeAttribute tool.
When you double-click the Get AttributeGet Attribute tool, Interaction Designer places the object for this tool in your handler.
Right-click the tool object, and select Pro pertiesPro perties .Enter the following information in the property page parameters:
Enter the Call Attribute NameCall Attribute Name in the Inputs properties page.
Enter the Call Attribute ValueCall Attribute Value in the Outputs properties page.
Click OKOK to save your changes.
You have now put the variable in scope and are ready to make your changes to the custom column in the Call Detail Record Log
object as detailed in the next step, Step Three.
Step Two: Interaction Designer - Get the Values of Custom Call AttributesStep Two: Interaction Designer - Get the Values of Custom Call Attributes
26
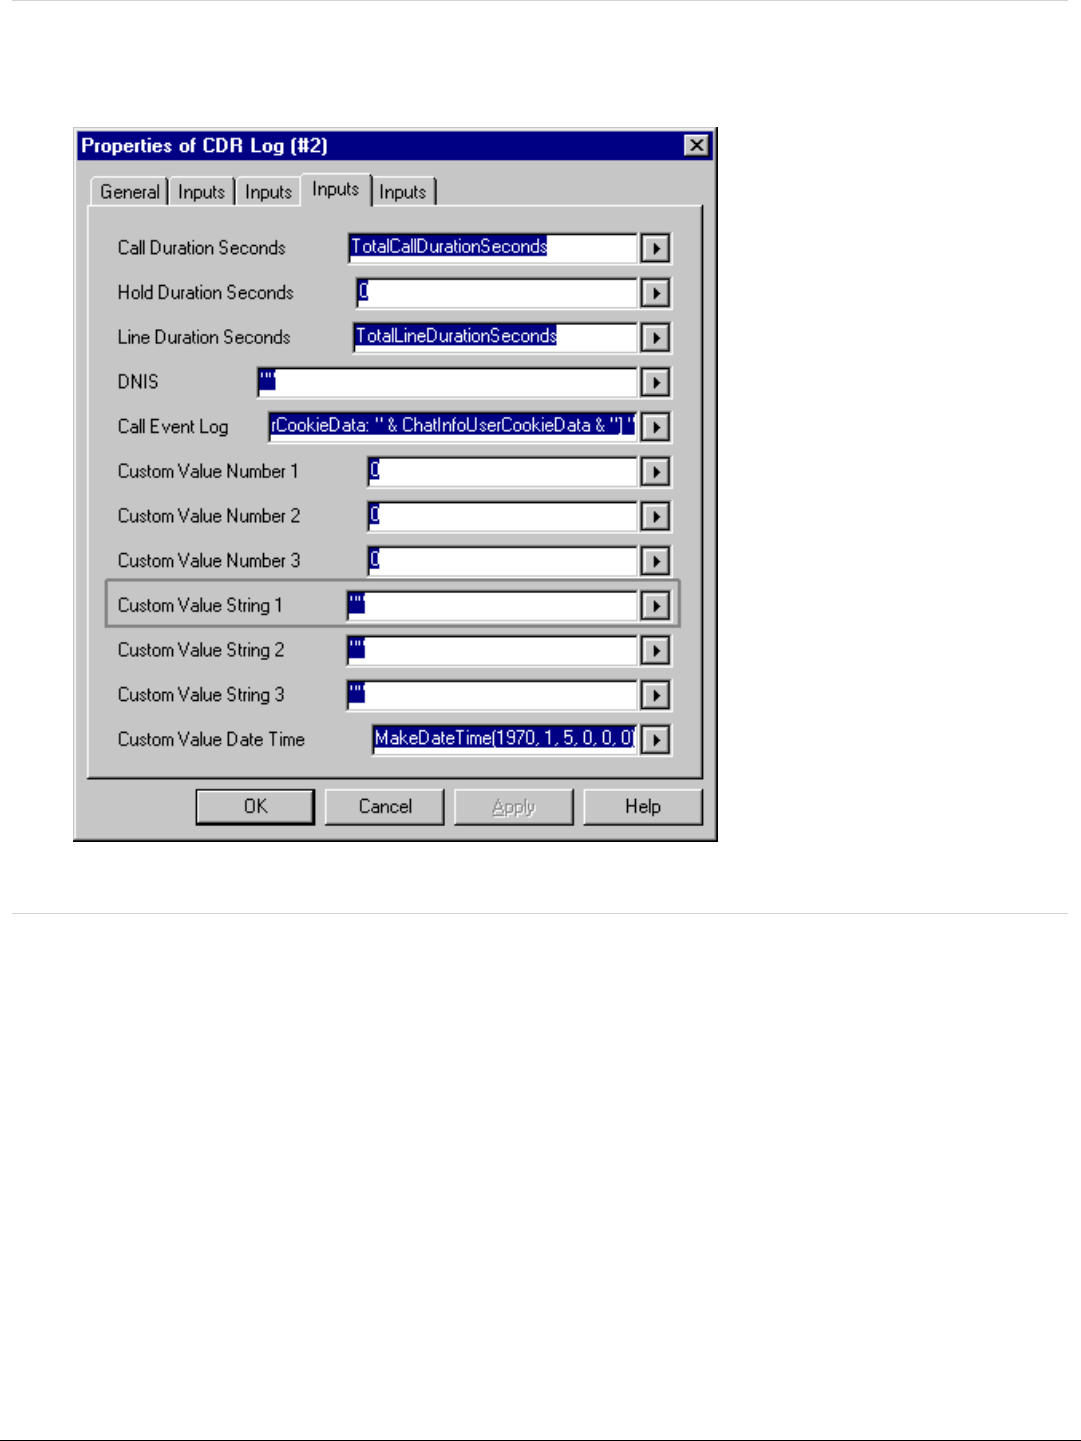
CIC's automated logging now assigns variables and adds values to custom columns using custom column bindings. You can view
the properties of the CDR log to see the inputs of the custom columns as shown in the following figure.
The Properties page of the CDR Log lists The Properties page of the CDR Log lists the inputs for your custo m columns.the inputs fo r your custom columns.
To report on the new call attribute, you can either add a field to an existing report template that shipped with CIC, or create a new
report template.
Using Crystal ReportsUsing Crystal Reports
1. Open the template you want to modify in Crystal Reports. After the template opens, make sure you are connected to the
desired table in the CIC database.
2. Save the template using a different file name. When modifying the report templates that ship with CIC, always save the
customized template with a different name. This is to safeguard your changes from future upgrades to the existing templates.
If you saved your changes in the shipping template, a future upgrade might overwrite your customizations.
3. From the Crystal Reports Database menu, choose Set LocationSet Location. The Set Location Dialog box appears, as shown in the
following figure. This dialog shows which log this template retrieves information. For example, if you opened the
USERDETAIL.RPT template, you would see that it requires the CallDetail_viw (Alias CallDetail) from i3_IC database.
Step Three: Assign Variables and Add Values to Custom ColumnsStep Three: Assign Variables and Add Values to Custom Columns
Step Four: Display your custom call attribute in a Crystal Report templateStep Four: Display your custom call attribute in a Crystal Report template
27
4. If you need to specify the location of the table, click Set Set Lo cationLo cation. The Choose SQL TableChoose SQL Table dialog box is displayed.
5. Specify the table your template requires, and click OKOK.
6. Verify that your template can view all the fields in the table. Since you are using a custom column in the table, make sure that
this column is available in Crystal Reports. From the Database menu, choose Verify Database. Now you can add the field that
contains the custom call attribute information.
7. From the InsertInsert menu, choose Database FieldDatabase Field. The Insert Fields dialog is displayed, as shown in the following figure. From
this dialog box, you can insert the field, or create a formula that performs calculations on the data within the field. See the
Crystal Reports documentation for more information on data manipulation.
The Insert Fields dialog box displays the columns of your table.
28

Displaying your custom call attribute in a new report templateDisplaying your custom call attribute in a new report template
Use the following procedure to create a new report template.
In Crystal Reports, choose New Repo rtNew Repo rt from the FileFile menu. The Report Expert is displayed, allowing you to base your report on
one of the provided styles, or some other existing report. If you want your report to look like the other reports that shipped with CIC,
then choose one of the reports in the Reports directory on the CIC server. If you want to create a report with a different look,
choose one of the pre - made report templates provided.
If you are not basing your report on one of the existing CIC report templates, use the Report Expert to pick your table and the
fields you want to display, and to configure your report.
If you are basing your report on one of the CIC report templates, check the following items to make this report unique:
TableTable Verify that you are pointing to the correct CIC table. You might need to remove the currently configured database from the list
of databases to which this report is connected. Then choose another table in the database to which the report is connected.
Fields and formulas Fields and formulas The fields and formulas in the CIC report template will not calculate correctly if you are connected to a
different database. Delete the existing fields from the report, leaving just the basic layout elements.
New filename New filename Be sure to save your report under a different name so you do not overwrite the report template you are using as a
guide for the new template.
29
Logging Custom PassthroughLogging Custom Passthrough
The tool step simply takes an ODBC SQL statement given and forwards it to the CIC logging service through a special log.
CIC logging service executes the statement and logs any errors in the normal manner. The service does not do any special
processing against this statement. The submitter is responsible for formatting the statement, and for escaping any quotes in any of
its strings. You can use the SQLStr function, as seen the Another LCP E xampleAnother LCP Example below, to format data automatically. You use this
escape function the same way you use it with the SQL tool step.
The special log that is used is numbered 9999, Custom PassthroughCustom Passthrough, and is inactive by default. Before the feature can be used,
the log must be activated and selected in the Interaction Administrator server configuration, as shown in the following figure.
Use this tool to modify data using an ODBC SQL statement or statements.The ODBC distinction indicates that this tool allows
escape sequences. CIC assumes this statement will run on the same server and on the same database. While the database utilities
can be used to modify data as well, we recommend using the Logging Custom Passthrough (LCP) tool when asynchronous writing
to a database is desired.
You can also run stored procedures using the LCP, with the limitations being no outputs.
For more information on reporting tools, see Appendix B: CIC Reporting Tools Design.
30
LCP ExampleLCP Example
By using the SQL INSERT and UPDATE commands with the LCP, you have expanded use of reporting data. For example, a small
accounting business that would like to charge clients for phone support could use the LCP to perform operations for the user so
that the client is charged for phone support. The charge could be for a specific type of service, or per minute for support.
Note Note A simple way of achieving this could be the use of custom columns, as covered in the section "Using Custom Columns",
earlier in this document. Although the LCP method is more complex in nature, it allows you to do more with your data.
To expand on this example, let us say the client can use a credit card to pay up - front for support. After the client's credit card
number is entered and an approval is obtained through a handler, use LCP to enter the approval number in your database using
INSERT. When the approval number is stored, move the caller into the support queue. When the state of the call is client_connected,
you can start charging for time. On call disconnect, you can call a sub - routine to finish handling the process. Use the LCP to do an
UPDATE to write to the database.
Using LCP in this case is ideal, because you do not need to query the data immediately. This provides a more reliable conduit for
the information.
Note Note You can wait until after the call is complete, and after you have performed the support service, to determine what to bill
the client. Because you will query the data after - not during - the call, you minimize the number of hits at any one time on the
database.
Another LCP ExampleAnother LCP Example
This example is based on capturing the times when someone switches a call to private using the PrivatePrivate Button on a CIC client.
When this occurs an event is sent for Call Objects called PrivateStartPrivateStart. You can monitor this event with the Call Monitor Initiator.
Every time this occurs CIC activates the initiator in StatServer, and inserts a row of data into a database.
A simple table to capture this data might contain the following information:
CallIDKey
Private start time
Private end time
You can use the LPC tool to create an insert statement that inserts data into a table.
"insert into CustomPrivateCallLog (CallIdKey, StartingDateTime, EndingDateTime) values (" &
SQLStr(CallAttriburte_CallIdKey) & ", " & SQLStr(DateTimeNow()) & ",NULL )"
Note Note Use the LCP to run any valid SQL statement, such as stored procedures or blocks of transact SQL. Remember, CIC
logging service does no preprocessing or filtering to the statements.
31

Custom CountersCustom Counters
You can create custom counters through the Advanced/Query Counter tool steps. For more information on this tool step, see the
Interaction Designer
online Help. To learn more about logging custom counters to the database, see "Custom Logging to Report
Tables" in the
PureConnect Data Dictionary
.
32

CIC Report Groups and Statistic Groups (STIDs)CIC Report Groups and Statistic Groups (STIDs)
CIC generates advanced statistics on interactions and reports on these statistics to provide you with advanced statistical reporting.
CIC enables this functionality by using report group and statistic group(STID) assignments.
In CIC, there are three statistical hierarchies implemented. These hierarchies are Wo rk group to Report Gro upWorkgroup to Repo rt Group, User toUser to
WorkgroupWorkgroup, and STID STID to Repo rt Groupto Report Group. StatServeralso collects statistics on the Report Group on each queue or STID. Read this
section on report groups and statistic groups, so that you can have a better understanding of CIC's statistical tracking concepts.
Note Note CIC uses report groups for the DNIS reporting feature. Make sure the DNIS server parameter in Interaction Administrator
is disabled - it is disabled by default - before you can use the report groups for another purpose.
Report GroupsReport Groups
In addition to categorizing calls as ACD or non-ACD, you can create your own custom groups called report groups. You can
designate specific queue items as belonging to a report group. Report Groups are useful for reporting on a subset of the queue
items within any container, including workgroup queues, user queues, and statistics groups. When StatServer generates statistics
for a container, it additionally generates statistics for all the queue items belonging to a report group. A queue item cannot belong
to more than one report group.
CIC assigns each queue item a report group through Interaction Designer's Assign Report Group tool. For example, you can create a
report group called Language, and then mark certain calls as belonging to either the Danish Report Group or the English Report
Group. When StatServer generates statistics for queues and statistics groups, it provides an additional list of all the calls in that
queue that belonged to the Danish Report Group, and an additional list of calls in that queue that belonged to the English Report
Group.
The Assign Repo rt GroupAssign Report Group tool in a handler assigns a queue item to a particular report group. The Query Report Gro upQuery Repo rt Group tool
returns the name of the report group to which a queue item belongs. A queue item cannot belong to more than one report group.
For more information on assigning and querying calls from report groups, see the Interaction Designer online documentation.
Assign Report GroupAssign Report Group
This tool assigns a call to a report group. By leaving the report group name field empty, you can remove the call from its current
report group.
Query Report GroupQuery Report Group
This tool returns the name of the report group to which the call belongs.
Note Note The report group you assign to a queue object as it enters a statistics container is the report group that is used for the
life of that object within the container. In other words, if a report group and a STID are both assigned to a call, the report group
should be assigned before the STID. If you assign the report group first, the STID will contain a report group appropriate to the
call. If the report group is assigned after adding the call to the STID, the report group will have no effect on the STID's data
collection.
Report Group ToolsReport Group Tools
33

Statistics GroupsStatistics Groups
An STID is a statistics tracking ID, or arbitrary string that represents a statistic group. CIC assigns each interaction an STID through
Interaction Designer's Assign Stats GroupAssign Stats Group tool.
STIDs are mechanisms that can be used to collect data on calls regardless of where they reside. STIDs allow StatServer to
generate statistics about calls across all queues. CIC analyzes collections of related calls that reside on more than one queue. You
can flag a call as belonging to a statistics group, and the call remains a member of that statistics group even if it is placed on a
different queue. At the interval designated in Interaction Administrator, StatServer generates statistics for statistics groups along
with the workgroup queues and user queues.
This is a simplified example of what a STID can be used for, and it is representative of one of many uses of STIDs. As an example
of how statistics groups work, imagine that your call center receives calls on three separate toll free numbers. You want to
determine how well your agents are processing these calls, so you need a way of organizing the statistics information generated by
StatServer. Each time a call enters SystemIVRWorkgroup, you assign that call to one of three statistics groups, depending upon
which toll - free number the caller dialed. Unlike report groups, a call can belong to more than one statistics group. When StatServer
generates statistics information about all of the calls in CIC, it also lists statistics for the groups of calls belonging to each
statistics group. In other words, StatServer generates statistics information for all of the calls, then for the three separate statistics
groups.
The Assign Statistics Group tool in a handler assigns a queue item to a particular statistics group. The Query Statistics GroupQuery Statistics Group
tool returns a list of statistics groups to which a queue item belongs, and the Remove Statistics Gro upRemove Statistics Group tool removes a queue
item from a statistics group. A queue item can belong to more than one statistics group. For more information on assigning and
removing calls from statistics groups, see the Interaction Designer online documentation.
Assign Stats GroupAssign Stats Group
This tool assigns a call to a statistics group.
Query Stats GroupsQuery Stats Groups
This tool returns a list of all statistics groups to which a call belongs.
Remove Stats GroupsRemove Stats Groups
This tool removes a call from a statistics group.
Gathering StatisticsGathering Statistics
It is possible to accumulate certain call statistics on more than one queue, resulting in the sum of the queue data not being equal
to the sum of the call data.
Note Note We distinguish these statistics as call statistics and not as agent statistics because agent statistics or staffing
statistics do not require a call. This distinction helps differentiate the tAgenttAgent values from the other call values.
For example, using tAcwtAcw, nAcwCallsnAcwCalls , and tAcwCallstAcwCalls , time and counts accumulate as follows:
Time accumulates as tAcw when in an ACW status. If an agent places a call while in an ACW status, the call is included in
the nAcwCalls count. The duration of the time spent on that call, while in ACW status, or time of the ACD call on hold, is
included in the tAcwCalls time. If the ACD call terminates or the agent leaves the ACW status, the tAcwCall time stops
accumulating.
If an agent goes into the ACW status, all of the above is accumulated relative to the statistics hierarchy, Queue - STID - ReportQueue - STID - Report
Gro upGro up, of the last ACD call.
Note that logging out clears the last ACD call data, so it is possible for the agent to go into ACW without any record of a previous
ACD call to guide the accumulation of the data. In this case, the data is collected relative to all of the queues of which the agent is
a member, so it is possible to accumulate tAcw, tAcwCalls, and nAcwCalls on more than one queue.
Statistics Group ToolsStatistics Group Tools
34

Simply stated for STIDs:
If the statistic is associated with a call, the statistic is tracked to the STID.
Because agents are not members of STIDs, staffing numbers are not tracked.
STID summarySTID summary
35
Multi-site ReportingMulti-site Reporting
Multi-site configuration provides a distributed environment - one where multiple CIC servers are connected and can share
resources, such as users, workgroups, and queues. Multi - site configuration is an appropriate solution for a large customer's
global, enterprise, or business needs.
Multi-site reporting is available to you if you have multiple CIC servers at different sites that send report log output to a single
database server (for exceptions, see Option 3 below) via a LAN, WAN, or some other remote connection. When you have a central
SQL Server or Oracle machine to host all of the call center report logs, each call center or site can be uniquely identified in the
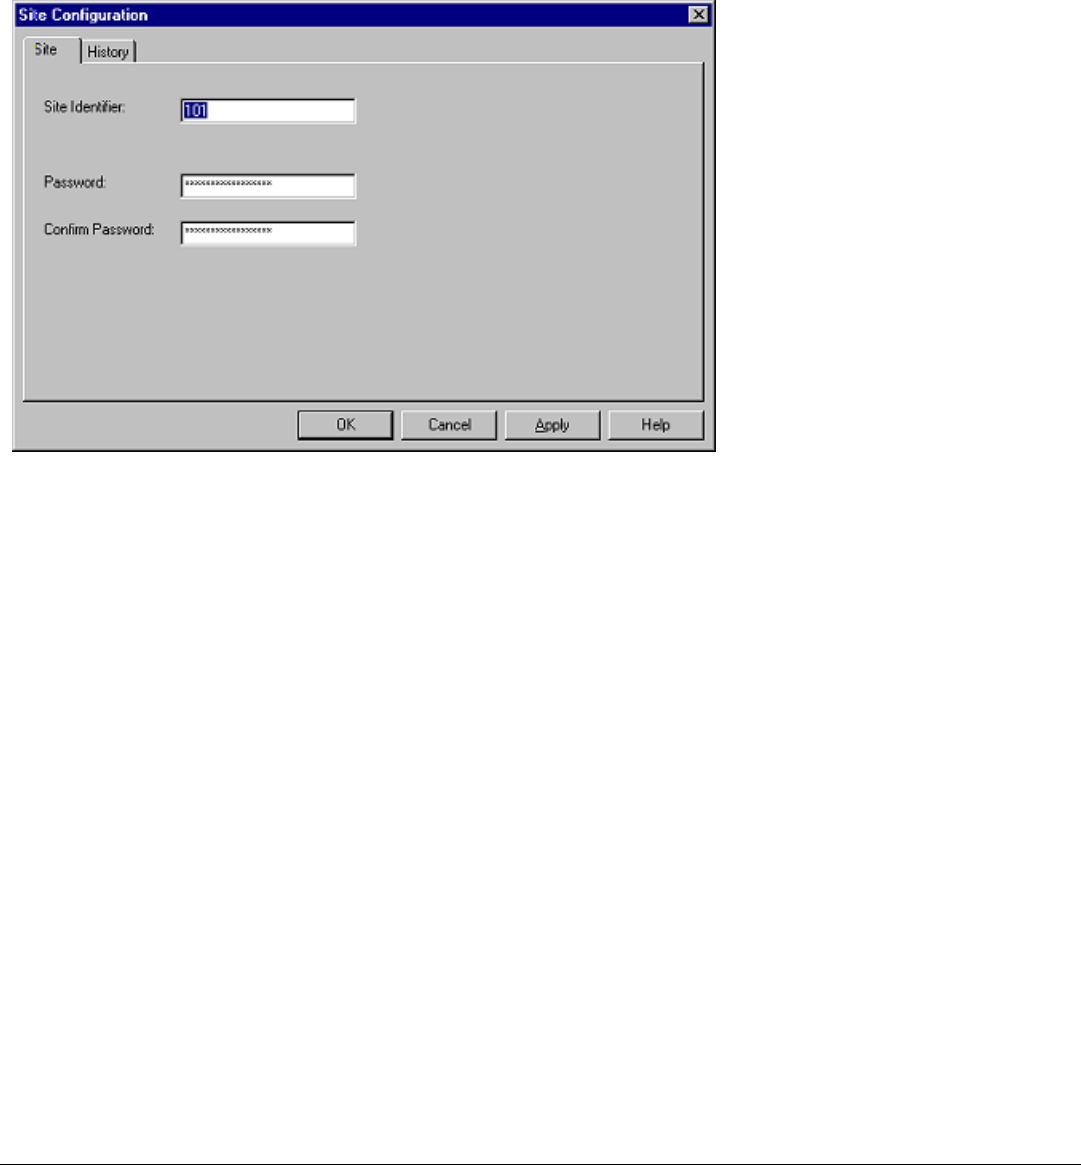
report log data by assigning a unique Site Identifier in the Site Configuration container, as shown in the following figure. Simply
double-click the container under your Site NameSite Name in the tree view in Interaction Administrator.
The Site Identifier in the Site Configuration container is used to identify reporting data from multiple sites.
All CIC report logs include a SiteIDSiteID field to identify the site for each row of data in the logs. This site ID number appears in all CIC
report logs and can be used to create custom queries that isolate data for this site. The default value for SiteID is 0 (zero), which
implies a single CIC server is writing data to the report logs. To correctly configure your CIC system to enable accurate site
reporting data, it is important to understand the importance of setting up site ID numbers for all sites.
Even if you have multiple sites, you can still report on all sites as a whole entity. On the other hand, you might want to report on
each site as a separate entity. In each case, certain requirements must be met to report accurately.
If you have multiple sites, consider the following guidelines to help decide on the type of reporting you require and the configuration
issues that need to be addressed.
Are your multiple CIC sites considered to be contiguous entities? In other words, are your sites each distinct in terms of user IDs,
workgroup names, line names, and line group names?
To answer this question with
yes
, the overall configuration has to resemble a single, large CIC configuration. If this is true, then the
resulting data from the systems can be easily mingled into a single database set of tables, and reporting can be run across the
whole set as if it were a single, large CIC entity. The existing reports use the single combined set of information without
modification. This is the only version of multiple-site shared reporting that is fully supported in CIC; please see Option 1 below. If
this is not true, then you will need to implement Option 2 or 3.
36

Option 1Option 1
Careful planning and configuration are necessary if you intend to use this option. We do not recommend this option as your first
choice, because you could encounter parsable data collisions, for example, from users or fields having the same names.
Send all data to a single CIC logging process and put it into common database tables.
Run reports across the entire tables as if the sites were a single, large CIC entity.
No customizations required. Be sure to confirm that all sites use the correct parameter configuration for the
ServerReportLogDataDestinationServerReportLogDataDestination, the common queue name.
Note Note It is a good idea to create separate site IDs for each CIC system. In the event your data overlaps, the site ID helps you
trace any problems.
37

Appendix A: How statistics are generated for each logAppendix A: How statistics are generated for each log
This appendix details how CIC generates the information written to logs. It details how information is generated for calls, users,
workgroups, lines, user status changes, and user status change intervals.
CallsCalls
Telephony Services generates a notification each time a call disconnects. Included in that notification is all of the attribute
information about that call object. Automated logging writes the information to the CallDetailRecord Log. Calls have an interaction
ID of 00.
ChatsChats
Chats are processed to the CallDetailRecord Log with an interaction ID of 11. Chats are generated through Web notifications. For
detailed information on Chats, see the Web Services technical reference, located in the Technical Reference Documents section of
the PureConnect Documentation Library.
Agent, Queue, Line and Line Group QueuesAgent, Queue, Line and Line Group Queues
The Statistics Server generates information for each User, Workgroup, Line, and Line Group queue and writes the information to the
appropriate log. User, Workgroup, and Statistics Group data are processed to the Queue Period Statistics tables by PMQ
(Persistent Message Queuing).
Note
User queue, Workgroup, Line, and Line Group information is collected at an interval that you specify in Interaction Administrator
Server Configuration dialog. The Queue/IVR reporting interval option on the Report Configuration page of the Server
Configuration dialog controls the frequency to which the Agent, Workgroup, and Statistics Group tables are written. The Line
reporting interval option controls the frequency to which the Line and Line Group tables are written. Both options are set at half
hour (1800 seconds) during the CIC server installation.
User Status ChangesUser Status Changes
The Statistics Server generates information on agent (user) availability, when an agent's status is changed, and writes the
information to the AgentActivity Log.
38

Appendix B: CIC Reporting Tools DesignAppendix B: CIC Reporting Tools Design
This appendix details how CIC allows the automation of reporting tasks through handler steps.
IntroductionIntroduction
The report tools are extensions of the CIC reporting system and allow the automation of reporting tasks through handler steps.
These tools execute the I3RunCrReport executable from within the IP environment and pass the parameters required for execution
via a named pipe. The tool steps operate synchronously and wait for a code returned from the report execution via the named pipe.
In order to limit the impact of the reports in CIC, only five (5) instances of the I3RunCrReport executable are allowed to be running
at any point in time from IP report tools. This is accomplished by use of a semaphore that counts the number of instances being
executed. If five instances are already executing, the sixth (6
th
) reporting thread in IP will wait up to 10 minutes for a previous
instance to terminate. If one does not terminate and free the semaphore before the timeout of 10 minutes, the waiting report thread
will log an error message and fail.
If an instance of a report takes longer than the timeout of ten (10) minutes to execute, it will be terminated, and an error message
will be logged. This behavior is intended to keep long running reports from degrading system performance, and to catch zombie
processes that might be blocked on a window waiting for user input. This precaution must be taken because some types of errors
will cause the Crystal, or ODBC subsystems to display a dialog box error message, which blocks the process completions.
39
Overview of ToolsOverview of Tools
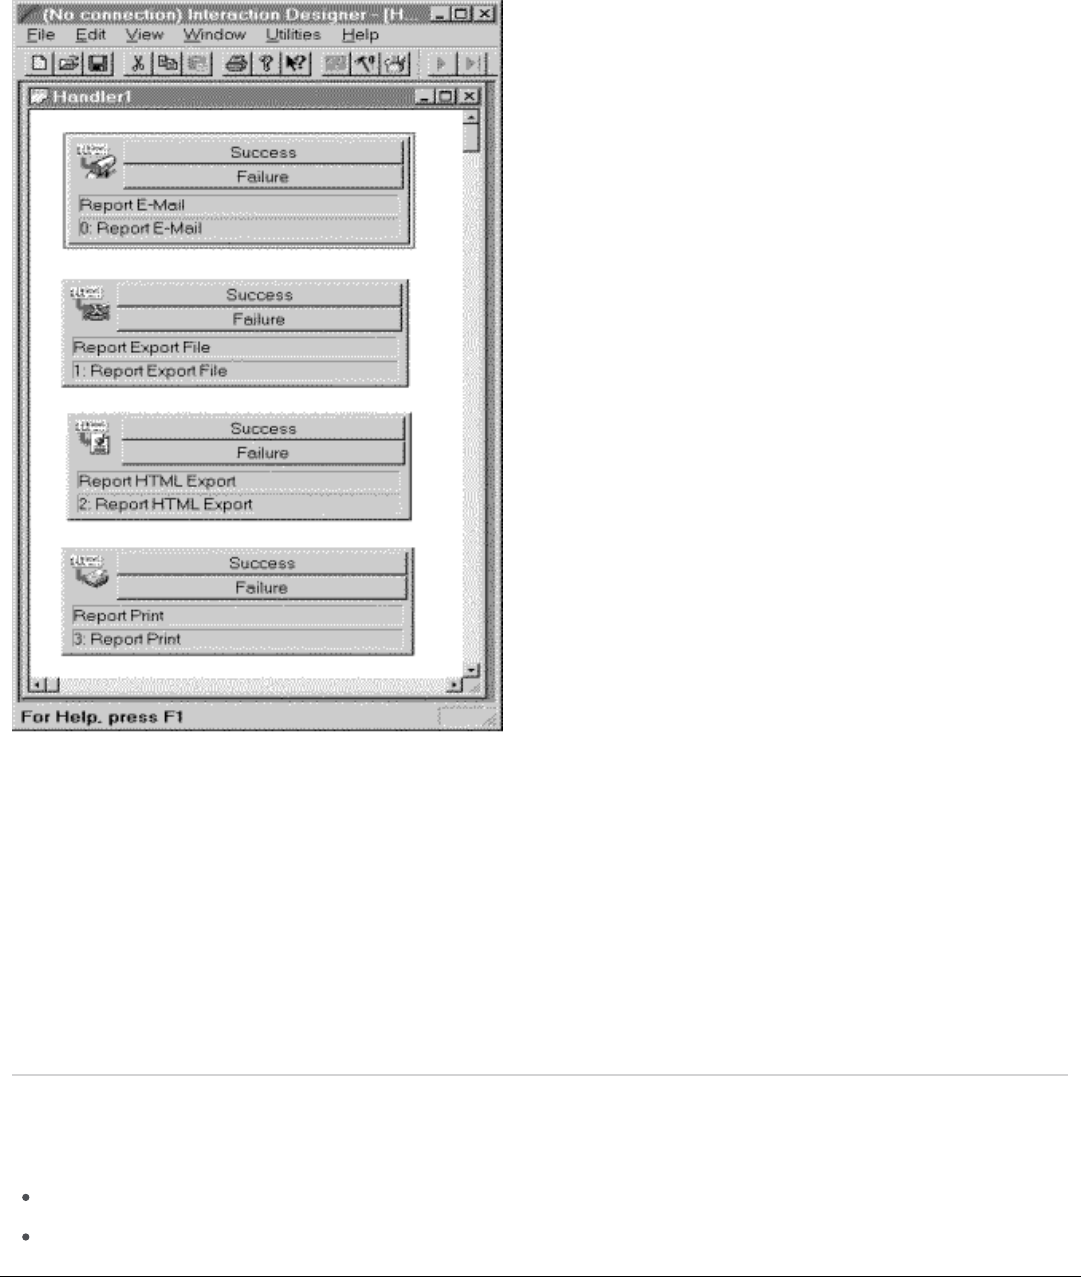
There are four tools to cover a range of report output options. Simple printing can be accomplished using the Report Print tool.
Simple exporting can be accomplished with the Report Export File tool. Exporting to HTML and exporting to an e-mail message are
more complex options, and require a special tool for each operation. These are the Report e-mail tool, and Report HTML export
tool.
Each of these tools operates by taking a report name as defined in Interaction Administrator, and four parameter list pairs, plus any
special parameters. The four parameter list pairs are String, Date Time, Number, and Boolean pair lists. A pair consists of a string
list that specifies the name of the user parameter, and the matching list contains the value to be used in the report.
Any parameter that is defined for the report in Interaction Administrator as a USER supplied value must have a matching value
supplied in the parameters pairs, or the report cannot be executed.
The remaining special parameters are specific to the type of export being performed.
Common ParametersCommon Parameters
Many of the parameters used by the tools are similar. Report Name is required for each report tool to determine the report that will
be executed. The following table is an explanation of the parameter types, the allowed values, and general use.
Some reports might export with a loss of formatting, although the reports do not exhibit a loss of information. The following are
examples of known formatting issues that occur when you export an CIC report:
Microsoft Wo rd Do cument E xport TypeMicro soft Word Document Export Type
There are occasional differences in precision. For example, numbers shown as "1" in the report preview might be displayed as
"1.00" in the Word document.
Known Export LimitationsKnown Export Limitations
40
Occasionally, a blank (blank, other than the header) page is at the beginning of the report before the actual data starts.
Graphs are usually cut off at the bottom (the footer overlays the graph).
With some extra wide reports, the export mis-aligns the columns, that is, it merges two separate lines into one line. We have
seen this occur with the Line Activity Summary by Line report.
Times might show up as "A" and "P" instead of "AM" and "PM" as they are shown in the preview.
XLS Expo rt TypeXLS Expo rt Type
Version 8.0e with default special options
Graphics (graphs and logos) never show up.
Columns might not align. For example, Line Activity Summary by Line report shows the Fro m:From: text object in column A while the
?StartLineGro up?StartLineGro up parameters are listed in column B.
Export might not justify correctly. The DNIS Detail report, for example, right-justifies the Call DurationCall Duration and Hold Hold TimeTime
columns, whereas it centers these columns in the RPT, PDF, and DOC export versions.
You might see the same differences in precision as listed above in the Microsoft Word Document Export Type. Also, the export
inserts thousands separators, such as 1,000.
XLS Export Type
Parameters
Input Allowed Values Explanation
Repo rtReport
NameName
Identifier Name of Report configured in Interaction Administrator This is the report definition
that will be used to
processes the requested
report.
ExportExport
TypeType
Acrobat Format (PDF), Character - separated values, Comma - separated
values (CSV), Crystal Reports (RPT), Crystal Reports(RPT), Data Interchange
Format (DIF), Excel 5.0 (XLS), Excel 5.0 (XLS) Extended, Excel 7.0 (XLS), Excel
7.0 Extended (XLS), Excel 8.0 (XLS), Excel 8.0 Extended (XLS), HTML 3.2,
HTML 4.0 (DHTML), Lotus 1 - 2 - 3 (WK1), Lotus 1 - 2 - 3 (WK2), Lotus 1 - 2 - 3
(WKS), ODBC, Paginated Text, Record style (columns of values), Report
Definition, Rich Text Format (RTF), Tab - separated text, Tab - separated
values, Text, Word for Windows document, XML.
Note: We list file extensions in "()" above to give you an example of file
types. Do not enter the information contained in "()". For example, if you
want "Acrobat Format" you need to enter exactly that (without the
information in the "()". If you enter "Acrobat Format (PDF)", you will receive
an error.
Export format to be used
for output of report.
Mail Mail ToTo Textual List of Valid mail addresses for CIC as allowed by other e - mail
tools.
List of mail addresses to
receive exported report.
Carbo nCarbon
CopyCopy
Textual List of Valid mail addresses for CIC as allowed by other e - mail
tools.
List of mail addresses to
be copied on exported
report.
SubjectSubject Any text Text to be used as subject
of e - mail.
MessageMessage Any text Text to be used as the body
of e - mail.
StringString
ParameterParameter
NamesNames
List of Parameter Names List of strings specifying
the names of the string
user parameters for the
report.
StringString
ParameterParameter
ValuesValues
List of String values List of strings specifying
the value for each of the
parameters named in the
String Parameter Values
list. They must match 1 for
1 with the String Parameter
Names list.
41

DatetimeDatetime
ParameterParameter
NamesNames
List of Parameter Names List of strings specifying
the names of the datetime
user parameters for the
report.
DatetimeDatetime
ParameterParameter
ValuesValues
List of Datetime values List of datetimes
specifying the value for
each of the parameters
named in the Datetime
Parameter Names list.
They must match one for
one with the Datetime
Parameter Names list.
NumberNumber
ParameterParameter
NamesNames
List of Parameters Names List of strings specifying
the names of the number
user parameters for the
report.
Boo leanBoo lean
ParameterParameter
ValuesValues
List of Boolean values List specifying the values
of the Boolean parameters
for the report.
NumberNumber
ParameterParameter
ValuesValues
List of Number values List of numbers specifying
the value for each of the
parameters named in the
Number Parameter Names
list. They must match one
for one with the Number
Parameter Name list.
SpecialSpecial
ExportExport
OptionsOptions
Depending on export type, any of the following values separated by a
semicolon:
LinesPerPage=n
UseReportNumberFormat=0 or 1
UseReportDateFormat=0 or 1
StringDelimiter={character}
FieldDelimiter={character}
DSN={ODBC data source}
UID={logging in user id}
PWD={logging in password}
TABLE={export table}
ExcelColumnHeadings=0 or 1
ExcelConstColWidth=0 to n, where n is the constant column width. Default is
9.
ExcelTabularFormat=0 or 1
ExcelBaseAreaType={PAGEHEADER, PAGEFOOTER, REPORTHEADER,
REPORTFOOTER, GROUPHEADER GROUPFOOTER}
ExcelBaseAreaGroupNum=n where n is a group number
ExcelNoWorksheetFunc
When exporting to PDF, HTML, or RTF, users can optionally specify a starting
and ending page range.
List of special export
parameters used to control
export for special export
types.
42
ExportExport
File PathFile Path
NameName
Valid file path name File name with path. The
exact intent is dependent
on export type. ODBC
export will ignore this
parameter.
If no path is supplied, the
file will be placed in the CIC
work directory if one exits,
or the temp directory, or
the root of the C: drive.
HTMLHTML
DirectoryDirectory
and Fileand File
NameName
Valid file path name File name with path. The
exact intent is dependent
on export type. HTML
export types will use the
file name as the base name
for the HTML, and will put
any JPG file in the
associated directory with
the file.
If no path is supplied, the
file will be placed in the CIC
work directory if one exits,
or the temp directory, or
the root of the C: drive.
HTMLHTML
OutputOutput
TypeType
Valid HTML export type:
HTML 3.2 and HTML 4.0
Export type
PrinterPrinter
NameName
Valid name of printer accessible from server. Printer name used for
output. A UNC path might
be required to correct
address the printer if it is a
network printer.
If no printer name is
supplied, the default printer
will be used.
NumberNumber
of co piesof copies
Empty to 65000 Tells print engine number
of copies to print. Value
defaults to one if nothing is
supplied.
StartingStarting
outputoutput
pagepage
Empty or 1 to maximum number of pages in document Specifies the starting page
of output. If nothing is
supplied, 1 is assumed.
EndingEnding
outputoutput
pagepage
Empty or 1 to maximum number of pages in document. Specifies the ending page
of output. If nothing is
supplied then the last page
is assumed.
CollateCollate
FlagFlag
Empty, or true or false If empty, the printer will
collate by default.
43
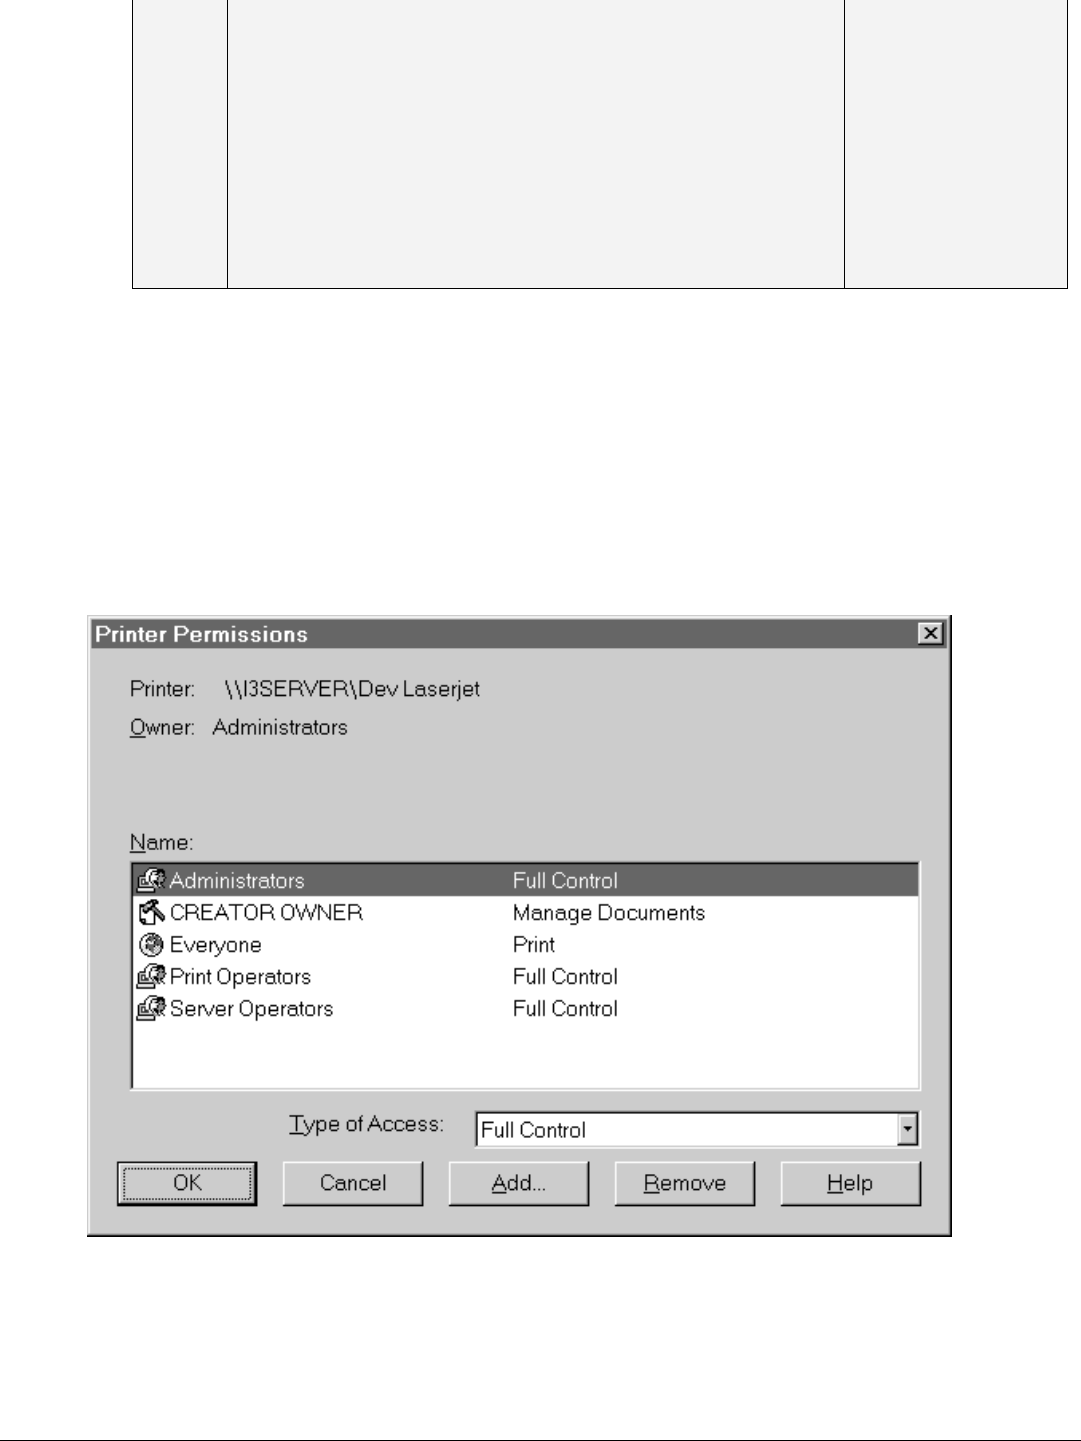
Print Print FileFile Valid path file name Forces output to be printed
to this file. This can be
used to create PostScript
output or to print to file
from the Fax Printer to
create a file that can be
processed for faxing.
If no path is supplied, the
file will be placed in the CIC
work directory if one exits,
or the temp directory, or
the root of the C: drive.
Report Print ToolReport Print Tool
The report print tool is used to output to a printer, or to file via the printer drivers. A blank printer name will output to the default
printer. If printing to file, no automated cleanup of the files will take place. Either automated or manual cleanup routines will have to
be executed to remove any files after they have been used.
When CIC runs as a service, care must be taken to ensure that the printers being used are accessible by the service. Services either
have to be given specific user privileges, or devices need to have printing rights granted to everyone to ensure that printing is
possible. Also, the full path to the printer as seen on the Printer Properties/Security/Permissions will likely have to be used unless
the printer is local.
The Printer Permissions dialog box shows specific user privileges.
44
Report Print Tool
Parameters
Input Allowed Values Explanation
Repo rtReport
NameName
Identifier Name of Report
configured in Interaction
Administrator
This is the report definition that will be used to process the requested report.
PrinterPrinter
NameName
Valid name of printer
accessible from server.
Printer name used for output. A UNC path might be required to correctly
address the printer if it is a network printer.
If no printer name is supplied, the default printer will be used.
Number Number ofof
copiesco pies
Empty to 65000 Tells print engine number of copies to print. Value defaults to one if nothing is
supplied.
StartingStarting
output pageoutput page
Empty or 1 to maximum
number of pages in
document
Specifies the starting page of output. If nothing is supplied, 1 is assumed.
EndingEnding
output pageoutput page
Empty or 1 to maximum
number of pages in
document.
Specifies the ending page of output. If nothing is supplied then the last page is
assumed.
CollateCollate
FlagFlag
Empty, or true or false If empty, the printer will collate by default.
StringString
ParameterParameter
NamesNames
List of Parameter Names List of strings specifying the names of the string user parameters for the report.
StringString
ParameterParameter
ValuesValues
List of String values List of strings specifying the value for each of the parameters named in the
String Parameter Values list. They must match 1 for 1 with the String Parameter
Names list.
DatetimeDatetime
ParameterParameter
NamesNames
List of Parameter Names List of strings specifying the names of the datetime user parameters for the
report.
DatetimeDatetime
ParameterParameter
ValuesValues
List of Datetime values List of datetimes specifying the value for each of the parameters named in the
Datetime Parameter Names list. They must match one for one with the
Datetime Parameter Names list.
NumberNumber
ParameterParameter
NamesNames
List of Parameters Names List of strings specifying the names of the number user parameters for the
report.
Boo leanBoo lean
ParameterParameter
ValuesValues
List of Boolean values List specifying the values of the Boolean parameters for the report.
NumberNumber
ParameterParameter
ValuesValues
List of Number values List of numbers specifying the value for each of the parameters named in the
Number Parameter Names list. They must match one for one with the Number
Parameter Name list.
Print Print FileFile Valid path file name Forces output to be printed to this file. This can be used to create PostScript
output or to print to file from the Fax Printer to create a file that can be
processed for faxing.
If no path is supplied, the file will be placed in the CIC work directory if one
exits, or the temp directory, or the root of the C: drive.
Report Export File ToolReport Export File Tool
45
Export any report file using this tool. The file path name supplied is used to create the output. If the output file already exists, it will
be replaced. The tool will do nothing to clean up files created for export. Either automated or manual cleanup routines will have to
be executed to remove any files after they have been used.
The I3RunCrReport.exe automatically registers as the processor of the RPT file extension. This allows an exported RPT file with
data to be opened and previewed simply by executing a shell open command on the file. A full copy of Crystal Reports is not
required for a recipient to preview an RPT file. They need only install printing support, and execute I3RunCrReport once to register
the extension.
Report Export File Tool
Parameters
Input Allowed Values Explanation
Repo rtReport
NameName
Identifier Name of Report configured in Interaction Administrator This is the report definition
that will be used to
process the requested
report.
ExportExport
TypeType
Acrobat Format (PDF), Character - separated values, Comma - separated values
(CSV), Crystal Reports (RPT), Crystal Reports (RPT), Data Interchange Format (DIF),
Excel 5.0 (XLS), Excel 5.0 (XLS) Extended, Excel 7.0 (XLS), Excel 7.0 Extended (XLS),
Excel 8.0 (XLS), Excel 8.0 Extended (XLS), HTML 3.2, HTML 4.0 (DHTML), Lotus 1 -
2 - 3 (WK1), Lotus 1 - 2 - 3 (WK2), Lotus 1 - 2 - 3 (WKS), ODBC, Paginated Text,
Record style (columns of values), Report Definition, Rich Text Format (RTF), Tab -
separated text, Tab - separated values, Text, Word for Windows document.
NoteNote We have listed file extensions in "()" to give you an example of file types. Do
not enter the information contained in "()". For example, if you want "Acrobat
Format" you need to enter exactly that (without the information in the "()". If you
enter "Acrobat Format (PDF)", you will receive an error.
Export format to be used
for output of report.
StringString
ParameterParameter
NamesNames
List of Parameter Names List of strings specifying
the names of the string
user parameters for the
report.
StringString
ParameterParameter
ValuesValues
List of String values List of strings specifying
the value for each of the
parameters named in the
String Parameter Values
list. They must match 1 for
1 with the String Parameter
Names list.
DatetimeDatetime
ParameterParameter
NamesNames
List of Parameter Names List of strings specifying
the names of the datetime
user parameters for the
report.
DatetimeDatetime
ParameterParameter
ValuesValues
List of Datetime values List of datetimes
specifying the value for
each of the parameters
named in the Datetime
Parameter Names list.
They must match one for
one with the Datetime
Parameter Names list.
NumberNumber
ParameterParameter
NamesNames
List of Parameters Names List of strings specifying
the names of the number
user parameters for the
report.
46
NumberNumber
ParameterParameter
ValuesValues
List of Number values List of numbers specifying
the value for each of the
parameters named in the
Number Parameter Names
list. They must match one
for one with the Number
Parameter Name list.
SpecialSpecial
ExportExport
OptionsOptions
Depending on export type, any of the following values separated by a semicolon:
LinesPerPage=n
UseReportNumberFormat=0 or 1
UseReportDateFormat=0 or 1
StringDelimiter={character}
FieldDelimiter={character}
ExcelColumnHeadings=0 or 1
ExcelConstColWidth=0 to n, where n is the constant column width. Default is 9.
ExcelTabularFormat=0 or 1
ExcelBaseAreaType={PAGEHEADER, PAGEFOOTER, REPORTHEADER,
REPORTFOOTER, GROUPHEADER GROUPFOOTER}
ExcelBaseAreaGroupNum=n where n is a group number
ExcelNoWorksheetFunc
List of special export
parameters used to
control export for special
export types.
ExportExport
File PathFile Path
NameName
Valid file path name File name with path. The
exact intent is dependent
on export type. ODBC
export will ignore this
parameter.
If no path is supplied, the
file will be placed in the
CIC work directory if one
exits, or the temp
directory, or the root of the
C: drive.
Report e-mail toolReport e-mail tool
Impo rtant NoteImportant No te
For CIC versions 2015 R2, or later, the reporting executable, ReportingE xecutable.exeRepo rtingE xecutable.exe , should be used in place of the Report
E-mail Tool. To run the reporting executable, see "Appendix C: Run an Interaction Reporter report or a Report Assistant report
using command line parameters" in the
CIC Scheduled Reports Installation and Configuration Guide.
The report e-mail tools export the report in the desired format, and then send the file to the Mail To and Carbon Copy (CC) list. All
temp files created in the process are automatically cleaned up.
For the report e-mail tool, enter e-mail addresses in typical SMTP format, for example, JohnDo[email protected]m. You can also enter e-
mail addresses in the format specified in the Address field of the user's Mailbox Selection window. This allows you to be more
explicit about which transport to use.
Note
If you are using multiple e-mail servers with CIC and you want a specific e-mail server to deliver a message to a recipient,
specify the recipient using the native format for that e-mail server.
47
Report e - mail tool
Parameters
Input Allowed Values Explanation
Repo rtReport
NameName
Identifier Name of Report configured in Interaction Administrator This is the report definition
that will be used to
processes the requested
report.
ExportExport
TypeType
Acrobat Format (PDF), Character - separated values, Comma - separated values
(CSV), Crystal Reports (RPT), Crystal Reports (RPT), Data Interchange Format (DIF),
Excel 5.0 (XLS), Excel 5.0 (XLS) Extended, Excel 7.0 (XLS), Excel 7.0 Extended
(XLS), Excel 8.0 (XLS), Excel 8.0 Extended (XLS), HTML 3.2, HTML 4.0 (DHTML),
Lotus 1 - 2 - 3 (WK1), Lotus 1 - 2 - 3 (WK2), Lotus 1 - 2 - 3 (WKS), Paginated Text,
Record style (columns of values), Report Definition, Rich Text Format (RTF), Tab -
separated text, Tab - separated values, Text, Word for Windows document.
Note: We have listed file extensions in "()" to give you an example of file types. Do
not enter the information contained in "()". For example, if you want "Acrobat
Format" you need to enter exactly that (without the information in the "()". If you
enter "Acrobat Format (PDF)", you will receive an error.
Export format to be used
for output of report. ODBC
types are excluded from
this list.
Mail Mail ToTo Textual List of Valid mail addresses for CIC as allowed by other e - mail tools. List of mail addresses to
receive exported report.
Carbo nCarbon
CopyCopy
Textual List of Valid mail addresses for CIC as allowed by other e - mail tools. List of mail addresses to
be copied on exported
report.
SubjectSubject Any text Text to be used as subject
of e - mail.
MessageMessage Any text Text to be used as the
body of e - mail.
StringString
ParameterParameter
NamesNames
List of Parameter Names List of strings specifying
the names of the string
user parameters for the
report.
StringString
ParameterParameter
ValuesValues
List of String values List of strings specifying
the value for each of the
parameters named in the
String Parameter Values
list. They must match 1 for
1 with the String Parameter
Names list.
DatetimeDatetime
ParameterParameter
NamesNames
List of Parameter Names List of strings specifying
the names of the datetime
user parameters for the
report.
DatetimeDatetime
ParameterParameter
ValuesValues
List of Datetime values List of datetimes
specifying the value for
each of the parameters
named in the Datetime
Parameter Names list.
They must match one for
one with the Datetime
Parameter Names list.
48
NumberNumber
ParameterParameter
NamesNames
List of Parameters Names List of strings specifying
the names of the number
user parameters for the
report.
NumberNumber
ParameterParameter
ValuesValues
List of Number values List of numbers specifying
the value for each of the
parameters named in the
Number Parameter Names
list. They must match one
for one with the Number
Parameter Name list.
SpecialSpecial
ExportExport
OptionsOptions
Depending on export type, any of the following values separated by a semicolon:
LinesPerPage=n
UseReportNumberFormat=0 or 1
UseReportDateFormat=0 to n, where n is the constant column width. Default is 9.
StringDelimiter={character}
FieldDelimiter={character}
ExcelColumnHeadings=0 or 1
ExcelConstColWidth=0 or 1
ExcelTabularFormat=0 or 1
ExcelBaseAreaType={PAGEHEADER, PAGEFOOTER, REPORTHEADER,
REPORTFOOTER, GROUPHEADER GROUPFOOTER}
ExcelBaseArea=n where n is a group number and
ExcelBaseAreaType=GROUPHEAER or GROUPFOOTER
ExcelNoWorksheetFunc
List of special export
parameters used to control
export for special export
types.
49
Report HTML Export ToolReport HTML Export Tool
The HTML export tool creates an HTML export file that contains a single running body of the report with a single footer and a single
header section. Obviously, this type of export is applicable to certain applications.
The HTML Directory and File name are used to create a directory, and an HTML file contains the body of the report. Also placed into
the directory are any related JPG files that must be generated to support graphics in the report. The directory used must be unique
to the report, as this is the only way to guarantee that these supporting JPG files will not collide with JPG files from other exports.
Report HTML Export Tool
Parameters
Input Allowed Values Explanation
Repo rtReport
NameName
Identifier Name of Report
configured in Interaction
Administrator
This is the report definition that will be used to processes the requested report.
HTMLHTML
Output TypeOutput Type
Valid HTML export type:
HTML 3.2, HTML 4.0
(DHTML)
Export type
HTMLHTML
DirectoryDirectory
and Fileand File
NameName
Valid file path name File name with path. The exact intent is dependent on export type. HTML export
types will use the file name as the base name for the HTML, and will put any JPG
file in the associated directory with the file.
If no path is supplied, the file will be placed in the CIC work directory if one exits,
or the temp directory, or the root of the C: drive.
StringString
ParameterParameter
NamesNames
List of Parameter Names List of strings specifying the names of the string user parameters for the report.
StringString
ParameterParameter
ValuesValues
List of String values List of strings specifying the value for each of the parameters named in the String
Parameter Values list. They must match 1 for 1 with the String Parameter Names
list.
DatetimeDatetime
ParameterParameter
NamesNames
List of Parameter Names List of strings specifying the names of the datetime user parameters for the
report.
DatetimeDatetime
ParameterParameter
ValuesValues
List of Datetime values List of datetimes specifying the value for each of the parameters named in the
Datetime Parameter Names list. They must match one for one with the Datetime
Parameter Names list.
NumberNumber
ParameterParameter
NamesNames
List of Parameters
Names
List of strings specifying the names of the number user parameters for the report.
NumberNumber
ParameterParameter
ValuesValues
List of Number values List of numbers specifying the value for each of the parameters named in the
Number Parameter Names list. They must match one for one with the Number
Parameter Name list.
50
Special Export OptionsSpecial Export Options
Several of the export types allow special parameter options to control the export process. The options were basically outlined in
the common parameter sections, but more detail is needed to use them effectively.
The following is a table of the export types, and the special export options that can be used with these export types.
Special Export Options
Parameters
Export Types Special Parameters Supported
All All Micro soft Excel ExtendedMicrosoft Excel E xtended ExcelColumHeadings=0 or 1
ExcelConstColWidth=0 to n, where n is the constant column
width. Default is 9.
ExcelTabularFormat=0 or 1
ExcelBaseAreaType={PAGEHEADER, PAGEFOOTER,
REPORTHEADER, REPORTFOOTER, GROUPHEADER
GROUPFOOTER}
ExcelBaseAreaGroupNum=n where n is a group number and
ExcelNoWorksheetFunc
Paginated Paginated TextText LinesPerPage=n
Text, Text, Tabbed Text, Comma Separated Text, TabTabbed Text, Comma Separated Text, Tab
Separated Text, Character Separated Text, Character Separated Text, Records,Separated Text, Reco rds,
DIFDIF
UseReportNumberFormat=0 or 1
UseReportDateFormat=0 or 1
Character Character Separated TextSeparated Text StringDelimiter={character}
FieldDelimiter={character}
ODBCODBC DSN={ODBC data source}
UID={logging in user id}
PWD={logging in password}
TABLE={export table}
Explanation of Special OptionsExplanation of Special Options
Any special option that takes a value must be followed immediately by an "=" and the values. Example ExcelConstColWidth=15. If
there are any spaces, tabs, or other characters between the "=" on either size, the parameters is considered invalid.
ExcelColumnHeadingsExcelColumnHeadings
Default is off/false. If true, then the column headings from the Page Header or Report Header area will be used.
ExcelConstColWidthExcelConstColWidth
Default is off/false. If true, constant column widths will be enabled with a default width of nine (9).
ExcelTabularFormatExcelTabularFormat
Default is off/false. If true, a tabular format will be generated for a specified area of the report. A tabular format is one where the
data of the report is flattened into a row. The base area to be flattened is specified by the ExcelBaseArea and ExcelBaseAreaType.
ExcelBaseAreaType=(see ExcelBaseAreaType=(see o ptions)options)
Defines the base area to be used for tabular formatting. This will be some section of the Crystal reporting hierarchy. The possible
values are PAGEHEADER, PAGEFOOTER, REPORTHEADER, REPORTFOOTER, GROUPHEADER and GROUPFOOTER.
If no ExcelBaseAreaType is defined, the report detail section will be used as the tabular format area.
If the base area is a group header or group footer, the ExcelBaseAreaGroupNum identifies which of the group sections defines the
tabular base area.
51
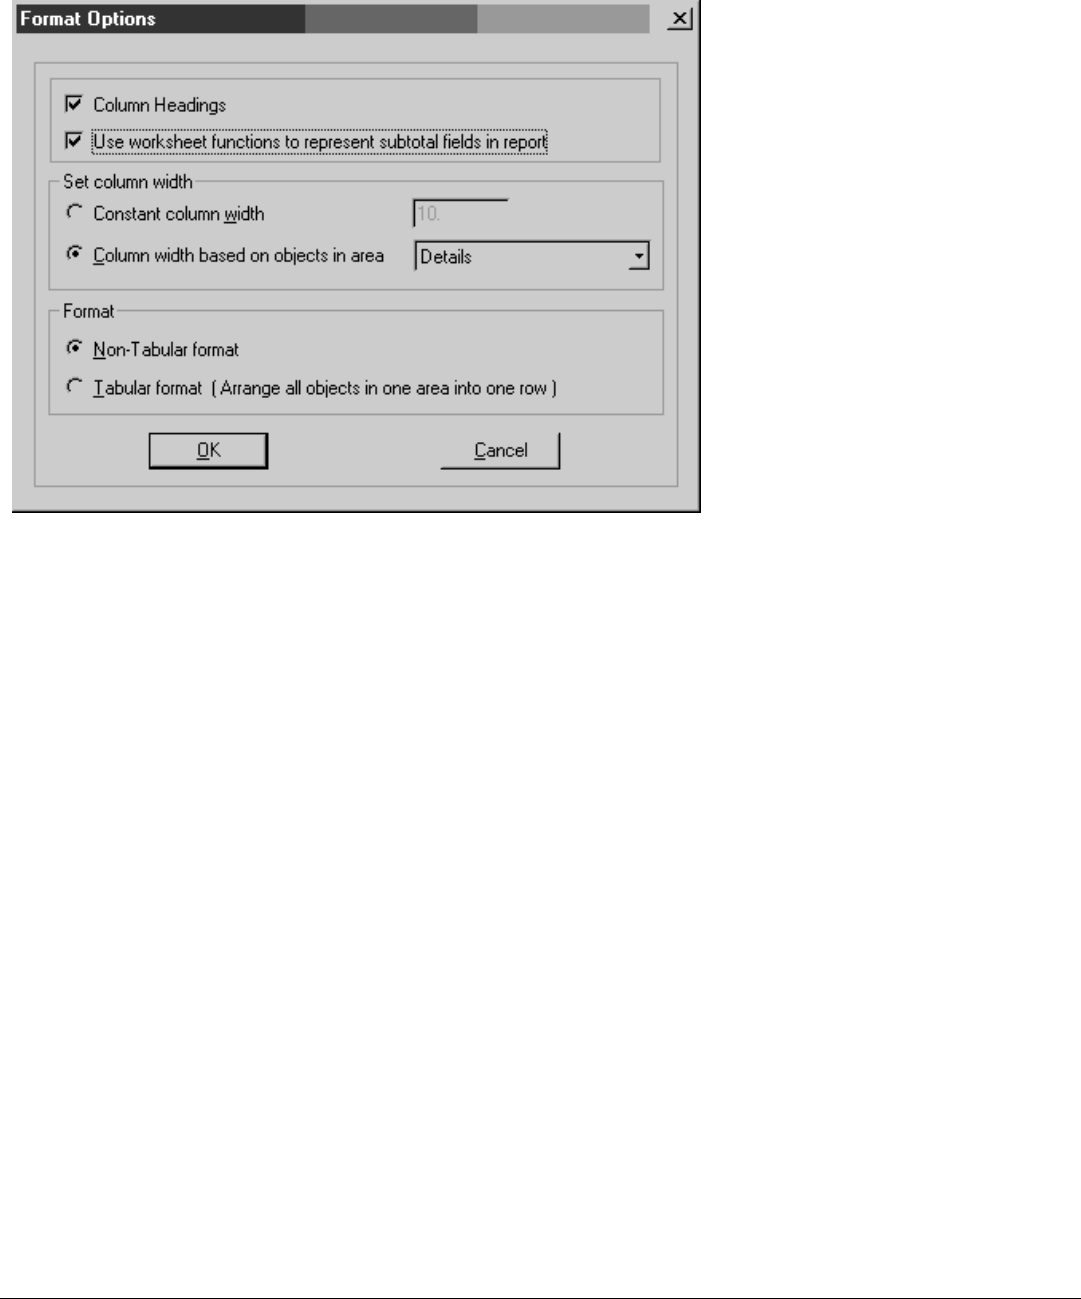
ExcelBaseAreaGroupNum=1 ExcelBaseAreaGroupNum=1 to nto n
If the ExcelBaseAreaType is GROUPHEADER or GROUPFOOTER, this defines the group that is to be used for the tabular format.
ExcelNo Wo rksheetFuncExcelNo Wo rksheetFunc
This is a new special option. It corresponds to the second option when exporting from Crystal's RPT designer:
If present, it uses Excel worksheet functions to represent subtotal fields in the exported report. If not present, it will not using them.
LinesPerPage=1 to n
For paginated export type, this sets the number of lines to be used for each page of output. The default value is 66.
UseReportNumberFormatUseReportNumberFormat
The default value for this is false. If true the report number formatting will be used for numeric output values in the export. If false,
then the system default numeric formats as defined by the Locale settings will be used.
UseReportDateFo rmatUseReportDateFo rmat
The default value for this is false. If true, the report date and time formatting will be used for date and time output values in the
export. If false, then the system default date and time formats as defined by the Locale settings will be used.
StringDelimiter={character}StringDelimiter={character}
Specified the single character that will be used as a delimiter at the beginning and end of a string value. The default is a double
quote.
FieldDelimiter={character}FieldDelimiter={character}
Specifies the single character that will be used to separate fields in the export. The default value is a comma.
DSN={ODBC data source}DSN={ODBC data source}
Specifies the ODBC data source name that will be used to connect to the database where the ODBC export should occur. This value
is not optional for ODBC exports. If not provided, the export will fail.
52

UID={logging in user id}UID={lo gging in user id}
User identifier for the data source specified in the DSN export options. This value might not be required if the ODBC source has
some other means of authenticating and connecting the user.
PWD={logging in passwo rd}PWD={logging in passwo rd}
User password to be used with the UID and DSN. This value might not be required if the ODBC source has some other means of
authenticating the connecting user.
TABLE ={export table}TABLE ={export table}
Destination table for the ODBC exports. This value is required for the export to succeed.
53

Apendix C: Reporting Terms GlossaryApendix C: Reporting Terms Glossary
Appendix C: Reporting Terms GlossaryAppendix C: Reporting Terms Glossary
AttributeAttribute
An attribute is a piece of information describing a queue item. Attributes are stored with the queue item and can be retrieved with
the Get Attribute tool. Some of the attributes for a call are CallId, LineName, and CallDirection. See Call Attribute in the Interaction
Designer online help for a complete listing of call object attributes.
Interaction AdministratorInteraction Administrator
Interaction Administrator is the application you use to customize and configure the many features in CIC. You'll use Interaction
Administrator almost every time you customize or configure reports.
Lo gging HandlersLogging Handlers
The handlers that write information to the logs. One such logging handler is CallDisconnectMonitor that writes call information to
the Call Detail Record log when a call disconnects.
Lo gs (also called Repo rt Lo gsLo gs (also called Repo rt Lo gs and CIC Logs)and CIC Lo gs)
CIC logs hold statistical information calls, queues, and users. The report templates extract data from the logs when a user runs a
report. Report log tools in Interaction Designer are used to build handlers that route the specified system data into the actual report
log tables. Each report log defined in Interaction Administrator has its own report log tool.
CIC provides essential report logs that store all line, call, and user related CIC interaction data. In Interaction Administrator, these
report logs are identified with numbers, such as, 7, 8, and 20.
CIC Logging Service (E ICLo ggingU.exe)CIC Logging Service (E ICLo ggingU.exe)
The CIC logging service is the subsystem that manages the writing of data to the report logs. It can run as a service on the CIC
server, or as a standalone application on the CIC server. It uses the new Persistent Message Queue (PMQ). For detailed information
on PMQ, see the
Persistent Message Queuing (PMQ) Fact Sheet
in the Technical Reference Documents section of the PureConnect
Documentation Library. The latest versions of technical reference documents can also be downloaded from our PureConnect
Customer Care Web site.
Repo rt TemplatesRepo rt Templates
Report templates are shells for reports with links to columns in the CIC logs. When a CIC user runs a report, Crystal Report retrieves
information from a CIC log and calculates the statistical information from the report. A template for each report is located in the
IC_ReportsIC_Reports folder on the CIC server. They have a .rpt extension.
54
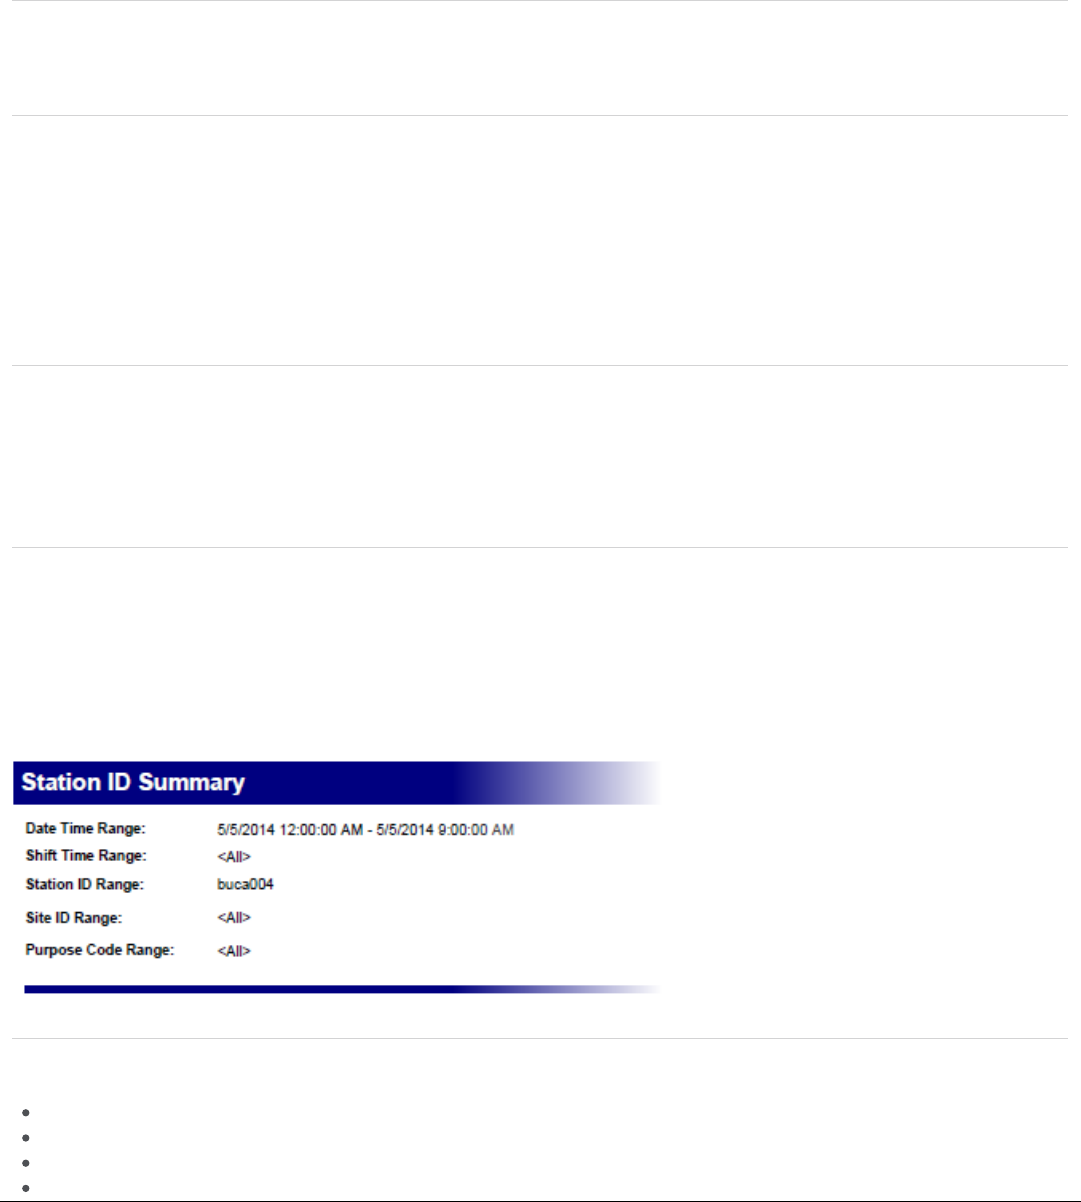
Appendix D: CIC Report Guidelines (Crystal Reports)Appendix D: CIC Report Guidelines (Crystal Reports)
This appendix provides the basic guidelines to be followed while creating crystal reports.
Text Font DefaultsText Font Defaults
These defaults apply to all sections of the reports, unless noted below.
Default margins OFF, all sides .25" (one quarter inch). This is found on the 'File|Page Margins' menu entry.
Body text: Arial 10pt, Arial 8pt on detail reports.
Row, Column Labels and Data: Arial 10pt Bold
Summary Labels and Data: Arial 10pt Bold
Group Separator Labels and Data: Arial 12pt Bold
Report Title Bar: Arial 16pt Bold.
Date: MM/DD/YY, No leading zeros.
Time: HH:MM XM, 12 hour clock.
Number Precision: 2 places where applicable.
Since Crystal Reports saves the default printer within the report file, use 'Radio Shack' printer driver 'Radio Shack JP500' during
design. This will avoid intersecting an existing driver, and force use of the station DEFAULT printer during testing.
Report (Page) HeaderReport (Page) Header
Text object, top border, bottom border.
Width should equal full-page width.
Colors: White text with Navy background.
Text should have one leading space inside text object block.
Page DefaultsPage Defaults
Font DefaultsFont Defaults
Data DefaultsData Defaults
Printer DefaultsPrinter Defaults
Report TitleReport Title
55

First Parameter should be one grid unit in from the left margin.
Title and parameters on vertical guides, evenly spaced
Left half of Header block.
Vertical orientation where possible,
In case of Name parameter, the rest of the parameter columns should be spaced from the right bitmap backwards, to maximize
the name length.
Bitmap .\I3smlogo2c450.bmp
Single line, 3pt, Navy. Should match width of Report Title.
Section HeaderSection Header
Flush to left margin.
As Body Text, evenly spaced.
Vertical columns on guides as necessary.
Centered above data column, on guideline.
Column Header Separator
Single line 1pt Black, on guideline.
Text BodyText Body
Indented 3 grid units, if necessary.
Text Positioning
Rows should be hooked to formatting guidelines.
Numeric data right justified, w/Right-guideline to center of column header.
Text data left justified, w/Left-guideline to center data.
Parameters (from left)Parameters (from left)
Logo (flush right)Logo (flush right)
Header SeparatorHeader Separator
Group Label(s)Group Label(s)
Summary DataSummary Data
Column HeadersColumn Headers
Group ColumnsGroup Columns
56
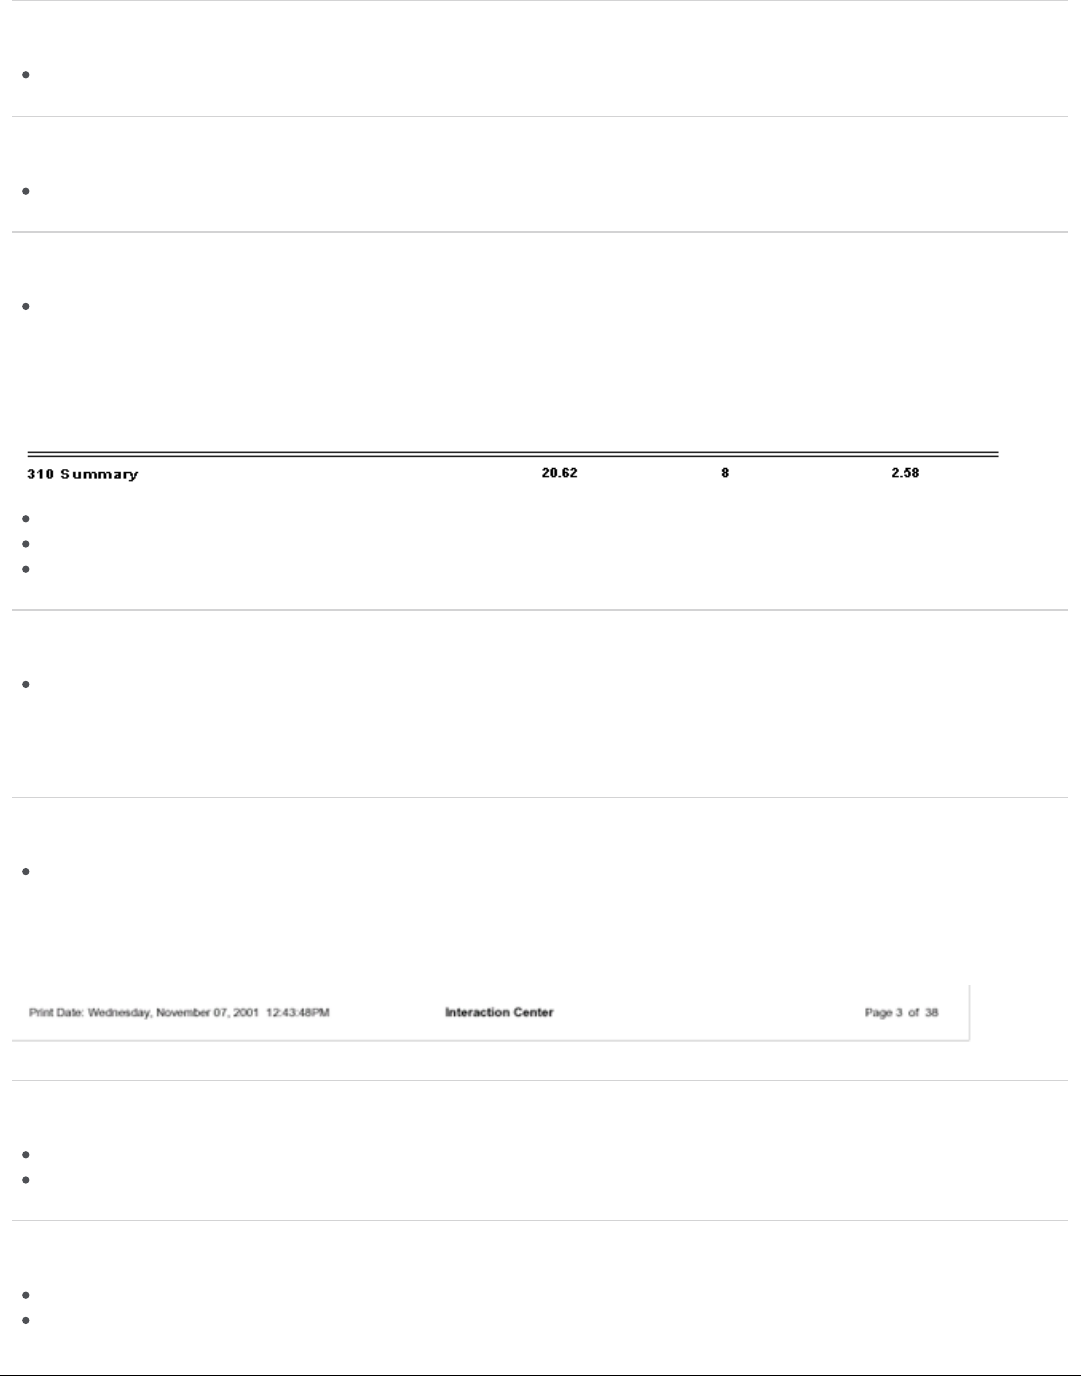
Graph DefaultsGraph Defaults
45° Rotation.
3-D graphs.
Known Bug: any graph which has no data does not display.In this case, a warning message should display to explain why the
page is blank.
'Chart not printed because all data points were zero. (0)'
is the current message.
Section FooterSection Footer
Summary Separator
2 Single lines 1pt Black, with minimum space between.
(less than the CR default grid of .083")
Same as Summary Font default.
Group FooterGroup Footer
1 Single line 3pt Black.
Report FooterReport Footer
Remove existing trailing lines, not part of a group header/footer
One leading line for spacing
Font: Arial 9pt."Print Date: [PrintDate]" (Embed left-justified 'PrintDate' field in Text object)
Flush to left margin
X-axis data labelsX-axis data labels
Graph TypeGraph Type
Warning MessagesWarning Messages
Summary DataSummary Data
Summary SeparatorSummary Separator
No Border LinesNo Border Lines
Left Text ObjectLeft Text Object
57

Font: Arial 10pt Bold."Interaction Center"
"Page [PageNumber] of [TotalPageCount]" (Embed right-justified fields within the text object)
Font: Arial 9pt. Flush to right margin
Center Text ObjectCenter Text Object
Right Text ObjectRight Text Object
58

Appendix E: Reporting Log Relationships and Report UseAppendix E: Reporting Log Relationships and Report Use
GuidelinesGuidelines
To use reporting logs and reports in the Customer Interaction Center (CIC) data collection and reporting system effectively, it is
important for you to know details about each log and its relationship to other logs in the system. For example, some of the data
within CIC is intended for more general use, such as enterprises running CIC. While these reports might benefit a call center running
CIC, they would not be suited to report on tasks performed by agents. In this appendix, we provide detailed descriptions of the types
of data, and the procedures and circumstances used to collect it. We also discuss data constraints anticipated by developers.
General Types of Report LoggingGeneral Types of Report Logging
We can place the report logging within CIC into several data types or categories; Call, Queue Statistics, Agent/User Status, Line and
Line Group, and Administrative. Although relationships exist between these data types, the CIC logging system handles as them as
distinct and separate sets of information.
CIC primarily stores the call detail data, the CDR Log, which we also reference as the Call Detail Log in many documents.
Source o f dataSource o f data: Snapshot of call state information at time of call disconnect.
Type of informatio nType of information: End call state, call origination, call duration, last user active with call.
Relationships to other dataRelatio nships to other data: Very limited. Because CIC captures only the user’s latest information, it cannot be directly
related to much of the data in the Queue Statistics, unless you have a very simple environment.Any transfers between
workgroups and agents are lost in the view of this data, so CIC will not reflect this data in any reports.
Repo rts types using this dataReports types using this data: Call and Call—Supervisor categories of reports. These categories include Call Detail and
User Summary reports showing simple call activity. These simple enterprise or summary activity reports will not be as
complete as the call counts of Queue Period Statistics agent reports. You should take care not to use these report values for
purposes when stringent control is required, such as calculating compensation, because there is no guarantee that a user’s
complete activity will be represented.
This category of data includes the IAgentQueueStats, IWrkgrpQueueStats, and IStatsGroup logs. These logs contain interval - based
data that accumulates the activity for agents, work groups, and custom statistics groups. CIC collects the standard ACD
management values, including counts of entered calls, answered and abandoned calls, and calls that flow out. Most actions that
trigger counts also track the sum time until this action occurred, thus tracking the total time to abandon, answer and flow out.
Included with these times is time spent on calls, time with calls on hold at an agent, and time in "after call work" state. Where
appropriate, CIC collects Agent staffing values including time logged in, time in available to take ACD call state, and time in other
states. The IStatsGroup does not have these times because no agents are associated with statistics groups, so there is no pool of
agents to drive these values.
Please note these logs include ACD and non-ACD data. Interactions (calls, chats) that are not distributed via ACD can still appear
on workgroup - queues, so it is possible to have ACD and non-ACD values relative to interactions. For attributes that are explicitly
ACD, the name will include ACD as a suffix, or as a portion of the name. Attributes without ACD are either ALL activity including
ACD, or are not differentiated by ACD. Examples of this type of attribute are "nAnswered" and "nAnsweredAcd". "nAnswered"
includes ACD and non-ACD calls that were answered. "tAgentLoggedIn" and "tAgentAvailable" are examples of values that cannot be
distinguished by the ACD attribute, as they are related to the agent, and not the interaction type. "tAcw" is an example of a value that
is related to ACD because it is time accumulated in a "After Call Work" state that might be (but does not have to be) after an ACD
call. Since "tAcw" is not directly related to an ACD interaction, it does not have ACD in the name.
Source o f dataSource o f data: Interval collection for Agent, Workgroup and Statistics Group.
Type of informatio nType of information: Counts of entry, answer, abandon, and flow out. Times for answer, abandon, flow out. Time on calls,
held with an agent, and in "after call work". In the case of Agent and Workgroups, the staffing times for agents and times agent
were in particular states.
Repo rt types using this dataRepo rt types using this data: Agent Performance and Queue categories. These categories include all of the Queue Period
Statistics reports.
Call Detail DataCall Detail Data
Queue Statistics DataQueue Statistics Data
59

CIC records user status changes in the Agent Activity Log. These changes include the login and logout events, including the status
at the time of login or logout. System changes to users’ status as seen in a CIC client are also logged in the Agent Activity Log.
You’ll see some status changes when you monitor agents that you do not see in this log.This is because some statuses are only
shown on real time monitoring, and do not represent actual changes of the user’s state.
It is important to know that CIC does not record the current state of the agent until the user ends his or her time in that status by
selecting another status. The one exception to this is that the status at midnight is written out to avoid having indefinitely long
periods associated with a status. Twenty-four hours should be the longest time recorded for a status.
Source o f dataSource o f data: Delayed event driven by change of user state. The previous state is recorded any time a new state is selected.
Type of informatio nType of information: Login Indicator, status used, time starting and ending the status, along with the calculated duration in
seconds. Flags also indicate if the status was an ACD, ACW, or DND type status.
Repo rt Types using this dataRepo rt Types using this data: Agent and Agent Supervisor reports show this information in detail and summary form.
Line and Line group statistics are interval data generated for each line and reporting line group you have configured. Reporting line
groups are line groups that you have activated using the "Reporting" attribute. No reporting line groups are created by default in CIC.
The system administrator must create these groups if there is going to be any meaningful data created for the line group reports.
It is worth noting that report group information is summary data about the lines of the group over the interval. Because of this, it is
possible for you to add or remove lines from the configuration during the interval. This does not cause any computation problems
because CIC does not record the number of lines, but instead records the total number of seconds the lines were in the
configuration. If you divide this total by the seconds in the duration, you'll compute a fractional number of lines for this period.
Source o f dataSource o f data: Interval-generated summary information about activity against the lines and line groups.
Type of informatio nType of information: Length of interval. Sum of seconds the lines were active. The sum of seconds all lines were busy.
Number of calls and total time for all and outbound traffic (subtract outbound from all to get inbound).Number of outbound
calls that were blocked.
Repo rt types using this dataRepo rt types using this data: The Line Group reports all use combinations of line and line group information for both
reports and charts.
This type of data includes the Interaction Administrator (IA) Change Notification and IC Change Notification logs that are audit trail
logs for configuration changes. Both of these logs record changes made in CIC, but they do it from different levels of the system.
An IA Change Notification is recorded for any change you make using the Interaction Administrator. Only changes made using this
application are recorded here.
The IC Change Notification records any change you make via the Directory Services subsystem, and includes any configuration
change. These changes include every persistent user/agent status change made by a user, or handler. For this reason, the IC
Change Notification log is not active by default. If you require tighter auditing, this log can provide that functionality at the cost of
additional database space.
Source o f dataSource o f data: Event driven by changes to configuration in Interaction Administrator, or any change made to the
configuration in the case of the IC Change Notification log.
Types of InformationTypes of Info rmatio n: The class, path, key, user, and station making the change (not available for IC Change Notification)
and type of change.
Repo rt types using this dataRepo rt types using this data: Administrative reports allow searching for changes by class and other attributes.
Agent/User Status DataAgent/User Status Data
Line and Line GroupLine and Line Group
AdministrativeAdministrative
60

The configuration mirror data is data that the system copies (mirror images) from the CIC configuration to aid in the generation of
reports. There are several mirror logs that include data for user and workgroup relationships, line and line group configuration, and
line - to - line group relationships. It is important to note that these logs reflect current configuration. There are two common uses
for this data. The user-to-workgroup relationship allows you to build reports that group user data by workgroups. CIC uses the line
and line group configuration information on the line and line group reports to show least used lines by group, or to display
additional configuration information about the line or group.
Reports that use these tables might not represent historical information correctly if you have changed the configuration information
since the historical data was generated. Currently, the Queue Period Statistics Agent Performance and Line Group reports operate
with this restriction.
Source o f dataSource o f data: CIC configuration copied from CIC to database on any restart, and updated any time the configuration is
changed.
Types of informatio nTypes of information: Portions of configuration information for user to workgroup relationships, line and line group
configuration, account codes, and line to line group relationships.
Repo rt types using this dataRepo rt types using this data: Some Queue reports use data to restrict users to non-queue workgroups, and Line Group
reports use this information to show details about lines and line group configurations, as well as to find the least used lines in
a group.
Configuration Mirror DataConfiguration Mirror Data
61

Appendix F: Including Ex-Agents in ReportsAppendix F: Including Ex-Agents in Reports
There might be an instance where you want to include an ex-agent, who is no longer included in a workgroup, in a report that you run
in Interaction Reporter. Use the User List parameter to select the users to include in a filter for the report. For example, a former
employee who was in a workgroup in February 2014 no longer appears in the User Call Detail report run on December 2014 data
using a current workgroup. To include an ex-agent in the report, use the User List parameter and add the current workgroup and the
name of the ex-agent to the selected users for the filter. You can save the filter to use again. For additional information about the
User List parameter and using a filter, see Interaction Reporter Help.
62
Appendix G: Parameter Types for Custom Crystal ReportsAppendix G: Parameter Types for Custom Crystal Reports
When you configure the parameters for a custom Crystal Report, use the following table to identify the setting to use for the User
Control Class Name field on the Miscellaneous tab that corresponds to the parameter type in the Class Name field on the General
tab.
Class NameClass Name User User Control Class NameControl Class Name
ININ.Reporting.Historical.Engine.Module.Parameters.
ViewModels.AutoCompleteDataDrivenComboBox
ININ.Reporting.Historical.Engine.Module.Parameters.Views.
AutoCompleteDataDrivenComboBox
ININ.Reporting.Historical.Engine.Module.
Parameters.ViewModels.Boolean
ININ.Reporting.Historical.Engine.Module.Parameters.Views.
ComboBoxParameter
ININ.Reporting.Historical.Engine.Module.Parameters.
ViewModels.CrystalNumericUpDown
ININ.Reporting.Historical.Engine.Module.Parameters.Views
.NumericUpDown
ININ.Reporting.Historical.Engine.Module.Parameters.
ViewModels.CrystalStringParameter
ININ.Reporting.Historical.Engine.Module.Parameters.Views.
TextBoxParameter
ININ.Reporting.Historical.Engine.Module.Parameters.
ViewModels.DateTimeParameter
ININ.Reporting.Historical.Engine.Module.Parameters.Views.
DateTimeParameter
ININ.Reporting.Historical.Engine.Module.Parameters.
ViewModels.DateTimeRange
ININ.Reporting.Historical.Engine.Module.Parameters.Views.
DateTimeRange
ININ.Reporting.Historical.Engine.Module.Parameters.
ViewModels.NumericUpDownRange
ININ.Reporting.Historical.Engine.Module.Parameters.Views.
NumericUpDownRange
ININ.Reporting.Historical.Engine.Module.Parameters.
ViewModels.ShiftTimeParameter
ININ.Reporting.Historical.Engine.Module.Parameters.Views.
ShiftTime
ININ.Reporting.Historical.Engine.Module.Parameters.
ViewModels.User
ININ.Reporting.Historical.Engine.Module.Parameters.Views.
AutoCompleteComboBox
ININ.Reporting.Historical.Engine.Module.Parameters.
ViewModels.DistributionQueueComboBox
ININ.Reporting.Historical.Engine.Module.Parameters.Views.
AutoCompleteComboBox
ININ.Reporting.Historical.Engine.Module.Parameters.
ViewModels.AutoCompleteWrapUpCodeComboBox
ININ.Reporting.Historical.Engine.Module.Parameters.Views.
AutoCompleteComboBox
Note: The following parameters are no longer auto filled:
Site ID
Campaign
Phone Numbers/DNIS
63

Appendix H:U2LININSUPPORTU.DLL Function CallsAppendix H:U2LININSUPPORTU.DLL Function Calls
This appendix provides a description of the function calls included in the DLL U2LININSUPPORTU.
The DLL file U2LININSUPPORTU.DLL extends the functionality of formulas in Crystal Reports. It adds CIC specific functions to the
list of available functions. To display the function calls in Crystal Report:
1. Start CrystalCrystal ReportsReports .
2. From the FileFile menu, click NewNew.
3. The Crystal Reports Gallery dialog is displayed. Select As As a Blank Reporta Blank Report , and click OKOK.
4. The Database Expert dialog is displayed. Click CancelCancel .
5. In the Field Explorer pane (from the V iewV iew menu, you might have to click Field ExplorerField Explorer to display) right-click FormulaFo rmula
FieldsFields , and click NewNew.
6. The Formula Name dialog is displayed. Type a name, and click Use EditorUse Editor.
7. The Formula Workshop Formula Editor dialog is displayed. Expand the window.
8. In the Functions pane, expand Additional FunctionsAdditional Functions .
9. Below Additional Functions, expand ininsupportu (u2lininsupportu.dll), to display the list of function calls.
64
Appendix I: Parser FunctionalityAppendix I: Parser Functionality
This section includes information on the parser, including recognized operators and built-in functions.
Data TypesData Types
Conversions of data types happen automatically in almost all cases within the parsing and execution of expression and values.
Explicit conversion can be performed using functions defined later in this document. If implicit conversion occurs to process an
expression, the rules used for explicit conversions are followed. This is important because it can cause loss of significant portions
of a value if a
double
gets converted to a
long
to perform an operation.
Type Description
Long Long integer value using 32bit signed value.
Double Double float value. The form Digits-Dot-Digts, or Digits-E-Digits (scientific notation) are both supported.
Boolean Boolean value of true or false.
String String value.
DatetimeDate time value as the number of seconds since 1970/1/1 00:00:00.
65

OperatorsOperators
Operators are the implicit actions performed within an expression. The parser and executor resolve to perform operators in highest
order of precedence first. To assist you, think of strings, integer and floating point values, and parentheses also as operators.
Operator Description
( ( )) Left and right parentheses must be used as a matched pair or a syntax error will occur. The contents of the
parentheses will be resolved first, and then used as a whole in operation with the highest operator to the left or
right.
IntegerInteger Literal integer value (123, or 458)
FloatFloat Literal floating point value (123.456, or 0.5, or 23E7)
IdentifierIdentifier Any alpha-numeric name supported as a function, constant or variable by the parser. Some of the constants
supported are defined under Constants.
.. Use this operator (..) at the end of an expression. It is used to separate multiple expressions.
"" Double quotes are used to define a string literal.
'' A single quote is used to define a string literal. String values can be between single or double quotes. For example,
'This' and "This" are legal. The two cannot be mixed like "error', but a single or double quote can be included within a
string stated with the other. 'This" contains a double quote' for example. If a single or double quote must be
included in a string literal, starting with the same quote, the quote must be doubled as an escape. "This is how to
include "" a double within a double quote".
**** Raise to a Power. Operand1 ** Operand2 Used as 2 ** 3 => 8.
~~ Bit wise Inversion. ~Operand1.
!! Binary inversion or NOT. !Operand1. !True equals False.
** Multiplication. Operand1 * Operand2. If the first operand is long integer, then the second this will be converted to
integer and this will be an integer operation returning a long integer.
// Division. Operand1 / Operand2. If the first operand is a long integer, then the second operator will be converted to a
long and this will be an integer division returning a long integer.
%% Modulus. Operand1 % Operand2. Only valid for integers. Returns the remainder from an integer division.
++ Add. Operand1 + Operand2.
-- Subtract. Operand1 + Operand2.
<< Less than. Operand1 < Operand2. True if Operand1 is less than the value of Operand2.
<= Less than or equal.
= Equal (not assignment)
<> Not Equal. Same as ! =.
> Greater than.
<= Greater than or equal
| Or. Operand1 | Operand2. This is a binary OR. So the Operand1 will be bit wise ored with Operand2. If Operand1 is
Binary, then if the Binary value of either operand is true, the expression is true.
^ Exclusive Or.
& And.
66

PrecedencePrecedence
Operators are the implicit actions performed within an expression. The parser and executor resolve and perform operators in
highest order of precedence first. To assist you, think of strings, integer and floating point values, and parentheses also as
operators. The parser resolves the closure, or parsing, of these values following the order of precedence rules.
/*7*/ ‘(‘, ‘)’, integer, float, identifier, ‘;’, ‘”’, ‘’’,
/*6*/ ’**’,
/*5*/ ‘~’, ‘!’,
/*4*/ ‘*’, ‘/’, ‘%’,
/*3*/ ‘+’, ‘-',
/*2*/ '<’, ‘<=’, ‘=’, ‘<>’, ‘>’, ‘<=’,
/*1*/ ‘|’, ‘^’, ‘&’
ConstantsConstants
null_datetime = January 1st, 1970
true = ToBoolean(True)
false = ToBoolean(False)
FunctionsFunctions
Long Round( Double )
Rounds the value up to the nearest integer and returns a long integer value. Examples: 12.1 => 12, 1.5 => 2, -1.5 => -1.
Long Trunc( Double )
Drops the factional portion of the floating point value, and returns a long.
Examples: 12.1 => 12, 1.5 => 1, -1.5 => -1.
Long Toint( Any Type )
Forces an explicit type conversion from any type to Long. Doubles will be truncated. Strings will be parsed and converted
based upon the same rules as parsing a number. Any fraction in the string will be truncated. Datetimes will convert to the
number of seconds since 1970/1/1 00:00:00.
Long Tolong( Any Type )
Same as Toint().
Double Todouble( Any Type )
Forces an explicate type conversion from any type to a Double. Strings will be parsed and converted based upon the same
rules as parsing a number. Datetimes will convert to the number of seconds ince 1970/1/1 00:00:00.
Boolean Toboolean( Any Type )
Forces an explicate type conversion from any type to Boolean. Strings values of ‘1’ will be converted to true, all others are
false. Non zero numeric values will be true, zero will be false.
Boolean Todatetime( Any Type )
Forces an explicate type conversion from any type to Datetime. Strings must be in the format YYYY-MM-DD HH:MM:SS.
Numeric values will be treated as the number of seconds since 1970/1/1 00:00:00.
67

Parser ErrorsParser Errors
ErrorDivideByZero
ErrorInvalidOp
ErrorRange
ErrorType
ErrorSyntaxGeneral
ErrorSyntaxParenExpected
ErrorSyntaxEOF
ErrorSyntaxErrorNumber
ErrorSyntaxErrorQuote
ErrorSyntaxErrorOperator
ErrorFunction
ErrorSyntaxNotSupported
Execution ErrorsExecution Errors
ErrorFeatureNotSupported
ErrorGeneralFailure
ErrorInvalidFunctionIdentifier
ErrorInvalidValueIdentifier
ErrorStackUnderflow
ErrorInvalidType
ErrorVariantException
68
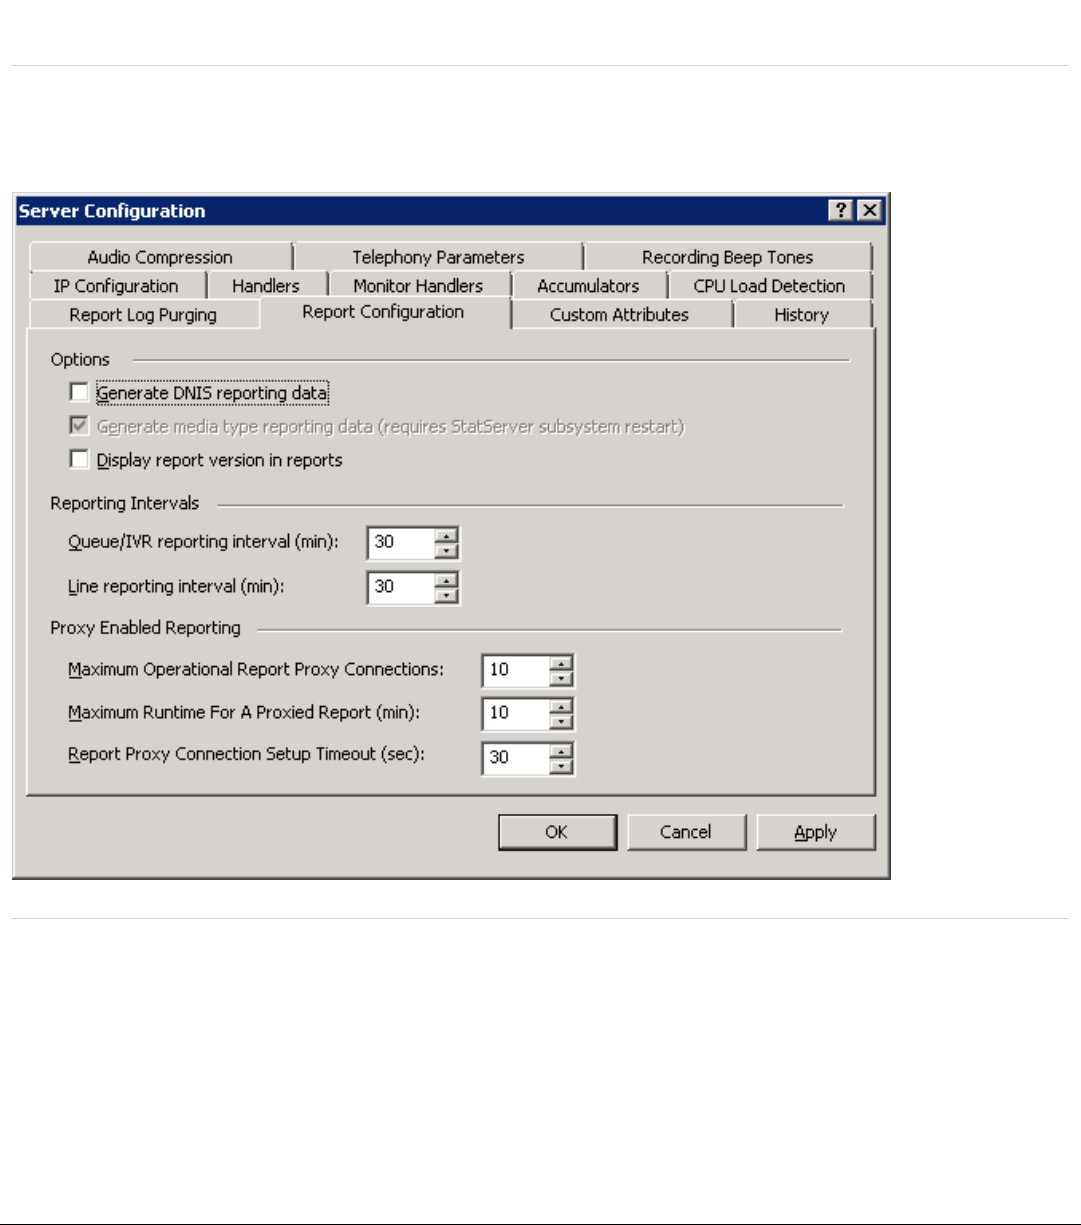
Appendix J: Internet Enabled ReportingAppendix J: Internet Enabled Reporting
Internet enabled reporting allows reporting services to execute without a direct connection from a workstation to the database
server. The connection to the database server uses a reporting plug-in added to the HttpPlugin Host to facilitate a proxy connection
to the database server. A secure (SSL/TLS) WebSocket tunnel between Interaction Reporter and the reporting plug-in establishes a
connection to the database. All database traffic uses this connection without the need for Interaction Reporter to establish direct
connection to the database.
Configure Internet enabled reporting Configure Internet enabled reporting in Interaction Administratorin Interaction Administrator
Select <IC Server> >Co nfiguration > Server Configuration <IC Server> >Configuration > Server Configuration > Report Configuration> Report Configuration and complete the information under
Proxy Enabled Reporting. For more information, see Interaction Administrator help.
Select <IC Data So urces> <Data source > >IC Data Source <IC Data Sources> <Data source > >IC Data Source Configuration > Repo rt Connection ConfigurationConfiguratio n > Report Connectio n Configuration and
complete the information. For more information, see Interaction Administrator help.
Configure reports for your CIC serverConfigure reports for your CIC server
Configure the data sourceConfigure the data source
69
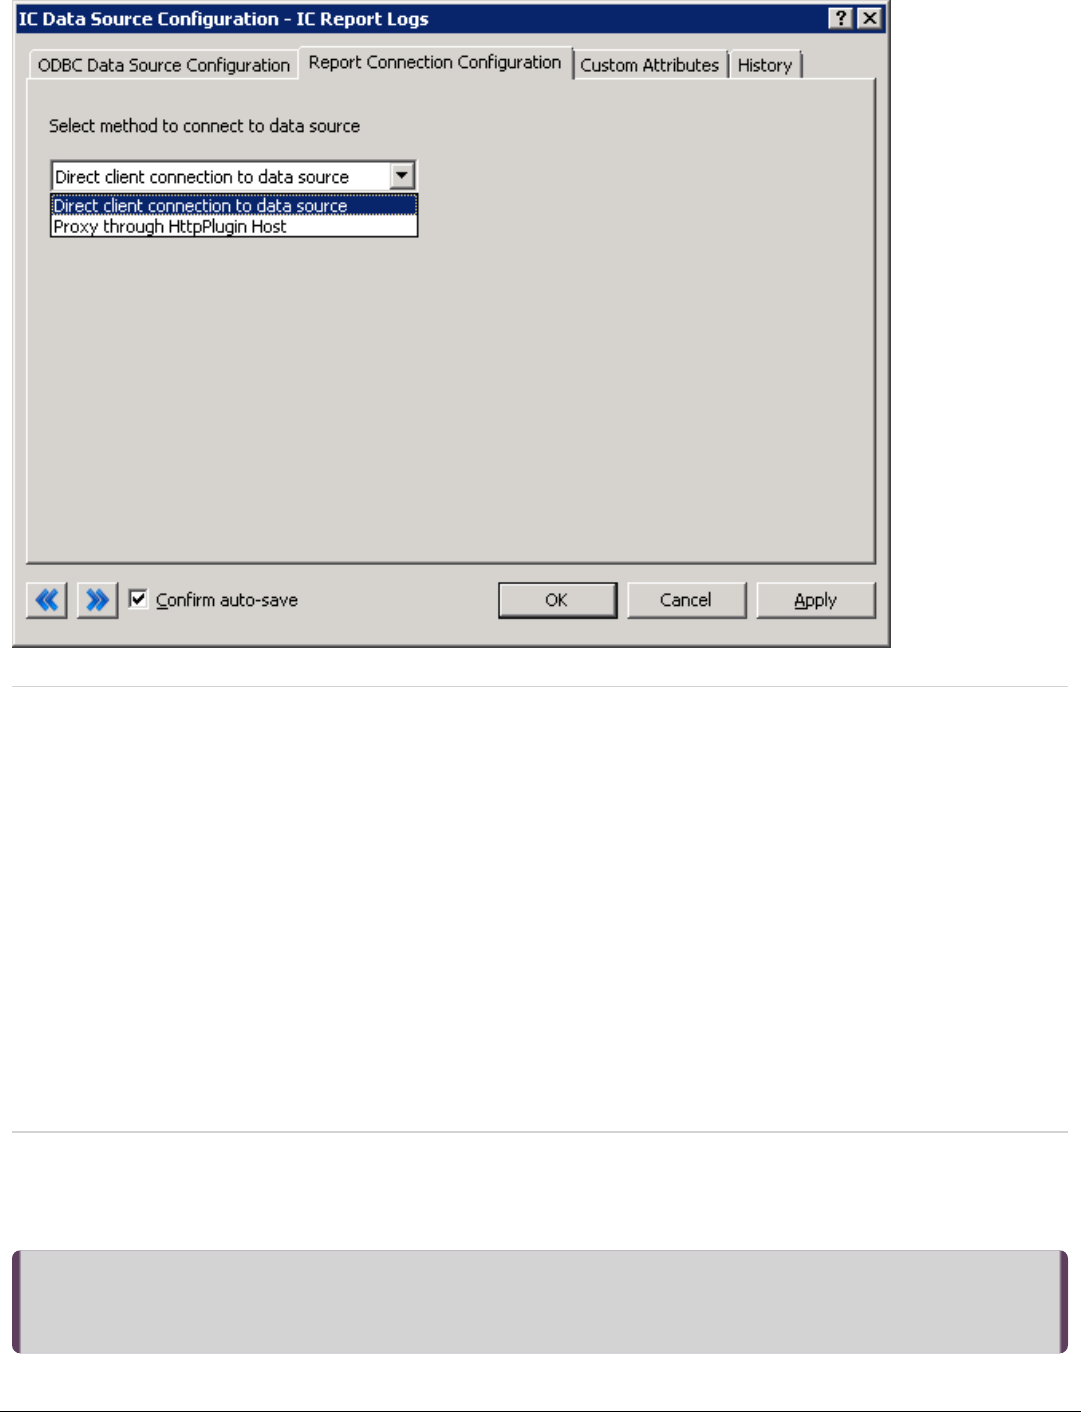
By default, the certificate checking is disabled [BypassReportingProxyCertificateCheck [BypassReportingProxyCertificateCheck = true]= true]
To enable certificate validation for websocket connection set [BypassReportingCertificateCheck = false][BypassReportingCertificateCheck = false] in
ICBusinessManager.exe.config:
<configuration>
<appSettings>
<add key="BypassReportingProxyCertificateCheck" value="false"/>
</appSettings>
</configuration>
Alternatively, this can be set in Registry, under Current User or Local Machine as follows:
1. Registry path: HKE Y_CURREN T_USER\SOFTWARE\Interactive HKEY_CURRENT_USER\SOFTWARE\Interactive Intelligence\Co mmo nApplicatio nIntelligence\CommonApplication
DWORD (32 bit) value: BypassReportingProxyCertificateCheck Value: 0
2. Registry path: HKE Y_LOCAL_MACHINE\SOFTWARE\Interactive HKEY_LOCAL_MACHIN E\SOFTWARE\Interactive Intelligence\CommonApplicationIntelligence\CommonApplicatio n
DWORD (32 bit) value: BypassReportingProxyCertificateCheck Value: 0
Oracle clients on client workstations require a new TNS entry per data source. Before you complete the extra configuration for
Oracle, a IC data source that uses Oracle must exist or you know how to configure the Oracle data source.
NoteNote :
Verify that the CIC server or off-server Session Manager has the ORACLE_HOME variable set to point to Oracle client directory
(for example, C:\oracle\app\devlab_user\product\11.2.0\client). Restart the CIC server or the off-server Session
Manager after you set this variable.
The settings for Oracle appear on the Repo rt Connection Co nfigurationReport Connection Configuration page. After you save the Report Connectio nRepo rt Co nnection
Configuratio nConfiguratio n page, reopen the page to access the extra configuration for Oracle. For more information, see Interaction
Internet Enabled Reporting need to bypass Certificate checking if SSL/TLS Internet Enabled Reporting need to bypass Certificate checking if SSL/TLS is not enabledis not enabled
Extra configuration for Oracle data sourceExtra configuration for Oracle data source
70
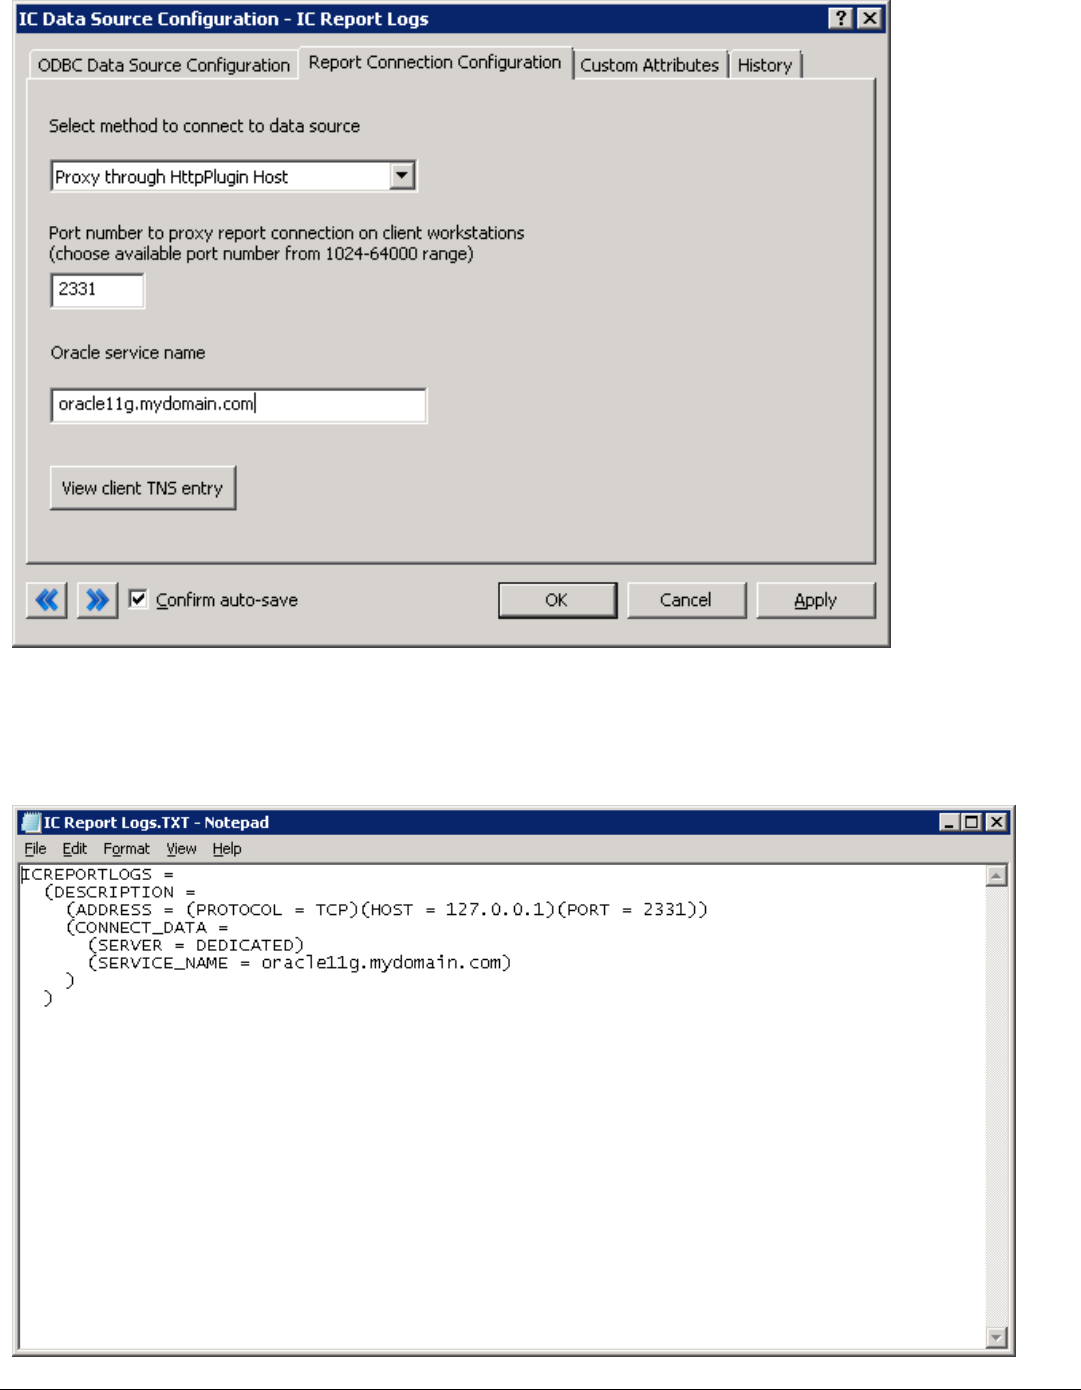
Administrator help.
After you configure the Report Co nnection Configuratio nRepo rt Co nnection Configuration page, click View client TN S entryView client TNS entry to generate a text file. The text
file shows the entry to add in the TNS. Ora files on all client machines. The text file uses the same name as the IC data source
followed by the .txt extension. Copy the text file in the same directory as the Interaction Administrator application. For example, if
Interaction Administrator runs on a CIC server, copy the text file in I3\IC\Server directory. The following example illustrates a text
file.
71
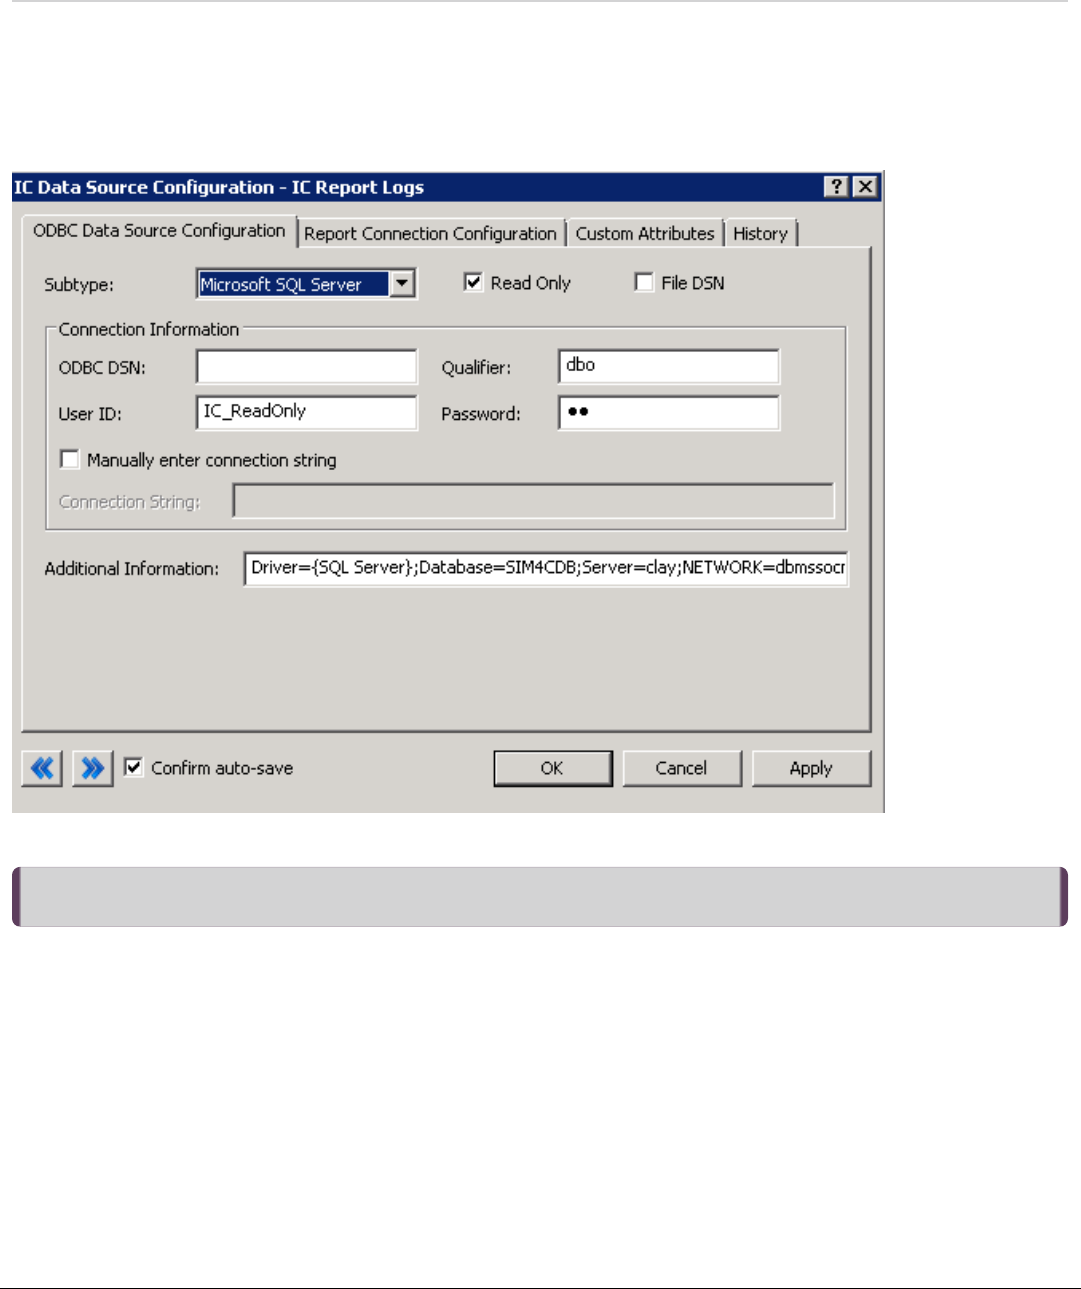
To update the tnsnames.ora file for each client machine, complete the following steps:
1. On a client machine, edit the tnsnames.ora file (for example,
C:\oracle\app\devlab_user\product\11.2.0\client\network\admin\tnsnames.ora)
2. Insert the complete entry from the text file to the tsnames.ora file.
3. Verify the reports execute correctly.
The reporting plug-in parses the connection string in the Additional Additional InformationInfo rmation field on the ODBC Data SourceODBC Data Source
Configuratio nConfiguratio n page to identify the host and port number for the tunnel connection. The IC Setup Assistant automatically sets the
connection string in the AdditionalAdditional Informatio nInformation field. To view the Additional Information field, select ICIC Data SourcesData Sources > <> < DataData
sourcesource >> IC Data SourceIC Data SourceCo nfigurationConfiguration > Repo rtReport ConnectionConnection Configuration.Configuration.
The following table contains example connection strings that the reporting plug-in can resolve.
Noteote: If the connection string contains the optional ENCRYPT=TRUE parameter on the connection string, the reporting plug-in
does not scan the incoming cipher text for SQL injection attacks.
Connection String FormatsConnection String Formats
72
DBMS
Platform
Connection String Example
SQL
Server
Driver={SQL Server};Database=I3_IC;Server=dbserver;NETWORK=dbmssocn;Trusted_Connection=No
Note: Connect to default SQL server instance on dbserver by using the default port.
SQL
Server
Driver={SQL Server};Database=I3_IC;Server=dbserver\instance;NETWORK=dbmssocn;Trusted_Connection=No
Note: Connect to a named instance of SQL server.SQL Browser Service must be running on dbserver and firewalls
must allow UDP communication to port 1434.
SQL
Server
Driver={SQL Server};Database=I3_IC;Server=dbserver;PORT=62413;NETWORK=dbmssocn;Trusted_Connection=No
Note: Connect to an unnamed instance of SQL server on dbserver by using port 62413.Use this string if security
restriction prevents SQL Browser resolution of named instances.
SQL
Server
Driver={SQL Server};Database=I3_IC;Server=dbserver,62413;NETWORK=dbmssocn;Trusted_Connection=No
Note: Connect to an unnamed instance of SQL server on dbserver by using port 62413. Use this string if security
restriction prevents SQL Browser resolution of named instances.
Oracle Driver={Oracle};DBQ=tnsnameofdatabase;
Note: Only use a connection through TNS name resolution for Oracle.Set the ORACLE_HOME environment
variable before starting the CIC server or the off - server Session Manager so that TNS resolution works.
Configuration BehaviorConfiguration Behavior
The following table explains how the different configurations behave based on the client session connection and data source
connection methods. For these configurations, the data source exists on the customer site.
Session
Connection
Method
Data Source
Connection
Method
Behavior
Direct (Over
MPLS)
Direct Traditional on - premises setup.
Proxy Direct Client sessions connect to CIC servers over the Internet by using a proxy connection. The
report data would be delivered to the client by using the proxy connection to the database.
Direct Proxy Client sessions connect directly to the CIC servers. The report data would be delivered to the
client by using the proxy connection to the database.
73

Appendix K: Report Log Purging for Large DatabasesAppendix K: Report Log Purging for Large Databases
With large report log databases, the purge process might run for an extended period of time, causing locks on the database for the
attempted delete. The purge process, which runs on the Transaction Server, has a five-minute timeout that could prevent the purge
from completing.
Large Database Purge MethodLarge Database Purge Method
To avoid the five-minute timeout, use the server parameter UseExternalTranProviderforPurging, which allows PureConnect to
execute the purge process using external scripts. Using external scripts requires the Microsoft SQL Server command line tools or
the Oracle SQL*Plus utility. If the tools or utility is not installed before the PureConnect service is started, a restart will be required
for them to be in the path for Transaction server to utilize.
Adding the Server ParameterAdding the Server Parameter
Add the UseExternalTranProviderfo rPurgingUseExternalTranPro viderforPurging Server Parameter in Interaction Administrator, and configure the value to a case-
insensitive setting of “True”, “Yes”, or “1”.
74
Change LogChange Log
DateDate ChangesChanges
12 - January - 2015 New document created by combining the Advanced Reporting TR and the IC Reporting TR. Updated
copyright and trademark information.
05 - May - 2015 Updated documentation to reflect the addition of two CIC client applications, Interaction Desktop and
Interaction Connect.
15 - May - 2015 Updated image of Report Configuration in the Configuring a Custom Crystal Report in Report Management
section.
09 - June - 2015 Updated cover page for new logo.
06 - August - 2015 Updated image for rebranding.
30 - November - 2015 Updated link to CIC documentation library.
22 - February - 2016
Added "Appendix J: Internet Enable Reporting".
Updated copyright and trademark information.
21 - August - 2016 Added reference to Interaction Administrator for additional information on configuring secure report
parameters
12 - April - 2017
Updated Copyright and Trademarks for 2017
Updated references for CIC Client
09 - May - 2017 Added information on running a reporting executable in place of the Report e-mail tool
02 - August - 2017 Rebranded Title Page and Copyright & Trademark Information
08 - August - 2017 Updated Documentation Library link
02 - November - 2017 Update for Windows environment
04 - Decmeber - 2017
Updated CIC Server parameters section for Report Log purging for large databases
Added Appendix K: Report log purging for large databases
01 - February - 2018
Converted source to HTML5
Edits to converted files
09 - February - 2018 Update for Report e-mail tool
30 - March - 2018 Removed information for converting a report to a fax, as the Convert PRN to 13F tool step was deprecated
in CIC 4.0
26 - September - 2018 Updated licensing information for the new Activation File Management tool
01 - February -2019 Information added for Crystal Reports version compatibility
10 - May - 2019 Updated parameter information in Appendix G.
16 - May - 2019 Updated hyperlink references to
PureConnect Data Dictionary
26 - November- 2019 Added a new topic to Appendix J, topic is Internet enabled reporting need to bypass certificate checking
28 - November- 2019 Added Intro to Appendix D topic
75
