12
GoldMine Report Writer
Printing a Report
The Report Center
Existing Reports
Contact Reports
Calendar Printouts
Service Reports
Analysis Reports
Labels & Envelopes
Other Reports
Customizing Reports
Sort Levels
Options
Cloning vrs Creating
New Reports
Filtering
Formulas & Expres-
sions
Graphics
Report Example
Contact List Report
In This Chapter
contributing author:
Andrea Dominguez
Printing a Re-
port
T
his is the chapter that has been years in the making. Not knowing
enough myself about the GoldMine Report Writer, I have asked Andrea
Dominguez, my go to reports person, to write this chapter for us. I must
say that she has done an exemplary job.
This chapter is to discuss the navigation, alteration and creation of reports
using the GoldMine Report Writer.
Several already created reports come with your copy of GoldMine Premium
as delivered. If you only needed to print reports without altering dates or us-
ers, you can go to File | Print a Report.... All reports that are pre-made reside
under the UserID of (public). To make alterations to reports, change param-
eters or create new reports select from the GoldMine menu:
Go To
Reports ►
Reports
From this dialog form, shown later in this chapter, reports can be cloned or
altered by adding elds and/or parameters called dialogs. One thing these
reports cannot do is be saved as an Excel spreadsheet or a PDF, although
they can be printed to a PDF printer. GoldMine Reports can be saved as an
.rtf, which can be opened in Word, or in the GoldMine Report Writer’s propri-
etary format of .frc.
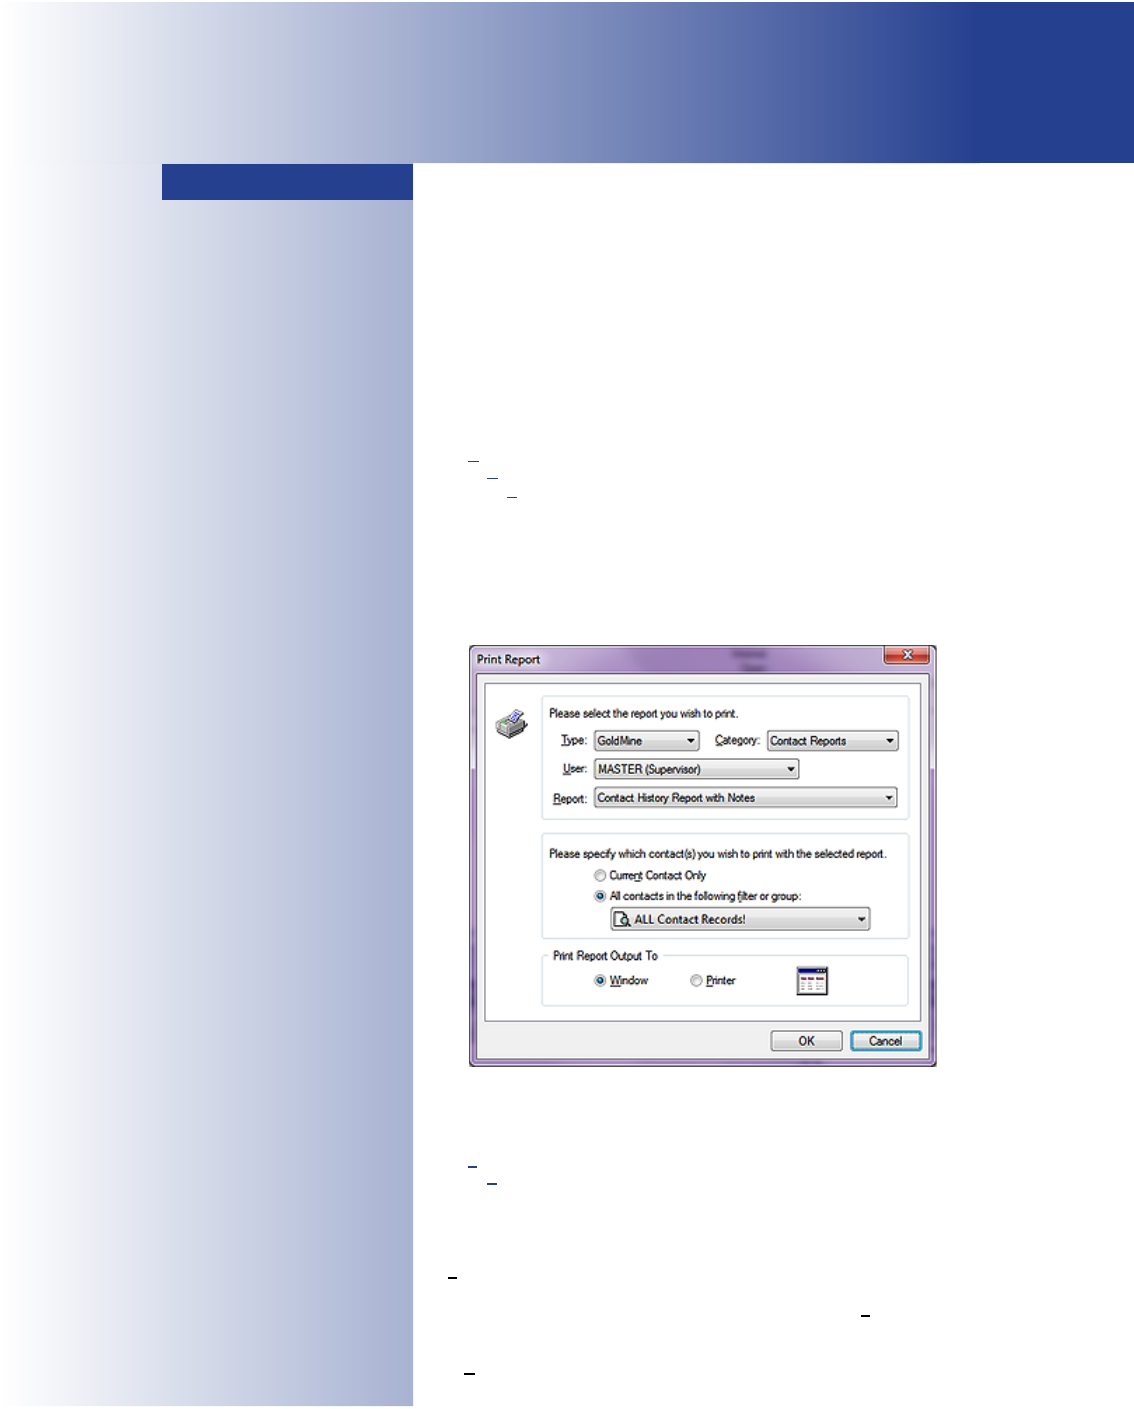
Let’s rst bring up the dialog form, displayed above in Figure 12-1, by select-
ing from the GoldMine menu:
File
Print a Report
In this dialog form we have three different frames, two untitled, and one titled.
Let’s begin by looking at the top most untitled frame in which there is a state-
ment: Please select the report you wish to print.. The rst entity in there
is Type:. If you have Crystal Reports installed, and those crystal les are in
your GoldMine folder, then there will two choices in this drop down, GoldMine
or Crystal otherwise only GoldMine will be available for the Type: of report.
This tells GoldMine what drivers should be loaded to run the report.
The Category: drop list is the next item of interest in this frame. There are 6
different categories from which to choose. These categories are available for
Figure 12-1
GoldMine Report Writer
GoldMine Premium - The Denitive Guide
266
both GoldMine reports, and Crystal Reports. You should familiarize yourself with the various reports
contained in each category prior to attempting to print a report.
• Contact Reports - these are reports that are based on the Contact record such as address
lists. While calendar reports or history reports, in general, are not stored in this category, this
category does contain some Pending and History reports.
• Calendar Printouts - this category includes graphical calendar reports as well as reports that
will t in Daytimer binders.
• Service Reports - this category is relatively new to GoldMine Premium. It includes a few de-
fault reports regarding Cases ( Opened and Resolved ), as well as a couple of detailed reports
from the same category.
• Analysis Reports - this category contains Opportunity Manager reports as well as various
Forecasted Sales Analysis reports.
• Labels and Envelopes - this is a self explanatory category, and contains various Avery Label
reports, and Monarch Envelope reports.
• Other Reports - these reports are odds and ends reports in the GoldMine application such as
the Filters Listing & Rolodex Reports.
As you change the category, the report selection changes accordingly.
All of the reports that come pre installed with GoldMine are located under the User: (public).
Lastly, in this frame, is the Report: that you wish to have printed. Only those reports that belong to
the specied User:, that are in the specied Category: will appear in this drop list.
The next untitled frame, as identied by the statement: Please specify which contact(s) you wish
to print with the selected report., is to tell the report which GoldMine records to include in the
report.
• Current Contact Only - will run the report only against the information from the currently active
Contact record.
• All Contacts in the following lter or group: - the default of which is ALL Contact Records!,
however, this option will select the records based on any already created Filter or Group located
under the current User Filter/Group menu or that of any User Filter/Group in the GoldMine sys-
tem to which the logged in UserID has access rights.
As these are a radio button selection one may only select the one or the other, and not both.
In the nal frame, Print Report Output To, you have a radio button selection option as well. You
may either select Window or Printer. Output to Window will print the report to the screen as
the output to Printer sends the report directly to the preselected printer ( see sidebar Tip ).
Finally, you may click upon the OK button to begin the report processing.
As mentioned before, all installed reports reside under the UserID of (public). All users have access
to this user even under the strictest of security setups unless you remove complete access to the
Report Center. Sometimes it gets confusing nding custom made reports in the sea of pre-made
reports under the UserID (public) unless you have a very good naming scheme in place. Some
scenarios of this nature would be like this, either create a new GoldMine UserID named Reports
or save all the reports under the UserID MASTER while giving the other users access to these re-
ports. All users would then be able
to view the custom made reports
easily, and use them as well.
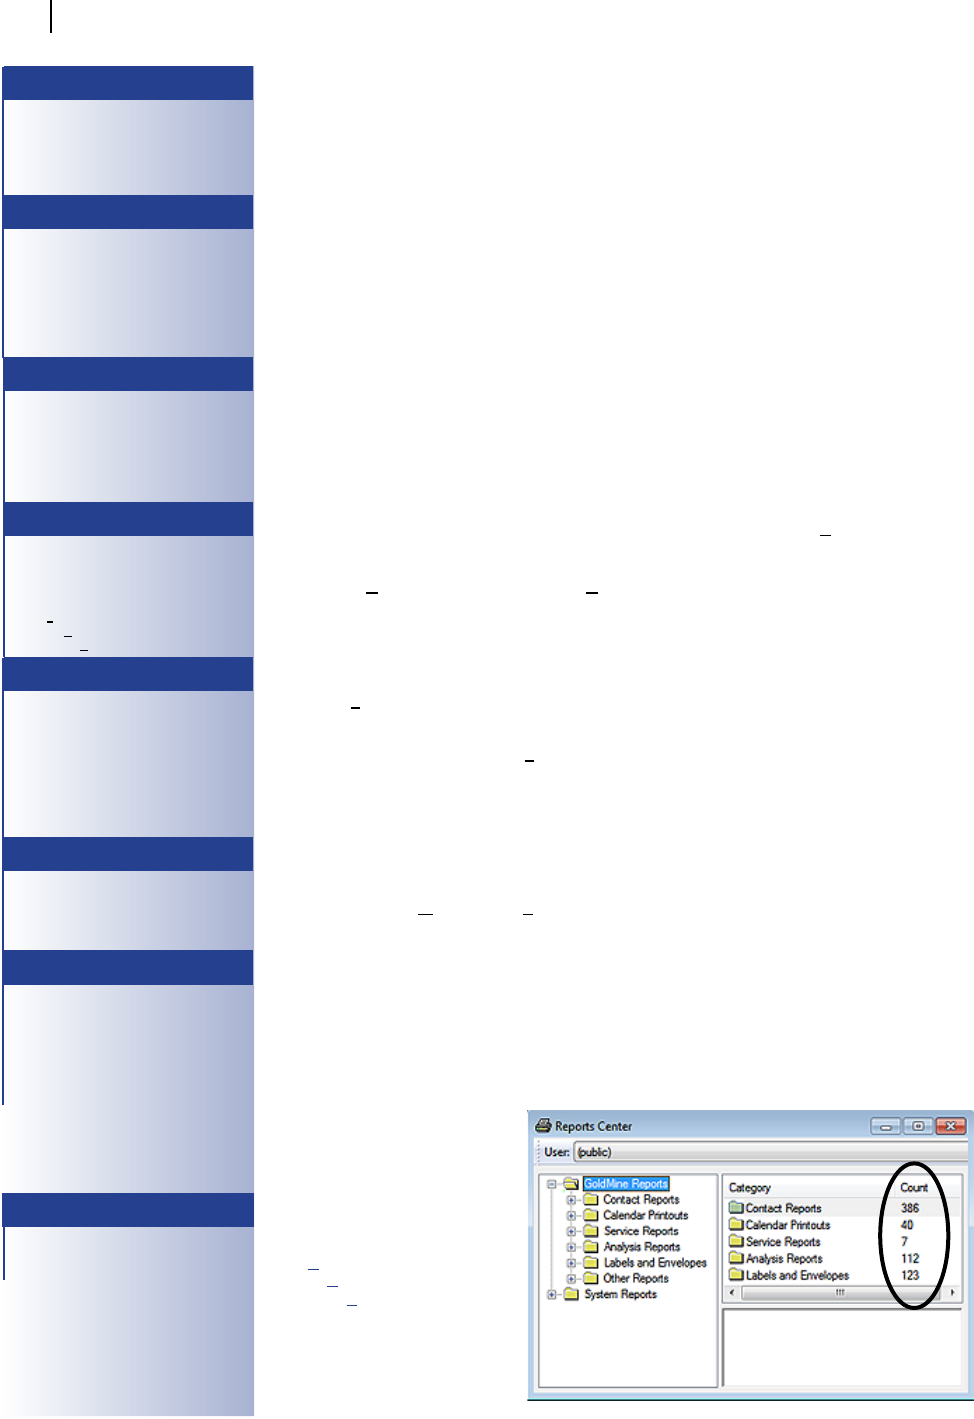
Let’s bring up the Report Center
by selecting from the GoldMine
menu:
Go To
Reports ►
Reports
You will notice, at the top of the re-
ports menu, there is a drop down
list for User:. When you login to
GoldMine for the rst time, the list
item defaults to the user (public).
Tip
As a general Rule of Thumb, do not
place Calendar based reports in the
Contact record category, nor place
Contact record listing reports in an-
other category.
Tip
If you decide to customize one of the
reports that come with GoldMine for
your users, it is recommended that
you Clone the reports under a UserID
name instead of the user (public).
This makes the customized reports
easier to nd and accessible by all.
Tip
Utilizing Filters & Groups for record
selection will make the report run
faster, and it is recommended to use
the Filters & Groups externally rather
than have the report do all of the lter-
ing at runtime.
Tip
Make certain that you have dened
your Printer prior to running any report
that you intend to print.
Tools
Congure►
Printer Setup...
Note
If you receive an error message while
trying to send your report to the printer
that states printer cannot exceed 59
characters, then change the name of
the printer to which you are sending
the print job. The path and/or name is
too long, and GoldMine has a limit on
reading paths.
Tip
For large reports without a Notes eld,
the performance will be better if you
rst print it to the window, then send it
to the printer.
Tip
While troubleshooting why reports
are not being sent to the printer from
a Window view, try sending the report
directly to the printer. There are some
environments that sending directly to
the printer works, when the Window
view does not.
The Report
Center
Figure 12-2
Note
The highlighted area, Figure 12-2, dis-
plays how many reports are contained
within each category.
GoldMine Report Writer
GoldMine Premium - The Denitive Guide
267
In the frame immediately below the User: drop down list in the tree there are 3 possible report type
choices:
GoldMine Reports
CrystalReports(TypeonlypresentifCrystalRunTimelesareintheGoldMinerootdirectory)
System Reports
Under the GoldMine and Crystal sections, there are subsections called categories. These categories
cannot be edited, nor can other categories be added. It is recommended to be mindful of where you
are saving your cloned or newly created reports in regards to these categories. You should not place
a Calendar report under the Contacts or Labels category.
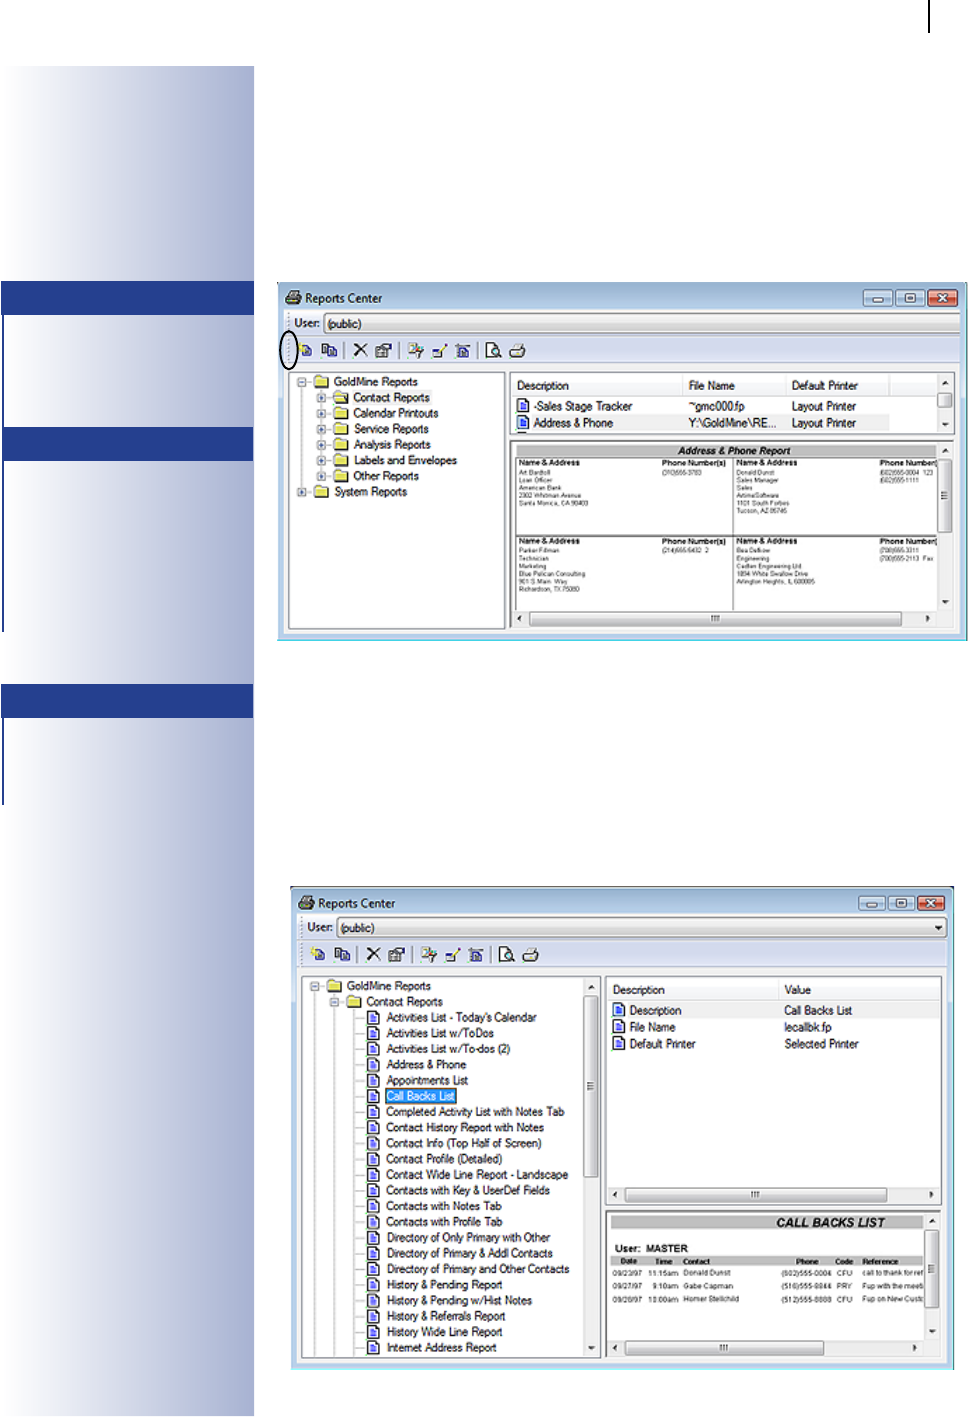
Let’s start with running an existing report. Refer to Figure 12-4 below. Expand the subcategory
branch called Contact Reports located under GoldMine Reports tree in the left column for the
(public) UserID. You should see several preexisting reports in this column. By clicking once to high-
light a report in the tree the right frame of the Report Center dialog form comes to life. You should
also see a jepg of the report in the bottom right frame as well as a Description, the File Name, and
the Default Printer it is designed to run with in the top right frame. Layout printer means that the
print driver that the report will use is that of the default printer selected in GoldMine at designed time.
Selected printer is the printer the user chooses. This does make a difference at runtime. You might
nd that some things that run ne for you might be chopped off for another user. This is because of
the various possible printer drivers called at runtime.
Note
You may have noticed, Figure 12-3,
that I have exposed the Report Center
Toolbar. I have done this by dragging
the highlighted handle of the Report
Center Toolbar under the User: Tool-
bar.
Note
Highlighting a Category from the tree
exposes a list of the reports contained
within that category to the right. High-
lighting a Report from the exposed list
will cause an image of the report to
display below the list items. This only
holds true for the default GoldMine re-
ports unless you create your own re-
port images in the proper manner for
the reports which you create.
Figure 12-3
Figure 12-4
Note
For the report image to display, the
image must reside in the Reports
folder under the GoldMine folder, and
it must have the exact same name as
the report with the .jpg extension.

GoldMine Report Writer
GoldMine Premium - The Denitive Guide
268
Your copy of GoldMine comes with pre-made reports. These reports are located under the UserID
(public), and the report type of GoldMine. By right clicking on a report, and left clicking on Proper-
ties... you can nd additional notes on how the report runs as well as for what it may be used.
Under the Contact Reports category branch, the following reports should be available;
Description File Name Report Summary
Activities List - Today’s Calendar abactvt.fp Reads from System date, and returns only activities for
run date.
Activities List w/ToDos abactvu.fp Works with Options tab, and returns activities based on
selection.
Activities List w/To-dos (2) abactlst.fp Works with Options tab, and returns activities based on
selection.
Address & Phone leaddrph.fp Works with external lters, and gives summary in busi-
ness card size area.
Completed Activity List w/Notes lecmphst.fp Displays completed activities by contact record as well as
the Notes tab. Works best with current contact or ltered
group - should not be used on all contact records unless
database is very small.
Contact Details contprof.fp Displays a snapshot of complete record, Pending, His-
tory, Details. Works best with current contact.
Contact History Report w/Notes lecomhst.fp Displays Contact1 address info as well as completed ac-
tivities, and the Notes entered on those activities.
Contact Info (Top Half of Screen) smpcontp.fp Displays Contact1 info as well as Summary tab, and User
Dened elds.
Contact Wide Line Report-Landscape contline.fp Displays Address information is landscape format. One
record per line. Works best for large lters.
Contacts with Details Tab smppt.fp Displays Address info, UserDef elds, Key elds, Sum-
mary tab, and Details tab.
Contacts w/Key & UserDef Fields lekeyusr.fp Displays Company, Primary Contact, UserDef elds, Key
elds, and Notes.
Contacts w/Notes Tab smpnt.fp Similar to Contact Prole Detailed except only displays
Contact1, Contact2, and Notes.
Directory of Only Primary w/Other wwdir500.fp Displays Primary Contact as well as Other Contacts. Will
not display if nothing is entered under the Contacts tab.
Directory Prim & Addl Contacts abpcoc.fp Same graphical format as above listed report, list all re-
cords in external lter criteria.
Directory Prim & Other Contacts wwdir.fp Same basic graphical format, and properties as above
listed report. Other Contacts display in bold.
History & Pending Report smph&pts.fp Displays Address info, Key elds, User Dened elds,
Pending & History activities.
History & Pending w/Hist Notes abp&hn.fp Displays same as above listed report as well as Notes
entered in History activity.
History & Referrals Report histref.fp Displays Address, Key elds, User Dened elds, History
activity - no Notes. Good for current Contact only or small
lter.
History Wide Line Report histline.fp Landscape format, lists 1 history activity per line. Good
for running against larger lters, date range set in Options
tab.
Internet Address Report Intadd.fp E-mail Address list. Good for small ltered groups due to
format. Not meant for current Contact.
Linked Documents lelink.fp Displays Linked Documents. Best used in lter or all
Contact records. Not meant for current Contact only.
Message List smpml2.fp E-mail sent report. Not meant to use on current Contact
only. Date range set in Options tab.
Next Actions List smpnal2.fp Displays Pending Next Actions. Date range, and User
set in Options tab.
Organizational Tree orgtree.fp Lists all Relationship trees. MUST use all contact records
at runtime. Will not work with lter or current Contact.
Other Contacts Listing oclist.fp Lists Additional Contacts. Not meant for current Contact
only.
Pending Activity Report lefutact.fp Displays Pending activities specied in Options tab.
Pending Call List lecallbk.fp Returns calls in range selected in Options tab. Even
though it says Call Backs, it means all calls.
Note
Remember, in GoldMine Premium,
each default report has an associated
example image of that report.
For the report image to display, the
image must reside in the Reports
folder under the GoldMine folder, and
it must have the exact same name as
the report with the .jpg extension.
When the report is highlighted, in the
list of reports, the report example will
be displayed in the lower right quad-
rant of the dialog form.
Existing Re-
ports
Contact Reports

GoldMine Report Writer
GoldMine Premium - The Denitive Guide
269
Pending Wide Line Report smppwlr.fp Landscape format. Displays Pending activities specied
in Options tab.
Phone Book fonelist.fp Contact1 telephone list. Can use Sorts tab to set lookup
or external lter or both.
Phone Book (Primary & Additional) foneoth.fp Phone list for both Primary and Additional Contacts. Can
use Sorts tab, and external lters.
Phone Book Business Card Style fonebus.fp Lists Primary Contact record Phone, Address info in busi-
ness card graphical format.
Phone1 & Fax Report-Landscape le4fones.fp Lists Company, Contact, Phone1 and Fax.
Potential Dupe Contact Report smpdupch.fp Not the most accurate of reports, looks for potential dupli-
cate records.
Referral List abreferl.fp Displays Contact1 info for Referrals made; this record
was referred to this record.
Referral Status Report refstdtl.fp Lists Contact1 info for Referrals as well as the status se-
lected in Referral tab properties.
Today’s Appointments leapptls.fp Returns appointments selected in Options tab.
To-Do Listing smptd.fp Lists To-Do’s. MUST use all Contact records. Will not
work with current Contact or lter.
Under the Calendar Printouts category branch, the following reports are available:
Description File Name Report Summary
*Calendar Default Report c1.fp Lists Calendar Notes, not activities.
Activities Monthly lemonth.fp Displays Calendar in Month graphical format.
Daily - DayTimer (detailed) caldv.fp Displays by Day, Daytimer format Calendar with Contact
details. Folio size only.
Daily - DayTimer (summary) caldf.fp Displays by Day, Daytimer Summary format. Folio size
only. By default will insert current date into date range,
but you can change that.
Daily Appointment List c1fp000.fp Displays Scheduled Appointments, Contact, Duration,
Time, Date, Reference, and Notes.
Monthly - DayTimer calmv.fp Displays Calendar in Month graphical format. Folio size
only, and runs current month but you can alter dates.
Weekly - Day Timer*Avery 41357 calwl.fp Prints 2 Daytime Desk size pages per 8 1/2 X 11 piece of
paper.
Weekly - DayTimer (portrait) calwl000.fp Prints Folio size Daytimer calendar in Week graphical for-
mat. Auto inserts current week, but dates can be altered.
Weekly Appointment List (portrait) smpwalst.fp Prints Folio size Daytimer in Week graphical format. Only
displays Appointments.
Why don’t we take a look at the
Options that I have been dis-
cussing. You can bring up Figure
12-5 in your copy of GoldMine
Premium by right-clicking on any
report within the Report Center,
and selecting Properties... from
the local menu. Next click on the
Options tab in the dialog form. I
might add that the Options tab
displayed in Figure 12-5 is from
a Clone of one of the Weekly
Day Timers, which brings up a
good point, never work on the
original, always work on a Clone.
You will notice that there are four
frames on this dialog form this
time, one untitled, and three that
are titled. The rst frame, and
also the untitled frame, is the
rst of our ltering sets. You may
set the User: to lter the report
for the (Current User), the user
that is logged into GoldMine, or
Note
Remember, in GoldMine Premium,
each default report has an associated
example image of that report.
For the report image to display, the
image must reside in the Reports
folder under the GoldMine folder, and
it must have the exact same name as
the report with the .jpg extension.
When the report is highlighted, in the
list of reports, the report example will
be displayed in the lower right quad-
rant of the dialog form.
Figure 12-5
Note
If you wish to alter the dates that the
report is looking at, you will not be
able to reach the Options tab from the
Print a Report menu. You will need to
go to the Report Center, and open the
Options tab.
One should never consider modifying
any of the default reports in any man-
ner. One should always Clone the re-
port, and then modify the Clone.
WARNING
Calendar Printouts
GoldMine Report Writer
GoldMine Premium - The Denitive Guide
270
alternatively, for a specic user. For these particular report types, you cannot Filter against a User
Group. (Current User) will display only the activities for the person currently running the report, and
is typically the best choice. In the same frame, we next have a date range that can be applied as our
Filter. There is the from Date:, and the To: date for the Filter range. Lastly, and still in this frame,
we also have a time range that can be applied. There is the from Time:, as well as the To: time for
the completion of the range.
The next Filter that we can apply is via the Include Activities frame. As the frame title indicates, you
may Filter on the various Cal.RecTypes ( refer to The Tables chapter ) that are available simply by
checking or unchecking the appropriate boxes. Those that are checked will be included in the report
at runtime, while those that are unchecked, at runtime, will not be included.
Now it is your choice as to the information to include in these types of report, and you do so using
the Detail Text frame. Again, you have checkbox options to toggle on or off. I won’t reiterate the
list here, however, you have 7 pieces of additional information that may be included in your output
at runtime.
Lastly, on this dialog form, you have the Page Layout. Notice that there is no hot key for this frame.
As a general rule, do not change the settings in this frame.
And under the Service Reports category branch, the following reports are available:
Description File Name Report Summary
Assigned Cases by User SRAssignedCases.fp Prints Assigned Cases by the UserID, Start
Date.
Resolved Cases by User SRResolvedCases.fp Prints Resolved Cases by the UserID, Start
Date.
Resolved Cases by User per Mont SRResolvedCasesPer Month.fp Prints Resolved Cases by the UserID, Start
Date with a further breakdown by Month.
Service Report - Pending & History SRH&P.fp Prints the Case Details as well as a listing of
any Pending or Historical activities related
to this Case.
Service Report w/Tasks SRT.fp Prints the Case Details as well as a listing of
open Tasks remaining for this Case..
Under the Analysis Reports category branch, the following reports are available:
Description File Name Report Summary
*Opportunity Code Report abopidrp.fp Prints Opportunities by the ID GoldMine assigns, UserID,
Start date.
*Opportunity Report - Pending & History aboph&P.fp Prints full detail of opportunity. Pending items as well as
History, Contact information.
*Opportunity Report w/Tasks abopmgrr.fp Prints Opportunity with Task details, Competitor, Inuenc-
ers, and Contact information.
*Project Code Report oppcdrpt.fp Prints Projects by the ID GoldMine assigns, UserID, Start
date.
*Project Report - Pending & History abpjh&p.fp Prints full detail of project. Pending items as well as His-
tory, Contact information.
*Project Report w/Tasks abprjmgr.fp Prints Project with Task details, Competitor, Inuencers,
and Contact information.
Completed Sales by User compsale.fp Prints Completed Sales for all Users. This can be
changed to a single user in Sorts tab.
Completed Sales by User per Month smpcsum.fp Prints Completed Sales for Current User, and lists by
Month Sale in which the sale was completed.
Completed Sales by User per Month (2) conta003.fp Prints Completed Sales for all Users, and lists by Month
Sale in which the sale was completed.
Forcasted Sales Funnel by Cycle(detail) smpfsfcd.fp This report has a dialog for rate range, do not use the Op-
tions tab to set the date range. The Funnel is a display
Summary by Probability.
Forecasted Sales by User smpfsru.fp Lists Forecasted Sales for Current User as well as a total
for the Company, and Closing Ratio based on Probability.
Forecasted Sales by User (2) smpsfse.fp Lists Forecasted Sales for Current User.
Forecasted Sales-User per Month smpfsum.fp Prints Forecasted Sales for Current User, and lists by
Month Sale according to sale date.
Forecasted Sales by User per Month (2) smpsfum.fp Prints Forecasted Sales for all Users, and lists by Month
Sales according to sale date.
Service Reports
Note
Remember, in GoldMine Premium,
each default report has an associated
example image of that report.
For the report image to display, the
image must reside in the Reports
folder under the GoldMine folder, and
it must have the exact same name as
the report with the .jpg extension.
When the report is highlighted, in the
list of reports, the report example will
be displayed in the lower right quad-
rant of the dialog form.
Analysis Reports
Note
By program default, these reports in-
sert a date range that includes any-
thing that you’ll ever do. To help the
report performance, change the date
range to only what is actually needed.
Note
For reports that use a dialog for the
date range, make sure your Options
tab for that report has an end date that
is very far into the future ( by as much
as 10 years or more ).
GoldMine Report Writer
GoldMine Premium - The Denitive Guide
271
Forecasted Sales Funnel/Month(Yearly) smpfsfms.fp Prints Forecasted Sales. Uses dialog for date range. Also
displays numeric information by Probability.
Forecasted Sales Funnel by User smpsf.fp Same graphical display as Forecasted Sales Yearly, but
by User. Also uses dialogs for date range.
Forecasted Sales Funnel-User (Detail) smpsf2.fp This report has a dialog for date range, do not use Op-
tions tab to set the date range. It also lists for the Current
User. The Funnel is a display summary by Probability.
Opportunity Manager: Opportunities smpo&p.fp Prints existing Opportunities. Can also use on the current
selected record.
Opportunity Manager: Projects smpo&p2.fp Prints existing Projects. Can also use on the current selected
record.
Opportunity Manager: Opportunities (2) abopmgro.fp Prints existing Opportunities, but advances page after
each one.
Opportunity Manager: Projects (2) abopmgrp.fp Prints existing Projects, but advances page after each
one.
Phone Calls Log conta001.fp Prints on Current User. Lists Phone Calls com-pleted as
well as at end of report gives Statistics, Call made, Incom-
ing, Outgoing, etc…
Phone Calls Statistics conta002.fp Gives Completed Phone Call Statistics, Duration, Incom-
ing, Outgoing, etc…
Scheduled Activities Analysis smpactan.fp Gives Statistics to Pending activities by User. Total #
Calls, Appointments, etc…. Can limit User in Sorts op-
tions.
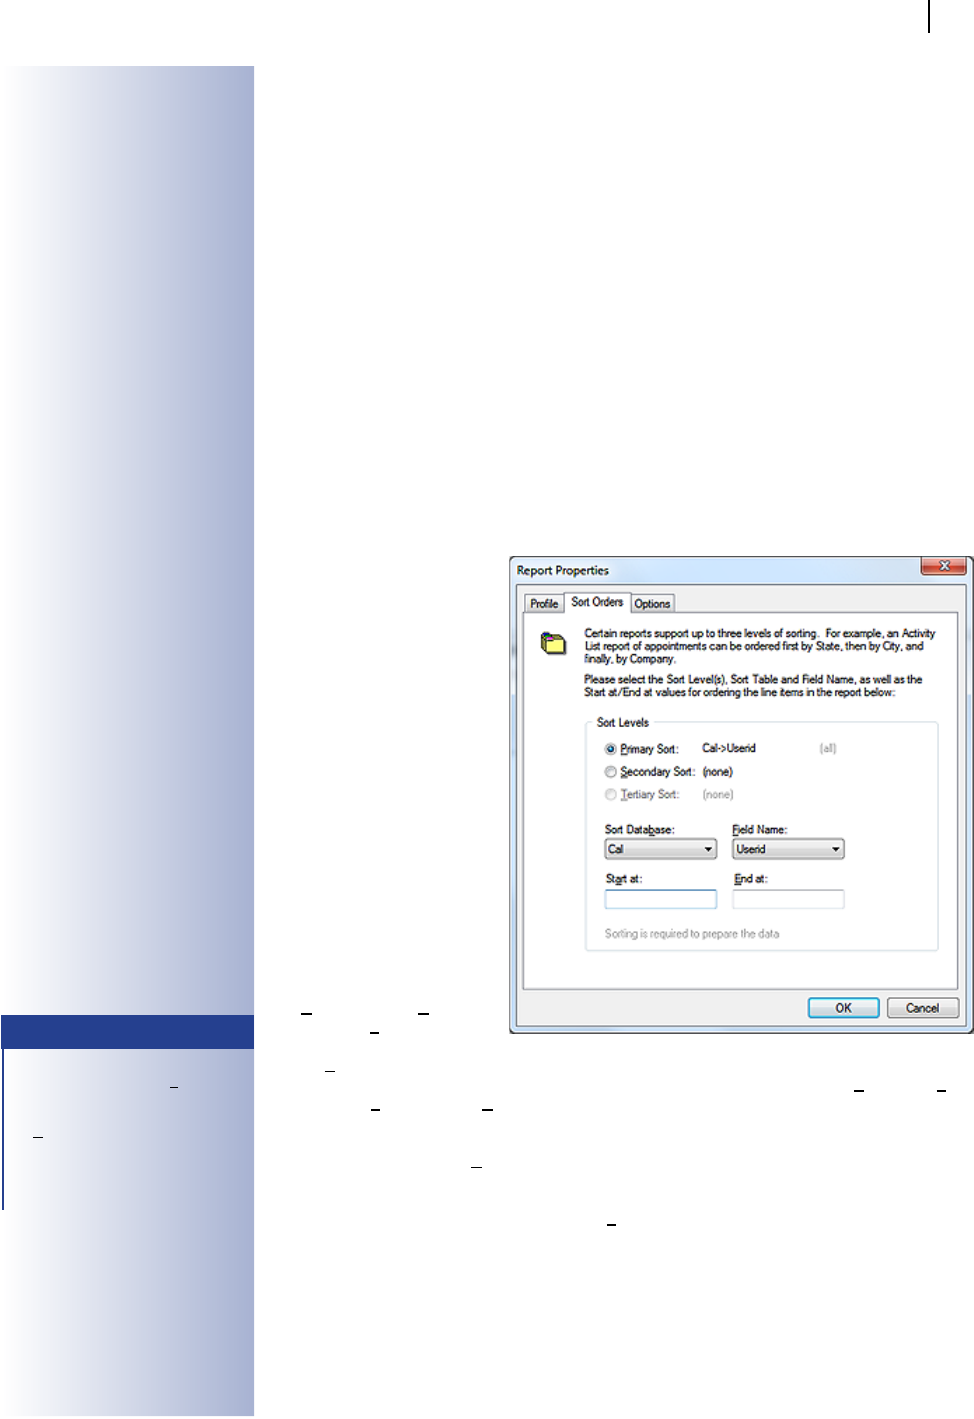
Since I have discussed the pos-
sible use of the sorting option, it
would only be fair that we dis-
cuss this in more detail. I have
selected the Sort Orders option
for the Scheduled Activities
Analysis report as my example,
and this can be seen here in Fig-
ure 12-6.
One of the rst things that you
may have noticed is that these
are radio button options which
would leave one to believe that
this report could only have one
sort order per report. Obvi-
ously, this could not be true,
or very useful either. Again,
the GoldMine developers have
used a control, the radio button
control, in a non conventional
manner. In fact, there are three
sort orders that you can control,
the Primary Sort:, Secondary
Sort: and the Tertiary Sort.
The Primary Sort: is always
selected when this dialog form is viewed, and the information in the Sort Database:, the Field
Name:, the Start at:, and the End at: elds all pertain to the selected sort which, in this case, is the
primary sort.
You may then select the Secondary Sort: option, and modify the information as is appropriate
for your report.
Lastly, if you need it, you may then select the Tertiary Sort: option, and customize the information
for the tertiary sort as is appropriate to your report.
I would like to reiterate once more, that making any changes, any where on the delivered GoldMine
reports could be detrimental. You should always, repeat always, be modifying a cloned copy of the
report in case any changes that you make in your testing crash the report or make it unusable. Trust
me as I speak from having worked to recover many client reports that magically just stopped working.
Labels and Envelopes have pretty much had the same standard list since GoldMine 3.2 ( perhaps
even earlier ). There are several different Avery label sizes, and standard size envelopes. Where the
envelope size may have not altered since 1995, the labels have changed in size. They have been
Labels & Envelopes
Figure 12-6
Note
You could limit a report, that lists all
Users, by changing the Start at: value
which may have AAA, to the UserID,
and then entering the same UserID in
the End at: eld.
So instead of it saying from AAA to
ZZZ, it could now say from ANDREA
to ANDREAz.
GoldMine Report Writer
GoldMine Premium - The Denitive Guide
272
changed to accommodate deskjets, inkjets and laser printers. Since there are so many printers on
the market, the labels tend to creep at runtime. Later in the chapter I will give detailed instructions
on how to prevent the label creeping.
Under the Other Reports category branch, the following reports are available:
Description File Name Report Summary
Filters Listing wwlter.fp Lists lters for all UserIDs complete with the expression (
in English as well as dBase ). Can limit to single UserID
in Sorts tab.
Lookup File Listing lookup.fp Lists the contents of a Lookup menu which is controlled in
Sorts tab.
MailBox Report smpmailb.fp Displays E-mail sent and received. UserID and Date
Range is controlled in Sorts tab.
Merge Form List formlist.fp Lists Merge Forms by UserID.
Scripts Report lescript.fp Displays Telemarketing Scripts
Users List smpuslt.fp GoldMine User list. Also shows last Login/Logout time,
Date, Full username.
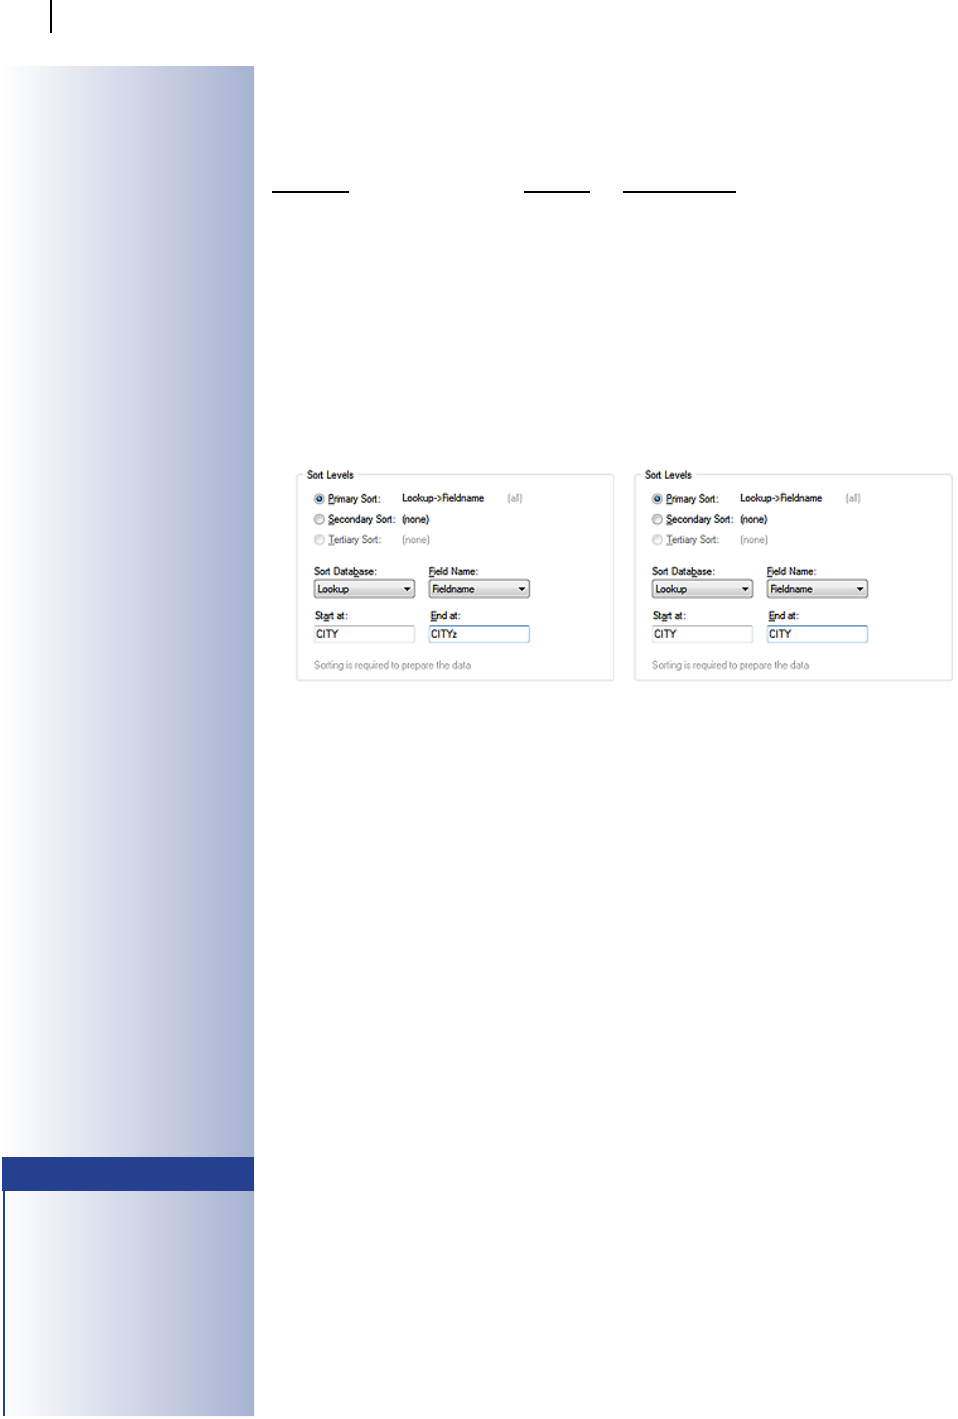
Pay close attention to Sort Levels in the Other Reports category branch, for that matter, pay close
attention to Sort Levels in all category branches. For example, the Lookup Listing Report has, in
the default state, on the Lookup.FieldName with no sort range specied. In Figures 7a & 7b above
I show you two possible sort ranges. The sort range in Figure 7a, when printed, will produce results
while the sort range in Figure 7b will produce a blank page. The rst sort range, Figure 12-7a, re-
quires an extra character to see the entire list, and the report returns what is asked for as expected.
The second sort range, Figure 12-7b, is missing that extra character, and did not return any results.
You can have up to three sorts for any given report. Sorting is a type ltering that is activated at
runtime. It does not function until all of the records have been read into the view by the report. Sort
Levels is also how the report will be graphically grouped. When creating your report sorting, it is
best to approach it as you would with creating a complex GoldMine Filter. The Primary Sort is the
largest body of data to be reviewed. If you are creating a report on a contact listing by City, then your
Primary Sort would be City unless the database is using record curtaining, and there are far more
records in the curtained group. I showed you a typical Sort Orders dialog form in Figures 7a & 7b.
In the report itself, however, you could add a 4th sort. By going into the properties of the fourth sort,
and adding an additional lter. You can also add further lters to the properties of all the sorts such
as particular RecTypes.
You can select Users, Date Ranges and Activity Types if you are running History or Pending reports.
It is generally a good rule of thumb practice to limit user’s exposure to this area. If the report needs to
be exible for items such as being able to change activity type or user, inserting runtime parameters,
called Dialogs, is a much better approach.
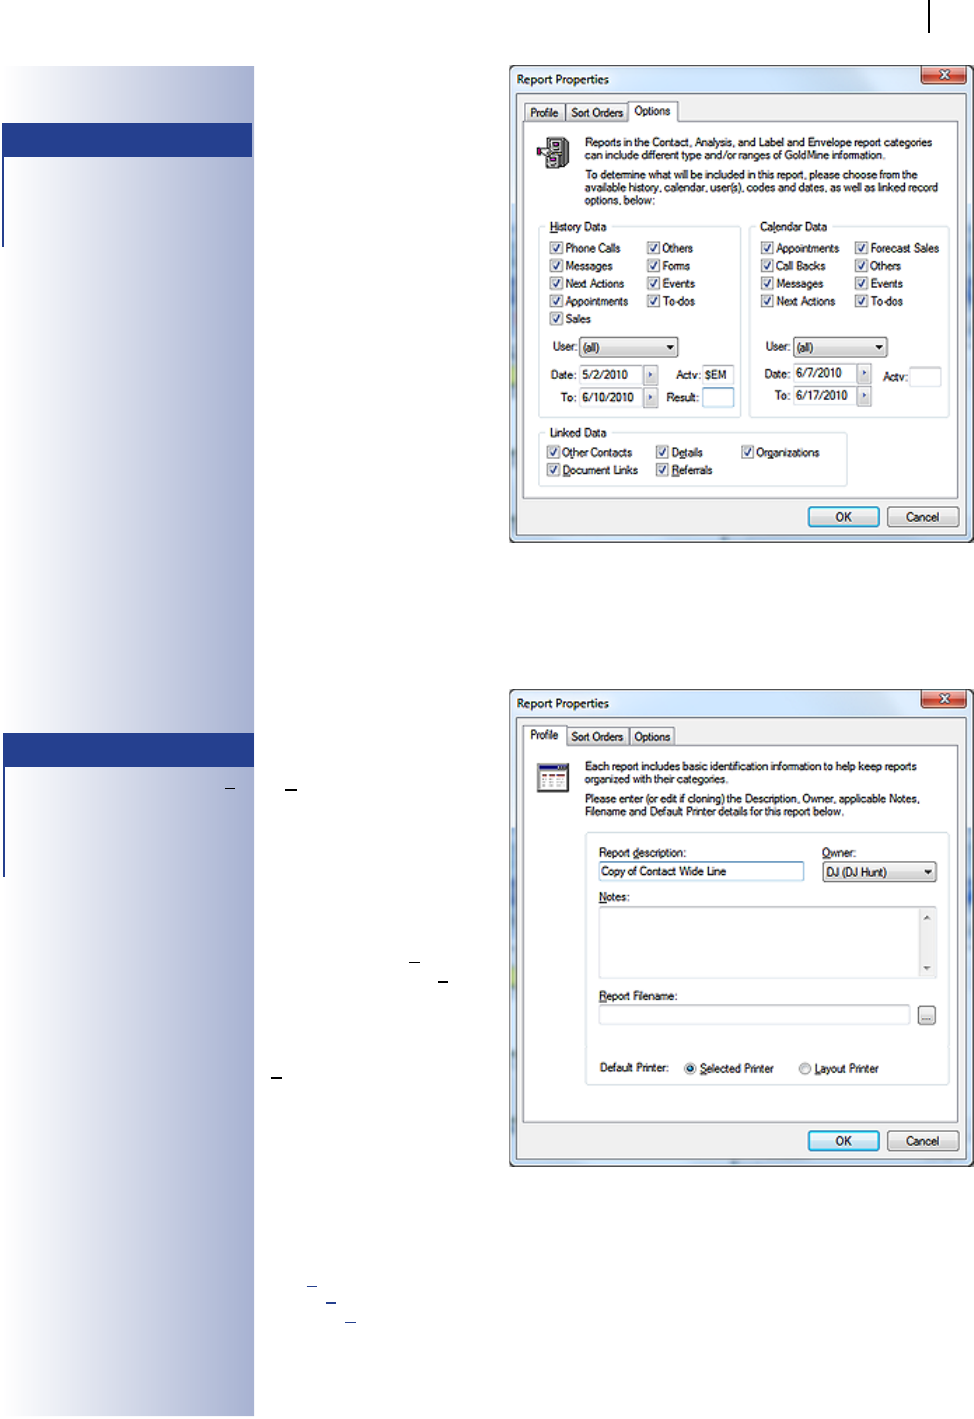
The Options tab is divided into different sections depending on the category. If the report is some-
thing like the History and Pending Report located under the Contact Reports category branch,
then both sections need to be altered prior to running the report. Where as, if the report were strictly
a History report then you would only need to adjust the options in the History Data frame.
The Options dialog form shown in Figure 12-8, on the next page, appears for all report categories
with the exception of the Calendar Printouts, and the Service Reports categories, however, in La-
bels and Envelopes category, the Options settings do not do much for the end result. See Figure
12-5, and the detailed explanation accompanying it, for the Calendar Printouts category Options.
If the report that you want to create is very similar to an existing report, it is far easier to clone that
report, and to add your customizations instead of creating the report scratch. In my experience, His-
Other Reports
Figure 12-7a Figure 12-7b
Customizing
Reports
Sort Levels
Options
Note
If you are running a report such as
History & Pending Report for a
single GoldMine UserID, you will need
to change the UserID from (all) to the
GoldMine UserID in both History Data
frame, and the Calendar Data frame.
And do not forget to set the Date
Range. Typically if a report like this
is going to be accessed by several us-
ers, it is recommended that you do not
let the users modify the Options tab,
and to use report dialogs instead.
GoldMine Report Writer
GoldMine Premium - The Denitive Guide
273
tory reports and Forecast Analy-
sis reports are usually easier to
create from scratch rather than
cloning a report that is slightly
like the end result you are after.
Opportunity reports are easier to
do by cloning an existing report,
and altering to suit your specic
needs.
To clone a report rst nd the re-
port you wish to clone, and then
right-click on it. A local menu will
appear, click on Clone.... The
Report Properties dialog form
will then open. By program de-
fault, the cloned report will ap-
pear in the title box with Copy of
inserted in front of it, see Figure
12-9.
You may change this name at
any time. The owner should be
you unless you are creating this
report for another specic user.
Alternatively, if you listened to
my suggestion earlier and cre-
ated a specic Reports UserID than you may want to select that UserID from the drop list. After the
report is nished, you could change it to the (public) user for others to use although I still don’t rec-
ommend that you intermingle your custom reports within the GoldMine default reports. The cloned
report will then be inserted into the same category branch from which it was cloned, but under
the specied UserID. Calendar reports under (public) go to Calendar reports under your UserID.
It is best to keep them in their
categories, and to not attempt
to move them to other category
branches.
A Report Filename: then needs
to be created. You can make
it anything that you wish it to
be. Pay attention to the length,
it does not need to match the
title name, but it should be de-
scriptive enough so that you will
recognize it when in Windows
Explorer. Also, do not use any
punctuation in the Report File-
name:, the Report descrip-
tion:, however, is a whole differ-
ent story.
You could put notes in the
Notes: section if you want to,
but it is not necessary. Yet it
could be helpful when reviewing
the report in the future. Now you
need to go to Sort Orders, and
then to Options to establish the
rst set of parameters if they are
to be different than those in the original report.
To create a new report, open the Reports Center:
Go To
Reports ►
Reports
Select your User:, if it is not already present there for you, and then, under the GoldMine Reports
branch, nd the category branch that your report will run under.
Cloning vrs Creating
New Reports
Figure 12-8
No where do I mention modifying a
GoldMine pre-installed report. You
should always Clone these reports as
opposed to modifying them regardless
of your reason.
WARNING
Figure 12-9
Note
All that you need to do is enter a Re-
port Filename: such as Contact_
List. Click on the OK button, and the
Report Properties dialog form will
then create the le in the Reports
folder under the GoldMine root folder.
GoldMine Report Writer
GoldMine Premium - The Denitive Guide
274
Contact Lists, History reports belong under Contact Reports
Calendar Reports belong under Calendar Reports
Forecasted Sales, Opportunity Reports belong under Analysis Reports
There is also the Service Reports, Labels and Enve-
lopes, and the Other Reports branches that are avail-
able to you for this exercise. Keep in mind that what
category, and what type of report you are running does
matter. Different report macros are activated depending
on category.
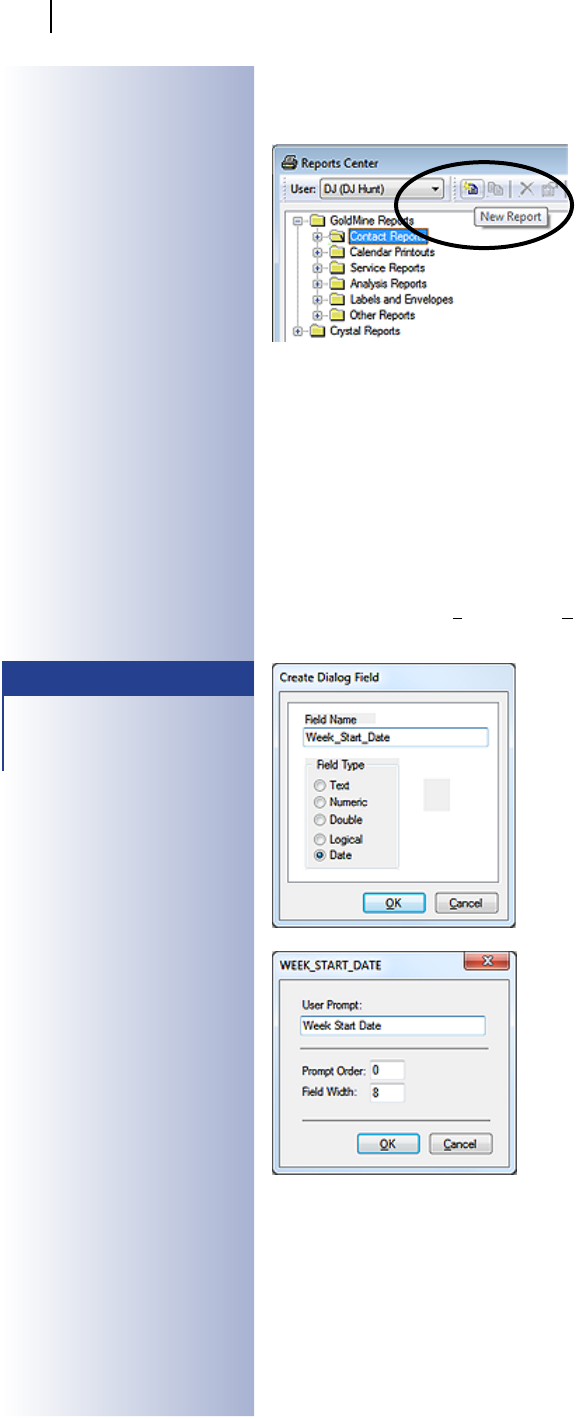
You can either right-click on the category that your new
report will belong under, and select New from the local
menu or click on the category to highlight it, and then
push the New Report button in the report toolbar as
shown here in Figure 12-10.
Most people make an assumption that when one creates a report that all of the work must be ac-
complished by the report formulas. Truth be told, the more you can get ltering involved the faster
your report will run. You can use GoldMine’s own Filters and Groups for very large databases, but
the report writer comes with several of its own ltering functions.
Report Filters - report lters are used when the report begins running. Dialogs may be inserted into
this area as well to facilitate the correct ltering. This is how the dialog prompts appear at runtime.
If you are creating a report for a particular activity type, inserting that condition into the report lters
will make the report run faster.
Sort Tab - You can put a lter on the sorts, pun not intended, such as if a sort is by State, you can
enter the State in both Start at: and the End at: elds. The report will return only the records that
are in that range.
Dialog – A dialog is a prompt that is inserted into the report, and
prompts the user to enter a value at runtime, such as a date
range. To create a dialog, open the report layout, and place your
cursor anywhere on the report. Right-click, and a local menu will
appear. Select Dialog Fields Table
►, and then select Cre-
ate.... The Create Dialog Field dialog form will appear, Figure
12-11. Create a name for the parameter, and then select the
type of parameter it is.
You see that I am creating a new dialog eld to be utilized in a
particular report. The Field Name will be the actual name of the
report variable so it may not contain any spaces or special char-
acters other than the underscore as shown here in Figure 12-11.
In the next frame, Field Type, you have the following possible
types available:
Text - string values. It is good for a UserID or the name of a
city for instance.
Numeric - numeric values only. To be used for elds that are
truly numeric, and not numeric text.
Double - for oat values.
Logical - returns True/False, Yes/No values.
Date - for values such as CreateOn or OnDate.
To make the input dialog look nicer at runtime, you can modify
the dialog eld to remove the existing underscores from the actual User Prompt:, and replace them
with spaces. Refer to Figure 12-12. To do this, right-click in the body of the report, and go to:
DialogFieldsTable►
Modify... Ctrl+M
Now select the dialog that you wish to modify.
The name with the underscores will remain displayed in the titlebar. You can now give it a totally dif-
ferent name in the User Prompt: eld which could include spaces and/or special characters.
Figure 12-10
Filtering
Tip
To create a dialog eld that is more
than one word, use the underscore
character. To create dialog eld for
start date, name it start_date.
Figure 12-11
Figure 12-12

GoldMine Report Writer
GoldMine Premium - The Denitive Guide
275
Prompt Order: tells the report in which order this dialog input request will appear. If you are just
inserting two dialogs for date range ( Start at & End at ) then you do not need to do anything with
prompt order, the report lter will take care of it. Also the report should display prompts in the order
of the report lter. There are instances when dialogs are required at different phases during runtime.
If this is the case, then you should use Prompt Order: for all dialogs in your report.
The Field Width: is the standard width that is associated with the type of dialog that you had chosen.
In most cases, leaving it alone is a good idea. However, you can change a date width. 8 is for MM/
DD/YYYY, 6 would be for MM/DD/YY, etcetera.
Just creating the dialog is not enough. You must now tell the report to use it. Right-click on your
report, and, from the local menu, select:
ReportSettings►
Filter... Ctrl+F7
Now you should see the Report Selection Criteria dialog form.
Report Filter Dialog examples:
Returning History records for a Date Range
Create a dialog eld for Start_Date Date
Create a dialog eld for End_Date Date
Create a dialog eld for UserID Text
Then insert the following into the Report Filter:
(ContHist->OnDate >= dlg->Start_Date .and. ContHist->OnDate <= dlg->End_Date)
This will return all records that where the ContHist.OnDate is within the date range as specied by
the user running the report in the dialog elds.
Now let’s add the dialog eld for UserID into this report lter.
(ContHist->OnDate >= dlg->Start_Date .and. ContHist->OnDate <= dlg->End_Date) .and. ContHist-
>UserID = dlg->UserID
When the report starts to run this time, it will ask for date range rst, and then the UserID for which to
look. You could insert the UserID rst, but you may see a performance difference at runtime unless
it is a single user database.
ReturningSpeciedActivities
This gets a little trickier because the database itself does not know what Appointment means, and
unless you can get the end user to understand to type an A then you need to convert the values at
runtime in the report lter using the if/then/else functionality.
First create a text dialog for Activity. Then, in this report lter, insert the following:
.if. dlg->Activity = [Appointment] .then. ContHist->sRecType = [A] .else.if. dlg->Activity = [Phone]
.then. ContHist->sRecType = [C] .else. ContHist->sRecType $ [D O T M]
Formulas and expressions can be used to return numerical data, such as the total number of activi-
ties. Expressions can be used to return boolean values, such as if a primary contact name is Joe
then display on the report Joseph or True/False values. These are just two simple examples of what
you can do with formulas and expressions, the list below will give a far better denition.
When to use a formula, and when to use an expression? The basic rule of thumb is; if you do not see
the function listed in the builder then more than likely it will need to be an expression.
Creating Formulas
Insert►
Expression Field F3
Open the formula builder ( which is called Calculation Field Name, and shows up in the report as a
CALC eld ), and the rst thing that it will ask is to name your formula. You cannot have any spaces
in the formula name similar to the dialog eld name, but it is possible to make it look like it is more
than one word by using the underscore character. So, instead of Count the Records, create the
name as we have, for example, see Figure 12-13 titlebar, COUNT_EM.
Tip
If you can get your users to follow the
structure of the &CalActvName and
&ContHistActvName macros, then
you can use that instead of writing out
the translation.
Tip
If the eld that you are creating your
dialog on is a string eld yet contains
numeric text, do not use a numeric
dialog unless you want to create a for-
mula to convert the numeric text into
a numeric value and then attach your
dialog to that formula.
Formulas & Expres-
sions
GoldMine Report Writer
GoldMine Premium - The Denitive Guide
276
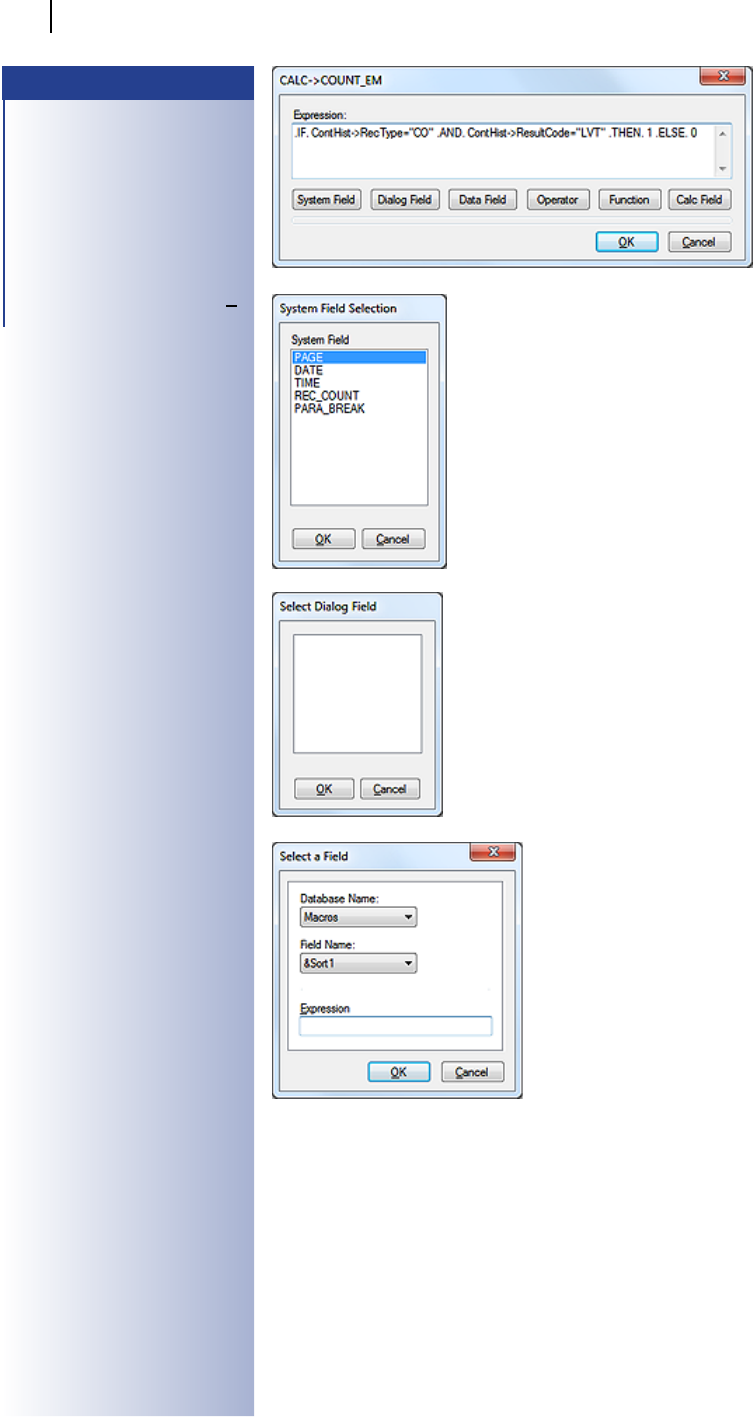
Push the OK button, and the
formula builder opens, Figure
12-13. You could type your
expression in the window or
use the buttons below the ex-
pression window to assist you
in your expression building.
System Field - Figure 12-14,
is used to insert print Date,
Time, or the Page number
into your expression. You
could also insert a Paragraph Break, and a total Record Count for the
criteria met on the report. Some of these items would, most likely, not be
utilized in an expression as much as in the report itself.
Dialog Field - Figure 12-15 - any dialog ( user entry prompt ) that is cre-
ated for this report will be listed in the Select Dialog Field dialog form
for insertion into the expression that you are building for this report. You
cannot create a dialog from this window, and your dialogs must have been
created prior to bring up this dialog form for insertion of a dialog eld into
your expression.
Data Field - Figure 12-16 - database elds ( refer to other sections of this
book for eld denitions ), and macros that may be utilized in your expres-
sion. There is one extra option in the Database Name: drop list that is not
a table alias, and it is called Macros. Macros are like shortcuts. Such
as you can use &FullAddress in your report instead of manually inserting
each eld that would create the full address. Below are the macros that
can be used when inserting a new report into the Contacts category or in
your expression, however, even though I am showing you these through
the expression builder dialog form, you would probably not utilize any of
the macros in your expression.
&Sort1 - displays the sort1 label
&Sort2 - displays the sort2 label
&Sort3 - displays the sort3 label
&SourceFile - the database that is being used in the report
&CalActvName - list the activity type such as Appointment
from the Cal table
&HistActvName - list the activity type such as Appointment
from the ContHist Table
&Contact,Company - displays Contact, and the Company
name in that order, separated by a comma
&Company,Contact - displays Company, and the Contact
name in that order, separated by a comma
&Name&Address - lists the Contacts name along with the
Address
&Title&Address - lists the Title value along with the Address
&Company&Address - lists the Company name along with the
Address
&FullAddress - list entire address including the Country eld
&Address1&2 - list Address lines 1, and 2
&CityStateZip - list City, State and Zipcode with the City State values separated via a comma
&Phones - lists all 3 phone elds
&User - the GoldMine UserID for the user running the report
&FullName - the GoldMine users full name who is running the report
&Licensee - lists the name to which GoldMine is licensed
&EmailAddress - lists the primary E-mail Address for the Contact record that is currently being
reported upon
Figure 12-13
Note
If you are new to dbase expressions, it
is a good idea to use the formula build-
er so you can get familiar with how the
syntax is structured. It is generally not
a good idea to have spaces in your
formula unless you are telling it to look
for a space, however, GoldMine will
automatically remove any spaces that
you may have added for readability.
The space shown in the expression
in Figure 12-13, for instance, will be
removed when one clicks on the OK
button.
Figure 12-14
Figure 12-15
Figure 12-16

GoldMine Report Writer
GoldMine Premium - The Denitive Guide
277
When you are creating a Pending Activity Report that you have inserted into the Calendar cat-
egory, the below macros could be used as well as the previously listed with the exception of sorts
because it is no longer a tab option.
&Detail1 - displays information entered in the Options tab - such as UserID, Date Range, and Activi-
ties
&ActvName - lists the activity name
&Year - displays current year in a 4 digit format. For instance, if the eld says 9/20/07, the report
displays 2007
&Month - displays numeric value for the month. September would be displayed as 9
&CMonth - displays a text value for the month. 9/1/07 would display as September
&CMonthYr - displays the Month along with the 4 digit year. 9/1/07 would display as September
2007
&Date - displays current date, however, it could be used in date range expression
&DoW - displays the numeric day of week value for the date in question. Sunday being rst day of
the week would return a 0, whereas, Monday would display as a 1
&CDoW - displays the text day of week similar to DOW, 1 would display as Monday
&DayNo - works on calendar year. 9/20/2007 would display as 263
&WeekNo - Works on calendar year. 9/20/2007 would display as 38
&WDay1, &WDay3, &WDay4, &WDay7 - returns a numeric date value. WDAY1 = Monday, 3 =
Wednesday, 4=Thursday, 7=Sunday. If the record that is being reviewed by the report falls on a
Tuesday, Sept. 4th, and if you are using &WDay1, the report will display a 3. By using the same
example, &WDay3 would display 5, &WDay4 would display 6.
&Hour, &Time, &Duration - will all display in a 12 hour format
&FrDate, &ToDate - From Date, and To end Date respectively
&LastMonth, &ThisMonth, &NextMonth - all displays Cal records from last month, this month or
next month respectively
Operator - contains standard operators such as equal to ( = ), greater than
( < ) as well as more complex operators. Refer here to Figure 12-17.
.total-of. - sums of numeric eld. You should never place a formula with this
type of operator in a header of a report because the records need to be read
rst. Place it in the details section to get a running total or in a Sort Footer for
a group total, or the Report Footer for a grand total.
$ - The dollar sign operator tells the formula to look for a contained value.
If you were looking for a value such as a city name that contains Red, then
use the $ operator.
.count-of. - This counts the number of records processed. If placed in a Sort
Header/Footer, it will count actual records that the sort is set to.
.if., .then., .else. - These will probably be the most utilized operators, and
they will be used together. If this happens, then do this or else do this.
The following operators work best in a Footer in the report, Sort for a total of the group, and Report
Footer for a grand total:
.ave-of. - provides average of numeric elds. First it sums up the eld then divides it by the number
of records that met the criteria.
.max-of. - looks at all values in the met criteria, and returns the highest value
.min-of. - looks at all values in the met criteria, and returns the lowest value
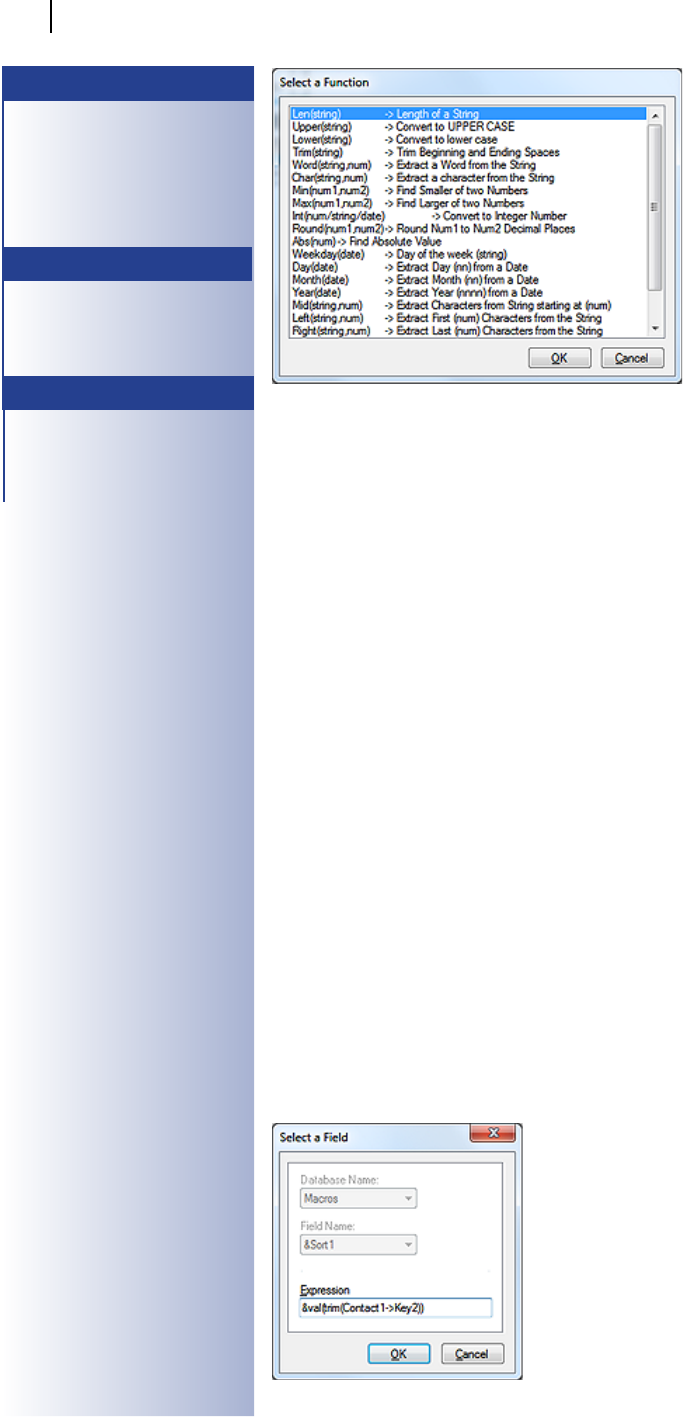
Function - Function tells the formula what should be done. You should refer to Figure 12-18 on the
next page.
The following items cover functions, insert the eld in place of ( string ), ( num ), ( date ). So if you
wanted to convert Company name into uppercase in your report it would look like upper(Contact1-
>Company)
String - text eld format
Num - numeric eld format ( not numeric text, for numeric text, you will also have to convert it to
numerical value at runtime)
Figure 12-17
GoldMine Report Writer
GoldMine Premium - The Denitive Guide
278
Date - date eld format
Len(string) - measures length of value.
Example; Andrea will be displayed as
the numeric 6.
Upper(string) - converts the value into
upper case.
Lower(string) - converts the value into
lower case.
Trim(string) - removes extra spaces
from the value.
Word(string, num) - extracts a word
from a eld
Char(string, num) - extracts a charac-
ter from a eld
Min(num1, num2) - nds the lower val-
ue of 2 numeric elds
Max(num1, num2) - nds the highest value of 2 numeric elds
Int(num/string/date) - converts eld value into an integer number
Round (num1, num2) - rounds number to 2 decimal places
Abs(num) - returns the absolute value of a numeric value
Mid(string, num) - returns bytes beginning at the specied position. Example; mid(“Andrea”, 3)
would return drea.
Left(string, num) - returns the left most bytes up to the specied number. Example; left(“Andrea”,
3) would return And.
Right(string, num) - returns the right most bytes up to the specied number. Example; right(“Andrea”,
3) would return dea.
Text(num, date) - converts the value into its string equivalent
Double(num/date/string) - converts the value into its decimal equivalent
Breaks(sum) - get the number of breaks on a sort
Date Based Functions
First thing you must do is to make sure that the machine holding GoldMine, and all workstations that
will be running GoldMine are all set the same for windows long and short date formatting under the
Regional Settings. That will eliminate many hours of troubleshooting when the report runs on one
computer just ne, but does not run on the next computer.
WeekDay(date) - returns the day of week for the date displayed. Example; 8/1/2007 would be dis-
played as Wednesday on the report.
Day(date) - displays the day date for the date displayed. Example; 8/1/2007 would be displayed as 1
Month(date) - displays the month value for the date displayed. Example; 8/1/2007 will be displayed
as 8.
Year(date) - displays the year value for the date displayed. Example; 8/1/2007 will be displayed as
2007
Directly Inserting Expressions
To insert a dBase expression directly into a report that a calcu-
lated eld cannot handle, from the local menu:
Insert►
Data Field F2
to bring up the dialog form shown here in Figure 12-19. Type
in the expression, similar to that shown in the gure. You do
not need to alter the drop down for Database Name: and Field
Name: as they will be disabled anyway. The report writer will
always display Macros and &Sort1 respectively.
The expression, &val(trim(Contact1->Key2)), tells the report
to remove null spaces ( left and right ), and then convert the
Figure 12-18
Note
If you are not sure of what type of eld
you are trying to create in your formu-
la, then either ask your administrator
or go to user dened elds window.
C = string
N = numeric
D = Date.
Do not, under any circumstance, open
the properties of a eld from the User
Dened Fields dialog form. The sys-
tem will delete all of the data that was
entered.
WARNING
Note
It is good practice to use the function
upper() in your report to convert elds
into the same case when your data in-
put is dirty or the database indexing is
not quite 100%.
Figure 12-19

GoldMine Report Writer
GoldMine Premium - The Denitive Guide
279
data from numeric text to a numeric value. This is useful for things such as displaying a xed char-
acter length on your report. It is not necessary for basic math. Inserting a calc eld that utilizes the
int() function will be sufcient.
The following functions could be used as well, but these functions need to be inserted as an expres-
sion. You will not nd them on the function menu selection:
trim() - removes spaces before and after the value entered in the eld.
alltrim() - removes all spaces in the value entered.
ltrim() - removes spaces to the left of the value entered in the eld.
rtrim() - removes spaces to the right of the value entered in the eld.
proper() - converts the value into proper case Example; chicago is converted in Chicago ( this is
especially handy for reports where the data entered is not always clean data, and can be especially
useful in a label or envelope reports ) Caveat: proper([IBM]) would return Ibm.
date() - system date in the set date format.
substr() - returns a dened portion of the string.
ctod() - converts a character string to a date.
time() - returns the system time in hh:mm:ss format.
dtoc() - converts date eld into short year format. Example; 09/12/2007 will get converted to 09/12/07.
dtos() - converts date value to string. Example; 9/12/2007 will get converted into 20070912.
reccount() - counts number of records.
stod() - converts a string value into a date value. Example; 20070912 will get converted into
9/12/2007.
val() - converts numeric text to numeric value.
str() - converts a numeric value to a string value
wdate(date, format) formats a date in different varieties.
0 - month day, 2 digit year - Sep. 12, 07
1 - day, month date, 2 digit year - Wed, Sep 12, 07
3 - long date - Wednesday, Sep 12, 2007
doy() - returns the number of days that have elapsed from the beginning of the year. Example;
9/12/2007 would have displayed 255.
age() - returns the age in years. Example; a date eld with 9/2/1970 will be displayed as 37.
pad() - adds extra spaces, characters to what is being displayed. Example; pad(“fred”, 10, “A”) will
display as: AAAfredAAA ( fred is the value, 10 is the length you want it to be in total, A is the ller
). Subsequently, you can use padl() for only adding to left of value, and padr() for adding to right of
value.
iif() - iif technically means immediate if. It is typically used as a conditional expression in GoldMine,
and should not be confused with the .if.. The iif() is used in expressions that are true/false. Example;
iif(5 > 1, “it is bigger”, “it is smaller”) will return: it is bigger. .If. is used in formulas; if this happens
.then. go do this. The .if. is great to use for arithmetic formulas.
Calc Field - lists the other formulas created in the report
Activities - There are two tables that hold Activity types, RecType and sRecType. sRecType is
found in ContHist table, and it is 1 character in length, so all you need is the table shown below. For
the Cal table, however, sRecType is not a choice. If you create a formula to look for Appointments
in the ContHist table, you should not do RecType = “A”. It is possible for there to be more than one
character in the entry. As you’ll remember from the chapter on The Tables, the ContHist.RecType
is 10 characters in length, and you need to create a formula to accommodate for the rst character
only unless you wanted your report to locate callbacks such as outgoing calls ( CO ) or incoming calls
( CI ). Our formula would appear as left(ContHist->RecType, 1) = “A”.
A - Appointment
C - Call
T - Todo
N - Next Action
O - Other Action
L - Merge form
M - Email sent
Note
A fully dened explanation/sample of
each of these functions can be located
in Appendix A of this book.
Note
Something useful about using padl()
in a eld that is good practice here.
The eld was 10 characters in length.
The value needed to be 9 characters.
The following expression was used to
get the values to be 9 characters in
length:
padl(Contact2->uDunsMP,9,”0”)
All that happened is the reverse, in-
stead of adding zeros, it made what
was in there disappear. There were
extra spaces that were not easily vis-
ible so the expression needed to be
altered:
padl(trim(Contact2->uDuns-MP),9,”0”)
Always keep scenarios like these in
mind when report writing. If it can hap-
pen anywhere else in the program, it
can happen here as well.
Note
doy() gets the rst of the year from the
date entered in the eld. So for our
example, 2007 is the year it looks into.

GoldMine Report Writer
GoldMine Premium - The Denitive Guide
280
A denitive description on the ContHist.RecType/Cal.RecType and the ContHist.sRecType elds
may be found in the chapter called The Tables found earlier in this book.
Creating Conditional Formulas
Creating a conditional formula basically means if this happens, then do this action. This is the most
commonly used formula structure when reporting. You can use the formula builder selection or just
type in the formula. Just remember that operators such as if, or, and, not, and else require a period
before and after. Examples; .if. , .or. , .and. , .not. , .else., .then.. These are not case sensitive,
however, it does make it easier to nd things in your formula down the road if you are consistent.
Formula Examples:
Count Cities - This formula says, if the city is not empty, then give it the value of 1, else give it the
value of 0.
.if. Contact1->City <> "" .then. 1 .else. 0
Count Cities - This formula is counting only records where the city is equal to Chicago. The city
eld itself is much longer than the name Chicago, so by surrounding it with the trim() function tells
the report to remove any extra spaces at runtime ( like when the user accidentally hits the space bar
before typing in the name ).
.if. trim(Contact1->City) = "Chicago" .then. 1 .else. 0
Count Records - To do a count of contact records created. The reason why you count by Ac-
countNo is because one is created for each and every record, and they are all unique. There is no
chance of duplication or nulls ( at least there shouldn't be ). Now you can also insert an expression
instead of creating this type of formula. Reccount() will count all Contact1 records. If you have a
SQL database, the formula may give you better speed performance.
.if. Contact1->AccountNo <> "" .then. 1 .else. 0
Counting Activities - To do a count of completed Appointments by User. The formula states that if
the username is not empty, and the activity type is that of an Appointment then to give it a value of 1.
.if. trim(ContHist->UserID) <> "" .and. ContHist->sRecType = "A" .then. 1 .else. 0
Text Substitution - To conditionally list a label on a report. Formulas like these are often used to
display names of Sorts or a eld that has a lookup associated with it.
.if. Contact1->Key4 = "" .then. "Not Assigned" .else. Contact1->Key4)
Find Long E-mail Address - What this formula is stating is if the ContSupRef is empty and the
Contact eld is equal to E-mail Address, then to ll using the ContSupp.Notes eld information.
.if. ContSupp->ContSupRef = "" .and. ContSupp->Contact = "E-mail Address" .then. ContSupp-
>Notes .else. ContSupp->ContSupRef
Who Created the Detail Record - to nd the user that entered the this particular Detail record.
left(ContSupp->City, 8)
What Date was the Detail Record Created - to nd the date the Detail was entered into the Cont-
Supp table, meaning when it was created.
left(mid(ContSupp->City, 13), 2) + "/" + left(mid(ContSupp->City, 15), 2) + "/" + left(mid(ContSupp-
>City, 11), 2)
When you create a calc expression, where you place it in your report will return different values. If
your report, for example, had two sorts, Sort1 being State, and Sort2 being City, and your formula
would be to count records. If you place the formula in the Sort1 footer, then it will return the total
number of records in the State being viewed. If you take that same formula and place it in the Sort2
footer, then it will display the total number of records for the City being displayed.
Can you place the same formula in more than one area in your report? Yes - but it is recommended
in simple reports only. If your report is going to do a lot of processing, it will run faster if you place
another calc eld as the grand total. If we use the example above, and the formula to count records
is called COUNT_EM then that formula would be placed in the Sort2 footer, and a new calc eld
would be made for the grand total for the State.
GoldMine Report Writer
GoldMine Premium - The Denitive Guide
281
It would look like:
.total-of. calc->Count_Em
Date Month - &month(Contact2->uDate) - displays the numeric value for month entered in the eld
uDate.
Date Subtraction - <rim(str(int((ctod("12/31/2010") - Contact2->uStartDt) / 7))) - the rst part
of this expression converts the last day of the year to a numeric value, and then subtracts this value
from the date entered into the eld uStartDt and then divides it by 7. This will return the remaining
number of weeks left in the year based on the date entered.
Numeric Division - &val(Contact2->ucPerCen)/100 – converts numeric text contained in the
ucPerCen eld into a value, and then divides it by 100 to return a percentage value.
Numeric Multiplication - &Contact2->unMorEv * 12 - multiplies the numeric value entered into
eld unMorEv, and multiplies it by 12.
Most people tend to overlook making reports look pretty, and most think that the GoldMine report writ-
er is not meant to be pretty. By taking the extra few minutes to make the report graphically appealing
gives the look of professional polish, and somehow it makes it look like the report is more reliable.
Inserting Pictures or Logos - Save the image you wish to insert as a bitmap ( BMP ), and then open
the report layout. If you do not have a graphics program, you can always use Microsoft Paint™ for
the task ( all the examples used for report writing were created in Microsoft Paint ). Then push the
Picture toolbar button when in the report layout, and the Explorer dialog form will open that will allow
you to browse to your bitmap image.
After you have inserted the image into the report, you can also place a border around the image by
right-clicking on it, and then, from the local menu, choosing:
Edit ►
Outlines... Ctrl+O
You can create a drop shadow illusion for a eld by checking only the bottom from the Outlines
dialog form, and either the right or the left side. The Line Color button allows you to choose the line
color.
Backgrounds - When you right click on a label or eld, you can select from the local menu to:
Edit ►
Background... Ctrl+B
This will allow you to change the background design/color for the label or eld. Additionally, you
could create a background color for each section by double-clicking on the section header, and then
clicking on the Background button. There is no function to do the entire report, only sections and
elds, hence, to do the entire report you would need to do all of the sections the same.
Fonts - Double-click on the eld or label, and selecting the Font button. You can change font type,
size and color. Underlining, Italic & Bold can be set in these properties as well.
Inserting Lines and Boxes - To insert a line in your report, right-click, and select from the local
menu:
Line ►
Line Ctrl+F9
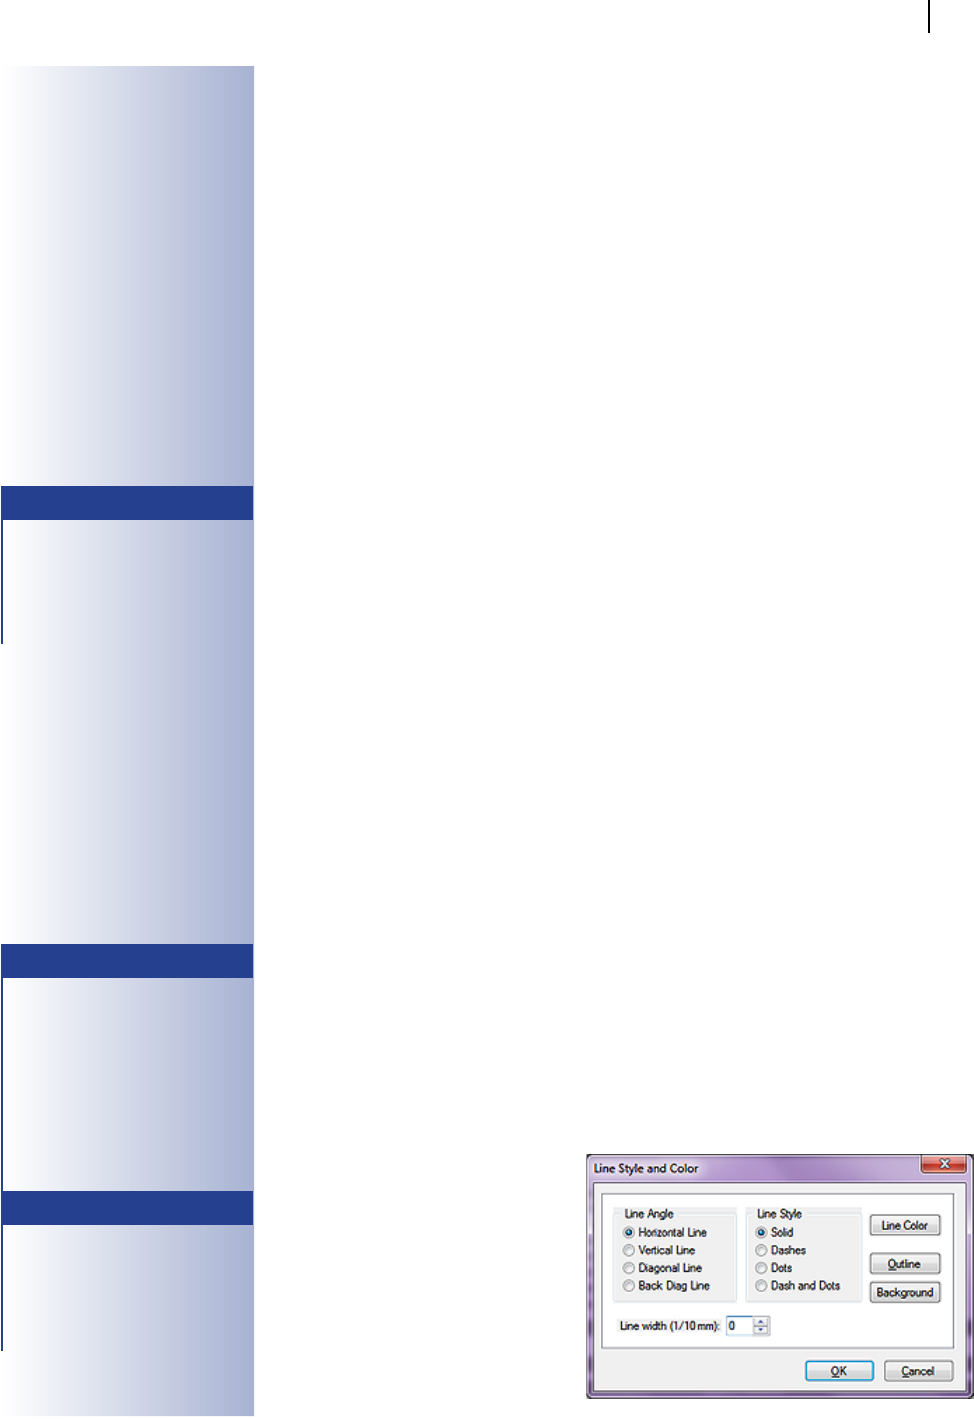
Alternatively, and probably easier, would be
to select Line from the Toolbar. There is no
ofcial function to create a box when insert-
ing your line, but, after inserting the line, you
could then double-click on the line to change
its characteristics. A dialog form appears,
Figure 12-20, and you can change the line
property from a Horizontal Line to a
Vertical Line, a Diagonal Line or even
a Back Diagonal Line. As well, from
the Line Style frame, you could choose the
style for this line. You will notice that there
are also buttons that will allow you to modify
Graphics
You can shrink an image or enlarge
an image only so much, as it will start
losing quality. It is always good rule
of thumb to save your image no more
than 10% smaller than the actual size,
and no more than 30% larger than the
actual size.
Tip
Watch out for fonts that have serifs.
Those are font tails like Times New
Roman. Some video cards have a
problem with the tails bleeding into
each other. Also, when you choose
a font, be sure it is something that all
machines using this report will have
installed, or you will run into problems
at runtime. A report favorite is Arial or
Tahoma. You also want to be careful
of using narrow fonts, like Arial Nar-
row.
Tip
You should not use more than 2 dif-
ferent font patterns, and you should
never use more than 2 colors ( white
doesn’t count as a color ). The more
fonts and colors used, the more dif-
cult it is to read the report. You want it
to look pretty, not garish.
Tip
Figure 12-20
GoldMine Report Writer
GoldMine Premium - The Denitive Guide
282
the Line Color, Outline, and the Background just as was mentioned previously for the fonts, and
backgrounds.
You could also create an outline for any data or formula eld in your report. By right clicking on the
eld, and, from the local menu, selecting:
Edit
►
Outlines... Ctrl+O
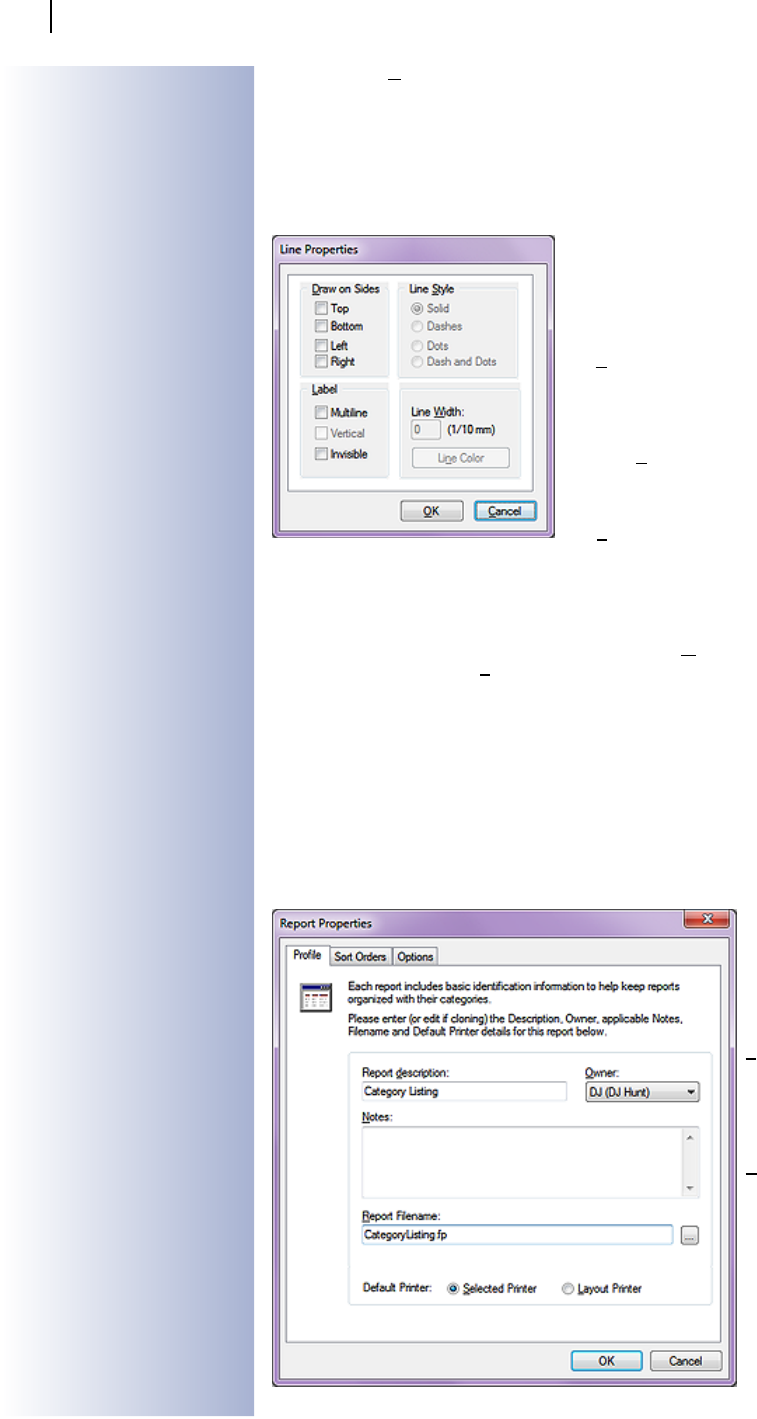
...the dialog form, shown here in Figure 12-21, will be dis-
played. You’ll notice immediately that this dialog form has
more options available for the Line Properties than that
which you saw in Figure 12-20, previous page, on the Line
Style and Color dialog form.
The Draw on Sides frame is for the Outline itself, and, as
before, let’s you select the sides upon which you wish the
line displayed. Checking all four will place a box entirely
around the entity.
The Line Style frame is a radio button selection that will
dene the style of the line to be used. The default will
always be Solid.
The Label frame allows you to manipulate the label, and
this is a checkbox selection meaning that all are select-
able. Although why anyone would want a label, and then select to have it Invisible is beyond me.
All three choices in the Label frame are only enabled if you right-click on a label. Each option in this
frame is self descriptive.
Lastly, in the unlabeled frame, you may modify the Line Width in (1/10mm) increments. As well,
you could also change the Line Color at this point by clicking upon the button or utilizing your hot
key, Ctrl+n.
Overview: In this report we need to create a Contact listing that can be used by anyone that wishes
to see the contacts in any Category. This report needs to print the records in the various categories
by City. Since more than one category can be in the same city, the report will need to sort according-
ly. The database has Contact1.Key1 as the eld where the category is identied in this database.
We will be basing the category on the Contact1.Key1 eld value for this report.
Step 1: Open the Reports Center. Make certain that your name appears in the Users: eld, if not
change the value so that you are the user of record for this report, and then choose ( highlight ) the
Contact Reports category.
Step 2: Select the New Report
button from the Report Center
Toolbar, and the dialog form
shown here in Figure 12-22 is
brought up, and ready for your
completion. Give your report a
descriptive name in the Report
description: eld. Remember
to make this a meaningful de-
scription that you will be able
to understand its meaning if
you don’t revisit this report for
another year. Then ll in the
Report Filename: eld. I ask
you to do this so that your report
le name will have some mean-
ing as opposed to the indescript
names that are auto assigned by
GoldMine Premium, ~GM1008.
fp, should you forget to enter
anything into this eld. For this
report I have chosen Category-
Listing.fp. The report le name
must end in .fp.
You may also have noticed that I
Figure 12-21
Contact List Report
Report Example
Figure 12-22
GoldMine Report Writer
GoldMine Premium - The Denitive Guide
283
have accepted the Default Printer: Selected Printer. Click on the OK button to create this report.
Next highlight the Gategory Listing report, and right-click on the report. From the local menu select
Options..., and then click on the Sort Orders tab.
Step 3: For the Primary Sort select or reselect the Contact1 table, and then, in this case, the Cat-
egory eld ( Contact1.Key1 ). Then for the Secondary Sort select the Contact1 table again, and
this time select the City eld. Click on the OK button, and now open the report in layout mode by
clicking on the Edit Report Layout icon in the Report Center Toolbar.
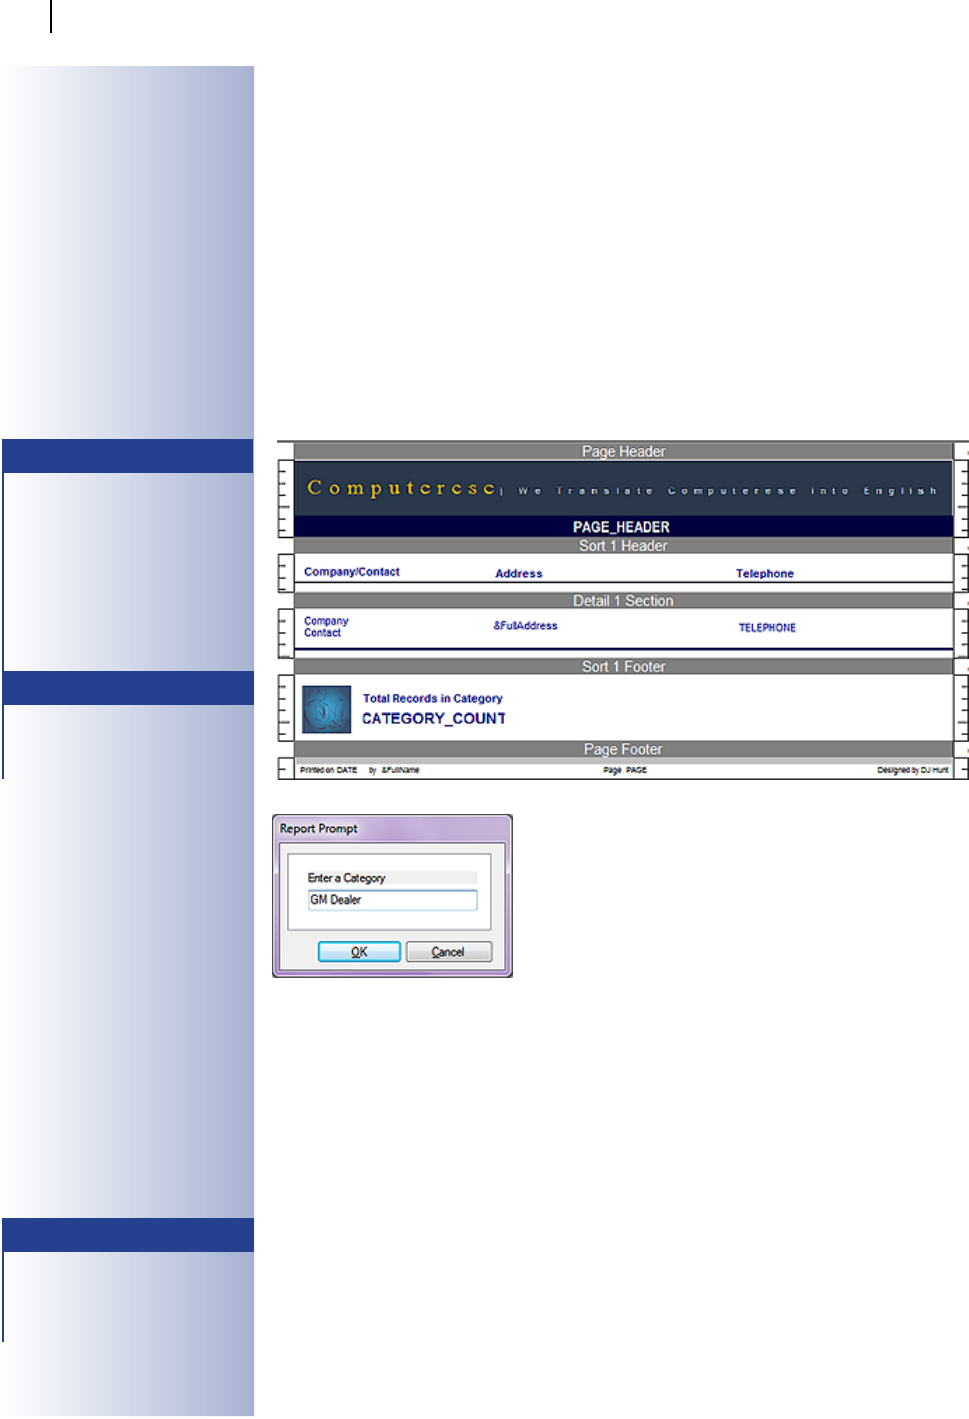
Step 4: The report should have Page Header, Sort 1 Header, Detail 1 Section, and a Page Footer
already present as shown here in Figure 12-23. Let’s add a section - Sort 1 Footer. Our list does
not need to have a break in the section for each city so inserting the Sort 2 Header will not be neces-
sary for this report.
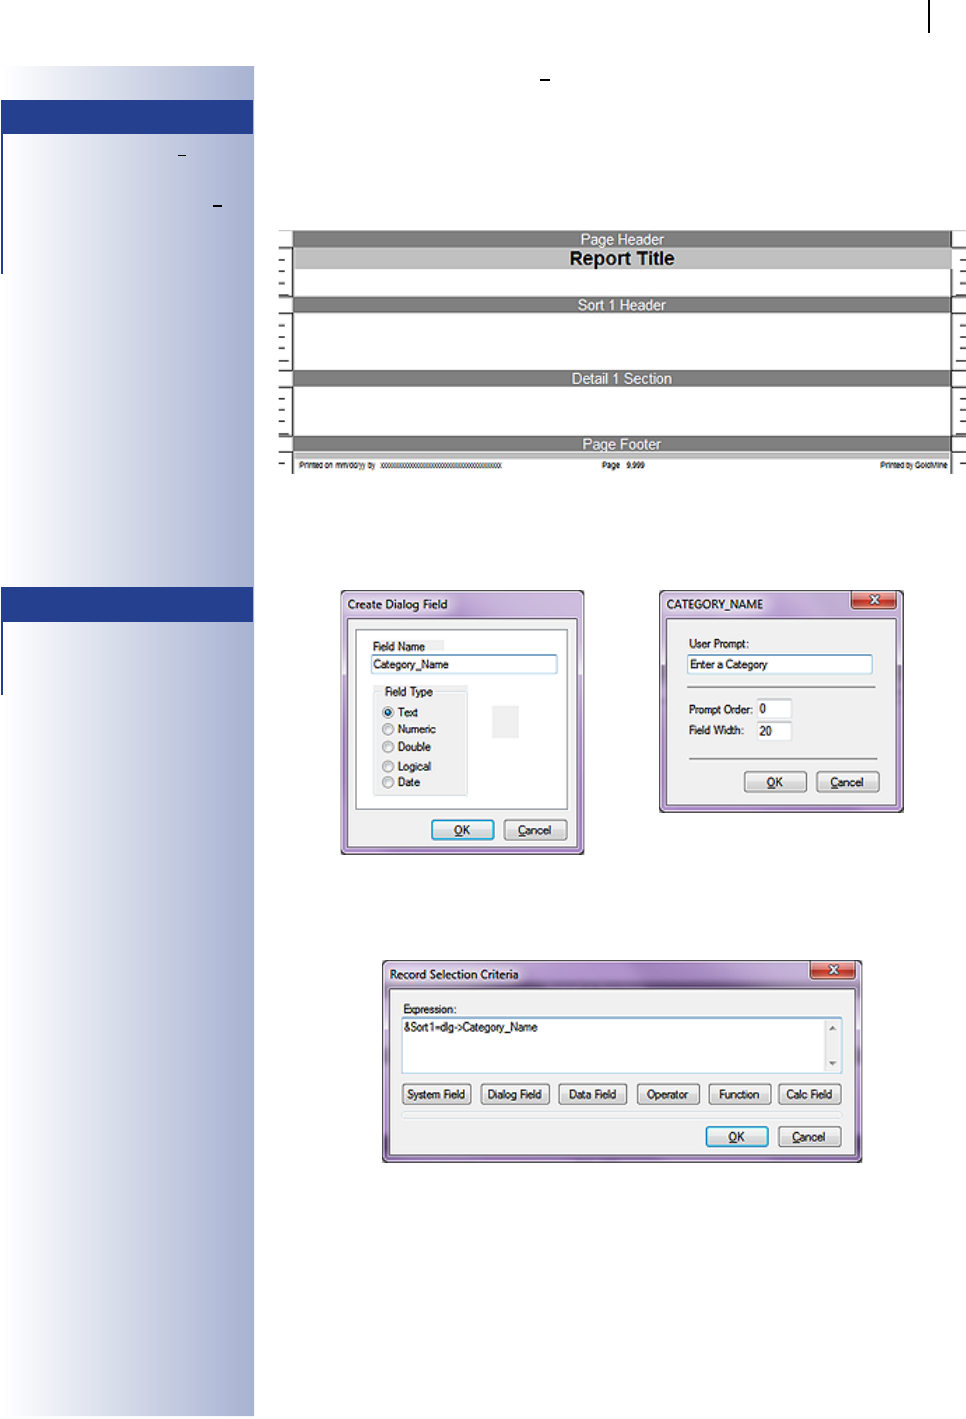
Step 5: Now we will create a new dialog eld ( Ctrl-R ), Figure 12-24a. We will give it a eld name
that the end user will understand, but we will also edit the eld characteristics ( Ctrl-M ) to give this
dialog eld a more user friendly User Prompt:, Figure 12-24b.
Step 6: Now let’s create the general report lter ( Filter button from the Category Listing layout
Toolbar or Ctrl-F7 ). In Figure 12-25, notice the Expression: that I have entered. If you are follow-
ing along, please enter this same expression.
Step 7: Insert the elds, and the eld labels that we want to display, Figure 12-26 on the next page.
You will notice that the page header has the PAGE_HEADER expression inserted. This particular
espression that I utilized is:
"Category Selected: "+trim(Contact1->Key1)
You could also insert the Sort1 label here as well, and you would have achieved a similar result.
Since the eld labels do not need to be printed for every entry, they were inserted in the Sort 1 Head-
Note
Even though the Sort Database: drop
list may appear to be enabled, do not
be confused as it is not really enabled.
You will not be able to enter a Field
Name: unless you rst pick a sort da-
tabase from the drop list even if it is
the same default Contact1 table that
already appears to be selected.
Note
Remember that we cannot have any
spaces in our dialog Field Name when
we create it, so we use the underscore
key. Refer to Figure 12-24a.
Figure 12-23
Figure 12-24a Figure 12-24b
Figure 12-25
GoldMine Report Writer
GoldMine Premium - The Denitive Guide
284
er frame. If the report were multiple pages, and this needed to be on all pages, then insert these
eld labels into the Page Header frame or you could select the Sort 1 Header property to Reprint
titles on every page. Remove the background, and insert a colored box for the logo background.
Step 8: We are now going to add the formula to count records to put in the Sort 1 Footer.
.if. Contact1->AccountNo > "" .then. 1 .else. 0.
Now insert the formula into the Sort 1 Footer, and right click on it. Select Edit | Properties from
the local menu. This is where we can tell the eld what type of summary we would like for it to do.
9 times out of 10, the Total summary is the proper setting, but it can never hurt to check, and, of
course, the Total is what we desire for this particular report.
Step 9: Now to make it look pretty. First the Page Header was changed to a solid color background.
Next the logo in bitmap format was inserted into the Page Header. The Page Header label was
changed from Category Selected: xxxxxxxx, and the color and background was changed. Double-
click on the Detail 1 Section, and select Outlines. Check the Top outline box, and change line color
and thickness as is appropriate to your designing eyes. Alternatively, as DJ has done in Figure 12-
26, insert the report Line. Our completed layout appear below;
Step 10: Save the report as we are now ready to run it. Go to
Print a Report, and change to your username ( if not already
selected ), and double-click on your report. When the report
runs, the rst thing it asks for is the dialog information as shown
here in Figure 12-27.
Step 11: The resulting report is shown to you in Figure 12-28 on
the next page. It was way too big for this page.
Step 12: Some of the records do not have all of the phone num-
bers entered. This is common of most end users. You can leave them with the empty spaces or
you can create a formula to point out that the phone number is missing. To do this, open the report
layout, and remove the Phone1 eld.
Step 13: Next create a formula:
.if. Contact1->Phone1 = "" .then. "Need To Fill In" .else. Contact1->Phone1
This tells the report if there is nothing already entered in the Phone1 eld then print on the report
Need To Fill In.
Step 14: There are two things left to do. The rst is to do a screen shot of your nished report.
Save it as a JPG, and name it the same name as your report lename. Since this report le name is
CategoryListing.fp, our screenshot le name would be CategoryListing.jpg. Save the jpg in the
reports folder in GoldMine, and then go into the properties of your report. Now change the owner to
(public). It is a good idea to also make a copy of your report for backup purposes. By creating the
JPG, you make a preview available to users in the customize reports menu.
Note
Although Andrea doesn’t state this,
when I inserted the &FullAddress
macro into my report, I did have to
change some of the properties so that
the resulting display matched hers.
Double-click on the &FullAddress
macro eld to bring up the properties
dialog form, and make certain that
Wrap Text, and Variable Number of
Lines is checked.
Note
I have to admit that my GoldMine is
not congured the same as Andreas
GoldMine as I use the Key1 eld for
Contact Type, whereas Andrea uses
the Key1 for the Salespersons name.
Hence, even though this dialog is ask-
ing me to Enter Sales Name, I was
forced to enter Prospect to be able to
show you the resulting report.
Note
I, and this is DJ speaking, always
suggest moving the GoldMine default
reports to the MASTER UserID from
the (public) UserID. Put any shared
reports under the (public) UserID.
Figure 12-26
Figure 12-27

GoldMine Report Writer
GoldMine Premium - The Denitive Guide
285
Figure 12-28

GoldMine Report Writer
GoldMine Premium - The Denitive Guide
286
